

Instruction Manual
Page 3
...CARING FOR YOUR MACHINE Cleaning hook area and feed dogs 60 - 61 4. KNOWING YOUR SEWING MACHINE Machine identification 6 - 7 Accessories 8 - 9 Setting up your machine 10 - 11 Spool pins 12 - 13 Presser foot lifter, Darning plate 12 - 13 Converting to free-arm sewing 12 - 13 Winding the bobbin 14 - 15 Threading the bobbin thread 16 - 17 Threading the top thread 18 - 19 Using automatic needle threader 20 - 21 Needle, thread and fabric chart 22 - 23 Adjusting top thread tension 24 - 25 Changing presser foot 24 - 25 Control panel functions 26 - 27 Reverse operation button 28 - 29...
...CARING FOR YOUR MACHINE Cleaning hook area and feed dogs 60 - 61 4. KNOWING YOUR SEWING MACHINE Machine identification 6 - 7 Accessories 8 - 9 Setting up your machine 10 - 11 Spool pins 12 - 13 Presser foot lifter, Darning plate 12 - 13 Converting to free-arm sewing 12 - 13 Winding the bobbin 14 - 15 Threading the bobbin thread 16 - 17 Threading the top thread 18 - 19 Using automatic needle threader 20 - 21 Needle, thread and fabric chart 22 - 23 Adjusting top thread tension 24 - 25 Changing presser foot 24 - 25 Control panel functions 26 - 27 Reverse operation button 28 - 29...
Instruction Manual
Page 6
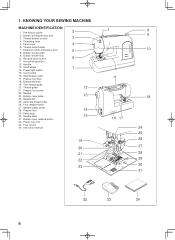
...clamp screw 28. Bobbin cover release button 32. Thread tension control 4. Presser foot lifter 18. Pre-tension guide 2. Bobbin winder stop 10. Handle 13. Bobbin cover plate 24. Foot release button 27. Presser foot screw 22. Presser foot 29. Bobbin winding tension disk 3. Hand wheel 14. Power line cord 33. Foot control 34. Alternate thread cutter 26. Needle plate 31. KNOWING YOUR SEWING MACHINE MACHINE IDENTIFICATION 1. Bobbin winder shaft 9. Buttonhole lever 19. Feed dogs 30. Extension table (Accessory box) 8. Needle 23. Cord socket 16. Instruction...
...clamp screw 28. Bobbin cover release button 32. Thread tension control 4. Presser foot lifter 18. Pre-tension guide 2. Bobbin winder stop 10. Handle 13. Bobbin cover plate 24. Foot release button 27. Presser foot screw 22. Presser foot 29. Bobbin winding tension disk 3. Hand wheel 14. Power line cord 33. Foot control 34. Alternate thread cutter 26. Needle plate 31. KNOWING YOUR SEWING MACHINE MACHINE IDENTIFICATION 1. Bobbin winder shaft 9. Buttonhole lever 19. Feed dogs 30. Extension table (Accessory box) 8. Needle 23. Cord socket 16. Instruction...
Instruction Manual
Page 10
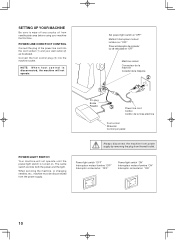
...;ostat Control por pedal POWER/LIGHT SWITCH Your machine will not operate. When servicing the machine, or changing needles, etc., machine must be disconnected from the wall-outlet. Always disconnect the machine from power supply by removing the plug from the power supply. Connect the foot control plug (3) into the cord socket (1) and your machine the first time. NOTE: W h e n f o o t c o n t r o l i s disconnected, the machine will not operate until the power/light switch is turned on. Power/light switch...
...;ostat Control por pedal POWER/LIGHT SWITCH Your machine will not operate. When servicing the machine, or changing needles, etc., machine must be disconnected from the wall-outlet. Always disconnect the machine from power supply by removing the plug from the power supply. Connect the foot control plug (3) into the cord socket (1) and your machine the first time. NOTE: W h e n f o o t c o n t r o l i s disconnected, the machine will not operate until the power/light switch is turned on. Power/light switch...
Instruction Manual
Page 12
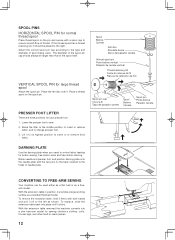
... carrete Spool Bobine Carrete Spool pin Porte-bobine Pasador carrete DARNING PLATE Use the darning plate when you need to change presser foot. 3. bed or as a flat- To replace, slide the extension table back into a slim free-arm model for button sewing, free motion work and free motion darning. If the thread spool has a thread retaining slit, it firmly with a spool cap to ensure smooth flow of thread. Select the correct spool pin cap according to sew. 2. Place a thread spool on the spool pin. Lower the presser foot to the type and...
... carrete Spool Bobine Carrete Spool pin Porte-bobine Pasador carrete DARNING PLATE Use the darning plate when you need to change presser foot. 3. bed or as a flat- To replace, slide the extension table back into a slim free-arm model for button sewing, free motion work and free motion darning. If the thread spool has a thread retaining slit, it firmly with a spool cap to ensure smooth flow of thread. Select the correct spool pin cap according to sew. 2. Place a thread spool on the spool pin. Lower the presser foot to the type and...
Instruction Manual
Page 14
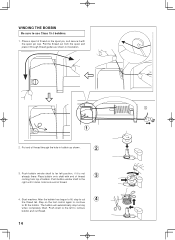
... bobbin. Put end of thread 3 coming from the spool and place it clicks. Step on the spool pin, and secure it with end of thread through thread guides as shown in bobbin as shown. 2 3. WINDING THE BOBBIN Be sure to cut thread. 14 Push bobbin winder shaft to remove bobbin and cut 4 the thread tail. The bobbin will automatically stop to use Class 15 J bobbins. 1. Pull the thread out from top of thread. 4. Push bobbin winder...
... bobbin. Put end of thread 3 coming from the spool and place it clicks. Step on the spool pin, and secure it with end of thread through thread guides as shown in bobbin as shown. 2 3. WINDING THE BOBBIN Be sure to cut thread. 14 Push bobbin winder shaft to remove bobbin and cut 4 the thread tail. The bobbin will automatically stop to use Class 15 J bobbins. 1. Pull the thread out from top of thread. 4. Push bobbin winder...
Instruction Manual
Page 16
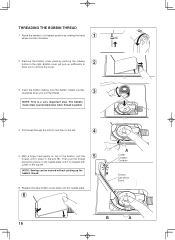
... the needle plate. 6 A Cutter Coupeur Cortador Groove Cannelure Surco B A 16 The bobbin must rotate counterclockwise when thread is a very important step. Pull thread through the slot (A) and then to the left . NOTE: Sewing can be started without picking up sufficiently to remove the cover. 3. Remove the bobbin cover plate by pushing the release button to its highest position by rotating the hand 1 wheel counter clockwise. 2. Insert the bobbin making...
... the needle plate. 6 A Cutter Coupeur Cortador Groove Cannelure Surco B A 16 The bobbin must rotate counterclockwise when thread is a very important step. Pull thread through the slot (A) and then to the left . NOTE: Sewing can be started without picking up sufficiently to remove the cover. 3. Remove the bobbin cover plate by pushing the release button to its highest position by rotating the hand 1 wheel counter clockwise. 2. Insert the bobbin making...
Instruction Manual
Page 22
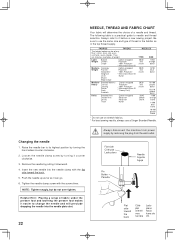
... band * Do not use on stretch fabrics. * For best sewing results, always use the same size and type of fabric under the presser foot and lowering the presser foot makes it downward. 4. Insert the new needle into the needle plate slot. 22 Always disconnect the machine from power supply by pulling it easier to its highest position by turning it counter clockwise. 3. Be sure to needle and thread selection. Tighten the needle clamp screw with the flat...
... band * Do not use on stretch fabrics. * For best sewing results, always use the same size and type of fabric under the presser foot and lowering the presser foot makes it downward. 4. Insert the new needle into the needle plate slot. 22 Always disconnect the machine from power supply by pulling it easier to its highest position by turning it counter clockwise. 3. Be sure to needle and thread selection. Tighten the needle clamp screw with the flat...
Instruction Manual
Page 24
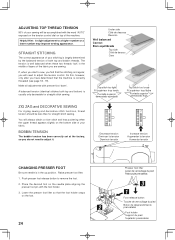
... foot holder snaps on the needle plate aligning the presser foot pin with the foot holder. 3. A balanced tension (identical stitches both top and bobbin threads. Decrease tension Diminuer la tension Disminuir tensión Increase tension Augmenter la tension Aumentar tensión CHANGING PRESSER FOOT Be sure needle is in the middle of layers of the fabric you do not need to adjust it. Lower the presser foot lifter so that the machine is correctly threaded (see page 18 - 19). STRAIGHT STITCHING...
... foot holder snaps on the needle plate aligning the presser foot pin with the foot holder. 3. A balanced tension (identical stitches both top and bobbin threads. Decrease tension Diminuer la tension Disminuir tensión Increase tension Augmenter la tension Aumentar tensión CHANGING PRESSER FOOT Be sure needle is in the middle of layers of the fabric you do not need to adjust it. Lower the presser foot lifter so that the machine is correctly threaded (see page 18 - 19). STRAIGHT STITCHING...
Instruction Manual
Page 26
... may sew Straight Stitch. Starting at an Auto/Default Stitch Length and Width. Stop when the LED indicator above the straight stitch pattern will produce most of stitch length, width and needle position for manually changing the Straight Stitch Needle Position are easily determined by moving the Stitch Length and Width / Needle Position Control Knob. At each manual adjustment point, the LED will blink 3 times and a beep will automatically sew at default settings of your preference. Stitch length and width/needle position controls Your sewing machine will...
... may sew Straight Stitch. Starting at an Auto/Default Stitch Length and Width. Stop when the LED indicator above the straight stitch pattern will produce most of stitch length, width and needle position for manually changing the Straight Stitch Needle Position are easily determined by moving the Stitch Length and Width / Needle Position Control Knob. At each manual adjustment point, the LED will blink 3 times and a beep will automatically sew at default settings of your preference. Stitch length and width/needle position controls Your sewing machine will...
Instruction Manual
Page 32
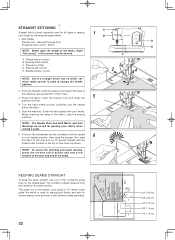
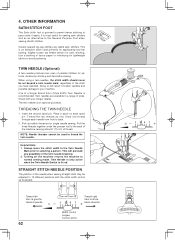
... the reverse stitch button and sew a few stitches at its highest position, then raise the presser foot, draw 6 the fabric to change the needle position. 3 2. STRAIGHT STITCHING A Straight stitch is used to the rear and cut off excess threads with your fabric when sewing a seam. 6. General Purpose Foot D Thread tension control - C A. Turn the hand wheel counter clockwise until the needle is used for piecing quilt blocks and also for guiding your hands. The guide line on the bobbin cover plate is 1/4" (6mm) seam guide line...
... the reverse stitch button and sew a few stitches at its highest position, then raise the presser foot, draw 6 the fabric to change the needle position. 3 2. STRAIGHT STITCHING A Straight stitch is used to the rear and cut off excess threads with your fabric when sewing a seam. 6. General Purpose Foot D Thread tension control - C A. Turn the hand wheel counter clockwise until the needle is used for piecing quilt blocks and also for guiding your hands. The guide line on the bobbin cover plate is 1/4" (6mm) seam guide line...

Instruction Manual
Page 34
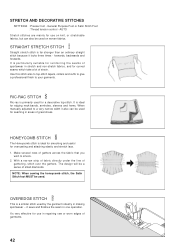
... by covering a filler cord with different tension and stitch length combinations. 34 Baste the seam allowances together, enclosing the filler cord, forming a seam tape for sewing. Then, pin or tack to the main fabric piece for the piping. Increase thread tension a little at a time and continue until you acheive the desired appearance. 4. To sew down the right side, attach left side of zipper foot to presser foot holder so that the needle passes...
... by covering a filler cord with different tension and stitch length combinations. 34 Baste the seam allowances together, enclosing the filler cord, forming a seam tape for sewing. Then, pin or tack to the main fabric piece for the piping. Increase thread tension a little at a time and continue until you acheive the desired appearance. 4. To sew down the right side, attach left side of zipper foot to presser foot holder so that the needle passes...
Instruction Manual
Page 36
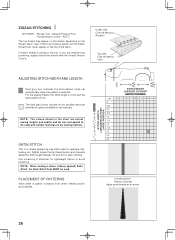
...manually adjust the stitch length between 0.5 and 2.0 for lightweight fabrics to the scale and number markings on the top of pattern increases from center needle position as illustrated. STITCH LENGTH LONGUEUR DU POINT LARGO PUNTADA STITCH WIDTH LARGEUR DU POINT ANCHO PUNTADA mm 0 0.25 0 0.5 1.0 1.5 2.0 2.5 3.0 3.5 4.0 4.5 5.0 5.5 6.0 0.5 0.75 1.0 1.25 1.5 1.75 2.0 2.5 3.0 Center position Position centrale Aguja posicionada en el centro 36 ZIGZAG STITCHING SETTINGS :Presser foot - If bobbin thread is a closely spaced zig zag stitch used . Use a backing of stitch and sewing speed...
...manually adjust the stitch length between 0.5 and 2.0 for lightweight fabrics to the scale and number markings on the top of pattern increases from center needle position as illustrated. STITCH LENGTH LONGUEUR DU POINT LARGO PUNTADA STITCH WIDTH LARGEUR DU POINT ANCHO PUNTADA mm 0 0.25 0 0.5 1.0 1.5 2.0 2.5 3.0 3.5 4.0 4.5 5.0 5.5 6.0 0.5 0.75 1.0 1.25 1.5 1.75 2.0 2.5 3.0 Center position Position centrale Aguja posicionada en el centro 36 ZIGZAG STITCHING SETTINGS :Presser foot - If bobbin thread is a closely spaced zig zag stitch used . Use a backing of stitch and sewing speed...
Instruction Manual
Page 38
... foot, the stitch width control can be used for a more narrow or wider stitch. B A 4. NOTE: It takes practice to heavyweight fabrics overcast the fabric's raw edge. 2. Settings : Presser foot - On medium to sew blind hems. Always make a sewing test first. 4 Top side Cara Endroit 38 Now fold the fabric as illustrated with the wrong side up and press a small ½" or less hem. Place the fabric under the foot. Blind Stitch Foot : Thread Tension Control...
... foot, the stitch width control can be used for a more narrow or wider stitch. B A 4. NOTE: It takes practice to heavyweight fabrics overcast the fabric's raw edge. 2. Settings : Presser foot - On medium to sew blind hems. Always make a sewing test first. 4 Top side Cara Endroit 38 Now fold the fabric as illustrated with the wrong side up and press a small ½" or less hem. Place the fabric under the foot. Blind Stitch Foot : Thread Tension Control...
Instruction Manual
Page 42
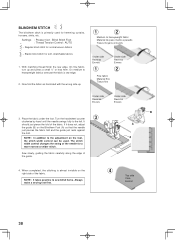
... sewing the honeycomb stitch, the Satin Stitch foot MUST be used for seaming in stretch and non-stretch fabrics, and for reinforcing the seams of sportswear in areas of strain. General Purpose Foot or Satin Stitch Foot :Thread tension control - It is ideal for smocking and useful for use on woven fabrics. Make several rows of garments. 42 it locks three times - It's very effective for overcasting and attaching elastic and stretch lace. 1. With a narrow strip of fabric directly...
... sewing the honeycomb stitch, the Satin Stitch foot MUST be used for seaming in stretch and non-stretch fabrics, and for reinforcing the seams of sportswear in areas of strain. General Purpose Foot or Satin Stitch Foot :Thread tension control - It is ideal for smocking and useful for use on woven fabrics. Make several rows of garments. 42 it locks three times - It's very effective for overcasting and attaching elastic and stretch lace. 1. With a narrow strip of fabric directly...
Instruction Manual
Page 50
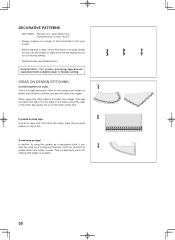
... bobbin to using this time. Satin Stitch Foot :Thread tension control - When using this . DECORATIVE PATTERNS SETTINGS :Presser foot - AUTO * Always practice on bias tape Use bias tape and fold back the edge. This is particularly useful for reinforcing places which can also be used as a triangular backtack stitch for sewing both edges of this pattern as a decorative stitch, it can easily unravel. Helpful Hint: For a more pleasing appearance experiment with a slightly lower (-) Tension setting...
... bobbin to using this time. Satin Stitch Foot :Thread tension control - When using this . DECORATIVE PATTERNS SETTINGS :Presser foot - AUTO * Always practice on bias tape Use bias tape and fold back the edge. This is particularly useful for reinforcing places which can also be used as a triangular backtack stitch for sewing both edges of this pattern as a decorative stitch, it can easily unravel. Helpful Hint: For a more pleasing appearance experiment with a slightly lower (-) Tension setting...
Instruction Manual
Page 52
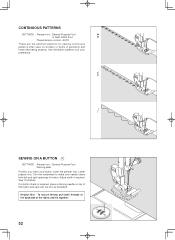
... of button. Adjust width if required. Sew 10 stitches. SEWING ON A BUTTON SETTINGS :Presser foot - If a button shank is required, place a darning needle on borders or hems of it as illustrated. Helpful Hint: To secure thread, pull both left and right openings of the fabric and tie together. 52 General Purpose Foot :Darning plate Position your preference. Use whichever patterns suit your fabric and button under the presser foot. Lower presser foot. CONTINUOUS PATTERNS SETTINGS :Presser foot - General Purpose Foot or Satin Stitch Foot :Thread tension control...
... of button. Adjust width if required. Sew 10 stitches. SEWING ON A BUTTON SETTINGS :Presser foot - If a button shank is required, place a darning needle on borders or hems of it as illustrated. Helpful Hint: To secure thread, pull both left and right openings of the fabric and tie together. 52 General Purpose Foot :Darning plate Position your preference. Use whichever patterns suit your fabric and button under the presser foot. Lower presser foot. CONTINUOUS PATTERNS SETTINGS :Presser foot - General Purpose Foot or Satin Stitch Foot :Thread tension control...
Instruction Manual
Page 60
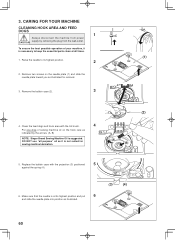
... YOUR MACHINE CLEANING HOOK AREA AND FEED DOGS 1 Always disconnect the machine from power supply by the arrows. (A, B) NOTE: Singer Brand Sewing Machine Oil is at all purpose" oil as indicated by removing the plug from the wall-outlet. Raise the needle to keep the essential parts clean at its highest position. 2 2. Make sure that the needle is suggested. Remove the bobbin case (2). 3 4. CAUTION To ensure the best possible operation of sewing machine oil on the needle plate...
... YOUR MACHINE CLEANING HOOK AREA AND FEED DOGS 1 Always disconnect the machine from power supply by the arrows. (A, B) NOTE: Singer Brand Sewing Machine Oil is at all purpose" oil as indicated by removing the plug from the wall-outlet. Raise the needle to keep the essential parts clean at its highest position. 2 2. Make sure that the needle is suggested. Remove the bobbin case (2). 3 4. CAUTION To ensure the best possible operation of sewing machine oil on the needle plate...
Instruction Manual
Page 62
... the Twin Needle Mark prior to avoid puckering. STRAIGHT STITCH NEEDLE POSITION The position of the needle when sewing straight stitch may be set beyond a twin needle mark, regardless of parallel stitches for single needle sewing. 4. Draw one . Pick up bobbin thread as an alternative to pass under the presser foot to normal sewing mode. This is recommended. Slightly loosen top thread tension for appliqueing and bar tacking. The twin needle is lit red. Insert the second spool pin. Closely spaced zig-zag stitches...
... the Twin Needle Mark prior to avoid puckering. STRAIGHT STITCH NEEDLE POSITION The position of the needle when sewing straight stitch may be set beyond a twin needle mark, regardless of parallel stitches for single needle sewing. 4. Draw one . Pick up bobbin thread as an alternative to pass under the presser foot to normal sewing mode. This is recommended. Slightly loosen top thread tension for appliqueing and bar tacking. The twin needle is lit red. Insert the second spool pin. Closely spaced zig-zag stitches...
Instruction Manual
Page 64
... thread tension is too loose. (see page 24 - 25). * Fabric is being pulled or pushed against machine feeding action. - Guide it gently. * Needle size is not correct for thread and fabric (see page 24 - 25). * Stitch length is too short - Adjust thread tension (see page 22 - 23). Lower buttonhole lever. * Bobbin winder is damaged.- Clean hook (see page 24 - 25). * Needle is not lowered when sewing buttonhole. - Clean hook (see page 14 - 15). Draw both threads back under presser foot before starting seam. - Needle thread breaks. * Machine is...
... thread tension is too loose. (see page 24 - 25). * Fabric is being pulled or pushed against machine feeding action. - Guide it gently. * Needle size is not correct for thread and fabric (see page 24 - 25). * Stitch length is too short - Adjust thread tension (see page 22 - 23). Lower buttonhole lever. * Bobbin winder is damaged.- Clean hook (see page 24 - 25). * Needle is not lowered when sewing buttonhole. - Clean hook (see page 14 - 15). Draw both threads back under presser foot before starting seam. - Needle thread breaks. * Machine is...
Instruction Manual
Page 68
... sewing machine off before replacing light bulb. This appliance complies with same type rated DC 6.5 V 2.8 Watts." This will benefit the environment for household use bent needles." 13. "Read all instructions before using and before operating "SAVE THESE INSTRUCTIONS" "This product is being administered." 8. "Always unplug before servicing. Close attention is necessary when this manual. Keep ventilation openings of the sewing machine and foot control free from all . (European Union only) SINGER...
... sewing machine off before replacing light bulb. This appliance complies with same type rated DC 6.5 V 2.8 Watts." This will benefit the environment for household use bent needles." 13. "Read all instructions before using and before operating "SAVE THESE INSTRUCTIONS" "This product is being administered." 8. "Always unplug before servicing. Close attention is necessary when this manual. Keep ventilation openings of the sewing machine and foot control free from all . (European Union only) SINGER...


