Instruction Manual
Page 6
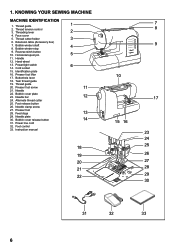
... cover release button 14 31. Face cover 5. Thread cutter/holder 3 6. Power/light switch 14. Identification plate 16. Thread tension control 3. Power line cord 32. Instruction manual 18 19 20 21 22 7 8 9 10 17 15 16 23 24 25 26 27 28 29 30 31 32 33 6 Thread guide 1 2. Buttonhole lever 18...
... cover release button 14 31. Face cover 5. Thread cutter/holder 3 6. Power/light switch 14. Identification plate 16. Thread tension control 3. Power line cord 32. Instruction manual 18 19 20 21 22 7 8 9 10 17 15 16 23 24 25 26 27 28 29 30 31 32 33 6 Thread guide 1 2. Buttonhole lever 18...
Instruction Manual
Page 26
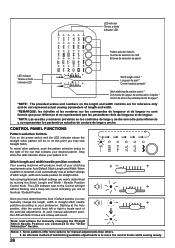
... sew at the Auto position, slide the control knob left or right to the right of stitch length, width and needle position for manually changing the Straight Stitch Needle Position are at an Auto/Default Stitch Length and Width. LED indicator Témoin a diode Indicador LED... de largo y ancho. The LED Indicator next to move the control knobs while sewing slowly. 26 Auto (preprogrammed) default settings are for manual adjustments than others. 2. Some patterns offer more options for reference only and do not represent actual sewing parameters of your desired pattern. Stitch...
... sew at the Auto position, slide the control knob left or right to the right of stitch length, width and needle position for manually changing the Straight Stitch Needle Position are at an Auto/Default Stitch Length and Width. LED indicator Témoin a diode Indicador LED... de largo y ancho. The LED Indicator next to move the control knobs while sewing slowly. 26 Auto (preprogrammed) default settings are for manual adjustments than others. 2. Some patterns offer more options for reference only and do not represent actual sewing parameters of your desired pattern. Stitch...
Instruction Manual
Page 36
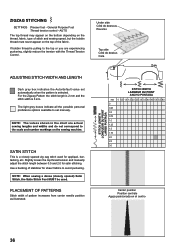
...: The values shown in the chart are experiencing puckering, slightly reduce the tension with the Thread Tension Control. Slightly loosen the top thread tension and manually adjust the stitch length between 0.5 and 2.0 for appliqué, bartacking, etc. PLACEMENT OF PATTERNS Stitch width of the fabric. Under side Côté de dessous...
...: The values shown in the chart are experiencing puckering, slightly reduce the tension with the Thread Tension Control. Slightly loosen the top thread tension and manually adjust the stitch length between 0.5 and 2.0 for appliqué, bartacking, etc. PLACEMENT OF PATTERNS Stitch width of the fabric. Under side Côté de dessous...
Instruction Manual
Page 40
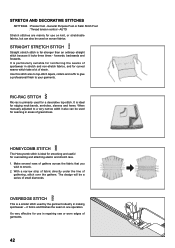
NOTE: Mending a tear or overedging as its name implies, it is highly recommended for bartacks, mending tears, patching, sewing towelling, patch-work and attaching flat elastic. For this reason it makes three short stitches where the normal zig-zag makes only one. MULTI-STITCH ZIGZAG SETTINGS :Presser foot - General Purpose Foot :Thread tension control - It is a strong stitch because as shown in illustration requires manual adjustment of fabrics. AUTO This is also ideal for overcasting all types of the length control. 40
NOTE: Mending a tear or overedging as its name implies, it is highly recommended for bartacks, mending tears, patching, sewing towelling, patch-work and attaching flat elastic. For this reason it makes three short stitches where the normal zig-zag makes only one. MULTI-STITCH ZIGZAG SETTINGS :Presser foot - General Purpose Foot :Thread tension control - It is a strong stitch because as shown in illustration requires manual adjustment of fabrics. AUTO This is also ideal for overcasting all types of the length control. 40
Instruction Manual
Page 42
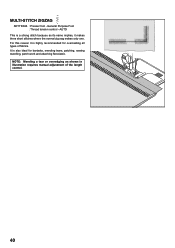
... is particularly suitable for reinforcing the seams of sportswear in stretch and non-stretch fabrics, and for edging neck-bands, armholes, sleeves and hems. When manually adjusted to your garments. General Purpose Foot or Satin Stitch Foot :Thread tension control - forwards, backwards and forwards. Use this stitch also to top-stitch...
... is particularly suitable for reinforcing the seams of sportswear in stretch and non-stretch fabrics, and for edging neck-bands, armholes, sleeves and hems. When manually adjusted to your garments. General Purpose Foot or Satin Stitch Foot :Thread tension control - forwards, backwards and forwards. Use this stitch also to top-stitch...
Instruction Manual
Page 68
... before replacing light bulb. Return the sewing machine to persons: " 1. Close cover before operating "SAVE THESE INSTRUCTIONS" "This product is necessary when this manual. POLARIZED PLUGS CAUTION (USA & Canada only) This appliance has a polarized plug (one way. If it to fit in a polarized outlet only one...this sewing machine if it has a damaged cord or plug, if it is intended to break." 14. "Read all . (European Union only) SINGER® is a registered trademark of electric shock, this plug is not working properly, if it in the outlet, reverse the plug. "Do not...
... before replacing light bulb. Return the sewing machine to persons: " 1. Close cover before operating "SAVE THESE INSTRUCTIONS" "This product is necessary when this manual. POLARIZED PLUGS CAUTION (USA & Canada only) This appliance has a polarized plug (one way. If it to fit in a polarized outlet only one...this sewing machine if it has a damaged cord or plug, if it is intended to break." 14. "Read all . (European Union only) SINGER® is a registered trademark of electric shock, this plug is not working properly, if it in the outlet, reverse the plug. "Do not...


