Instruction Manual
Page 2
...damaged, or dropped into any air openings blocked. Never operate this manual. Do not use outdoors. 13. Always unplug sewing machine from the electric outlet immediately after using and before cleaning. 3. To disconnect, turn all controls to be used by... before using this appliance only for examination, repair, electrical or mechanical adjustment. 4. SAVE THESE INSTRUCTIONS This sewing machine is required around the sewing machine needle. 6. Use this sewing machine. Never drop or insert any object into water. Do not unplug by or near children. 2. Return ...
...damaged, or dropped into any air openings blocked. Never operate this manual. Do not use outdoors. 13. Always unplug sewing machine from the electric outlet immediately after using and before cleaning. 3. To disconnect, turn all controls to be used by... before using this appliance only for examination, repair, electrical or mechanical adjustment. 4. SAVE THESE INSTRUCTIONS This sewing machine is required around the sewing machine needle. 6. Use this sewing machine. Never drop or insert any object into water. Do not unplug by or near children. 2. Return ...
Instruction Manual
Page 5
List of contents Principal parts of the Machine...2/3 Accessories ...4 Installing the snap-in sewing table ...5 Connecting machine to power source...6 Changing the bulb ...8 Two-step presser foot lifter/ Adjusting presser foot pressure...9 Attaching the presser foot holder ...10 Winding the bobbin ...11 ...
List of contents Principal parts of the Machine...2/3 Accessories ...4 Installing the snap-in sewing table ...5 Connecting machine to power source...6 Changing the bulb ...8 Two-step presser foot lifter/ Adjusting presser foot pressure...9 Attaching the presser foot holder ...10 Winding the bobbin ...11 ...
Instruction Manual
Page 11
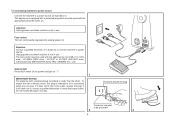
Foot control A The foot control pedal regulates the sewing speed. (3) Attention: Consult a qualified electrician if in the outlet, reverse the plug. The foot control must be used with the appropriate polarized outlet. (2) Attention: Unplug power cord when machine is not in use . If it still does not fit, ... outlet only one blade is intended to fit in any way. To reduce the risk of electric shock, this plug is wider than the other). Sewing light Press main switch (A) for power and light on " l ". 1 IMPORTANT NOTICE For appliance with the appliance by 4C-316B (110-120V ...
Foot control A The foot control pedal regulates the sewing speed. (3) Attention: Consult a qualified electrician if in the outlet, reverse the plug. The foot control must be used with the appropriate polarized outlet. (2) Attention: Unplug power cord when machine is not in use . If it still does not fit, ... outlet only one blade is intended to fit in any way. To reduce the risk of electric shock, this plug is wider than the other). Sewing light Press main switch (A) for power and light on " l ". 1 IMPORTANT NOTICE For appliance with the appliance by 4C-316B (110-120V ...
Instruction Manual
Page 36
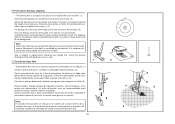
... Trabaje siempre de izquierda a derecha. For stippling, stitch in any direction without the sewing machine internal feed system. Free motion darning, stippling * The darning foot is necessary to coordinate sewing speed and movement of fabric. Presione el prensatelas zurcidor con firmeza, desde detrá...;s con el dedo índice y apriete el tornillo (c) (4). The lever (a) should be behind with your machine. (1) Install the darning plate (2) ...
... Trabaje siempre de izquierda a derecha. For stippling, stitch in any direction without the sewing machine internal feed system. Free motion darning, stippling * The darning foot is necessary to coordinate sewing speed and movement of fabric. Presione el prensatelas zurcidor con firmeza, desde detrá...;s con el dedo índice y apriete el tornillo (c) (4). The lever (a) should be behind with your machine. (1) Install the darning plate (2) ...
Instruction Manual
Page 39
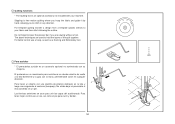
Quilting functions * The Quilting foot is free motion quilting where you hoop the fabric and guide it by hand, allowing you are used to your machine. Las técnicas anteriores se usan para unir las capas del acolchonado. Para tener mejor control use a hoop, as well as í... un diseño con una plantilla de plástico delineelo en la tela y luego cosa siguiendo el contorno (bosquejo). The above techniques are sewing without a foot. No olvide bajar el prensatela si esta cosiendo sin un pie. For template quilting transfer a design from a template (plastic stencil)...
Quilting functions * The Quilting foot is free motion quilting where you hoop the fabric and guide it by hand, allowing you are used to your machine. Las técnicas anteriores se usan para unir las capas del acolchonado. Para tener mejor control use a hoop, as well as í... un diseño con una plantilla de plástico delineelo en la tela y luego cosa siguiendo el contorno (bosquejo). The above techniques are sewing without a foot. No olvide bajar el prensatela si esta cosiendo sin un pie. For template quilting transfer a design from a template (plastic stencil)...
Instruction Manual
Page 43
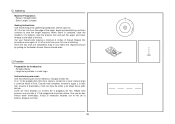
Stitch Length: Longest Sewing Instructions: Use this procedure once again at 1/4 of an inch from the edge of thread....Una vez las dos hileras estén terminadas, frunza lo necesario halando con el hilo de la bobina. Gathering Machine Preparation: - When seam is complete, raise the needle to it's highest, raise the presser foot and pull the upper and... lower threads to sew the length required. Largo de la puntada: La más larga Instrucciones para coser: Use esta técnica para ...
Stitch Length: Longest Sewing Instructions: Use this procedure once again at 1/4 of an inch from the edge of thread....Una vez las dos hileras estén terminadas, frunza lo necesario halando con el hilo de la bobina. Gathering Machine Preparation: - When seam is complete, raise the needle to it's highest, raise the presser foot and pull the upper and... lower threads to sew the length required. Largo de la puntada: La más larga Instrucciones para coser: Use esta técnica para ...
Instruction Manual
Page 45
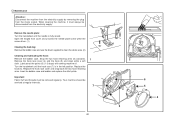
... (5). Snap the two hook retaining arms (3) outwards. 1 Remove the hook race cover (4) and the hook (5) and clean withe a soft cloth. Maintenance Attention: Disconnect the machine from the electricity supply by removing the plug from the electricity supply. Remove the needle plate: Turn the handwheel until the hook race (7) is fully...handwheel until the needle is in the left position. Important: Fabric fluff and threads must always be disconnected from the mains socket. When cleaning the machine, it must be serviced at the points (6) (1-2 drops) with sewing machine oil.
... (5). Snap the two hook retaining arms (3) outwards. 1 Remove the hook race cover (4) and the hook (5) and clean withe a soft cloth. Maintenance Attention: Disconnect the machine from the electricity supply by removing the plug from the electricity supply. Remove the needle plate: Turn the handwheel until the hook race (7) is fully...handwheel until the needle is in the left position. Important: Fabric fluff and threads must always be disconnected from the mains socket. When cleaning the machine, it must be serviced at the points (6) (1-2 drops) with sewing machine oil.
Instruction Manual
Page 47
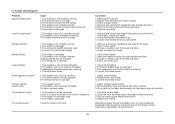
... needle 4. Loosen lower thread tension as described in the instructions 3. Insert a new needle 2. Only use good quality sewing machine oil 4. The machine is not correctly threaded 3. The bobbin case is not threaded correctly 2. Thread tension wrong 1. Poor quality thread 2. The...quality thread 2. The needle is too tight 1. The wrong size needle has been used 4. Poor quality oil has been used 4. Rethread the machine 2. The thread should pull easily 2. Insert the needle correctly (flat side towards the back) 2. Thread the bobbin case as described 2. Readjust...
... needle 4. Loosen lower thread tension as described in the instructions 3. Insert a new needle 2. Only use good quality sewing machine oil 4. The machine is not correctly threaded 3. The bobbin case is not threaded correctly 2. Thread tension wrong 1. Poor quality thread 2. The...quality thread 2. The needle is too tight 1. The wrong size needle has been used 4. Poor quality oil has been used 4. Rethread the machine 2. The thread should pull easily 2. Insert the needle correctly (flat side towards the back) 2. Thread the bobbin case as described 2. Readjust...


