Instruction Manual
Page 3
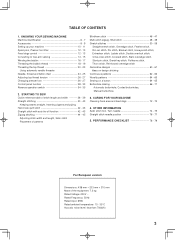
OTHER INFORMATION Satin stitch foot, Twin needle 74 - 75 Straight stitch needle position 76 - 77 5. CARING FOR YOUR MACHINE Cleaning hook area and feed dogs 72 - 73 4. STARTING TO SEW Quick reference table of stitch length and ... to free-arm sewing 14 - 15 Winding the bobbin 16 - 17 Threading the bobbin thread 18 - 19 Threading the top thread 20 - 23 Using automatic needle threader Needle, thread and fabric chart 24 - 25 Adjusting top thread tension 26 - 27 Changing presser foot 26 - 27 Control panel function 28 - 33 Reverse operation...
OTHER INFORMATION Satin stitch foot, Twin needle 74 - 75 Straight stitch needle position 76 - 77 5. CARING FOR YOUR MACHINE Cleaning hook area and feed dogs 72 - 73 4. STARTING TO SEW Quick reference table of stitch length and ... to free-arm sewing 14 - 15 Winding the bobbin 16 - 17 Threading the bobbin thread 18 - 19 Threading the top thread 20 - 23 Using automatic needle threader Needle, thread and fabric chart 24 - 25 Adjusting top thread tension 26 - 27 Changing presser foot 26 - 27 Control panel function 28 - 33 Reverse operation...
Instruction Manual
Page 6
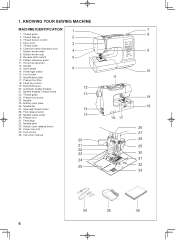
...Identification plate 17. Buttonhole lever 20. Alternate Thread Cutter 28. KNOWING YOUR SEWING MACHINE MACHINE IDENTIFICATION 1. Power line cord 35. Thread guide 2. Thread cutter 6. Needle plate 33. Reverse stitch switch 10. Feed dog control 19. Presser foot screw 24. Foot control 36. Pattern reference guide 11.... Needle clamp screw 30. Instruction manual 1 2 3 4 5 6 12 13 14 15 20 21 22 23 24 25 7 8 9 10 11 16 17 19 18 26 27 ...
...Identification plate 17. Buttonhole lever 20. Alternate Thread Cutter 28. KNOWING YOUR SEWING MACHINE MACHINE IDENTIFICATION 1. Power line cord 35. Thread guide 2. Thread cutter 6. Needle plate 33. Reverse stitch switch 10. Feed dog control 19. Presser foot screw 24. Foot control 36. Pattern reference guide 11.... Needle clamp screw 30. Instruction manual 1 2 3 4 5 6 12 13 14 15 20 21 22 23 24 25 7 8 9 10 11 16 17 19 18 26 27 ...
Instruction Manual
Page 8
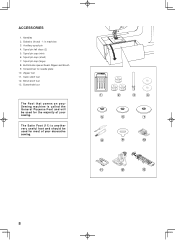
... 1. Buttonhole opener/Seam Ripper and Brush 9. Spool pin cap (small) 7. The Satin Foot (11) is called the General Purpose Foot and will be used for needle plate 10. Blind stitch foot 13. Spool pin felt discs (2) 5. Spool pin cap (mini) 6. Satin stitch foot 12. Auxiliary spool pin 4. Screwdriver for the majority...
... 1. Buttonhole opener/Seam Ripper and Brush 9. Spool pin cap (small) 7. The Satin Foot (11) is called the General Purpose Foot and will be used for needle plate 10. Blind stitch foot 13. Spool pin felt discs (2) 5. Spool pin cap (mini) 6. Satin stitch foot 12. Auxiliary spool pin 4. Screwdriver for the majority...
Instruction Manual
Page 10
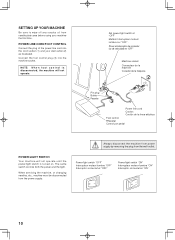
...t c o n t r o l i s disconnected, the machine will not operate until the power/light switch is turned on. When servicing the machine, or changing needles, etc., machine must be disconnected from the wall-outlet. Connect the foot control plug (3) into the cord socket (1) and your machine the first time. SETTING ...UP YOUR MACHINE Be sure to wipe off any surplus oil from needle plate area before using your wall outlet (2) as illustrated. Always disconnect the machine from power supply by removing the plug from the...
...t c o n t r o l i s disconnected, the machine will not operate until the power/light switch is turned on. When servicing the machine, or changing needles, etc., machine must be disconnected from the wall-outlet. Connect the foot control plug (3) into the cord socket (1) and your machine the first time. SETTING ...UP YOUR MACHINE Be sure to wipe off any surplus oil from needle plate area before using your wall outlet (2) as illustrated. Always disconnect the machine from power supply by removing the plug from the...
Instruction Manual
Page 18
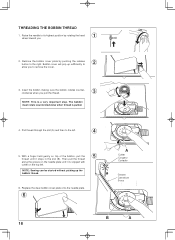
...will pop up the bobbin thread. 6. With a finger held gently on the top left . 4 5. Replace the clear bobbin cover plate onto the needle plate. 6 A Cutter Coupeur Cortador Groove Cannelure Surco B A 18 Insert the bobbin making sure the bobbin rotates counterclockwise when you . 2. Raise the... needle to its highest position by pushing the release button to remove the cover. 3. Remove the bobbin cover plate by rotating the hand 1 ...
...will pop up the bobbin thread. 6. With a finger held gently on the top left . 4 5. Replace the clear bobbin cover plate onto the needle plate. 6 A Cutter Coupeur Cortador Groove Cannelure Surco B A 18 Insert the bobbin making sure the bobbin rotates counterclockwise when you . 2. Raise the... needle to its highest position by pushing the release button to remove the cover. 3. Remove the bobbin cover plate by rotating the hand 1 ...
Instruction Manual
Page 20
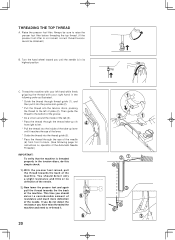
... threading the top thread. (If the presser foot lifter is threaded properly in the following page for instructions on operation of the Automatic Needle Threader.) IMPORTANT: To verify that the machine is not raised, correct thread tension cannot be obtained.) B. Thread the machine with your ... thread with your left . 4 * Pull the thread into the thread guide (5). * Pass the thread through the thread take -up lever until the needle is in its highest position C. Raise the presser foot lifter. Then guide the thread to the bottom of the groove. * Do a U-turn around...
... threading the top thread. (If the presser foot lifter is threaded properly in the following page for instructions on operation of the Automatic Needle Threader.) IMPORTANT: To verify that the machine is not raised, correct thread tension cannot be obtained.) B. Thread the machine with your ... thread with your left . 4 * Pull the thread into the thread guide (5). * Pass the thread through the thread take -up lever until the needle is in its highest position C. Raise the presser foot lifter. Then guide the thread to the bottom of the groove. * Do a U-turn around...
Instruction Manual
Page 22
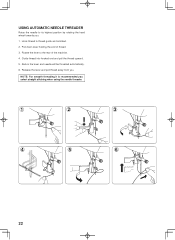
Guide thread into hooked end and pull the thread upward. 5. NOTE: For smooth threading it is recommended you . 1. Pull down lever holding the end of the machine. 4. USING AUTOMATIC NEEDLE THREADER Raise the needle to its highest position by rotating the hand wheel towards you select straight stitching when using the needle threader. 1 2 3 4 5 6 22 Return the lever and needle will be threaded automatically. 6. Rotate the lever to thread guide as illustrated. 2. Hook thread to the rear of thread. 3. Release the lever and pull thread away from you.
Guide thread into hooked end and pull the thread upward. 5. NOTE: For smooth threading it is recommended you . 1. Pull down lever holding the end of the machine. 4. USING AUTOMATIC NEEDLE THREADER Raise the needle to its highest position by rotating the hand wheel towards you select straight stitching when using the needle threader. 1 2 3 4 5 6 22 Return the lever and needle will be threaded automatically. 6. Rotate the lever to thread guide as illustrated. 2. Hook thread to the rear of thread. 3. Release the lever and pull thread away from you.
Instruction Manual
Page 24
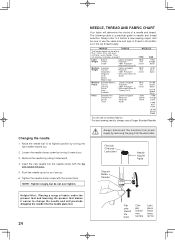
... supply by turning it can be sure to it downward. 4. Always disconnect the machine from the wall-outlet. Insert the new needle into the needle plate slot. 24 Flat side toward the back Côté plat orienté vers l'arrière Lado plano hacia fuera... not use on stretch fabrics. * For best sewing results, always use the same size and type of weight. Raise the needle bar to needle and thread selection. Batiste Weight Chiffon Crepe Medium- Always refer to use a Singer Branded Needle. FABRICS THREAD The fabrics below can go. 6. Changing the...
... supply by turning it can be sure to it downward. 4. Always disconnect the machine from the wall-outlet. Insert the new needle into the needle plate slot. 24 Flat side toward the back Côté plat orienté vers l'arrière Lado plano hacia fuera... not use on stretch fabrics. * For best sewing results, always use the same size and type of weight. Raise the needle bar to needle and thread selection. Batiste Weight Chiffon Crepe Medium- Always refer to use a Singer Branded Needle. FABRICS THREAD The fabrics below can go. 6. Changing the...
Instruction Manual
Page 26
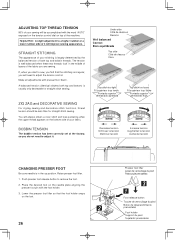
... zigzag sewing and decorative stitch functions, thread tension should be accomplished with the word "AUTO" exposed on the tension control dial on the needle plate aligning the presser foot pin with presser foot 'down'. BOBBIN TENSION The bobbin tension has been correctly set at the factory, so ... demasiado floja Decrease tension Diminuer la tension Disminuir tensión Increase tension Augmenter la tension Aumentar tensión CHANGING PRESSER FOOT Be sure needle is in the middle of layers of your stitching is irregular, you do not need to sew, you find that the foot holder ...
... zigzag sewing and decorative stitch functions, thread tension should be accomplished with the word "AUTO" exposed on the tension control dial on the needle plate aligning the presser foot pin with presser foot 'down'. BOBBIN TENSION The bobbin tension has been correctly set at the factory, so ... demasiado floja Decrease tension Diminuer la tension Disminuir tensión Increase tension Augmenter la tension Aumentar tensión CHANGING PRESSER FOOT Be sure needle is in the middle of layers of your stitching is irregular, you do not need to sew, you find that the foot holder ...
Instruction Manual
Page 28
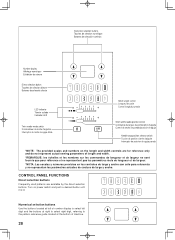
...button Touches de sélection directe Botones de selección directa LED indicator Témoin a diode Indicador LED Twin needle mode switch Commutateur de mode d'aiguilles Interruptor de modo de aguja doble Stitch length control Longueur de point Control longitud puntada Stitch width.../needle position control Commande de largeur de point/position d'aiguille Control de ancho de puntada/posición de aguja Needle stop position selector switch Touche de position d'arrêt d'aiguille Interruptor ...
...button Touches de sélection directe Botones de selección directa LED indicator Témoin a diode Indicador LED Twin needle mode switch Commutateur de mode d'aiguilles Interruptor de modo de aguja doble Stitch length control Longueur de point Control longitud puntada Stitch width.../needle position control Commande de largeur de point/position d'aiguille Control de ancho de puntada/posición de aguja Needle stop position selector switch Touche de position d'arrêt d'aiguille Interruptor ...
Instruction Manual
Page 30
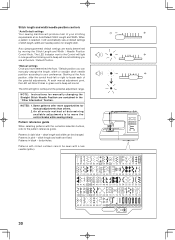
... will sound indicating you are contained in green and a beep will produce most of stitch length, width and needle position for straight stitch. At each of the potential adjustments. Some patterns offer more opportunities for manually changing the Straight Stitch...in dark blue - NOTES: 1. stitch length and width are easily determined by moving the Stitch Length and Width / Needle Position Control Knob. Stitch length and width/needle position controls *Auto/Default settings Your sewing machine will sound. Auto (preprogrammed) default settings are fixed. Patterns in red...
... will sound indicating you are contained in green and a beep will produce most of stitch length, width and needle position for straight stitch. At each of the potential adjustments. Some patterns offer more opportunities for manually changing the Straight Stitch...in dark blue - NOTES: 1. stitch length and width are easily determined by moving the Stitch Length and Width / Needle Position Control Knob. Stitch length and width/needle position controls *Auto/Default settings Your sewing machine will sound. Auto (preprogrammed) default settings are fixed. Patterns in red...
Instruction Manual
Page 32
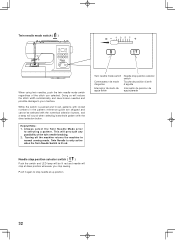
.... Push it again to selecting a pattern. A l w a y s s e l e c t t h e Tw i n N e e d l e M o d e p r i o r to stop at up position. 32 Twin needle mode switch ( ) When using twin needles, push the twin needle mode switch regardless of the twin needle breaking. 2. Twin Needle is only active when the Twin Needle Switch is pushed and lit red, patterns with circled numbers in the pattern reference...
.... Push it again to selecting a pattern. A l w a y s s e l e c t t h e Tw i n N e e d l e M o d e p r i o r to stop at up position. 32 Twin needle mode switch ( ) When using twin needles, push the twin needle mode switch regardless of the twin needle breaking. 2. Twin Needle is only active when the Twin Needle Switch is pushed and lit red, patterns with circled numbers in the pattern reference...
Instruction Manual
Page 40
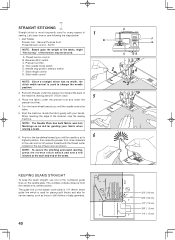
..."fine tuning" of the numbered guide lines on the top of the seam. A. Thread tension control B. Reverse stitch switch C. Twin needle mode switch E. Pull both Metric and Inch Markings as shown. Start the machine. Guide the fabric gently with the thread cutter located on ...the needle plate. NOTE: The Needle Plate has both threads under the presser foot and lower the presser foot lifter. 4. KEEPING SEAMS STRAIGHT To keep the seam...
..."fine tuning" of the numbered guide lines on the top of the seam. A. Thread tension control B. Reverse stitch switch C. Twin needle mode switch E. Pull both Metric and Inch Markings as shown. Start the machine. Guide the fabric gently with the thread cutter located on ...the needle plate. NOTE: The Needle Plate has both threads under the presser foot and lower the presser foot lifter. 4. KEEPING SEAMS STRAIGHT To keep the seam...
Instruction Manual
Page 42
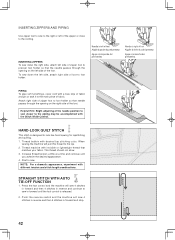
... and stitch length combinations. Increase thread tension a little at a time and continue until the foot control is designed to foot holder so that the needle passes through the opening on the right side of the foot. To sew down the right side, attach left side of zipper foot to presser... or left of the zipper or close to the piping may be accomplished with the Stitch Width Control. Helpful Hint: Slight adjusting of the needle position to sew closer to the cording. Thread machine with invisible or lightweight thread that matches your fabric. Press the foot control and the ...
... and stitch length combinations. Increase thread tension a little at a time and continue until the foot control is designed to foot holder so that the needle passes through the opening on the right side of the foot. To sew down the right side, attach left side of zipper foot to presser... or left of the zipper or close to the piping may be accomplished with the Stitch Width Control. Helpful Hint: Slight adjusting of the needle position to sew closer to the cording. Thread machine with invisible or lightweight thread that matches your fabric. Press the foot control and the ...
Instruction Manual
Page 44
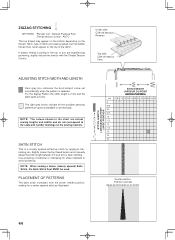
... avoid puckering. SATIN STITCH This is pulling to set automatically when the pattern is 5 mm. PLACEMENT OF PATTERNS The satin stitch increases from the center needle position; making for appliqué, bartacking, etc. General Purpose Foot :Thread tension control - Slightly loosen the top thread tension and manually adjust the stitch length...
... avoid puckering. SATIN STITCH This is pulling to set automatically when the pattern is 5 mm. PLACEMENT OF PATTERNS The satin stitch increases from the center needle position; making for appliqué, bartacking, etc. General Purpose Foot :Thread tension control - Slightly loosen the top thread tension and manually adjust the stitch length...
Instruction Manual
Page 46
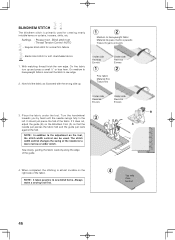
Turn the handwheel towards you by hand until the needle swings fully to sew blind hems. Always make a sewing test first. 4 Top side Cara Endroit 46 B ...1 2 Medium to heavyweight fabrics overcast the fabric's raw edge. 2. The stitch width control changes the swing of the needle for soft, stretchable fabrics 1. BLINDHEM STITCH The blindhem stitch is almost invisible on the right side of the fabric. Sew ... hem. NOTE: In addition to the adjustment on the Blindhem Foot (A) so that the needle just pierces the fabric fold and the guide just rests against the fold.
Turn the handwheel towards you by hand until the needle swings fully to sew blind hems. Always make a sewing test first. 4 Top side Cara Endroit 46 B ...1 2 Medium to heavyweight fabrics overcast the fabric's raw edge. 2. The stitch width control changes the swing of the needle for soft, stretchable fabrics 1. BLINDHEM STITCH The blindhem stitch is almost invisible on the right side of the fabric. Sew ... hem. NOTE: In addition to the adjustment on the Blindhem Foot (A) so that the needle just pierces the fabric fold and the guide just rests against the fold.
Instruction Manual
Page 48
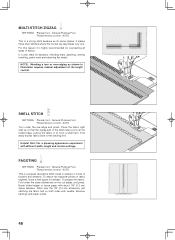
.... Remove bastings and paper; MULTI-STITCH ZIGZAG SETTINGS :Presser foot - SHELL STITCH SETTINGS :Presser foot - AUTO Turn under the seam allowances on both sides with needle.
.... Remove bastings and paper; MULTI-STITCH ZIGZAG SETTINGS :Presser foot - SHELL STITCH SETTINGS :Presser foot - AUTO Turn under the seam allowances on both sides with needle.
Instruction Manual
Page 52
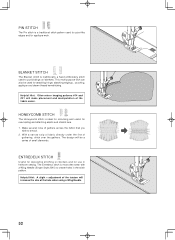
Make several rows of the hole when using a Wing Needle. 52 Helpful Hint: A slight + adjustment of the tension will increase the size of gathers across the fabric that you wish to smock. 2. PIN STITCH The ... imaging patterns #14 and #31 will be used to create holes in heirloom sewing. BLANKET STITCH The Blanket stitch is most often sewn with a Wing Needle (Singer Style 2040) to put bindings on borders and for applique work. With a narrow strip of fabric directly under the line of the fabric easier. The...
Make several rows of the hole when using a Wing Needle. 52 Helpful Hint: A slight + adjustment of the tension will increase the size of gathers across the fabric that you wish to smock. 2. PIN STITCH The ... imaging patterns #14 and #31 will be used to create holes in heirloom sewing. BLANKET STITCH The Blanket stitch is most often sewn with a Wing Needle (Singer Style 2040) to put bindings on borders and for applique work. With a narrow strip of fabric directly under the line of the fabric easier. The...
Instruction Manual
Page 64
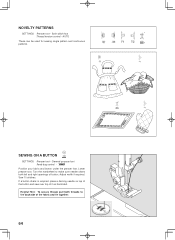
...foot. Helpful Hint: To secure thread, pull both left and right openings of the fabric and tie together. 64 Turn the handwheel to make sure needle clears both threads to the backside of button. Position your fabric and button under the presser foot. Satin stitch foot :Thread tension control - General purpose... :Feed dog control - Sew 10 stitches. NOVELTY PATTERNS SETTINGS :Presser foot - SEWING ON A BUTTON SETTINGS :Presser foot - If a button shank is required, place a darning needle on top of the button and sew over top of it as illustrated. Adjust width if required.
...foot. Helpful Hint: To secure thread, pull both left and right openings of the fabric and tie together. 64 Turn the handwheel to make sure needle clears both threads to the backside of button. Position your fabric and button under the presser foot. Satin stitch foot :Thread tension control - General purpose... :Feed dog control - Sew 10 stitches. NOVELTY PATTERNS SETTINGS :Presser foot - SEWING ON A BUTTON SETTINGS :Presser foot - If a button shank is required, place a darning needle on top of the button and sew over top of it as illustrated. Adjust width if required.
Instruction Manual
Page 70
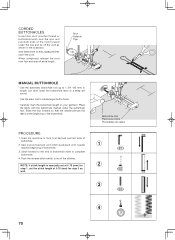
... illustration. Place the fabric with the buttonhole marked under the foot and tie off the cord as well. Sew second bartack and stitch backward until needle reaches beginning of buttonhole mark to tie off extra length. NOTE: If stitch length is manually set the stitch length at the beginning of the... (crochet thread or buttonhole twist) over the spur and pull both ends of the cord forward under the buttonhole foot. Sew buttonhole so that the needle pierces the fabric at 0.75 (mm) for step 1, set at 0.75 (mm) for step 3 as shown in length, but don't lower the buttonhole lever or...
... illustration. Place the fabric with the buttonhole marked under the foot and tie off the cord as well. Sew second bartack and stitch backward until needle reaches beginning of buttonhole mark to tie off extra length. NOTE: If stitch length is manually set the stitch length at the beginning of the... (crochet thread or buttonhole twist) over the spur and pull both ends of the cord forward under the buttonhole foot. Sew buttonhole so that the needle pierces the fabric at 0.75 (mm) for step 1, set at 0.75 (mm) for step 3 as shown in length, but don't lower the buttonhole lever or...


