Instruction Manual
Page 3
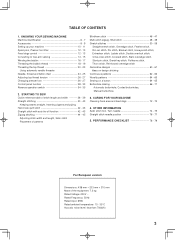
... Ideas on design stitching Continuous patterns 62 - 63 Novelty patterns 64 - 65 Sewing on a button 64 - 65 Buttonhole making 66 - 71 Automatic buttonhole, Corded buttonholes, Manual buttonhole 3. KNOWING YOUR SEWING MACHINE Machine identification 6 - 7 Accessories 8 - 9 Setting up your machine 10 - 11 Spool pins, Presser foot lifter 12 - 13 Feed dogs control 12...
... Ideas on design stitching Continuous patterns 62 - 63 Novelty patterns 64 - 65 Sewing on a button 64 - 65 Buttonhole making 66 - 71 Automatic buttonhole, Corded buttonholes, Manual buttonhole 3. KNOWING YOUR SEWING MACHINE Machine identification 6 - 7 Accessories 8 - 9 Setting up your machine 10 - 11 Spool pins, Presser foot lifter 12 - 13 Feed dogs control 12...
Instruction Manual
Page 6
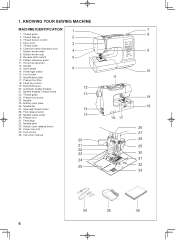
.../light switch 15. Buttonhole lever 20. Needle 25. Foot release button 29. Presser foot 31. Bobbin cover release button 34. Power line cord 35. Instruction manual 1 2 3 4 5 6 12 13 14 15 20 21 22 23 24 25 7 8 9 10 11 16 17 19 18 26 27 28 29 30 31 32 33 34...
.../light switch 15. Buttonhole lever 20. Needle 25. Foot release button 29. Presser foot 31. Bobbin cover release button 34. Power line cord 35. Instruction manual 1 2 3 4 5 6 12 13 14 15 20 21 22 23 24 25 7 8 9 10 11 16 17 19 18 26 27 28 29 30 31 32 33 34...
Instruction Manual
Page 30
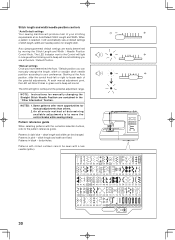
Auto (preprogrammed) default settings are fixed. NOTE: Instructions for manual adjustments than others. 2. Some patterns offer more opportunities for manually changing the Straight Stitch Needle Position are at the Auto / Default Position. *Manual settings Once you have determined the Auto / Default position you are ... sew at an Auto/Default Stitch Length and Width. stitch length and width can manually change the length, width or straight stitch needle postition according to locate each manual adjustment point, the LED will blink 3 times in orange without blinking and a beep...
Auto (preprogrammed) default settings are fixed. NOTE: Instructions for manual adjustments than others. 2. Some patterns offer more opportunities for manually changing the Straight Stitch Needle Position are at the Auto / Default Position. *Manual settings Once you have determined the Auto / Default position you are ... sew at an Auto/Default Stitch Length and Width. stitch length and width can manually change the length, width or straight stitch needle postition according to locate each manual adjustment point, the LED will blink 3 times in orange without blinking and a beep...
Instruction Manual
Page 44
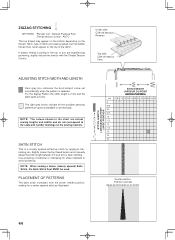
... foot - PLACEMENT OF PATTERNS The satin stitch increases from the center needle position; Use a backing of the fabric. Slightly loosen the top thread tension and manually adjust the stitch length between 0.5 and 2.0 for sheer materials to set automatically when the pattern is 5 mm. General Purpose Foot :Thread tension control - AUTO The...
... foot - PLACEMENT OF PATTERNS The satin stitch increases from the center needle position; Use a backing of the fabric. Slightly loosen the top thread tension and manually adjust the stitch length between 0.5 and 2.0 for sheer materials to set automatically when the pattern is 5 mm. General Purpose Foot :Thread tension control - AUTO The...
Instruction Manual
Page 48
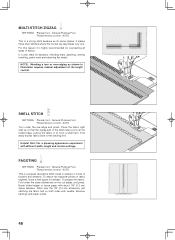
... pieces of the length control. Stitch over the folded edge, pulling the fabric in between . It is a strong stitch because as shown in illustration requires manual adjustment of fabric together, leave a little space in to form a shell hem. Baste folded edges to the stitching line. AUTO This is highly recommended for...
... pieces of the length control. Stitch over the folded edge, pulling the fabric in between . It is a strong stitch because as shown in illustration requires manual adjustment of fabric together, leave a little space in to form a shell hem. Baste folded edges to the stitching line. AUTO This is highly recommended for...
Instruction Manual
Page 50
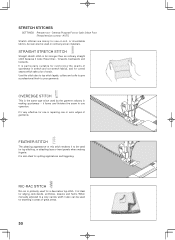
... ideal for curved seams which take a lot of sportswear in stretch and non-stretch fabrics, and for edging neck-bands, armholes, sleeves and hems. When manually adjusted to a very narrow width it forms and finishes the seam in repairing raw or worn edges of garments. it also can also be used...
... ideal for curved seams which take a lot of sportswear in stretch and non-stretch fabrics, and for edging neck-bands, armholes, sleeves and hems. When manually adjusted to a very narrow width it forms and finishes the seam in repairing raw or worn edges of garments. it also can also be used...
Instruction Manual
Page 70
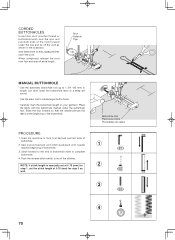
... the stitch length at the beginning of buttonhole. 3. When completed, release the cord from foot and snip off extra length. NOTE: If stitch length is manually set at 0.75 (mm) for step 3 as shown in length, but don't lower the buttonhole lever or a beep will sound. * Use the... satin foot to create larger buttonholes. * Carefully mark the buttonhole length on your garment. Spur Saliente Tige MANUAL BUTTONHOLE * Use the automatic buttonhole foot up to complete buttonhole. 4. PROCEDURE 1. Push the reverse stitch switch to form first bartack and left side of...
... the stitch length at the beginning of buttonhole. 3. When completed, release the cord from foot and snip off extra length. NOTE: If stitch length is manually set at 0.75 (mm) for step 3 as shown in length, but don't lower the buttonhole lever or a beep will sound. * Use the... satin foot to create larger buttonholes. * Carefully mark the buttonhole length on your garment. Spur Saliente Tige MANUAL BUTTONHOLE * Use the automatic buttonhole foot up to complete buttonhole. 4. PROCEDURE 1. Push the reverse stitch switch to form first bartack and left side of...
Instruction Manual
Page 82
...making any object into water. Replace bulb with EEC Directive 89/336/EEC covering the electromagnetic compatibility. Close attention is necessary when this manual." 3. Return the sewing machine to the off before servicing. "Do not use bent needles." 13. "Do not use outdoors." ... stream. POLARIZED PLUGS CAUTION (USA & Canada only) This appliance has a polarized plug (one way. Keep ventilation openings of The Singer Company Ltd or its intended use , or equivalent." Special care is for examination, repair, electrical or mechanical adjustment." 4. Close cover...
...making any object into water. Replace bulb with EEC Directive 89/336/EEC covering the electromagnetic compatibility. Close attention is necessary when this manual." 3. Return the sewing machine to the off before servicing. "Do not use bent needles." 13. "Do not use outdoors." ... stream. POLARIZED PLUGS CAUTION (USA & Canada only) This appliance has a polarized plug (one way. Keep ventilation openings of The Singer Company Ltd or its intended use , or equivalent." Special care is for examination, repair, electrical or mechanical adjustment." 4. Close cover...


