
Instruction Manual
Page 2
... etc. 18. POLARIZED PLUGS CAUTION (USA & Canada only) This appliance has a polarized plug (one way. Children should not use of The Singer Company Limited S.à r.l. Return the sewing machine to the nearest authorized dealer or service center for use only. 9. Keep fingers away from the...have been given supervision or instruction concerning use the product and send it to break. 15. or its Affiliates. ©2013 The Singer Company Limited S.à r.l. Never sew with reduced physical, sensory or mental capabilities, or lack of the appliance when leaving it still ...
... etc. 18. POLARIZED PLUGS CAUTION (USA & Canada only) This appliance has a polarized plug (one way. Children should not use of The Singer Company Limited S.à r.l. Return the sewing machine to the nearest authorized dealer or service center for use only. 9. Keep fingers away from the...have been given supervision or instruction concerning use the product and send it to break. 15. or its Affiliates. ©2013 The Singer Company Limited S.à r.l. Never sew with reduced physical, sensory or mental capabilities, or lack of the appliance when leaving it still ...

Instruction Manual
Page 5
... Placement of the equipment: 8.3 kg Rated Voltage: 230 V ~ Rated Frequency: 50 Hz Rated input: 75 W Using ambient temperature: Normal temperature Acoustic noise level: less than 70 db(A) 3 TABLE OF CONTENTS 1. KNOWING YOUR SEWING MACHINE Machine identification 6 - 7 Accessories 8 - 9 Setting up your machine 10 - 11 Spool pins 12 - 13 Presser foot lifter, Feed...
... Placement of the equipment: 8.3 kg Rated Voltage: 230 V ~ Rated Frequency: 50 Hz Rated input: 75 W Using ambient temperature: Normal temperature Acoustic noise level: less than 70 db(A) 3 TABLE OF CONTENTS 1. KNOWING YOUR SEWING MACHINE Machine identification 6 - 7 Accessories 8 - 9 Setting up your machine 10 - 11 Spool pins 12 - 13 Presser foot lifter, Feed...

Instruction Manual
Page 8
Foot release button 28. Bobbin cover release button 33. Foot control 35. Pre-tension guide 2 2. Bobbin winding tension disk 3. Thread tension control 3 4. Bobbin winder shaft 5 9. Cord socket 16. Presser foot lifter 12 19. Needle 24. Feed dogs 31. 1. Threading lever 5. Handle 13. Extension table release button 18. Alternate thread cutter 14 27. Presser foot 30. Power line cord 34. Buttonhole lever 20. Needle clamp screw 15 29. KNOWING YOUR SEWING MACHINE MACHINE IDENTIFICATION 1. Face cover 4 6. Thread cutter/holder ...
Foot release button 28. Bobbin cover release button 33. Foot control 35. Pre-tension guide 2 2. Bobbin winding tension disk 3. Thread tension control 3 4. Bobbin winder shaft 5 9. Cord socket 16. Presser foot lifter 12 19. Needle 24. Feed dogs 31. 1. Threading lever 5. Handle 13. Extension table release button 18. Alternate thread cutter 14 27. Presser foot 30. Power line cord 34. Buttonhole lever 20. Needle clamp screw 15 29. KNOWING YOUR SEWING MACHINE MACHINE IDENTIFICATION 1. Face cover 4 6. Thread cutter/holder ...

Instruction Manual
Page 10
Blindhem stitch foot 13. When purchasing additional bobbins, be used for most of your decorative sewing - ACCESSORIES 1. Buttonhole opener/seam ripper and brush 9. Spool pin cap (small) 6. Screwdriver for the majority of your sewing. Needles 2. Spool pin felt disks 5. Satin stitch foot 12. Buttonhole foot and underplate The foot that comes on your sewing machine is another very useful foot and should be used for needle plate 10. The satin foot (11) is called the general purpose foot and will be sure they are Class I5 J. 8 1 2 3 4 5 6 7 8 9 10 ...
Blindhem stitch foot 13. When purchasing additional bobbins, be used for most of your decorative sewing - ACCESSORIES 1. Buttonhole opener/seam ripper and brush 9. Spool pin cap (small) 6. Screwdriver for the majority of your sewing. Needles 2. Spool pin felt disks 5. Satin stitch foot 12. Buttonhole foot and underplate The foot that comes on your sewing machine is another very useful foot and should be used for needle plate 10. The satin foot (11) is called the general purpose foot and will be sure they are Class I5 J. 8 1 2 3 4 5 6 7 8 9 10 ...
Instruction Manual
Page 12
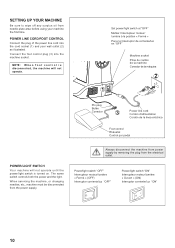
Set power/light switch at "OFF" Mettez l'interrupteur moteur/ lumière à la position « Fermé » Poner el Interruptor de corriente/luz en "OFF" machine socket Prise du cordon de la machine Conector de la máquina 2 1 Pin plug Butée Conector 3 Power line cord Cordon d'alimentation Cordón de la linea eléctrica Foot control Rhéostat Control por pedal POWER/LIGHT SWITCH Your machine will not operate. Always disconnect the machine from power supply by removing the plug from the power supply. Connect the foot control plug (3) into the ...
Set power/light switch at "OFF" Mettez l'interrupteur moteur/ lumière à la position « Fermé » Poner el Interruptor de corriente/luz en "OFF" machine socket Prise du cordon de la machine Conector de la máquina 2 1 Pin plug Butée Conector 3 Power line cord Cordon d'alimentation Cordón de la linea eléctrica Foot control Rhéostat Control por pedal POWER/LIGHT SWITCH Your machine will not operate. Always disconnect the machine from power supply by removing the plug from the power supply. Connect the foot control plug (3) into the ...

Instruction Manual
Page 14
The diameter of the spool itself. Place the felt disc over it clicks. Raise the lifter to the middle position to insert or remove fabric, and to sew. 2. Spool pin cap Chapeau de bobine Tapa del pasador carrete Spool Bobine Carrete Spool pin Porte-bobine Pasador carrete FEED DOG CONTROL The feed dogs control the movement of the fabric that of the spool pin cap should always be used . You will alert you remove the extension table. To replace, slide the extension table back into a slim free-arm model for your presser foot. 1. VERTICAL SPOOL PIN for darning, freehand ...
The diameter of the spool itself. Place the felt disc over it clicks. Raise the lifter to the middle position to insert or remove fabric, and to sew. 2. Spool pin cap Chapeau de bobine Tapa del pasador carrete Spool Bobine Carrete Spool pin Porte-bobine Pasador carrete FEED DOG CONTROL The feed dogs control the movement of the fabric that of the spool pin cap should always be used . You will alert you remove the extension table. To replace, slide the extension table back into a slim free-arm model for your presser foot. 1. VERTICAL SPOOL PIN for darning, freehand ...

Instruction Manual
Page 16
Place bobbin onto shaft with end of thread 3 coming from the spool and place it with the spool pin cap. After the bobbin has begun to fill, stop turning when completely filled. Push shaft to the right until it is down. 4. WINDING THE BOBBIN Be sure to remove bobbin and cut 4 the thread tail. Push bobbin winder shaft to the left position, if it clicks. Start machine. The bobbin will automatically stop to fill the bobbin. Put end of thread on the foot control again to continue to cut thread. 14 Push bobbin winder shaft to far left to use Class 15 J bobbins...
Place bobbin onto shaft with end of thread 3 coming from the spool and place it with the spool pin cap. After the bobbin has begun to fill, stop turning when completely filled. Push shaft to the right until it is down. 4. WINDING THE BOBBIN Be sure to remove bobbin and cut 4 the thread tail. Push bobbin winder shaft to the left position, if it clicks. Start machine. The bobbin will automatically stop to fill the bobbin. Put end of thread on the foot control again to continue to cut thread. 14 Push bobbin winder shaft to far left to use Class 15 J bobbins...

Instruction Manual
Page 18
Raise the needle to its highest position by pushing the release button to the right. Pull thread through the slot (A) and then to remove the cover. 3. Remove the bobbin cover plate by rotating the hand 1 wheel counter clockwise. 2. Insert the bobbin making sure the bobbin rotates counterclockwise when you to the left . Then pull the thread along the groove on top of the bobbin, pull the 5 thread until it stops in the slot (B). NOTE: Sewing can be started without picking up sufficiently to 2 allow you pull the thread. 3 NOTE: This is snipped with cutter on the top ...
Raise the needle to its highest position by pushing the release button to the right. Pull thread through the slot (A) and then to remove the cover. 3. Remove the bobbin cover plate by rotating the hand 1 wheel counter clockwise. 2. Insert the bobbin making sure the bobbin rotates counterclockwise when you to the left . Then pull the thread along the groove on top of the bobbin, pull the 5 thread until it stops in the slot (B). NOTE: Sewing can be started without picking up sufficiently to 2 allow you pull the thread. 3 NOTE: This is snipped with cutter on the top ...

Instruction Manual
Page 20
Raise the presser foot lifter. Turn the hand wheel counter clockwise until the needle is in the tension discs, do not detect the resistance you have mis-threaded the machine and need to re-thread it down along the groove (3). * Guide the thread into the thread guide (4). * Pass the thread through the eye of the needle (5) from front to raise the presser foot lifter before threading the top thread. (If the presser foot lifter is threaded properly in its highest position. Always be sure to back. (See following order as illustrated. * Guide the thread through thread guides (1 & 2),...
Raise the presser foot lifter. Turn the hand wheel counter clockwise until the needle is in the tension discs, do not detect the resistance you have mis-threaded the machine and need to re-thread it down along the groove (3). * Guide the thread into the thread guide (4). * Pass the thread through the eye of the needle (5) from front to raise the presser foot lifter before threading the top thread. (If the presser foot lifter is threaded properly in its highest position. Always be sure to back. (See following order as illustrated. * Guide the thread through thread guides (1 & 2),...
Instruction Manual
Page 24
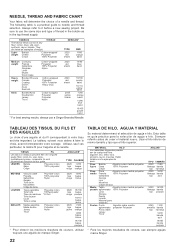
...18/110 yellow band 11/80 orange band 14/90 blue band 16/100 purple band * For best sewing results, always use siempre agujas marca Singer. 22 LÉGERS Batiste Gaze Crêpe Polyester-coton 100% polyester AIGUILLES* TYPE CALIBRE 2020 11/80 tige bague rouge orange MOYENS LOURDS .../80 bague orange 14/90 bague bleue 16/100 bague pourpre * Pour obtenir les meilleurs résultats de couture, utilisez toujours une aiguille de marque Singer. NEEDLE, THREAD AND FABRIC CHART Your fabric will determine the choice of any fiber: cotton, linen, silk, wool, synthetic, rayon, blends. Be sure to...
...18/110 yellow band 11/80 orange band 14/90 blue band 16/100 purple band * For best sewing results, always use siempre agujas marca Singer. 22 LÉGERS Batiste Gaze Crêpe Polyester-coton 100% polyester AIGUILLES* TYPE CALIBRE 2020 11/80 tige bague rouge orange MOYENS LOURDS .../80 bague orange 14/90 bague bleue 16/100 bague pourpre * Pour obtenir les meilleurs résultats de couture, utilisez toujours une aiguille de marque Singer. NEEDLE, THREAD AND FABRIC CHART Your fabric will determine the choice of any fiber: cotton, linen, silk, wool, synthetic, rayon, blends. Be sure to...

Instruction Manual
Page 26
Helpful Hint: A slight adjustment to remove the foot. 2. If, when you start to sew, you find that the stitching is largely determined by the balanced tension of both top and bottom) is correctly threaded (see page 18 - 19). You will always obtain a nicer stitch and less puckering when the upper thread appears slightly on the needle plate aligning the presser foot pin with presser foot 'down'. Place the desired foot on the bottom side of your sewing will need to adjust the tension control. Decrease tension Diminuer la tension Disminuir tensión Increase tension ...
Helpful Hint: A slight adjustment to remove the foot. 2. If, when you start to sew, you find that the stitching is largely determined by the balanced tension of both top and bottom) is correctly threaded (see page 18 - 19). You will always obtain a nicer stitch and less puckering when the upper thread appears slightly on the needle plate aligning the presser foot pin with presser foot 'down'. Place the desired foot on the bottom side of your sewing will need to adjust the tension control. Decrease tension Diminuer la tension Disminuir tensión Increase tension ...

Instruction Manual
Page 28
When a pattern is selected, it will automatically sew at the auto / default position. The LED indicator above the stitch length or stitch width control buttons indicating the selected function. Note: Instructions for manually changing the straight stitch needle position are easily determined by pressing the stitch length and width / needle position Control. To select other patterns, push the pattern selection button. At this point you power off the machine. The LED will light above the control will continue until you may sew straight stitch. The setting you determine on ...
When a pattern is selected, it will automatically sew at the auto / default position. The LED indicator above the stitch length or stitch width control buttons indicating the selected function. Note: Instructions for manually changing the straight stitch needle position are easily determined by pressing the stitch length and width / needle position Control. To select other patterns, push the pattern selection button. At this point you power off the machine. The LED will light above the control will continue until you may sew straight stitch. The setting you determine on ...

Instruction Manual
Page 30
REVERSE OPERATION BUTTON Dual purpose reverse/tacking stitch button Reverse stitch button Bouton du point de marche arrière interruptor de puntadas hacia atrás * Reverse stitch function for straight and zigzag stitches ( ) Reverse sewing is carried out while the reverse stitch button is very useful for tie-off the sewing pattern to tie off the sewing on all patterns except straight and zigzag stitches. The position of other stitches ( ) The sewing machine makes 4 tiny tacking stitches to avoid raveling at the exact spot in reverse as long as the reverse stitch button is ...
REVERSE OPERATION BUTTON Dual purpose reverse/tacking stitch button Reverse stitch button Bouton du point de marche arrière interruptor de puntadas hacia atrás * Reverse stitch function for straight and zigzag stitches ( ) Reverse sewing is carried out while the reverse stitch button is very useful for tie-off the sewing pattern to tie off the sewing on all patterns except straight and zigzag stitches. The position of other stitches ( ) The sewing machine makes 4 tiny tacking stitches to avoid raveling at the exact spot in reverse as long as the reverse stitch button is ...

Instruction Manual
Page 34
B D 1. SETTINGS Presser foot - Thread tension control B. Reverse stitch button C. NOTE: The needle plate has both threads under the presser foot and lower the 5 presser foot lifter. 4. The numbers indicate distance from the needle at its highest position, then raise the presser foot, draw 6 the fabric to change the needle position. 3 2. AUTO NOTE: Based upon the weight of the fabric, slight "fine tuning" of sewing. 1 A Let's begin by following the steps below. Stitch length control E. The guide line on the top of face cover as an aid for guiding your hands. ...
B D 1. SETTINGS Presser foot - Thread tension control B. Reverse stitch button C. NOTE: The needle plate has both threads under the presser foot and lower the 5 presser foot lifter. 4. The numbers indicate distance from the needle at its highest position, then raise the presser foot, draw 6 the fabric to change the needle position. 3 2. AUTO NOTE: Based upon the weight of the fabric, slight "fine tuning" of sewing. 1 A Let's begin by following the steps below. Stitch length control E. The guide line on the top of face cover as an aid for guiding your hands. ...
Instruction Manual
Page 36
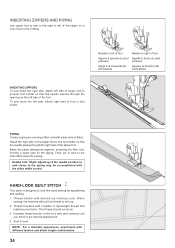
PIPING Create a piping by covering a filler cord with desired top stitching color. Baste the seam allowances together, enclosing the filler cord, forming a seam tape for the piping. Thread bobbin with a bias strip of fabric. This thread should not show. 3. Increase thread tension a little at a time and continue until you acheive the desired appearance. 4. Attach the right side of the zipper foot to sew. Start to the foot holder so that the needle passes through the opening on the left side of the foot. Helpful hint: Slight adjusting of the needle position to sew closer to look...
PIPING Create a piping by covering a filler cord with desired top stitching color. Baste the seam allowances together, enclosing the filler cord, forming a seam tape for the piping. Thread bobbin with a bias strip of fabric. This thread should not show. 3. Increase thread tension a little at a time and continue until you acheive the desired appearance. 4. Attach the right side of the zipper foot to sew. Start to the foot holder so that the needle passes through the opening on the left side of the foot. Helpful hint: Slight adjusting of the needle position to sew closer to look...

Instruction Manual
Page 38
NOTE: The values shown in the chart are experiencing puckering, slightly reduce the tension with the thread tension control. SATIN STITCH This is 5 mm. Slightly loosen the top thread tension and manually adjust the stitch length between 0.5 and 2.0 for appliqué, bar tacking, etc. Use a backing of stabilizer for lightweight fabrics to the scale and number markings on the top of the fabric. AUTO The top thread may appear on the bottom depending on the thread, fabric, type of pattern increases from center needle position as illustrated. If bobbin thread is selected. ...
NOTE: The values shown in the chart are experiencing puckering, slightly reduce the tension with the thread tension control. SATIN STITCH This is 5 mm. Slightly loosen the top thread tension and manually adjust the stitch length between 0.5 and 2.0 for appliqué, bar tacking, etc. Use a backing of stabilizer for lightweight fabrics to the scale and number markings on the top of the fabric. AUTO The top thread may appear on the bottom depending on the thread, fabric, type of pattern increases from center needle position as illustrated. If bobbin thread is selected. ...

Instruction Manual
Page 40
Settings : Presser foot - Elastic blind stitch for overcasting all types of the needle for bartacks, mending tears, patching, sewing towelling, and attaching flat elastic. On fine fabric, turn up . Now fold the fabric as illustrated with the wrong side up and press a small ½" or less hem. It 3 should just pierce the fold of the guide. 4. A NOTE: In addition to the adjustment on the foot, the stitch width control can be used for normal woven fabrics - For this reason it is highly recommended for soft, stretchable fabrics 1. With matching thread finish the raw edge. On ...
Settings : Presser foot - Elastic blind stitch for overcasting all types of the needle for bartacks, mending tears, patching, sewing towelling, and attaching flat elastic. On fine fabric, turn up . Now fold the fabric as illustrated with the wrong side up and press a small ½" or less hem. It 3 should just pierce the fold of the guide. 4. A NOTE: In addition to the adjustment on the foot, the stitch width control can be used for normal woven fabrics - For this reason it is highly recommended for soft, stretchable fabrics 1. With matching thread finish the raw edge. On ...

Instruction Manual
Page 42
AUTO Stretch stitches are mainly for use in stretch and non-stretch fabrics, and for use on knit, or stretchable fabrics, but can also be used. STRAIGHT STRETCH STITCH Straight stretch stitch is primarily used on woven fabrics. Use this stitch also to top-stitch lapels, collars and cuffs to give a professional finish to a very narrow width, it locks three times - it sews and finishes the seam in making sportswear - It's very effective for curved seams which take a lot of strain. With a narrow strip of fabric directly under the line of gathers across the fabric that you ...
AUTO Stretch stitches are mainly for use in stretch and non-stretch fabrics, and for use on knit, or stretchable fabrics, but can also be used. STRAIGHT STRETCH STITCH Straight stretch stitch is primarily used on woven fabrics. Use this stitch also to top-stitch lapels, collars and cuffs to give a professional finish to a very narrow width, it locks three times - it sews and finishes the seam in making sportswear - It's very effective for curved seams which take a lot of strain. With a narrow strip of fabric directly under the line of gathers across the fabric that you ...

Instruction Manual
Page 44
LADDER STITCH The ladder stitch is primarily used for the ladder stitch is also ideal for top stitching, or attaching lace or inset panels when making lingerie. Another use for drawn thread hemstitching. FEATHER STITCH The pleasing appearance of this stitch enables it to be used for quilting applications and joining fabrics. It is couching over thin tape in one operation to produce a narrow, supple seam, particularly suited to put bindings on blankets. This multi-purpose stitch can also be obtained for appliqué work , choose a coarse linen type fabric and after sewing draw...
LADDER STITCH The ladder stitch is primarily used for the ladder stitch is also ideal for top stitching, or attaching lace or inset panels when making lingerie. Another use for drawn thread hemstitching. FEATHER STITCH The pleasing appearance of this stitch enables it to be used for quilting applications and joining fabrics. It is couching over thin tape in one operation to produce a narrow, supple seam, particularly suited to put bindings on blankets. This multi-purpose stitch can also be obtained for appliqué work , choose a coarse linen type fabric and after sewing draw...

Instruction Manual
Page 46
... threads to make sure that there is most often sewn with a slightly lower (-) tension setting. Helpful hint: For a more pleasing appearance experiment with a Wing Needle (Singer Style 2040) to make sure needle clears both left and right openings of button. General purpose foot :Feed dog control - Position your preference. DECORATIVE PATTERNS...
... threads to make sure that there is most often sewn with a slightly lower (-) tension setting. Helpful hint: For a more pleasing appearance experiment with a Wing Needle (Singer Style 2040) to make sure needle clears both left and right openings of button. General purpose foot :Feed dog control - Position your preference. DECORATIVE PATTERNS...