Instruction Manual
Page 9
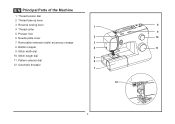
Thread tension dial 2. Thread take-up lever 3. Presser foot 6. Bobbin stopper 4 11 9. Reverse sewing lever 1 8 4. Pattern selector dial 6 12. Needle plate cover 2 10 7. Automatic threader 7 12 2 Removable extension table/ accessory storage 3 8. Thread cutter 9 5. Stitch length dial 5 11. EN Principal Parts of the Machine 1. Stitch width dial 10.
Thread tension dial 2. Thread take-up lever 3. Presser foot 6. Bobbin stopper 4 11 9. Reverse sewing lever 1 8 4. Pattern selector dial 6 12. Needle plate cover 2 10 7. Automatic threader 7 12 2 Removable extension table/ accessory storage 3 8. Thread cutter 9 5. Stitch length dial 5 11. EN Principal Parts of the Machine 1. Stitch width dial 10.

Instruction Manual
Page 36
...29 2 B Pull threads down the reverse sewing lever (A). Release the lever and the machine will sew forward again. (1) A Removing the Work Turn the handwheel toward you (counterclockwise) to bring the thread take up lever to its highest position, raise the presser foot and remove work behind the needle and ...1 presser foot. (2) Cutting the Thread Pull the threads under and behind the presser foot. Sew a few reverse stitches. EN Reverse Sewing To secure the beginning and the end of a ...
...29 2 B Pull threads down the reverse sewing lever (A). Release the lever and the machine will sew forward again. (1) A Removing the Work Turn the handwheel toward you (counterclockwise) to bring the thread take up lever to its highest position, raise the presser foot and remove work behind the needle and ...1 presser foot. (2) Cutting the Thread Pull the threads under and behind the presser foot. Sew a few reverse stitches. EN Reverse Sewing To secure the beginning and the end of a ...


