Singer 3321 Talent Support Question
Singer 3321 Talent Support Question
Find answers below for this question about Singer 3321 Talent.Need a Singer 3321 Talent manual? We have 1 online manual for this item!
Question posted by glenyseva on August 9th, 2013
Oiling The Machine
I have purchased a Singer 3321 machine but there are no oiling instructions in the manual. can you give me some instructions please?
Current Answers
Related Singer 3321 Talent Manual Pages
Instruction Manual - Page 2

...the like. 10. Do not use outdoors. 13. Do not use bent needles. 8. SAVE THESE INSTRUCTIONS
This sewing machine is not working properly, if it is intended for examination, repair, electrical or mechanical adjustment. 4....its service agent or a similar qualified person in the instruction manual. 11. Never drop or insert any object into water. Do not unplug by the manufacturer...
Instruction Manual - Page 6

EN List of contents
Machine Basics Principle Parts of the Machine...2/4 Connecting Machine to Power Source ...6 Two Step Presser Foot Lifter ...8 Accessories ...9
Threading the Machine Winding the Bobbin...11 Inserting the Bobbin ...13 Threading the Upper Thread ...15 Automatic Needle Threader ...17 Raising the Bobbin Thread ...19 Thread Tension...21
Sewing How to Choose Your Pattern...
Instruction Manual - Page 9
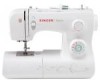
Reverse sewing lever
1
8
4. Needle plate cover
2
10
7. Bobbin stopper
4
11
9. Pattern selector dial
6
12. Automatic threader
7
12
2 Presser foot
6. Removable extension table/ accessory storage
3
8. Thread cutter
9 5. Stitch length dial
5
11. EN Principal Parts of the Machine
1. Thread tension dial
2. Stitch width dial
10. Thread take-up lever
3.
Instruction Manual - Page 11
...
23
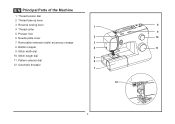
23. Presser foot lifter
24. Bobbin winding spindle
15. Power and light switch
13
18. Foot speed control 25. EN Principal Parts of the Machine
13. Hole for auxiliary spool pin
19
16. Face plate 22. Power cord
17
18
24
25
4
Instruction Manual - Page 13

Co., Ltd. (Vietnam)
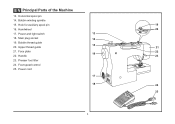
Sewing light Press main switch (A) to install the proper outlet. If it does
not fit fully in the outlet, reverse the plug. Unplug power cord when machine is not in use . Polarized attachment plug b. EN Connecting Machine to Power Source
Connect the machine to be grounded
b 2
6
A 3 If it still does not
fit...
Instruction Manual - Page 16

... with this machine; Cording foot s. Quilting/ straight stitch foot u. Buttonhole foot d. Pack of needles h. Bobbin (3x) j. Hemmer foot r. Blind hem foot t. Darning/ embroidery foot w. Seam ripper/ brush f. Overcasting foot q. Zipper foot c. Spool holders i. Soft cover
Optional accessories (2) (These 10 accessories are , however, available for purchase from your authorized...
Instruction Manual - Page 18

... Bobbin
- Wind thread clockwise around bobbin winder tension discs. (4)
- Hold thread end. (7) 1
-
Please Note:
When the bobbin winder spindle is in "bobbin winding"
position, the machine will not sew and the hand wheel will
not turn.
Instruction Manual - Page 22

... needle to its highest point (1), and continue turning the handwheel counterclockwise until the needle just slightly begins to spool. (2)
- Start by not doing so several sewing problems could result.
- Now pass the thread behind the horizontal thread guide, and then behind the thin wire needle clamp guide (7) and then down right...
Instruction Manual - Page 28

... need to higher number. Lower thread tension
The bobbin tension has been set correctly at the factory, so you will be less than for all sewing will always obtain a nicer
stitch and less fabric puckering when the upper thread
appears on the bottom side of your fabric. A
B
-
A. Turn
dial to adjust...
Instruction Manual - Page 30

...to sew these stretch patterns is a stretch stitch pattern, and information on how to Choose Your Pattern
The diagram on this page display the stitch patterns available on the machine.
...stitch as desired for the project. The Pattern Selector Dial may be turned in either direction. Reverse Sewing Lever b. To select the patterns indicated with the gray color, turn the Pattern Selector Dial. (d)...
Instruction Manual - Page 32

... 6mm; however, the width can be reduced on any patterns. "6". (1) The Stitch Width Dial is also the control for when straight stitching
For straight stitch sewing, turn the Pattern Selector Dial to zig-zag.
The density of stitch length dial while zig-zag stitching
Set the Pattern Selector Dial to the...
Instruction Manual - Page 34

EN Sewing Straight Stitch
To begin sewing, set the machine for straight stitch. (1) Place the fabric under the presser foot with the fabric edge lined up with the desired seam guide line on the needle plate. (2) Lower the presser foot lifter, and then step on the foot controller to start sewing. (3)
1
2
3
27
Instruction Manual - Page 36

Pull threads down
the reverse sewing lever (A). Release the lever and the machine will sew forward again. (1)
A
Removing the Work
Turn the handwheel toward you (counterclockwise) to bring
the thread take up lever .... (2)
Cutting the Thread
Pull the threads under and behind the presser foot. EN Reverse Sewing
To secure the beginning and the end of the face plate and into thread cutter...
Instruction Manual - Page 38

... several stretch patterns, here are indicated with a blue color on the Pattern Selector Dial.
Adjust the Stitch Width Dial to stretch and hardwearing seams.
The machine sews two stitches forward and one stitch backwards.
Used to add triple reinforcement to between "3" and "6". To select these stitches, turn the Stitch Length Dial to...
Instruction Manual - Page 40

...sure the needle touches slightly the folded top to make blind hem sewing even easier, use a blind hem foot, available from your SINGER® retailer. (See page 9
for the weight/type of fabric... and press. 2
Note:
To make sure the machine settings are appropriate for heavier weight fabrics. Blind hem for stretch fabrics. Start to sew slowly on the diagram at a setting appropriate for ...
Instruction Manual - Page 42

... the needle is advisable to another with the center of button and add 0.3 cm
(1/8") for bar tacks to determine this. Always test sew a buttonhole on fabric (a). 3. Take care not to sew the buttonhole. Slightly reducing upper thread tension will produce better
results. - Place fabric under the foot, so that the buttonhole center...
Instruction Manual - Page 44

... goes cleanly into the left and right holes of the button.
Set the machine for straight stitch again, then sew a few securing stitches to the distance between the holes of the fabric. Place the button and fabric under the Button Sewing foot, as needed, according to finish. "6". For buttons with about 10 stitches...
Instruction Manual - Page 50

.... IMPORTANT: Match needle size to 18 (110). Heavy woolen, overcoat fabrics, upholstery fabrics, some Heavy duty thread, carpet thread.
SINGER® 2032 Leather needles. 12 (80) to 18 (110). For best sewing results always use the same thread on natural woven fabrics for best
Heavyweight fabrics-canvas, woolens, outdoor tent and quilted...
Instruction Manual - Page 57

Should there be any problem, consult your authorized SINGER® retailer.
1
B A
C
2
50
Replace bulb with same type rated 10 watts (110-120V area) or 15 watts (220-240V area).
- Replace the face plate and tighten screw. EN Changing the Bulb
Disconnect the machine from the power supply by removing the plug from the...
Instruction Manual - Page 59

...
1. The machine is incorrectly threaded. 3. Thread is caught in the hook.
52
Correction
1. Select a larger needle. 4. Remove and reinsert the bobbin case and pull on the fabric while sewing, let it be lubricated. 2. Insert the needle correctly. (flat side towards the back) 3. Select the correct foot.
1. The needle size must be drawn...
Similar Questions

Oiling H74
Does model H74 need to be oiled? It isn't mentioned under maintenence of the machine in the manual. ...
Does model H74 need to be oiled? It isn't mentioned under maintenence of the machine in the manual. ...
(Posted by Hochh13 1 year ago)

There Is No Mention On Oiling Parts Of Machine In The Manual
Where do I oil this machine there in no mention of where or how in the manual,
Where do I oil this machine there in no mention of where or how in the manual,
(Posted by kpenn714 9 years ago)

Oiling Instructions
The machine manual lacks any oiling instructions. Please provide.
The machine manual lacks any oiling instructions. Please provide.
(Posted by naelrassam 9 years ago)

Singer 3321 Talent
my singer 3321 is missing a part inside to winding spindle.What part is it?Will not spinn...
my singer 3321 is missing a part inside to winding spindle.What part is it?Will not spinn...
(Posted by mariannehansen08 10 years ago)
