Instruction Manual
Page 2
... it has been dropped or damaged, or dropped into any adjustments in the instruction manual. 11. SAVE THESE INSTRUCTIONS This sewing machine is not intended for household use bent needles. 8. Close attention is necessary when this manual. Special care is being administered. 14... appliance with same type rated 10 watts (110-120V area) or 15 watts (220-240V area). Switch the sewing machine off the machine or unplug when the machine is 75dB(A). 17. Use only attachments recommended by persons (including children) with the appliance. Do not unplug by a...
... it has been dropped or damaged, or dropped into any adjustments in the instruction manual. 11. SAVE THESE INSTRUCTIONS This sewing machine is not intended for household use bent needles. 8. Close attention is necessary when this manual. Special care is being administered. 14... appliance with same type rated 10 watts (110-120V area) or 15 watts (220-240V area). Switch the sewing machine off the machine or unplug when the machine is 75dB(A). 17. Use only attachments recommended by persons (including children) with the appliance. Do not unplug by a...

Instruction Manual
Page 6
... Power Source ...6 Two Step Presser Foot Lifter ...8 Accessories ...9 Threading the Machine Winding the Bobbin...11 Inserting the Bobbin...13 Thread Tension...15 Threading the Upper Thread ...17 Automatic Needle Threader ...19 Raising the Bobbin Thread ...... Sewing/ Removing the Work/ Cutting the Thread ...29 Choosing Stretch Stitch Patterns...31 Blind Hem ...33 Sew 1-Step Buttonhole ...35 Sewing on Buttons (Model 3221)...37 Sewing on Buttons (Model 3232)...39 General Information Installing the Removable Accessory Storage ...41 Attaching the Presser Foot Shank ...43 Needle/Fabric/Thread Chart...
... Power Source ...6 Two Step Presser Foot Lifter ...8 Accessories ...9 Threading the Machine Winding the Bobbin...11 Inserting the Bobbin...13 Thread Tension...15 Threading the Upper Thread ...17 Automatic Needle Threader ...19 Raising the Bobbin Thread ...... Sewing/ Removing the Work/ Cutting the Thread ...29 Choosing Stretch Stitch Patterns...31 Blind Hem ...33 Sew 1-Step Buttonhole ...35 Sewing on Buttons (Model 3221)...37 Sewing on Buttons (Model 3232)...39 General Information Installing the Removable Accessory Storage ...41 Attaching the Presser Foot Shank ...43 Needle/Fabric/Thread Chart...
Instruction Manual
Page 9
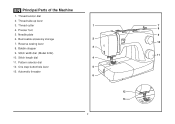
Removable accessory storage 2 7. Stitch length dial 4 11. Automatic threader 6 12 13 2 Presser foot 8 5. Thread take-up lever 3. Thread cutter 1 7 4. Needle plate 9 6. Pattern selector dial 12. Reverse sewing lever 10 8. One step buttonhole lever 5 13. Stitch width dial (Model 3232) 11 10. Bobbin stopper 3 9. EN Principal Parts of the Machine 1. Thread tension dial 2.
Removable accessory storage 2 7. Stitch length dial 4 11. Automatic threader 6 12 13 2 Presser foot 8 5. Thread take-up lever 3. Thread cutter 1 7 4. Needle plate 9 6. Pattern selector dial 12. Reverse sewing lever 10 8. One step buttonhole lever 5 13. Stitch width dial (Model 3232) 11 10. Bobbin stopper 3 9. EN Principal Parts of the Machine 1. Thread tension dial 2.

Instruction Manual
Page 11
Handwheel 15 18. Power cord 18 19 25 26 4 Face plate 23. Foot speed control 26. Power and light switch 21 19. Hole for second spool pin 14 20 17. Handle 24. Presser foot lifter 25. Horizontal spool pin 15. Bobbin thread guide 17 23 21. Main plug socket 16 22 20. EN Principal Parts of the Machine 14. Bobbin winding spindle 16. Upper thread guide 24 22.
Handwheel 15 18. Power cord 18 19 25 26 4 Face plate 23. Foot speed control 26. Power and light switch 21 19. Hole for second spool pin 14 20 17. Handle 24. Presser foot lifter 25. Horizontal spool pin 15. Bobbin thread guide 17 23 21. Main plug socket 16 22 20. EN Principal Parts of the Machine 14. Bobbin winding spindle 16. Upper thread guide 24 22.
Instruction Manual
Page 13
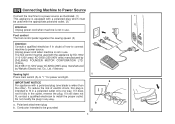
... not in any way. a. To reduce the risk of how to connect machine to power source. Polarized attachment plug b. IMPORTANT NOTICE a For appliance with a polarized plug (one way. Do not modify the plug in ...3 Conductor intended to install the proper outlet. Co., Ltd. (Vietnam) Sewing light 1 Press main switch (A) to " l " for power and light. EN Connecting Machine to Power Source Connect the machine to a power source as illustrated. (1) This appliance is equipped with a polarized plug which must be used with the appropriate polarized outlet. (2) Attention: Unplug...
... not in any way. a. To reduce the risk of how to connect machine to power source. Polarized attachment plug b. IMPORTANT NOTICE a For appliance with a polarized plug (one way. Do not modify the plug in ...3 Conductor intended to install the proper outlet. Co., Ltd. (Vietnam) Sewing light 1 Press main switch (A) to " l " for power and light. EN Connecting Machine to Power Source Connect the machine to a power source as illustrated. (1) This appliance is equipped with a polarized plug which must be used with the appropriate polarized outlet. (2) Attention: Unplug...
Instruction Manual
Page 16
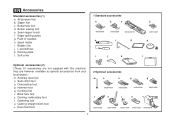
.../ brush f. Bobbin (3x) j. Satin stitch foot o. Hemmer foot q. EN Accessories Standard accessories (1) a. Darning plate l. Cording foot r. All purpose foot b. they are not supplied with this machine;
.../ brush f. Bobbin (3x) j. Satin stitch foot o. Hemmer foot q. EN Accessories Standard accessories (1) a. Darning plate l. Cording foot r. All purpose foot b. they are not supplied with this machine;
Instruction Manual
Page 18
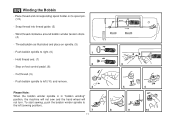
... pedal. (8) - Cut thread. (9) - Push bobbin spindle to the left (10) and remove. 4 Please Note: When the bobbin winder spindle is in "bobbin winding" position, the machine will not sew and the hand wheel will not turn. To start sewing, push the bobbin winder spindle to right. (6) 1 - Place thread and corresponding spool...
... pedal. (8) - Cut thread. (9) - Push bobbin spindle to the left (10) and remove. 4 Please Note: When the bobbin winder spindle is in "bobbin winding" position, the machine will not sew and the hand wheel will not turn. To start sewing, push the bobbin winder spindle to right. (6) 1 - Place thread and corresponding spool...
Instruction Manual
Page 34
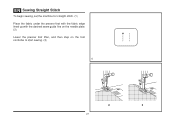
EN Sewing Straight Stitch To begin sewing, set the machine for straight stitch. (1) Place the fabric under the presser foot with the fabric edge lined up with the desired seam guide line on the needle plate. (2) Lower the presser foot lifter, and then step on the foot controller to start sewing. (3) 1 2 3 27
EN Sewing Straight Stitch To begin sewing, set the machine for straight stitch. (1) Place the fabric under the presser foot with the fabric edge lined up with the desired seam guide line on the needle plate. (2) Lower the presser foot lifter, and then step on the foot controller to start sewing. (3) 1 2 3 27
Instruction Manual
Page 36
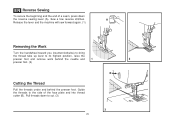
A Release the lever and the machine will sew forward again. (1) Removing the Work Turn the handwheel toward you (counterclockwise) to bring the thread take up lever to the side of a seam, ...
A Release the lever and the machine will sew forward again. (1) Removing the Work Turn the handwheel toward you (counterclockwise) to bring the thread take up lever to the side of a seam, ...
Instruction Manual
Page 38
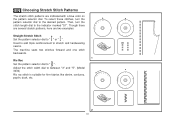
Used to add triple reinforcement to stretch and hardwearing seams. The machine sews two stitches forward and one stitch backwards. 1 Ric Rac Set the pattern selector dial to the indicator marked "S1". EN Choosing Stretch Stitch Patterns ...
Used to add triple reinforcement to stretch and hardwearing seams. The machine sews two stitches forward and one stitch backwards. 1 Ric Rac Set the pattern selector dial to the indicator marked "S1". EN Choosing Stretch Stitch Patterns ...

Instruction Manual
Page 40
... firm fabrics. Generally, a narrower stitch is used for lighter weight fabrics, and a wider stitch is completed and press. 2 Note: To make sure the machine settings are normally sewn with the range shown on curtains, trousers, skirts, etc. Start to sew slowly on the right of the folded fabric. Blind... Hem: Turn up the hem to make blind hem sewing even easier, use a blind hem foot, available from your SINGER® retailer. (See page 9 for part number) 33 Blind hem for stretch fabrics. Set the stitch width dial at the right. Set the ...
... firm fabrics. Generally, a narrower stitch is used for lighter weight fabrics, and a wider stitch is completed and press. 2 Note: To make sure the machine settings are normally sewn with the range shown on curtains, trousers, skirts, etc. Start to sew slowly on the right of the folded fabric. Blind... Hem: Turn up the hem to make blind hem sewing even easier, use a blind hem foot, available from your SINGER® retailer. (See page 9 for part number) 33 Blind hem for stretch fabrics. Set the stitch width dial at the right. Set the ...
Instruction Manual
Page 42
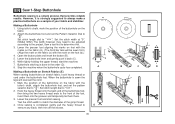
... of the foot, insert them into the grooves and temporarily tie them there. 3. Set stitch length dial to " ". 2. Lower the presser foot and start the machine. 7. When the buttonhole is sewn the legs will be adjusted according to the project, Sew a test first to determine this. 3. However, it back (C). 6. Lower the...
... of the foot, insert them into the grooves and temporarily tie them there. 3. Set stitch length dial to " ". 2. Lower the presser foot and start the machine. 7. When the buttonhole is sewn the legs will be adjusted according to the project, Sew a test first to determine this. 3. However, it back (C). 6. Lower the...
Instruction Manual
Page 46
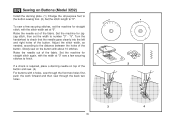
... check that the needle goes cleanly into the left and right holes of the fabric. "5". Turn the handwheel to number "3" - Set the machine for straight stitch again, with the width at "0". Adjust the stitch width, as needed, according to "0". Raise the needle out of the button.... Set the machine for zigzag stitch, then set at "0" sew a few securing stitches, set the machine for straight stitch, with about 10 stitches. EN Sewing on Buttons (Model 3232) Install the darning plate....
... check that the needle goes cleanly into the left and right holes of the fabric. "5". Turn the handwheel to number "3" - Set the machine for straight stitch again, with the width at "0". Adjust the stitch width, as needed, according to "0". Raise the needle out of the button.... Set the machine for zigzag stitch, then set at "0" sew a few securing stitches, set the machine for straight stitch, with about 10 stitches. EN Sewing on Buttons (Model 3232) Install the darning plate....
Instruction Manual
Page 59
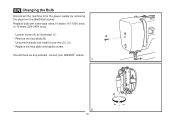
Loosen screw (A) as illustrated. (1) - B A Should there be any problem, consult your SINGER® retailer. 1 C 2 52 Replace bulb with same type rated 10 watts (110-120V area) or 15 watts (220-240V area). - Replace the face plate and tighten screw. Unscrew the bulb and install a new one (C). (2) - EN Changing the Bulb Disconnect the machine from the power supply by removing the plug from the electrical socket! Remove the face plate (B). -
Loosen screw (A) as illustrated. (1) - B A Should there be any problem, consult your SINGER® retailer. 1 C 2 52 Replace bulb with same type rated 10 watts (110-120V area) or 15 watts (220-240V area). - Replace the face plate and tighten screw. Unscrew the bulb and install a new one (C). (2) - EN Changing the Bulb Disconnect the machine from the power supply by removing the plug from the electrical socket! Remove the face plate (B). -
Instruction Manual
Page 61
...not inserted correctly. 5. Select the correct foot. 1. Check the threading. 2. Thread is wound around the spool holder pin. 6. Rethread the machine. 2. Insert a new needle. 2. Clean the hook and feed dog as described. 1. The thread is caught in the hook. Loosen .... 3. Reduce the thread tension. (lower number) 3. Replace the needle. 1. Thread the bobbin case as illustrated. 3. Only use good quality sewing machine oil. 4. Check both bobbin and bobbin case. 3. The needle is damaged. 4. Select a larger needle. 4. Fabric has been pulled. 1. The...
...not inserted correctly. 5. Select the correct foot. 1. Check the threading. 2. Thread is wound around the spool holder pin. 6. Rethread the machine. 2. Insert a new needle. 2. Clean the hook and feed dog as described. 1. The thread is caught in the hook. Loosen .... 3. Reduce the thread tension. (lower number) 3. Replace the needle. 1. Thread the bobbin case as illustrated. 3. Only use good quality sewing machine oil. 4. Check both bobbin and bobbin case. 3. The needle is damaged. 4. Select a larger needle. 4. Fabric has been pulled. 1. The...


