Instruction Manual
Page 3
... Position Selector 3.18. Spool Cap Usage 3.23. Anti-Spill Sleeve Usage 3.24. Fittings for Hem Sewing 3.27. Safety Instructions 1.1. Needle and Thread 3.6. Stitch Width Regulator 3.19. Instruction Manual and Parts List 4 4 5 6 6 7 8 8 9 9 10 11 11 13 13 ...23 24 25 26 26 29 29 30 Belt Cover Installation 3.4. Bobbin Thread Tension Adjustment 3.17. Lubrication 3.5. Machine Threading 3.12. Presser Foot Pressure Adjustment 3.14. Safe Operation 2. Needle Thread Tension Adjustment 3.15. Knee Lifter Installation 3.25. Product Description and Machine...
... Position Selector 3.18. Spool Cap Usage 3.23. Anti-Spill Sleeve Usage 3.24. Fittings for Hem Sewing 3.27. Safety Instructions 1.1. Needle and Thread 3.6. Stitch Width Regulator 3.19. Instruction Manual and Parts List 4 4 5 6 6 7 8 8 9 9 10 11 11 13 13 ...23 24 25 26 26 29 29 30 Belt Cover Installation 3.4. Bobbin Thread Tension Adjustment 3.17. Lubrication 3.5. Machine Threading 3.12. Presser Foot Pressure Adjustment 3.14. Safe Operation 2. Needle Thread Tension Adjustment 3.15. Knee Lifter Installation 3.25. Product Description and Machine...
Instruction Manual
Page 4
... 55 57 Safety Inspection 5. Arm Shaft (upright) and Rotating Hook Drive Shaft Components 6.7. Hook and Bobbin Case Components 6.8. Accessories and Attachments 6.12. Troubleshooting 6. Thread Stand Components 6.13. Thread Take-up, Arm Shaft and Handwheel Components 6.3. Face Plate, Arm Top Cover and Arm Side Cover Components 6.2. Zigzag Triangular Cam and Hook Advancing Crank...
... 55 57 Safety Inspection 5. Arm Shaft (upright) and Rotating Hook Drive Shaft Components 6.7. Hook and Bobbin Case Components 6.8. Accessories and Attachments 6.12. Troubleshooting 6. Thread Stand Components 6.13. Thread Take-up, Arm Shaft and Handwheel Components 6.3. Face Plate, Arm Top Cover and Arm Side Cover Components 6.2. Zigzag Triangular Cam and Hook Advancing Crank...
Instruction Manual
Page 5
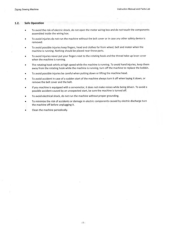
... • Before running the machine, make sure all basic safety instructions which are adequate to the items following situations arise: o Passing the thread by unauthorized changes in your safety, goggles must be used running the machine. • In case of lubricant oil contact with the eyes or... and use should not be made by properly trained personnel. • For your country. • The machine should be followed. • Singer will not be held responsible for any damage caused by the needle or replacing the bobbin or looper. o When the operator is in its ...
... • Before running the machine, make sure all basic safety instructions which are adequate to the items following situations arise: o Passing the thread by unauthorized changes in your safety, goggles must be used running the machine. • In case of lubricant oil contact with the eyes or... and use should not be made by properly trained personnel. • For your country. • The machine should be followed. • Singer will not be held responsible for any damage caused by the needle or replacing the bobbin or looper. o When the operator is in its ...
Instruction Manual
Page 6
... remove the belt cover and the belt. • If you machine is running , turn the machine off the machine to the rotating hook and the thread take-up lever cover when the machine is running. • The rotating hook whirls at high speed while the machine is running . To avoid hand...
... remove the belt cover and the belt. • If you machine is running , turn the machine off the machine to the rotating hook and the thread take-up lever cover when the machine is running. • The rotating hook whirls at high speed while the machine is running . To avoid hand...
Instruction Manual
Page 8
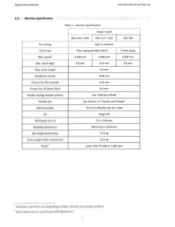
...Singer model For sewing Stitch type 20U-109 / 109C 20U-112 / 112C Light to DIN 4563-45-A 1. stitch length 5.0 mm Needle bar stroke 34.8 mm Presser bar lift (manual) 6.35 mm Presser bar lift (knee lifter) 9.0 mm Needle catalog (needle system) Cat. 1910-05 (135x9) Needle size See Section 3.5 "Needle and Thread..." Machine pulley 74.0 mm effective dia. Zigzag Sewing Machine Instruction Manual and Parts List 2.2. for v-belt Oil Singer Oil Workspace (w x h) 211 x 130 mm Bedplate dimensions 399.0 mm...
...Singer model For sewing Stitch type 20U-109 / 109C 20U-112 / 112C Light to DIN 4563-45-A 1. stitch length 5.0 mm Needle bar stroke 34.8 mm Presser bar lift (manual) 6.35 mm Presser bar lift (knee lifter) 9.0 mm Needle catalog (needle system) Cat. 1910-05 (135x9) Needle size See Section 3.5 "Needle and Thread..." Machine pulley 74.0 mm effective dia. Zigzag Sewing Machine Instruction Manual and Parts List 2.2. for v-belt Oil Singer Oil Workspace (w x h) 211 x 130 mm Bedplate dimensions 399.0 mm...

Instruction Manual
Page 14
... 18 - 19 (110 - 120) Needle catalog (Needle system) 1910-05 (135x9) * or an equivalent size of other types of proper needle and thread sizes to be cut off the machine. • Do not operate the machine without the finger guard '2' (see Figure 8) Insert the needle in the ...before attaching the needle. 3.6. No. 1910-05 needle system (135x9) only. Raise needle bar to the table below Model Application Light weight materials 20U-109 / 109C / 112 / 112C / 309 Medium weight materials Mid-heavy weight materials Max. Make sure its highest position by turning hand wheel toward...
... 18 - 19 (110 - 120) Needle catalog (Needle system) 1910-05 (135x9) * or an equivalent size of other types of proper needle and thread sizes to be cut off the machine. • Do not operate the machine without the finger guard '2' (see Figure 8) Insert the needle in the ...before attaching the needle. 3.6. No. 1910-05 needle system (135x9) only. Raise needle bar to the table below Model Application Light weight materials 20U-109 / 109C / 112 / 112C / 309 Medium weight materials Mid-heavy weight materials Max. Make sure its highest position by turning hand wheel toward...
Instruction Manual
Page 16
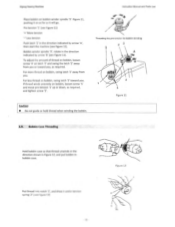
... (see Figure 11). Pre tension '1' (see Figure 11) '+' More tension '-' Less tension Push latch '2' in bobbin case. Bobbin Case Threading Hold bobbin case so that thread unwinds in the direction shown in Figure 12, and put bobbin in the direction indicated by arrow 'B' (see Figure 13) 15 • ...For less thread on latch '2' and swing the latch '2' away from you . Zigzag Sewing Machine Instruction Manual and Parts List Place bobbin on bobbin, loosen ...
... (see Figure 11). Pre tension '1' (see Figure 11) '+' More tension '-' Less tension Push latch '2' in bobbin case. Bobbin Case Threading Hold bobbin case so that thread unwinds in the direction shown in Figure 12, and put bobbin in the direction indicated by arrow 'B' (see Figure 13) 15 • ...For less thread on latch '2' and swing the latch '2' away from you . Zigzag Sewing Machine Instruction Manual and Parts List Place bobbin on bobbin, loosen ...

Instruction Manual
Page 17
Zigzag Sewing Machine Instruction Manual and Parts List Figure 13 Draw thread out from bobbin. Allow about 4 inches of thread to hang freely from slot '2' on end of spring '1', (Figure 14) and pass it through bobbin case thread guide '1' of Figure 15. - 16 - Figure 14 Figure 15 Note: • When straight stitching, a better result can be obtained if bobbin thread is not threaded through bobbin case thread guide '1', Figure 15.
Zigzag Sewing Machine Instruction Manual and Parts List Figure 13 Draw thread out from bobbin. Allow about 4 inches of thread to hang freely from slot '2' on end of spring '1', (Figure 14) and pass it through bobbin case thread guide '1' of Figure 15. - 16 - Figure 14 Figure 15 Note: • When straight stitching, a better result can be obtained if bobbin thread is not threaded through bobbin case thread guide '1', Figure 15.

Instruction Manual
Page 19
Machine Threading Instruction Manual and Parts List 6 i / a co i -# ( G Figure 17 Lead thread from the thread unwinder through all the threading points in the order shown in Figure 17 Thread the needle from front to back, as show in Figure 17 Draw about 3 inches of thread through eye of needle. Caution: • Switch off the machine. • Do not operate the machine without thread take-up guard. • Do not operate the machine without finger guard. -18- Zigzag Sewing Machine 3.11.
Machine Threading Instruction Manual and Parts List 6 i / a co i -# ( G Figure 17 Lead thread from the thread unwinder through all the threading points in the order shown in Figure 17 Thread the needle from front to back, as show in Figure 17 Draw about 3 inches of thread through eye of needle. Caution: • Switch off the machine. • Do not operate the machine without thread take-up guard. • Do not operate the machine without finger guard. -18- Zigzag Sewing Machine 3.11.
Instruction Manual
Page 21
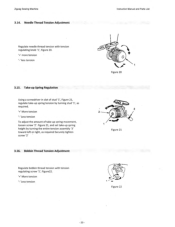
... spring height by turning stud '1', as required Securely tighten screw '2' 3.16. Figure 21 Figure 22 -20- Zigzag Sewing Machine 3.14. Needle Thread Tension Adjustment Instruction Manual and Parts List Regulate needle thread tension with tension regulating screw '1', Figure22. '+' More tension Less tension (0 Figure 20 2 3 -- Take-up Spring Regulation Using a screwdriver in slot...
... spring height by turning stud '1', as required Securely tighten screw '2' 3.16. Figure 21 Figure 22 -20- Zigzag Sewing Machine 3.14. Needle Thread Tension Adjustment Instruction Manual and Parts List Regulate needle thread tension with tension regulating screw '1', Figure22. '+' More tension Less tension (0 Figure 20 2 3 -- Take-up Spring Regulation Using a screwdriver in slot...

Instruction Manual
Page 26
Sig 5 Figure 31 - 25 - Forcing it onto the spool pin may result in breaking the slotted spigot of the spool cap (see Figure 31). Set height of spool rest so there is approximately 2.0 mm clearance between top end of spool pin and the tip of the slotted spigot of the spool cap (see Figure 31) The spool cap should never be fitted on the spool pin '5'. Zigzag Sewing Machine 3.22_ Spool Cap Usage Instruction Manual and Parts List When using a reel type thread spool, fit the spool cap '1' supplied with the machine onto the thread spool '3' (see Figure 31).
Sig 5 Figure 31 - 25 - Forcing it onto the spool pin may result in breaking the slotted spigot of the spool cap (see Figure 31). Set height of spool rest so there is approximately 2.0 mm clearance between top end of spool pin and the tip of the slotted spigot of the spool cap (see Figure 31) The spool cap should never be fitted on the spool pin '5'. Zigzag Sewing Machine 3.22_ Spool Cap Usage Instruction Manual and Parts List When using a reel type thread spool, fit the spool cap '1' supplied with the machine onto the thread spool '3' (see Figure 31).

Instruction Manual
Page 27
Zigzag Sewing Machine 3.23. Knee Lifter Installation Knee lifter mounting Fasten knee lifter bracket '1' to underside of table '2' 145mm from the bottom of cone '1' leaving the thread end to hang free at the top of antispill sleeve '2' as shown in Figure 32 3.24. Anti-Spill Sleeve Usage When using synthetic threads that easily spill off the cone '1', slip the anti-pill sleeve '2' furnished with the machine over the thread from table cut-out as shown in Figure 33 Instruction Manual and Parts List 2 Figure 32 145 mm ti 1 2 Figure 33 -26-
Zigzag Sewing Machine 3.23. Knee Lifter Installation Knee lifter mounting Fasten knee lifter bracket '1' to underside of table '2' 145mm from the bottom of cone '1' leaving the thread end to hang free at the top of antispill sleeve '2' as shown in Figure 32 3.24. Anti-Spill Sleeve Usage When using synthetic threads that easily spill off the cone '1', slip the anti-pill sleeve '2' furnished with the machine over the thread from table cut-out as shown in Figure 33 Instruction Manual and Parts List 2 Figure 32 145 mm ti 1 2 Figure 33 -26-

Instruction Manual
Page 33
... knots? 7. Remove lint & fluff from bobbin case & hook 10. Connect plug to feed Fabric puckers 20. Correct needle threading Needle thread breaks 2. Is feed regulating dial properly adjusted? 21. Is there any lint in sewing even after making adjustments, contact your ... turned on power switch 29. Select proper needle size S, thread 7. Check whether bobbin thread is encountered, check and make adjustments as follows. Correct needle threading 24. Is thread tension too tight? 25. Adjust needle thread tension 4. Insert new needle 14. Do not pull fabric...
... knots? 7. Remove lint & fluff from bobbin case & hook 10. Connect plug to feed Fabric puckers 20. Correct needle threading Needle thread breaks 2. Is feed regulating dial properly adjusted? 21. Is there any lint in sewing even after making adjustments, contact your ... turned on power switch 29. Select proper needle size S, thread 7. Check whether bobbin thread is encountered, check and make adjustments as follows. Correct needle threading 24. Is thread tension too tight? 25. Adjust needle thread tension 4. Insert new needle 14. Do not pull fabric...

Instruction Manual
Page 35
Zigzag Sewing Machine No. Part No. 1 554113-383 2 606407 3 606395 4 606632 5 606633 6 606634 7 554118-385 8 606635 9 606433 601433 10 606636 11 606454 12 606637 13 606638 GO207-8 14 606452 15 606453 16 606449 17 606451 GS272-8 18 606439 19 550032 20 544208-005 21 606447 22 606448 GZ202-8 23 606446 24 544208-005 25 606639 GR482/6-8 26 606440 27 606442 28 606441 29 606443 GL162-8 30 606439 31 606602 32 606398 GT150-8 33 606397 34 554128 35 554144 36 544212-001 37 Gl
Zigzag Sewing Machine No. Part No. 1 554113-383 2 606407 3 606395 4 606632 5 606633 6 606634 7 554118-385 8 606635 9 606433 601433 10 606636 11 606454 12 606637 13 606638 GO207-8 14 606452 15 606453 16 606449 17 606451 GS272-8 18 606439 19 550032 20 544208-005 21 606447 22 606448 GZ202-8 23 606446 24 544208-005 25 606639 GR482/6-8 26 606440 27 606442 28 606441 29 606443 GL162-8 30 606439 31 606602 32 606398 GT150-8 33 606397 34 554128 35 554144 36 544212-001 37 Gl

Instruction Manual
Page 36
Zigzag Sewing Machine 6.2. Thread Take-up, Arm Shaft and Handwheel Components Instruction Manual and Parts List 15 2 14 w 13 .1 7 8 10 12 9 CI1ES1Z!--1:1R1 24 18 20 ("4 20 0*, 29 21 .\12733 35 23 a 4 44 19 26 16 17 42 39 40 38 - 35 -
Zigzag Sewing Machine 6.2. Thread Take-up, Arm Shaft and Handwheel Components Instruction Manual and Parts List 15 2 14 w 13 .1 7 8 10 12 9 CI1ES1Z!--1:1R1 24 18 20 ("4 20 0*, 29 21 .\12733 35 23 a 4 44 19 26 16 17 42 39 40 38 - 35 -

Instruction Manual
Page 52
Presser Bar Lifter and Thread Tension Components Instruction Manual and Parts List 8 23 sat 12 18. C) 15 17 b 20 21 CCiZb C44 4 14 22 ti tC,is 1 10 j 11 2 ' CD 27 24 26 28 29 27 30 31 - 51 - Zigzag Sewing Machine 6.10.
Presser Bar Lifter and Thread Tension Components Instruction Manual and Parts List 8 23 sat 12 18. C) 15 17 b 20 21 CCiZb C44 4 14 22 ti tC,is 1 10 j 11 2 ' CD 27 24 26 28 29 27 30 31 - 51 - Zigzag Sewing Machine 6.10.

Instruction Manual
Page 53
...Lever Tension Release Lever Screw Spring Tension Release Lever Screw Thread Retainer Thread Retainer Screw Thread Guide Thread Guide Screw Thread Guard Pin Tension Assembly Tension Disc Tension Releasing Disc Tension Release Pin Tension Spring Thread Take-up Spring Tension Base Assembly Tension Securing Screw ...Tension Stud Thumb Nut Thumb Nut Washer Set Screw Lifting Lever Hinge Screw Connecting Rod Connecting Rod Pin Connecting Rod Connecting Rod Pin Bell Crank Assembly Screw Instruction Manual and Parts List Quantity 109...
...Lever Tension Release Lever Screw Spring Tension Release Lever Screw Thread Retainer Thread Retainer Screw Thread Guide Thread Guide Screw Thread Guard Pin Tension Assembly Tension Disc Tension Releasing Disc Tension Release Pin Tension Spring Thread Take-up Spring Tension Base Assembly Tension Securing Screw ...Tension Stud Thumb Nut Thumb Nut Washer Set Screw Lifting Lever Hinge Screw Connecting Rod Connecting Rod Pin Connecting Rod Connecting Rod Pin Bell Crank Assembly Screw Instruction Manual and Parts List Quantity 109...
Instruction Manual
Page 55
... Unwinder Spool Cap Thread Unwinder Spool Net Drip Pan Drip Pan Nail Knee Lifter Assembly Knee Lifter Assembly Machine Hinge Machine Hinge Cushion Machine Cushion Nail Quantity 109 109C 112 112C 309 1 1 1 1 1 3 3 3 3 3 1 1 1 1 1 1 1 1 1 1 1 1 1 1 1 1 1 1 1 1 1 1 1 1 1 1 1 1 2 2 2 2 2 1 1 1 1 1 1 1 1 1 1 1 1 1 1 1 1 1 1 1 1 1 1 1 1 2 2 2 2 2 2 2 2 1 1 1 1 1 4 4 4 4 4 1 1 1 1 1 2 2 2 2 1 2 2 2 2 1 4 4 4 4 1 6 6 6 6 1 - 54 - Zigzag Sewing Machine Instruction Manual and Parts List No...
... Unwinder Spool Cap Thread Unwinder Spool Net Drip Pan Drip Pan Nail Knee Lifter Assembly Knee Lifter Assembly Machine Hinge Machine Hinge Cushion Machine Cushion Nail Quantity 109 109C 112 112C 309 1 1 1 1 1 3 3 3 3 3 1 1 1 1 1 1 1 1 1 1 1 1 1 1 1 1 1 1 1 1 1 1 1 1 1 1 1 1 2 2 2 2 2 1 1 1 1 1 1 1 1 1 1 1 1 1 1 1 1 1 1 1 1 1 1 1 1 2 2 2 2 2 2 2 2 1 1 1 1 1 4 4 4 4 4 1 1 1 1 1 2 2 2 2 1 2 2 2 2 1 4 4 4 4 1 6 6 6 6 1 - 54 - Zigzag Sewing Machine Instruction Manual and Parts List No...

Instruction Manual
Page 56
Zigzag Sewing Machine 6.12. Thread stand components 10 --C Instruction Manual and Parts List Cs o -• , a-421 1. (142) - -
Zigzag Sewing Machine 6.12. Thread stand components 10 --C Instruction Manual and Parts List Cs o -• , a-421 1. (142) - -

Instruction Manual
Page 57
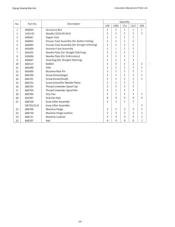
... Rubber cap 3 10131008 Spool post (lower) 4 10131009 Spool post (upper) 5 10112039 Spool post joint 6 10112040 Spool arm (upper) 7 10112041 Spool arm (lower) 8 504013 Screw 9 10113010 Thread guide 10 10131010 Spool pin 11 10128009 Spring washer 12 10128002 Washer 13 101516006 Nut 14 10111013 Spool rest 15 10111014 Spool retainer 16 10128010...
... Rubber cap 3 10131008 Spool post (lower) 4 10131009 Spool post (upper) 5 10112039 Spool post joint 6 10112040 Spool arm (upper) 7 10112041 Spool arm (lower) 8 504013 Screw 9 10113010 Thread guide 10 10131010 Spool pin 11 10128009 Spring washer 12 10128002 Washer 13 101516006 Nut 14 10111013 Spool rest 15 10111014 Spool retainer 16 10128010...


