
Instruction Manual
Page 3
...ventilation openings of lint, dust, and loose cloth. 5. Never drop or insert any object into water. SAVE THESE INSTRUCTIONS This sewing machine is used as threading needle, changing needle, threading bobbin, changing presser foot or changing the light. 10. IMPORTANT SAFETY INSTRUCTIONS When...as contained in the needle area, such as a toy. WARNING -To reduce the risk of electrical shock: 1. Always unplug sewing machine from all instructions before cleaning. An appliance should be used by persons (including children) with any other user servicing adjustments mentioned ...
...ventilation openings of lint, dust, and loose cloth. 5. Never drop or insert any object into water. SAVE THESE INSTRUCTIONS This sewing machine is used as threading needle, changing needle, threading bobbin, changing presser foot or changing the light. 10. IMPORTANT SAFETY INSTRUCTIONS When...as contained in the needle area, such as a toy. WARNING -To reduce the risk of electrical shock: 1. Always unplug sewing machine from all instructions before cleaning. An appliance should be used by persons (including children) with any other user servicing adjustments mentioned ...

Instruction Manual
Page 4
... buttons (see page 26/27/28 2 Selection buttons (see page 29/30 3 LCD SCREEN 4-5 PATTERN CHART 6-7 ACCESSORIES 8 CONNECTING THE MACHINE TO THE POWER SOURCE 9 Connecting the machine 9 WINDING THE BOBBIN 10-11 Bobbin winding 10-11 INSERTING THE BOBBIN 12 THREADING THE UPPER THREAD 13-14 USING THE NEEDLE... THREADER 15 DRAWING UP THE LOWER THREAD 16 CUTTING THE THREAD 16 TWO-STEP PRESSER FOOT LIFTER 17 STARTING SEWING 18 Start/stop ...
... buttons (see page 26/27/28 2 Selection buttons (see page 29/30 3 LCD SCREEN 4-5 PATTERN CHART 6-7 ACCESSORIES 8 CONNECTING THE MACHINE TO THE POWER SOURCE 9 Connecting the machine 9 WINDING THE BOBBIN 10-11 Bobbin winding 10-11 INSERTING THE BOBBIN 12 THREADING THE UPPER THREAD 13-14 USING THE NEEDLE... THREADER 15 DRAWING UP THE LOWER THREAD 16 CUTTING THE THREAD 16 TWO-STEP PRESSER FOOT LIFTER 17 STARTING SEWING 18 Start/stop ...

Instruction Manual
Page 5
...46 Inserting a lapped zipper 47 NARROW HEMMING 48 CORDING 49 Single cording 49 Triple cording 49 SATIN STITCH SEWING 50 EDGE/QUILTING GUIDE 51 GATHERING 52 SMOCKING 53 FREE MOTION SEWING 54-55 Darning 54 Embroidery 55 Monogramming 55 WALKING FOOT 56 FAGOTING 57 DECORATIVE TOPSTITCHING 57 SCALLOP STITCH 58... display 66 Instruction animation message display 66 Warning beeping sound 67 BUZZER SOUND 68 MAINTENANCE 69-70 Cleaning the screen 69 Cleaning the sewing machine surface 69 Cleaning the hook 69-70 TROUBLE SHOOTING GUIDE 71-72 STITCH ADJUSTMENT REFERENCE CHART 73-78
...46 Inserting a lapped zipper 47 NARROW HEMMING 48 CORDING 49 Single cording 49 Triple cording 49 SATIN STITCH SEWING 50 EDGE/QUILTING GUIDE 51 GATHERING 52 SMOCKING 53 FREE MOTION SEWING 54-55 Darning 54 Embroidery 55 Monogramming 55 WALKING FOOT 56 FAGOTING 57 DECORATIVE TOPSTITCHING 57 SCALLOP STITCH 58... display 66 Instruction animation message display 66 Warning beeping sound 67 BUZZER SOUND 68 MAINTENANCE 69-70 Cleaning the screen 69 Cleaning the sewing machine surface 69 Cleaning the hook 69-70 TROUBLE SHOOTING GUIDE 71-72 STITCH ADJUSTMENT REFERENCE CHART 73-78

Instruction Manual
Page 6
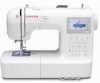
PRINCIPAL PARTS OF THE MACHINE Tension dial Face plate Operation buttons A Thread cutter Buttonhole lever Auto needle threader Needle plate cover Sewing table and accessory box Hole for second spool pin Handwheel Main power switch Power cord socket Foot controller connector 1 Bobbin winder spindle Speed limiting adjustment lever LCD screen B Function buttons C Selection buttons B Function buttons Pattern plates Horizontal spool pin Handle Presser foot lifter Drop feed lever
PRINCIPAL PARTS OF THE MACHINE Tension dial Face plate Operation buttons A Thread cutter Buttonhole lever Auto needle threader Needle plate cover Sewing table and accessory box Hole for second spool pin Handwheel Main power switch Power cord socket Foot controller connector 1 Bobbin winder spindle Speed limiting adjustment lever LCD screen B Function buttons C Selection buttons B Function buttons Pattern plates Horizontal spool pin Handle Presser foot lifter Drop feed lever

Instruction Manual
Page 7
... to stop . 4. Function buttons (see page 24/25) 1. Start/stop the machine. 2. Mode selection button Press this button to start or stop button Press this button to sew stitches in selected position until button is pressed again. Needle up/down position button Press.... 6. Stitch width adjustment buttons Press this button to adjust the width of the current patterns and automatically stop in reverse or sew reinforcement stitches at the end of the zigzag stitch. 2 MACHINE CONTROL BUTTONS 15 4 3 2 1 6 START STOP 12 11 1 2 3 4 5 6 7 8 9 0 5 7 13 8 14 9 10 A. ...
... to stop . 4. Function buttons (see page 24/25) 1. Start/stop the machine. 2. Mode selection button Press this button to start or stop button Press this button to sew stitches in selected position until button is pressed again. Needle up/down position button Press.... 6. Stitch width adjustment buttons Press this button to adjust the width of the current patterns and automatically stop in reverse or sew reinforcement stitches at the end of the zigzag stitch. 2 MACHINE CONTROL BUTTONS 15 4 3 2 1 6 START STOP 12 11 1 2 3 4 5 6 7 8 9 0 5 7 13 8 14 9 10 A. ...

Instruction Manual
Page 8
Edit button Press this button to enter or store the created pattern combination in the memory. 13. Memory button Press this button to change the sewing speed. 3 Speed limiting adjustment lever Slide this button. Elongation button Pattern 28 to 51 can be elongated up to five times its normal length by ... range when using the twin needle to direct pattern or press number buttons of the stitch. 8. Direct pattern selection and number buttons Instant access to sew. 9. MACHINE CONTROL BUTTONS 7. Twin needle button Press this button will clear it. 14.
Edit button Press this button to enter or store the created pattern combination in the memory. 13. Memory button Press this button to change the sewing speed. 3 Speed limiting adjustment lever Slide this button. Elongation button Pattern 28 to 51 can be elongated up to five times its normal length by ... range when using the twin needle to direct pattern or press number buttons of the stitch. 8. Direct pattern selection and number buttons Instant access to sew. 9. MACHINE CONTROL BUTTONS 7. Twin needle button Press this button will clear it. 14.

Instruction Manual
Page 13
... Spool holders (L & S) R12373209(L) TA10943209(S) Edge/quilting guide 006008001 Bobbin (3x) 006084009 Screwdriver (L & S) 006012008 Pack of needles 006014148 Spool pin felt 006015009 Second spool pin R60033209 Sewing machine dust cover 020L008000 Extension table H1A1464209 Optional Cording foot M 006813008 Rolled hem foot K 006900008 Quilting foot P 006916008 Darning/ Embroidery foot 006016008 Gathering foot 006917008...
... Spool holders (L & S) R12373209(L) TA10943209(S) Edge/quilting guide 006008001 Bobbin (3x) 006084009 Screwdriver (L & S) 006012008 Pack of needles 006014148 Spool pin felt 006015009 Second spool pin R60033209 Sewing machine dust cover 020L008000 Extension table H1A1464209 Optional Cording foot M 006813008 Rolled hem foot K 006900008 Quilting foot P 006916008 Darning/ Embroidery foot 006016008 Gathering foot 006917008...

Instruction Manual
Page 14
...the voltage and frequency shown on the machine is conforming with your electrical power. Turn on a stable surface. 1. Do not modify the plug in use and before inserting or removing parts. Connect the power line cord to the electric outlet. 3. The sewing lamp will fit in the outlet, reverse... the plug. Place machine on the power switch. 4. Connect the power line plug to the machine by inserting the 2-hole plug into the power cord socket. 2. If the plug...
...the voltage and frequency shown on the machine is conforming with your electrical power. Turn on a stable surface. 1. Do not modify the plug in use and before inserting or removing parts. Connect the power line cord to the electric outlet. 3. The sewing lamp will fit in the outlet, reverse... the plug. Place machine on the power switch. 4. Connect the power line plug to the machine by inserting the 2-hole plug into the power cord socket. 2. If the plug...

Instruction Manual
Page 16
... the bobbin winder switch to the left , which is placed on the LCD screen. Stop the machine. WINDING THE BOBBIN 6 When the bobbin winder spindle is pushed to the right, which is the 6 "sewing position". 7 Hold the thread tail securely in one hand. 7 8 Press the Start/stop button or the foot ... the bobbin. 10 Please Note: When the bobbin winder switch is the "bobbin winding position", the symbol " " appears on the right, "bobbin winding position", the machine will not sew and the handwheel will disappear from the LCD screen when the bobbin winder spindle is pushed to the left...
... the bobbin winder switch to the left , which is placed on the LCD screen. Stop the machine. WINDING THE BOBBIN 6 When the bobbin winder spindle is pushed to the right, which is the 6 "sewing position". 7 Hold the thread tail securely in one hand. 7 8 Press the Start/stop button or the foot ... the bobbin. 10 Please Note: When the bobbin winder switch is the "bobbin winding position", the symbol " " appears on the right, "bobbin winding position", the machine will not sew and the handwheel will disappear from the LCD screen when the bobbin winder spindle is pushed to the left...

Instruction Manual
Page 23
.../Stop button can control the sewing speed. The machine will limit the maximum speed of the speed limiting adjustment lever will run the machine when the foot controller is unplugged from the machine. Foot control With the sewing machine turned off, insert the foot control plug into its connector on the sewing machine, and then slowly depress the...
.../Stop button can control the sewing speed. The machine will limit the maximum speed of the speed limiting adjustment lever will run the machine when the foot controller is unplugged from the machine. Foot control With the sewing machine turned off, insert the foot control plug into its connector on the sewing machine, and then slowly depress the...

Instruction Manual
Page 28
...side of the shaft should be in order to raise the feed dogs. 23 Damaged points RAISE OR LOWER THE FEED DOGS With the sewing table off ("O") position when carrying out any of the operations shown below. B. Make a complete turn the handwheel, even if the lever...problems. Insert the needle following the illustrated instructions. Problems can be seen on the base in back of the sewing machine. REPLACING THE NEEDLE B A Attention: Turn power switch of off the machine, the feed dogs adjustment lever can occur with: - Needles must be towards the back. Blunt needles -...
...side of the shaft should be in order to raise the feed dogs. 23 Damaged points RAISE OR LOWER THE FEED DOGS With the sewing table off ("O") position when carrying out any of the operations shown below. B. Make a complete turn the handwheel, even if the lever...problems. Insert the needle following the illustrated instructions. Problems can be seen on the base in back of the sewing machine. REPLACING THE NEEDLE B A Attention: Turn power switch of off the machine, the feed dogs adjustment lever can occur with: - Needles must be towards the back. Blunt needles -...

Instruction Manual
Page 36
... end of a seam. Press the reverse button and sew 4-5 stitches. SEWING TIPS Sewing corners 3 2 1 4 Reverse Free arm 1. Lower the needle into the fabric 5 manually or by pressing the needle up/ down button once. 3. Stop the sewing machine when you reach a corner. 2. Free-arm sewing is convenient for sewing tubular areas such as a pivot and turn the fabric...
... end of a seam. Press the reverse button and sew 4-5 stitches. SEWING TIPS Sewing corners 3 2 1 4 Reverse Free arm 1. Lower the needle into the fabric 5 manually or by pressing the needle up/ down button once. 3. Stop the sewing machine when you reach a corner. 2. Free-arm sewing is convenient for sewing tubular areas such as a pivot and turn the fabric...

Instruction Manual
Page 59
Move the drop feed lever to the presser foot holder bar. Movement of the fabric is accomplished without the sewing machine internal feed system. Overlap the outline stitching at each end of the area, keeping the lines of the hole to secure the threads....of stitching. 54 Press the darning foot on firmly from behind the needle clamp screw (b). FREE MOTION SEWING 1 5 3.5~5.0 a b ab a b c * The Darning foot is necessary to coordinate sewing speed and movement of fabric. First sew around the edges of stitching closely spaced and even in length. " to lower the Remove the presser...
Move the drop feed lever to the presser foot holder bar. Movement of the fabric is accomplished without the sewing machine internal feed system. Overlap the outline stitching at each end of the area, keeping the lines of the hole to secure the threads....of stitching. 54 Press the darning foot on firmly from behind the needle clamp screw (b). FREE MOTION SEWING 1 5 3.5~5.0 a b ab a b c * The Darning foot is necessary to coordinate sewing speed and movement of fabric. First sew around the edges of stitching closely spaced and even in length. " to lower the Remove the presser...

Instruction Manual
Page 61
Your sewing machine offers excellent stitch quality 1 on your machine. Replace and tighten (clockwise) the presser bar attaching screw. - It also helps to prevent uneven feeding of difficult or napped fabrics, such as c follows: - b 33 Attach the Walking foot to sew first without the walking foot accessory.... 56 WALKING FOOT 1 * The Walking foot is fitted onto the presser foot bar. - Please Note: Always try to the machine as velvet or corduroy. 11 Lift the presser foot lifter to multiple layers of fabrics from delicate chiffons to raise the 2 presser foot...
Your sewing machine offers excellent stitch quality 1 on your machine. Replace and tighten (clockwise) the presser bar attaching screw. - It also helps to prevent uneven feeding of difficult or napped fabrics, such as c follows: - b 33 Attach the Walking foot to sew first without the walking foot accessory.... 56 WALKING FOOT 1 * The Walking foot is fitted onto the presser foot bar. - Please Note: Always try to the machine as velvet or corduroy. 11 Lift the presser foot lifter to multiple layers of fabrics from delicate chiffons to raise the 2 presser foot...

Instruction Manual
Page 67
... patterns can be stored for patterns such as Stitch length, Stitch width, Elongation, Mirror, and Auto-lock. Since stored patterns are not lost after the sewing machine is available to set its function such as names, which may be entered into memory. - Combining patterns or letters 11 Press "MODE" button to open...
... patterns can be stored for patterns such as Stitch length, Stitch width, Elongation, Mirror, and Auto-lock. Since stored patterns are not lost after the sewing machine is available to set its function such as names, which may be entered into memory. - Combining patterns or letters 11 Press "MODE" button to open...

Instruction Manual
Page 70
... M 1 22 Input the number of memory module. (e.g. 2) M 2 33 LCD screen shows the first pattern of memory module when the cursor start the sewing machine. 4 M 55 The screen shows the current sewing pattern. 5 66 Press the "000" button to leave memory mode and return to enter memory mode and then input the number of...
... M 1 22 Input the number of memory module. (e.g. 2) M 2 33 LCD screen shows the first pattern of memory module when the cursor start the sewing machine. 4 M 55 The screen shows the current sewing pattern. 5 66 Press the "000" button to leave memory mode and return to enter memory mode and then input the number of...

Instruction Manual
Page 71
...find the solution. Lower the buttonhole lever When you to lower the buttonhole lever. 66 WARNING FUNCTIONS Warning animation message display The sewing machine is experiencing a problem The animation message means that the thread is to remind you select any buttonhole or darning stitch, LCD screen... will continue to sew. Instruction animation message display Bobbin winding The bobbin winder is winding the bobbin. After the problem has been solved, the machine will be demonstrated the figure " ", it is twisted or jammed and...
...find the solution. Lower the buttonhole lever When you to lower the buttonhole lever. 66 WARNING FUNCTIONS Warning animation message display The sewing machine is experiencing a problem The animation message means that the thread is to remind you select any buttonhole or darning stitch, LCD screen... will continue to sew. Instruction animation message display Bobbin winding The bobbin winder is winding the bobbin. After the problem has been solved, the machine will be demonstrated the figure " ", it is twisted or jammed and...

Instruction Manual
Page 72
... the hand wheel axle can't move. When the sewing machine is in trouble and can't sew: 8 seconds short beeps It means that the thread is not resolved, please contact SINGER at www.singer.com. Attention: During the sewing, if the thread get jammed inside the hook stopping... "Trouble shooting guide" on /off switch to restart the sewing machine, you continue pressing the foot control, the security switch will stop the machine completely. When operating correctly: 1 beep - After the problem has been solved, the machine will be operational. When operating incorrectly: 3-short beeps -...
... the hand wheel axle can't move. When the sewing machine is in trouble and can't sew: 8 seconds short beeps It means that the thread is not resolved, please contact SINGER at www.singer.com. Attention: During the sewing, if the thread get jammed inside the hook stopping... "Trouble shooting guide" on /off switch to restart the sewing machine, you continue pressing the foot control, the security switch will stop the machine completely. When operating correctly: 1 beep - After the problem has been solved, the machine will be operational. When operating incorrectly: 3-short beeps -...

Instruction Manual
Page 74
... with a soft, dry cloth. Cleaning the hook If lint and bits of the sewing machine is dirty, wipe it out firmly and then wipe the surface. Attention: Disconnect the machine from the wall socket before carrying out any organic solvents or detergents. MAINTENANCE Attention: ...Disconnect the power cord from the wall outlet before cleaning the screen and sewing machine surface, otherwise injury or electrical shock may result. Cleaning the sewing machine surface If the surface of thread accumulate in mild detergent, squeeze it gently with a brush. ...
... with a soft, dry cloth. Cleaning the hook If lint and bits of the sewing machine is dirty, wipe it out firmly and then wipe the surface. Attention: Disconnect the machine from the wall socket before carrying out any organic solvents or detergents. MAINTENANCE Attention: ...Disconnect the power cord from the wall outlet before cleaning the screen and sewing machine surface, otherwise injury or electrical shock may result. Cleaning the sewing machine surface If the surface of thread accumulate in mild detergent, squeeze it gently with a brush. ...

Instruction Manual
Page 77
...noisy 1.Thread is caught in the hook. 2.The feed dogs are packed with lint. Remove the upper thread and bobbin case. The sewing machine doesn't operate 4.The Start/stop button was not pressed. 2.Press the Start/stop button when the through the foot controller is caught... controller. 5.A thread is connected. Uneven stitches, uneven feed 1.Poor quality thread. 2.The bobbin case is threaded wrong. 3.Fabric has been pulled. 1.The machine is raised. 3.Lower the presser foot lever. To use Start/stop button. 3.The presser foot lever is not turned on. 1.Select a better quality thread...
...noisy 1.Thread is caught in the hook. 2.The feed dogs are packed with lint. Remove the upper thread and bobbin case. The sewing machine doesn't operate 4.The Start/stop button was not pressed. 2.Press the Start/stop button when the through the foot controller is caught... controller. 5.A thread is connected. Uneven stitches, uneven feed 1.Poor quality thread. 2.The bobbin case is threaded wrong. 3.Fabric has been pulled. 1.The machine is raised. 3.Lower the presser foot lever. To use Start/stop button. 3.The presser foot lever is not turned on. 1.Select a better quality thread...


