Instruction Manual
Page 1
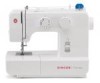
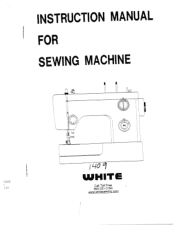
INSTRUCTION MANUAL FOR SEWING MACHINE fli H / H i WHITE Call Toll Free 800-331-3164 www.whftesewing.com
INSTRUCTION MANUAL FOR SEWING MACHINE fli H / H i WHITE Call Toll Free 800-331-3164 www.whftesewing.com
Instruction Manual
Page 2
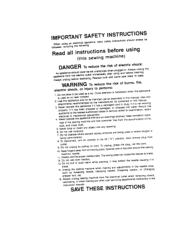
...all on cord. Do not unplug by Keep fingers away pulling from other tuhseeresleecrvtriiccianlgoaudtjleutstwmheenntsrmemeonvtiionngedcoivnetrhse, instruction manual. machine needle. erAafotlweredayc1sl5euawnnpailntutgsg.. Never drop or insert any object into any changing needle, adjustments in the threading ... or where oxygen is required around cord. To unplug, grasp moving parts. break. Unplug the sewing such as threading machine needle, when making any opening. 6. 7. outlet. Alulbwraicyastiunngp, lourgwsheewninmgamkinagchainnye from all controls to break...
...all on cord. Do not unplug by Keep fingers away pulling from other tuhseeresleecrvtriiccianlgoaudtjleutstwmheenntsrmemeonvtiionngedcoivnetrhse, instruction manual. machine needle. erAafotlweredayc1sl5euawnnpailntutgsg.. Never drop or insert any object into any changing needle, adjustments in the threading ... or where oxygen is required around cord. To unplug, grasp moving parts. break. Unplug the sewing such as threading machine needle, when making any opening. 6. 7. outlet. Alulbwraicyastiunngp, lourgwsheewninmgamkinagchainnye from all controls to break...
Instruction Manual
Page 7
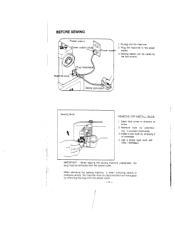
...screw type bulb with 120/1 5W(Max). Fit plug into the macnine. 2. I Sewing speed can be removed from the socket outlet. -4- emove bulb by the toot control. lMPOTANT : When leaving the sewing macnine unattended, the plug must ce disconnected from the supply by removing the plug from... the socket outlet. BEFORE SEWING 1. Sewing lamp REMOVE ORHNSTALL BULB 1. Plug the macnine tc he power supply 3. Qoen face cover in clockwise. 4. When servicing the sewing machine, or wnen removing covers or changing amps, the macnine must be ...
...screw type bulb with 120/1 5W(Max). Fit plug into the macnine. 2. I Sewing speed can be removed from the socket outlet. -4- emove bulb by the toot control. lMPOTANT : When leaving the sewing macnine unattended, the plug must ce disconnected from the supply by removing the plug from... the socket outlet. BEFORE SEWING 1. Sewing lamp REMOVE ORHNSTALL BULB 1. Plug the macnine tc he power supply 3. Qoen face cover in clockwise. 4. When servicing the sewing machine, or wnen removing covers or changing amps, the macnine must be ...
Instruction Manual
Page 8
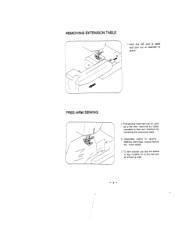
FREE-ARM SEWiNG 1. To sew tubular ust sliø the sleeve or leg of table and pull out in dIrection or arrow. Especially useful for sewing sleeves, pal-it legs, tubular faDr:cs etc., more easily. 3. REMOVING EXTENSION TABLE 1 Hold the left end of pants on to the free arm as a fiat bed machine out easily converts to free arm macnine by removing the extension table. 2. This sewing machine can be used as shown at side. -5- /
FREE-ARM SEWiNG 1. To sew tubular ust sliø the sleeve or leg of table and pull out in dIrection or arrow. Especially useful for sewing sleeves, pal-it legs, tubular faDr:cs etc., more easily. 3. REMOVING EXTENSION TABLE 1 Hold the left end of pants on to the free arm as a fiat bed machine out easily converts to free arm macnine by removing the extension table. 2. This sewing machine can be used as shown at side. -5- /
Instruction Manual
Page 13
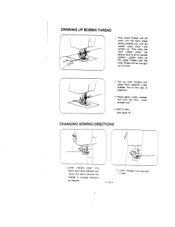
DRAWING UP BOBBIN ThREAD 1. pivot the fabric around the needle to sew. -10-- Hold upper thread with left hand, turn the hana wneel slcwiy towards you until the needle qoes down and comes up in a loop. 4 2. Lower ... the upper thread and the lower thread will be brought up . I Lower needle oown into fabric and raise presser foot. Start to the rear of machine. 3. Place fabric under presser foot to sow (see page 16) CHANGLNG...
DRAWING UP BOBBIN ThREAD 1. pivot the fabric around the needle to sew. -10-- Hold upper thread with left hand, turn the hana wneel slcwiy towards you until the needle qoes down and comes up in a loop. 4 2. Lower ... the upper thread and the lower thread will be brought up . I Lower needle oown into fabric and raise presser foot. Start to the rear of machine. 3. Place fabric under presser foot to sow (see page 16) CHANGLNG...
Instruction Manual
Page 19
... the a scrap of faric you clan length of machine to its highest position before owering presser foot. 4. Attention 1. When turning the balaj,ce wneel manually, always turn t toward you stop sewing. - !i5 - Raise the take-up ever to tne first two or three stitches. 3. Depress foot and start to ...rear of stitch and tension to use, suitaole to se'i' 5. Sufficient fabric should be placed under needle before starttnQ na after stopping sewing. 2. To Oreverit breaking needle always raise the needle out of the fabric when you . 2.Guide the cloth gently with your fabric. TO ...
... the a scrap of faric you clan length of machine to its highest position before owering presser foot. 4. Attention 1. When turning the balaj,ce wneel manually, always turn t toward you stop sewing. - !i5 - Raise the take-up ever to tne first two or three stitches. 3. Depress foot and start to ...rear of stitch and tension to use, suitaole to se'i' 5. Sufficient fabric should be placed under needle before starttnQ na after stopping sewing. 2. To Oreverit breaking needle always raise the needle out of the fabric when you . 2.Guide the cloth gently with your fabric. TO ...

Instruction Manual
Page 27
...A PENCIL OR CHAU( THE EXACT LENGTH OF THE BUTTONHOLE ON THE FABRIC. 2. ZiGZAG WIDTh KNOB ABOUT 7 NEEDLE POSITION KNOB ON LEFT POSITION. THEN SEW AS FIGURE (2) UN11LL YOU REACHES ThE END OF THE MARKING. 5. Cul outtonhole along centre ith cutter as shown. ZIGZAG WIDTh KNOB ON 2. SET... YOU REACHES THE END OF THE MARKING ON AS FIGURE (4). 7, REMOVE FABRIC FROM THE MACHINE AND OPEN ThE BUTTONHOLE WITH A BUTTONHOLE CUTTER CR SEAM CUTTER. (1) (2) (4) 1r it 4 Before sewing fit bultonhole tool as shown. 24 - - SET THE STCH LENGTH KNOB ON 0', ZIGZAG WIDTh KNOB ON 5 AND NEEDLE KNOB ...
...A PENCIL OR CHAU( THE EXACT LENGTH OF THE BUTTONHOLE ON THE FABRIC. 2. ZiGZAG WIDTh KNOB ABOUT 7 NEEDLE POSITION KNOB ON LEFT POSITION. THEN SEW AS FIGURE (2) UN11LL YOU REACHES ThE END OF THE MARKING. 5. Cul outtonhole along centre ith cutter as shown. ZIGZAG WIDTh KNOB ON 2. SET... YOU REACHES THE END OF THE MARKING ON AS FIGURE (4). 7, REMOVE FABRIC FROM THE MACHINE AND OPEN ThE BUTTONHOLE WITH A BUTTONHOLE CUTTER CR SEAM CUTTER. (1) (2) (4) 1r it 4 Before sewing fit bultonhole tool as shown. 24 - - SET THE STCH LENGTH KNOB ON 0', ZIGZAG WIDTh KNOB ON 5 AND NEEDLE KNOB ...
Instruction Manual
Page 29
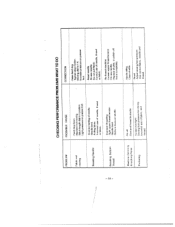
..., - [leeds oiling Glean stmutlle. - -Reset. - Improper threading. - Fit new needle. - Replace shuttle, or polish oil burrs completely. Reset needle. . Fit new needle. - Sewing toot pressure too strong - PROBLEM Fabric not moving . - Machine not moving Breaking Needle Breaking Bobbin Thread CHECKING PERFORMANCE PROBLEMS WHAT TO DO PROBABLE CAUSE Feed dog down. - Re-thread...
..., - [leeds oiling Glean stmutlle. - -Reset. - Improper threading. - Fit new needle. - Replace shuttle, or polish oil burrs completely. Reset needle. . Fit new needle. - Sewing toot pressure too strong - PROBLEM Fabric not moving . - Machine not moving Breaking Needle Breaking Bobbin Thread CHECKING PERFORMANCE PROBLEMS WHAT TO DO PROBABLE CAUSE Feed dog down. - Re-thread...


