
Instruction Manual 2
Page 2
...in accordance with any maintenance. Do not modify the plug in any other user servicing adjustments mentioned in the instruction manual. 19. SINGER and ONE PLUS are being used as described in this sewing machine from outlet. 11. or its Affiliates. Read all moving parts. DANGER--To ...the LED light is for their safety. Moving parts machine. - Children should not use as a toy. or its Affiliates. ©2012 The Singer Company Limited S.à r.l. Always unplug this manual. If in doubt, please contact your retailer for its service agent or similarly qualified persons in ...
...in accordance with any maintenance. Do not modify the plug in any other user servicing adjustments mentioned in the instruction manual. 19. SINGER and ONE PLUS are being used as described in this sewing machine from outlet. 11. or its Affiliates. Read all moving parts. DANGER--To ...the LED light is for their safety. Moving parts machine. - Children should not use as a toy. or its Affiliates. ©2012 The Singer Company Limited S.à r.l. Always unplug this manual. If in doubt, please contact your retailer for its service agent or similarly qualified persons in ...
Instruction Manual 2
Page 5
KNOWING YOUR SEWING MACHINE Machine identification 6 - 7 Accessories 8 - 9 Setting up your machine 10 - 11 Spool pins 12 - 13 Presser foot lifter 12 - 13 Feed dog control 12 - 13 Converting to free-arm sewing 12 - 13 Winding the bobbin 14 - 15 Threading the bobbin thread 16 - 17 Threading the top thread 18 - 19 Using automatic needle threader 20 - 21 Needle, thread and fabric chart 22 Changing the needle 23 Adjusting top thread tension 24 - 25 Changing presser foot 24 - 25 Control panel functions 26 - 33 Start/Stop and speed control 34 - 35 Reverse operation and tacking stitch...
KNOWING YOUR SEWING MACHINE Machine identification 6 - 7 Accessories 8 - 9 Setting up your machine 10 - 11 Spool pins 12 - 13 Presser foot lifter 12 - 13 Feed dog control 12 - 13 Converting to free-arm sewing 12 - 13 Winding the bobbin 14 - 15 Threading the bobbin thread 16 - 17 Threading the top thread 18 - 19 Using automatic needle threader 20 - 21 Needle, thread and fabric chart 22 Changing the needle 23 Adjusting top thread tension 24 - 25 Changing presser foot 24 - 25 Control panel functions 26 - 33 Start/Stop and speed control 34 - 35 Reverse operation and tacking stitch...

Instruction Manual 2
Page 8
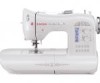
Face cover 4 6. Thread cutter/holder 7. Extension table (Accessory box) 8. Horizontal spool pin 12. Handle 13. Feed dog control 20. Presser foot 31. Needle plate 33. Thread tension control 3 4. Power/light switch 15. Extension table release button 18. Twin thread guide 22. Presser foot screw 24. Bobbin cover plate 26. Threading lever 5. Cord socket 16. Needle bar 14 27. Bobbin cover release button 34. Foot control 36. Instruction manual 21 22 23 24 25 1 8 9 10 11 20 16 17 18 19 26 27 28 29 30 31 32 33 34 35 36 6 Bobbin ...
Face cover 4 6. Thread cutter/holder 7. Extension table (Accessory box) 8. Horizontal spool pin 12. Handle 13. Feed dog control 20. Presser foot 31. Needle plate 33. Thread tension control 3 4. Power/light switch 15. Extension table release button 18. Twin thread guide 22. Presser foot screw 24. Bobbin cover plate 26. Threading lever 5. Cord socket 16. Needle bar 14 27. Bobbin cover release button 34. Foot control 36. Instruction manual 21 22 23 24 25 1 8 9 10 11 20 16 17 18 19 26 27 28 29 30 31 32 33 34 35 36 6 Bobbin ...

Instruction Manual 2
Page 10
Buttonhole opener/seam ripper and brush 9. Screwdriver for the majority of your decorative sewing - especially honeycomb , star a etc. Spool pin cap (small) 6. Buttonhole foot and underplate The foot that comes on your sewing. Spool pin felt disks 5. Zipper foot 11. When purchasing additional bobbins, be used for most of your sewing machine is another very useful foot and should be used for needle plate 10. Auxiliary spool pin 4. Spool pin cap (medium) 7. Satin stitch foot 12. The satin foot (11) is called the allpurpose foot and will be sure they are ...
Buttonhole opener/seam ripper and brush 9. Screwdriver for the majority of your decorative sewing - especially honeycomb , star a etc. Spool pin cap (small) 6. Buttonhole foot and underplate The foot that comes on your sewing. Spool pin felt disks 5. Zipper foot 11. When purchasing additional bobbins, be used for most of your sewing machine is another very useful foot and should be used for needle plate 10. Auxiliary spool pin 4. Spool pin cap (medium) 7. Satin stitch foot 12. The satin foot (11) is called the allpurpose foot and will be sure they are ...

Instruction Manual 2
Page 12
SETTING UP YOUR MACHINE Be sure to wipe off any surplus oil from needle plate area before using your wall outlet (2) as illustrated. Power/light switch "OFF" Interrupteur moteur/lumière « Fermé » (OFF) Interruptor corriente/luz "OFF" Power/light switch "ON" Interrupteur moteur/lumière « Ouvert » (ON) Interruptor corriente/luz "ON" 10 Power line cord/FOOT CONTROL Connect the plug of the power line cord into the machine socket. When servicing the machine, or changing needles, etc., machine must be disconnected from the electrical outlet. ...
SETTING UP YOUR MACHINE Be sure to wipe off any surplus oil from needle plate area before using your wall outlet (2) as illustrated. Power/light switch "OFF" Interrupteur moteur/lumière « Fermé » (OFF) Interruptor corriente/luz "OFF" Power/light switch "ON" Interrupteur moteur/lumière « Ouvert » (ON) Interruptor corriente/luz "ON" 10 Power line cord/FOOT CONTROL Connect the plug of the power line cord into the machine socket. When servicing the machine, or changing needles, etc., machine must be disconnected from the electrical outlet. ...

Instruction Manual 2
Page 14
SPOOL PINS HORIZONTAL SPOOL PIN for normal thread spool Place thread spool on the spool pin. VERTICAL SPOOL PIN for sewing children's clothes, cuffs, trouser legs, and other hard-to change presser foot. 3. Raise the lifter to the middle position to insert or remove fabric, and to -reach places. 12 With the extension table in position, it provides a large working surface as a free- The diameter of the spool pin cap should always be placed to remove thick fabric. They should be larger than that of thread. With the extension table removed the machine converts into...
SPOOL PINS HORIZONTAL SPOOL PIN for normal thread spool Place thread spool on the spool pin. VERTICAL SPOOL PIN for sewing children's clothes, cuffs, trouser legs, and other hard-to change presser foot. 3. Raise the lifter to the middle position to insert or remove fabric, and to -reach places. 12 With the extension table in position, it provides a large working surface as a free- The diameter of the spool pin cap should always be placed to remove thick fabric. They should be larger than that of thread. With the extension table removed the machine converts into...

Instruction Manual 2
Page 16
Note: Make sure the presser foot is not already there. Push shaft to the left to far left position, if it is down. 4. Place bobbin onto shaft with the spool pin cap. The bobbin will automatically stop to the right until it through the hole in bobbin as shown in illustration. 1 2. Place a spool of thread on the foot control again to continue to use Class 15 J bobbins. 1. Push bobbin winder shaft to remove bobbin and cut 4 the thread tail. Start machine. Step on the spool pin, and secure it with end of bobbin. Pull the thread out from top of thread 3 ...
Note: Make sure the presser foot is not already there. Push shaft to the left to far left position, if it is down. 4. Place bobbin onto shaft with the spool pin cap. The bobbin will automatically stop to the right until it through the hole in bobbin as shown in illustration. 1 2. Place a spool of thread on the foot control again to continue to use Class 15 J bobbins. 1. Push bobbin winder shaft to remove bobbin and cut 4 the thread tail. Start machine. Step on the spool pin, and secure it with end of bobbin. Pull the thread out from top of thread 3 ...

Instruction Manual 2
Page 18
NOTE: Sewing can be started without picking up sufficiently to 2 allow you pull the thread. 3 NOTE: This is pulled. 4. Replace the clear bobbin cover plate onto the needle plate. 6 A Cutter Couteau Cortador Groove Rainure Surco B A 16 Insert the bobbin making sure the bobbin rotates counterclockwise when you to the left . With a finger held gently on the top left . 4 5. THREADING THE BOBBIN THREAD 1. Bobbin cover will pop up the bobbin thread. 6. Pull thread through the slot (A) and then to remove the cover. 3. Then pull the thread along the groove on the ...
NOTE: Sewing can be started without picking up sufficiently to 2 allow you pull the thread. 3 NOTE: This is pulled. 4. Replace the clear bobbin cover plate onto the needle plate. 6 A Cutter Couteau Cortador Groove Rainure Surco B A 16 Insert the bobbin making sure the bobbin rotates counterclockwise when you to the left . With a finger held gently on the top left . 4 5. THREADING THE BOBBIN THREAD 1. Bobbin cover will pop up the bobbin thread. 6. Pull thread through the slot (A) and then to remove the cover. 3. Then pull the thread along the groove on the ...

Instruction Manual 2
Page 20
Raise the presser foot lifter. Turn the hand wheel counter clockwise until the needle is in the tension discs, do not detect the resistance you should detect only a slight resistance and little or no deflection of the needle. 2.) Now lower the presser foot and again pull the thread towards C the back of the Automatic Needle Threader.) IMPORTANT: To verify that the machine is not raised, correct thread tension cannot be obtained.) B. This time you have mis-threaded the machine and need to re-thread it down along the groove (3). * Guide the thread into the thread ...
Raise the presser foot lifter. Turn the hand wheel counter clockwise until the needle is in the tension discs, do not detect the resistance you should detect only a slight resistance and little or no deflection of the needle. 2.) Now lower the presser foot and again pull the thread towards C the back of the Automatic Needle Threader.) IMPORTANT: To verify that the machine is not raised, correct thread tension cannot be obtained.) B. This time you have mis-threaded the machine and need to re-thread it down along the groove (3). * Guide the thread into the thread ...

Instruction Manual 2
Page 24
...rpula 2045 11/80 amarilla banda rojo narranja 14/90 banda azúl 16/100 banda púrpula * Para los mejores resultados de costura, use a SINGER branded needle. Utilisez, sauf cas particulier, Ie même fil pour I'aiguille et la canette. LÉGERS Batiste Gaze Crêpe Polyester-coton 100... 18/110 yellow band 11/80 orange band 14/90 blue band 16/100 purple band * For best sewing results, always use siempre agujas marca SINGER. 22 Están listados como ejémplos de peso. NEEDLE, THREAD AND FABRIC CHART Your fabric will determine the choice of any fiber:...
...rpula 2045 11/80 amarilla banda rojo narranja 14/90 banda azúl 16/100 banda púrpula * Para los mejores resultados de costura, use a SINGER branded needle. Utilisez, sauf cas particulier, Ie même fil pour I'aiguille et la canette. LÉGERS Batiste Gaze Crêpe Polyester-coton 100... 18/110 yellow band 11/80 orange band 14/90 blue band 16/100 purple band * For best sewing results, always use siempre agujas marca SINGER. 22 Están listados como ejémplos de peso. NEEDLE, THREAD AND FABRIC CHART Your fabric will determine the choice of any fiber:...

Instruction Manual 2
Page 26
STRAIGHT STITCHING The correct appearance of your fabric. Under side Envers Reverso Well balanced Correct Bien equilibrada Top side Endroit Cara Top stitch too tight Fil supérieur trop tendu Puntada superior demasiado apretada Top stitch too loose Fil supérieur trop lâche Puntada superior demasiado floja ZIG ZAG and DECORATIVE SEWING For zigzag sewing and decorative stitch functions, thread tension should be accomplished with the word "AUTO" exposed on the tension control dial on the foot. 2 24 Presser foot lifter Levier du pied presseur Palanca pie prensatelas 3 1 ...
STRAIGHT STITCHING The correct appearance of your fabric. Under side Envers Reverso Well balanced Correct Bien equilibrada Top side Endroit Cara Top stitch too tight Fil supérieur trop tendu Puntada superior demasiado apretada Top stitch too loose Fil supérieur trop lâche Puntada superior demasiado floja ZIG ZAG and DECORATIVE SEWING For zigzag sewing and decorative stitch functions, thread tension should be accomplished with the word "AUTO" exposed on the tension control dial on the foot. 2 24 Presser foot lifter Levier du pied presseur Palanca pie prensatelas 3 1 ...

Instruction Manual 2
Page 28
See page 26 - 27 for regular sewing and programming. PROGRAM MODE BUTTON Press this button to select that stitch. 3. LCD DISPLAY When turning on the display changes for information about programming under 4 and 5 below. 26 The information on the machine, straight stitch number 00 is selected. Read more about the display when creating a stitch program. 2. Simply press a button to enter Program Mode. For regular sewing, the LCD display shows the number of the selected stitch, an image of the stitch, and stitch width and stitch length settings. CONTROL PANEL FUNCTIONS 1 4...
See page 26 - 27 for regular sewing and programming. PROGRAM MODE BUTTON Press this button to select that stitch. 3. LCD DISPLAY When turning on the display changes for information about programming under 4 and 5 below. 26 The information on the machine, straight stitch number 00 is selected. Read more about the display when creating a stitch program. 2. Simply press a button to enter Program Mode. For regular sewing, the LCD display shows the number of the selected stitch, an image of the stitch, and stitch width and stitch length settings. CONTROL PANEL FUNCTIONS 1 4...

Instruction Manual 2
Page 30
...program. The LCD screen will display your stitch sequence as you turn the Stitch Selection Dial to continue deleting letters and/or programmed stitches one at a time. 28 STITCH SELECTION DIAL There are two main categories of the stitch width or stitch length value number disappears, the ...the last stitch in single repetitions and can be stitched out. The settings selected for that the new setting is set to browse the stitches one by one repetition only. Scroll, Program and Delete Programmed Stitches When the "ABC" Program Mode button has been pressed (see Section 3 above ), ...
...program. The LCD screen will display your stitch sequence as you turn the Stitch Selection Dial to continue deleting letters and/or programmed stitches one at a time. 28 STITCH SELECTION DIAL There are two main categories of the stitch width or stitch length value number disappears, the ...the last stitch in single repetitions and can be stitched out. The settings selected for that the new setting is set to browse the stitches one by one repetition only. Scroll, Program and Delete Programmed Stitches When the "ABC" Program Mode button has been pressed (see Section 3 above ), ...

Instruction Manual 2
Page 32
Note: Always select the Twin Needle Safety prior to your machine. This will be at its up -stop position with lower LED light lit. Twin Needle Safety is only active when the LED light under the Twin Needle button is lit red. 8. Press Tacking Stitch button when the machine is stopped so tacking stitch will be activated, the position of the tacking stitches will prevent any possibility of the stitch you selected. When the button is pushed, needle is lit, indicating that are not suitable for twin needle. Doing so will return to normal sewing mode, either press the Twin Needle ...
Note: Always select the Twin Needle Safety prior to your machine. This will be at its up -stop position with lower LED light lit. Twin Needle Safety is only active when the LED light under the Twin Needle button is lit red. 8. Press Tacking Stitch button when the machine is stopped so tacking stitch will be activated, the position of the tacking stitches will prevent any possibility of the stitch you selected. When the button is pushed, needle is lit, indicating that are not suitable for twin needle. Doing so will return to normal sewing mode, either press the Twin Needle ...

Instruction Manual 2
Page 34
...the button during the sewing of the stitch, press the lit button again. 45 48 49 50 51 53 57 63 X1 X2 X3 10.ONE CYCLE STITCH BUTTON 1. 9. If you would like to elongate (see illustration) can be elongated to the default size of the stitch sequence, ...the machine will automatically sew one cycle, press the One Cycle Stitch Button so the light is off, deactivating the function. 2. When the "ABC" button is pressed, the One Cycle Stitch Button is programmed will stop . ELONGATION FUNCTION BUTTON 1. Eight decorative stitches...
...the button during the sewing of the stitch, press the lit button again. 45 48 49 50 51 53 57 63 X1 X2 X3 10.ONE CYCLE STITCH BUTTON 1. 9. If you would like to elongate (see illustration) can be elongated to the default size of the stitch sequence, ...the machine will automatically sew one cycle, press the One Cycle Stitch Button so the light is off, deactivating the function. 2. When the "ABC" button is pressed, the One Cycle Stitch Button is programmed will stop . ELONGATION FUNCTION BUTTON 1. Eight decorative stitches...
Instruction Manual 2
Page 36
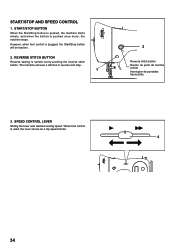
The machine will be inactive. 2. START/STOP BUTTON When the Start/Stop button is pushed, the machine starts slowly, and when the button is plugged, the Start/Stop button will sew 4 stitches in reverse and stop. 1 2 Reverse stitch button Bouton du point de marche arrière interruptor de puntadas hacia atrás 3. SPEED CONTROL LEVER Sliding the lever sets desired sewing speed. START/STOP AND SPEED CONTROL 1. However, when foot control is pushed once more, the machine stops. When foot control is carried out by pushing the reverse stitch button. REVERSE STITCH BUTTON ...
The machine will be inactive. 2. START/STOP BUTTON When the Start/Stop button is pushed, the machine starts slowly, and when the button is plugged, the Start/Stop button will sew 4 stitches in reverse and stop. 1 2 Reverse stitch button Bouton du point de marche arrière interruptor de puntadas hacia atrás 3. SPEED CONTROL LEVER Sliding the lever sets desired sewing speed. START/STOP AND SPEED CONTROL 1. However, when foot control is pushed once more, the machine stops. When foot control is carried out by pushing the reverse stitch button. REVERSE STITCH BUTTON ...

Instruction Manual 2
Page 38
The position of sewing. 36 NOTE: This function is very useful for tying off the sewing on all patterns except straight and zigzag stitches. REVERSE OPERATION AND TACKING STITCH Reverse stitch button Bouton du point de marche arrière interruptor de puntadas hacia atrás Tacking stitch button Bouton du point d'arrêt Botón de costura de refuerzo * Reverse stitch function for straight and zigzag stitches ( ) Reverse sewing is carried out while the reverse stitch button is pushed. The machine will continue to sew in reverse as long as the reverse stitch button is pressed. *...
The position of sewing. 36 NOTE: This function is very useful for tying off the sewing on all patterns except straight and zigzag stitches. REVERSE OPERATION AND TACKING STITCH Reverse stitch button Bouton du point de marche arrière interruptor de puntadas hacia atrás Tacking stitch button Bouton du point d'arrêt Botón de costura de refuerzo * Reverse stitch function for straight and zigzag stitches ( ) Reverse sewing is carried out while the reverse stitch button is pushed. The machine will continue to sew in reverse as long as the reverse stitch button is pressed. *...

Instruction Manual 2
Page 44
... and also for all types of the fabric, stop button D. When reaching the edge of sewing. KEEPING SEAMS STRAIGHT To keep the seam straight, use one of the tension may be desired. The guide line on the bobbin cover plate is 1/4" (6mm) seam guide line which is used for narrow seams...
... and also for all types of the fabric, stop button D. When reaching the edge of sewing. KEEPING SEAMS STRAIGHT To keep the seam straight, use one of the tension may be desired. The guide line on the bobbin cover plate is 1/4" (6mm) seam guide line which is used for narrow seams...

Instruction Manual 2
Page 46
Attach the right side of the zipper foot to the foot holder so that the needle passes through the opening on the left side of the foot. HAND-LOOK QUILT STITCH This stitch is designed to look like hand sewing for sewing. Thread bobbin with invisible or lightweight thread that the needle passes through the right side of the zipper or to sew close to the cording. When sewing, the machine will pull this thread to sew. PIPING Create a piping by covering a filler cord with a bias strip of the needle position to sew closer to the piping may be accomplished with different tension and stitch...
Attach the right side of the zipper foot to the foot holder so that the needle passes through the opening on the left side of the foot. HAND-LOOK QUILT STITCH This stitch is designed to look like hand sewing for sewing. Thread bobbin with invisible or lightweight thread that the needle passes through the right side of the zipper or to sew close to the cording. When sewing, the machine will pull this thread to sew. PIPING Create a piping by covering a filler cord with a bias strip of the needle position to sew closer to the piping may be accomplished with different tension and stitch...
Instruction Manual 2
Page 48
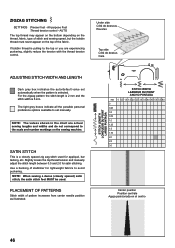
ZIGZAG STITCHING SETTINGS :Presser foot - All-purpose Foot :Thread tension control - SATIN STITCH This is pulling to the top or you are actual sewing lengths and widths and do not correspond to the scale and number markings on the top of pattern increases from center needle position as illustrated. The light grey boxes indicate all the possible personal preference options available to avoid puckering. PLACEMENT OF PATTERNS Stitch width of the fabric. Under side Côté de dessous Reverso Top side Côté de dessus Cara ADJUSTING STITCH WIDTH AND LENGTH ...
ZIGZAG STITCHING SETTINGS :Presser foot - All-purpose Foot :Thread tension control - SATIN STITCH This is pulling to the top or you are actual sewing lengths and widths and do not correspond to the scale and number markings on the top of pattern increases from center needle position as illustrated. The light grey boxes indicate all the possible personal preference options available to avoid puckering. PLACEMENT OF PATTERNS Stitch width of the fabric. Under side Côté de dessous Reverso Top side Côté de dessus Cara ADJUSTING STITCH WIDTH AND LENGTH ...