
XR10S|XR10X|XR20S|XR20X Operation Manual
Page 1
MULTIMEDIA PROJECTOR MODEL XR-20X/XR-20S XR-10X/XR-10S OPERATION MANUAL Introduction Quick Start Setup Connections Basic Operation Useful Features Appendix
MULTIMEDIA PROJECTOR MODEL XR-20X/XR-20S XR-10X/XR-10S OPERATION MANUAL Introduction Quick Start Setup Connections Basic Operation Useful Features Appendix

XR10S|XR10X|XR20S|XR20X Operation Manual
Page 2
... of this apparatus may occur. ii IMPORTANT • For your assistance in reporting the loss or theft of your Projector, please record the Model and Serial Number located on the bottom of the projector and retain this product is marked with the letter L or coloured red. Model No.: Serial No.: SPECIAL NOTE...
... of this apparatus may occur. ii IMPORTANT • For your assistance in reporting the loss or theft of your Projector, please record the Model and Serial Number located on the bottom of the projector and retain this product is marked with the letter L or coloured red. Model No.: Serial No.: SPECIAL NOTE...
XR10S|XR10X|XR20S|XR20X Operation Manual
Page 5
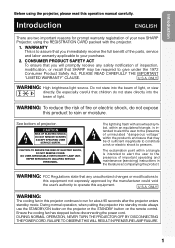
... QUALIFIED SERVICE PERSONNEL. U.S.A. Introduction ENGLISH There are two important reasons for about 90 seconds after the projector enters standby mode. WARRANTY This is to assure that SHARP may be required to give under the 1972 Consumer Product Safety Act, PLEASE READ CAREFULLY THE IMPORTANT...applicable to the presence of uninsulated "dangerous voltage" within a triangle is intended to alert the user to your new SHARP Projector, using the projector, please read this equipment. DO NOT REMOVE SCREWS EXCEPT SPECIFIED USER SERVICE SCREW. The exclamation point within the product's...
... QUALIFIED SERVICE PERSONNEL. U.S.A. Introduction ENGLISH There are two important reasons for about 90 seconds after the projector enters standby mode. WARRANTY This is to assure that SHARP may be required to give under the 1972 Consumer Product Safety Act, PLEASE READ CAREFULLY THE IMPORTANT...applicable to the presence of uninsulated "dangerous voltage" within a triangle is intended to alert the user to your new SHARP Projector, using the projector, please read this equipment. DO NOT REMOVE SCREWS EXCEPT SPECIFIED USER SERVICE SCREW. The exclamation point within the product's...

XR10S|XR10X|XR20S|XR20X Operation Manual
Page 6
...digital device, pursuant to Part 15 of the FCC Rules. ONLY Declaration of conformity SHARP PROJECTOR, MODEL XR-20X/XR-20S/XR-10X/XR-10S This device complies with the limits for help. ONLY PRODUCT DISPOSAL This projector utilizes tin-lead solder, and a pressurized lamp containing a small amount of America, ...picture quality or the life expectancy of the unit. 2 This SHARP projector uses a DMD panel. If this device must conform to. This very sophisticated panel contains 786,432 (XR20X/XR-10X) / 480,000 (XR-20S/XR-10S) pixels (micromirrors). This unit has some inactive pixels ...
...digital device, pursuant to Part 15 of the FCC Rules. ONLY Declaration of conformity SHARP PROJECTOR, MODEL XR-20X/XR-20S/XR-10X/XR-10S This device complies with the limits for help. ONLY PRODUCT DISPOSAL This projector utilizes tin-lead solder, and a pressurized lamp containing a small amount of America, ...picture quality or the life expectancy of the unit. 2 This SHARP projector uses a DMD panel. If this device must conform to. This very sophisticated panel contains 786,432 (XR20X/XR-10X) / 480,000 (XR-20S/XR-10S) pixels (micromirrors). This unit has some inactive pixels ...

XR10S|XR10X|XR20S|XR20X Operation Manual
Page 7
However, you can also be performed by using the projector. For Future Reference Maintenance P. 47 Troubleshooting PP. 59 and 60 Index P. 64 3 Note .........Indicates additional information for the selected input mode is displayed... How to Read this operation manual, the illustration and the screen display are slightly different, depending on the projector. 1 Press BMENU. • The "Picture" menu screen for setting up and operating the projector. Menu Selections (Adjustments) Example: Adjusting "Bright". • This operation can connect and operate all models ...
However, you can also be performed by using the projector. For Future Reference Maintenance P. 47 Troubleshooting PP. 59 and 60 Index P. 64 3 Note .........Indicates additional information for the selected input mode is displayed... How to Read this operation manual, the illustration and the screen display are slightly different, depending on the projector. 1 Press BMENU. • The "Picture" menu screen for setting up and operating the projector. Menu Selections (Adjustments) Example: Adjusting "Bright". • This operation can connect and operate all models ...

XR10S|XR10X|XR20S|XR20X Operation Manual
Page 8
... Image ........ 42 Selecting the Setup Guide 42 Reversing/Inverting Projected Images 42 Selecting the On-screen Display Language 42 Adjusting the Projector Function ("PRJ - Contents Preparing Introduction How to Read this Operation Manual .... 3 Contents 4 IMPORTANT SAFEGUARDS 6 How to Access... Screen Size and Projection Distance .. 20 Connections Connections 21 Samples of Cables for Connection ..... 22 Connecting to a Computer 23 Connecting to Video Equipment ......... 24 Connecting to a Monitor with RGB Input Terminal 25 Controlling the Projector by a Computer 26 Connecting the ...
... Image ........ 42 Selecting the Setup Guide 42 Reversing/Inverting Projected Images 42 Selecting the On-screen Display Language 42 Adjusting the Projector Function ("PRJ - Contents Preparing Introduction How to Read this Operation Manual .... 3 Contents 4 IMPORTANT SAFEGUARDS 6 How to Access... Screen Size and Projection Distance .. 20 Connections Connections 21 Samples of Cables for Connection ..... 22 Connecting to a Computer 23 Connecting to Video Equipment ......... 24 Connecting to a Monitor with RGB Input Terminal 25 Controlling the Projector by a Computer 26 Connecting the ...

XR10S|XR10X|XR20S|XR20X Operation Manual
Page 12
...in high-altitude areas such as not to +60°C). When using the projector in an area free from -4°F to 140°F (-20°C to hit or damage the surface of the lens. Rest your projector. Do not set "Fan Mode" to +35°C). Close the curtains and... of the adjustment foot. 8 Avoid locations with thin air, set up the screen in places exposed to avoid personal injury caused by a Sharp Authorized Projector Dealer or Service Center. Observe the following safeguards when setting up your eyes occasionally. Caution concerning the lamp unit I Be sure that this can...
...in high-altitude areas such as not to +60°C). When using the projector in an area free from -4°F to 140°F (-20°C to hit or damage the surface of the lens. Rest your projector. Do not set "Fan Mode" to +35°C). Close the curtains and... of the adjustment foot. 8 Avoid locations with thin air, set up the screen in places exposed to avoid personal injury caused by a Sharp Authorized Projector Dealer or Service Center. Observe the following safeguards when setting up your eyes occasionally. Caution concerning the lamp unit I Be sure that this can...

XR10S|XR10X|XR20S|XR20X Operation Manual
Page 13
...do not have this can result in internal temperature, as this manual. This does not indicate malfunction. • Do not unplug the power cord during projector operation due to changes in the CD-ROM drive. 2 Double click the "My Computer" icon. 3 Double click the "CD-ROM" drive. ...® Reader® on how to make the connections AFTER unplugging the power cord of the projector I When using the projector overseas, be sure not to sub- visual equipment to the projector, make the connections. Doing so may change during projection or cooling fan operation. dicators" on ...
...do not have this can result in internal temperature, as this manual. This does not indicate malfunction. • Do not unplug the power cord during projector operation due to changes in the CD-ROM drive. 2 Double click the "My Computer" icon. 3 Double click the "CD-ROM" drive. ...® Reader® on how to make the connections AFTER unplugging the power cord of the projector I When using the projector overseas, be sure not to sub- visual equipment to the projector, make the connections. Doing so may change during projection or cooling fan operation. dicators" on ...
XR10S|XR10X|XR20S|XR20X Operation Manual
Page 14
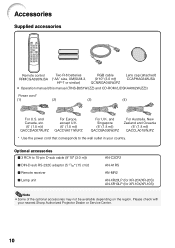
... the wall outlet in your nearest Sharp Authorized Projector Dealer or Service Center. 10 Please check with your country. and Canada, etc. (6' (1.8 m)) QACCDA007WJPZ For Europe, except U.K. (6' (1.8 m)) QACCVA011WJPZ For U.K. Optional accessories I Lamp unit AN-C3CP2 AN-A1RS AN-MR2 AN-XR20LP (for XR-20X/XR-20S) AN-XR10LP (for XR-10X/XR-10S) Note • Some of the...
... the wall outlet in your nearest Sharp Authorized Projector Dealer or Service Center. 10 Please check with your country. and Canada, etc. (6' (1.8 m)) QACCDA007WJPZ For Europe, except U.K. (6' (1.8 m)) QACCVA011WJPZ For U.K. Optional accessories I Lamp unit AN-C3CP2 AN-A1RS AN-MR2 AN-XR20LP (for XR-20X/XR-20S) AN-XR10LP (for XR-10X/XR-10S) Note • Some of the...

XR10S|XR10X|XR20S|XR20X Operation Manual
Page 15
Projector Top View Power indicator 27, 48 STANDBY/ON 27 button For turning the power on the menu. Front View Focus ring 28 For adjusting the ... or remove. 11 KEYSTONE 31 button For entering the Keystone Correction mode. ENTER button 37 For setting items selected or adjusted on and putting the projector into standby mode. Introduction Part Names and Functions Numbers in this operation manual where the topic is explained.
Projector Top View Power indicator 27, 48 STANDBY/ON 27 button For turning the power on the menu. Front View Focus ring 28 For adjusting the ... or remove. 11 KEYSTONE 31 button For entering the Keystone Correction mode. ENTER button 37 For setting items selected or adjusted on and putting the projector into standby mode. Introduction Part Names and Functions Numbers in this operation manual where the topic is explained.

XR10S|XR10X|XR20S|XR20X Operation Manual
Page 16
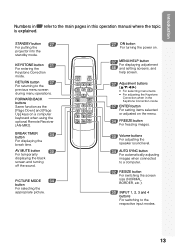
...the main pages in this operation manual where the topic is explained. Intake vent 47 26 RS-232C terminal Terminal for controlling the projector using a computer. 24 AUDIO (INPUT 25 3, 4) terminal (Shared for INPUT 3 and 4) 25 INPUT 4 terminal Terminal for... instructions on page 21. Using the Kensington Lock • This projector has a Kensington Security Standard connector for connecting video equipment with a Kensington MicroSaver Security System. AUDIO (INPUT 1, 2) 23 terminal (Shared for INPUT 1 ...
...the main pages in this operation manual where the topic is explained. Intake vent 47 26 RS-232C terminal Terminal for controlling the projector using a computer. 24 AUDIO (INPUT 25 3, 4) terminal (Shared for INPUT 3 and 4) 25 INPUT 4 terminal Terminal for... instructions on page 21. Using the Kensington Lock • This projector has a Kensington Security Standard connector for connecting video equipment with a Kensington MicroSaver Security System. AUDIO (INPUT 1, 2) 23 terminal (Shared for INPUT 1 ...
XR10S|XR10X|XR20S|XR20X Operation Manual
Page 17
... switching the screen size (NORMAL, BORDER, etc.). 30 INPUT 1, 2, 3 and 4 buttons For switching to the respective input modes. 13 STANDBY button 27 For putting the projector into the standby mode. KEYSTONE button 31 For entering the Keystone Correction mode. AV MUTE button 30 For temporarily displaying the black screen and turning...
... switching the screen size (NORMAL, BORDER, etc.). 30 INPUT 1, 2, 3 and 4 buttons For switching to the respective input modes. 13 STANDBY button 27 For putting the projector into the standby mode. KEYSTONE button 31 For entering the Keystone Correction mode. AV MUTE button 30 For temporarily displaying the black screen and turning...
XR10S|XR10X|XR20S|XR20X Operation Manual
Page 18
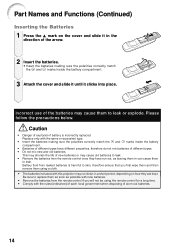
... and then remove them to leak. Be sure to skin, therefore ensure that you will not be using a cloth. • The batteries included with this projector may cause old batteries to leak. • Remove the batteries from leaked batteries is incorrectly replaced.
... and then remove them to leak. Be sure to skin, therefore ensure that you will not be using a cloth. • The batteries included with this projector may cause old batteries to leak. • Remove the batteries from leaked batteries is incorrectly replaced.
XR10S|XR10X|XR20S|XR20X Operation Manual
Page 19
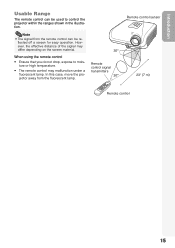
... remote control may differ depending on the screen material. When using the remote control • Ensure that you do not drop, expose to control the projector within the ranges shown in the illustration. However, the effective distance of the signal may malfunction under a fluorescent lamp. flected off a screen for easy operation...
... remote control may differ depending on the screen material. When using the remote control • Ensure that you do not drop, expose to control the projector within the ranges shown in the illustration. However, the effective distance of the signal may malfunction under a fluorescent lamp. flected off a screen for easy operation...

XR10S|XR10X|XR20S|XR20X Operation Manual
Page 20
... _PP. 21-26 3. Place the projector facing a wall or a screen _P. 18 2. Remove the lens cap and turn the projector on On the projector On the remote control _P. 27 16 Setup and Projection In this section, connection of the projector When connecting equipment other than the computer,... see the page described below for each step. Connect the projector to the computer and plug the power cord into the AC socket of the projector and the computer is explained using one example. 3 8 STANDBY/ON button 8 STANDBY button 6 INPUT button 4 ...
... _PP. 21-26 3. Place the projector facing a wall or a screen _P. 18 2. Remove the lens cap and turn the projector on On the projector On the remote control _P. 27 16 Setup and Projection In this section, connection of the projector When connecting equipment other than the computer,... see the page described below for each step. Connect the projector to the computer and plug the power cord into the AC socket of the projector and the computer is explained using one example. 3 8 STANDBY/ON button 8 STANDBY button 6 INPUT button 4 ...

XR10S|XR10X|XR20S|XR20X Operation Manual
Page 21
...INPUT button on the projector or C INPUT 1 on XR-20X.) On the projector Shrinks upper side. n page 42) 2 Follow the steps in the following order: INPUT1 INPUT2 INPUT3 INPUT4 • When using the remote control, press the CINPUT 1/CINPUT 2/DINPUT 3/EINPUT 4 button to put the projector into standby mode. ... switch the INPUT mode. _P. 30 7. On the remote control _P. 31 8. Adjust the projected image with the Setup Guide 1 After the projector turns on the remote control, and then press the button again while the confirmation message is set to finish the Setup Guide. _P. 28 5....
...INPUT button on the projector or C INPUT 1 on XR-20X.) On the projector Shrinks upper side. n page 42) 2 Follow the steps in the following order: INPUT1 INPUT2 INPUT3 INPUT4 • When using the remote control, press the CINPUT 1/CINPUT 2/DINPUT 3/EINPUT 4 button to put the projector into standby mode. ... switch the INPUT mode. _P. 30 7. On the remote control _P. 31 8. Adjust the projected image with the Setup Guide 1 After the projector turns on the remote control, and then press the button again while the confirmation message is set to finish the Setup Guide. _P. 28 5....

XR10S|XR10X|XR20S|XR20X Operation Manual
Page 22
...View Screen H Lens center L Note • Refer to the desired picture size. (See page 20.) Example of this installation. See page 42 for use the optional Sharp ceiling-mount bracket for this function. 18 Ceiling-mount Setup I Invert the image by setting "Ceiling... (Front Projection) I Place the projector at the required distance from the screen according to page 20 for additional information concerning "Screen Size and Projection Distance". Setting up the Projector Setting up the Projector For optimal image quality, position the projector perpendicular to obtain the recommended ceiling...
...View Screen H Lens center L Note • Refer to the desired picture size. (See page 20.) Example of this installation. See page 42 for use the optional Sharp ceiling-mount bracket for this function. 18 Ceiling-mount Setup I Invert the image by setting "Ceiling... (Front Projection) I Place the projector at the required distance from the screen according to page 20 for additional information concerning "Screen Size and Projection Distance". Setting up the Projector Setting up the Projector For optimal image quality, position the projector perpendicular to obtain the recommended ceiling...

XR10S|XR10X|XR20S|XR20X Operation Manual
Page 23
... a translucent screen) Menu item © "Rear" Menu item © "Ceiling + Rear" Indication of the 4 projection modes, shown in the diagram below. Projection (PRJ) Mode The projector can set the PRJ mode in "SCR-ADJ" menu.
... a translucent screen) Menu item © "Rear" Menu item © "Ceiling + Rear" Indication of the 4 projection modes, shown in the diagram below. Projection (PRJ) Mode The projector can set the PRJ mode in "SCR-ADJ" menu.

XR10S|XR10X|XR20S|XR20X Operation Manual
Page 24
... cm (52Љ) 125 cm (49Љ) 115 cm (45Љ) 105 cm (41Љ) 90 cm (35Љ) 75 cm (29Љ) 50 cm (20Љ) 9.5 m (31Ј 1Љ) 11.0 m (36Ј 0Љ) 8.5 m (28Ј 0Љ) 9.9 m (32Ј 5Љ) 7.6 m (24Ј 11Љ) 8.8 m (28Ј 10&#... with a minus (-) sign indicate the distance from the lens center to the bottom of the image (cm/in ) See page 41. Setting up the Projector (Continued) Screen Size and Projection Distance NORMAL Mode (4:3) Picture (Screen) size Diag. [χ] Width Height Projection distance [L] Minimum [L1] Maximum [L2...
... cm (52Љ) 125 cm (49Љ) 115 cm (45Љ) 105 cm (41Љ) 90 cm (35Љ) 75 cm (29Љ) 50 cm (20Љ) 9.5 m (31Ј 1Љ) 11.0 m (36Ј 0Љ) 8.5 m (28Ј 0Љ) 9.9 m (32Ј 5Љ) 7.6 m (24Ј 11Љ) 8.8 m (28Ј 10&#... with a minus (-) sign indicate the distance from the lens center to the bottom of the image (cm/in ) See page 41. Setting up the Projector (Continued) Screen Size and Projection Distance NORMAL Mode (4:3) Picture (Screen) size Diag. [χ] Width Height Projection distance [L] Minimum [L1] Maximum [L2...

XR10S|XR10X|XR20S|XR20X Operation Manual
Page 25
... INPUT 3 terminal Connecting video equipment with S-video output terminal (VCR, DVD player, etc.). (See page 24.) RS-232C terminal Connecting the computer to control the projector. (See page 26.) AUDIO OUTPUT terminal Connecting to this terminal. INPUT 4 terminal Connecting video equipment without Svideo output terminal. (See page 25.) 21
... INPUT 3 terminal Connecting video equipment with S-video output terminal (VCR, DVD player, etc.). (See page 24.) RS-232C terminal Connecting the computer to control the projector. (See page 26.) AUDIO OUTPUT terminal Connecting to this terminal. INPUT 4 terminal Connecting video equipment without Svideo output terminal. (See page 25.) 21


