
XL-MP150 Operation Manual
Page 2
... APPLIANCE TO RAIN OR MOISTURE. 0012 Caution - use of controls or adjustments or performance of procedures other than those specified herein may be obtained from that to which are designed to persons. Model number Serial number Date of purchase Place of the following measures: Reorient or relocate the receiving antenna. NO USER-SERVICEABLE PARTS INSIDE. Increase the separation between the equipment...
... APPLIANCE TO RAIN OR MOISTURE. 0012 Caution - use of controls or adjustments or performance of procedures other than those specified herein may be obtained from that to which are designed to persons. Model number Serial number Date of purchase Place of the following measures: Reorient or relocate the receiving antenna. NO USER-SERVICEABLE PARTS INSIDE. Increase the separation between the equipment...
XL-MP150 Operation Manual
Page 3
... a wet basement; Do not use instructions should be read before cleaning. This plug will only fit into the outlet, try reversing the plug. See Instruction Manual for replacement or resetting of the polarized plug. The safety and operating instructions should be blocked by the manufacturer, or sold with a three-wire grounding-type plug, a plug having overload protection. The product is operated. 2 Retain Instructions - Unplug this product on...
... a wet basement; Do not use instructions should be read before cleaning. This plug will only fit into the outlet, try reversing the plug. See Instruction Manual for replacement or resetting of the polarized plug. The safety and operating instructions should be blocked by the manufacturer, or sold with a three-wire grounding-type plug, a plug having overload protection. The product is operated. 2 Retain Instructions - Unplug this product on...

XL-MP150 Operation Manual
Page 4
... water, d) If the product does not operate normally by the manufacturer or have fallen into this indicates a need for service. 22 Replacement Parts - XL-MP150 IMPORTANT SAFETY INSTRUCTIONS (continued) Important Instruction 15 Outdoor Antenna Grounding - The product should not be sure the service technician has used replacement parts specified by following conditions: a) When the power-supply cord or plug is grounded so as radiators, heat registers...
... water, d) If the product does not operate normally by the manufacturer or have fallen into this indicates a need for service. 22 Replacement Parts - XL-MP150 IMPORTANT SAFETY INSTRUCTIONS (continued) Important Instruction 15 Outdoor Antenna Grounding - The product should not be sure the service technician has used replacement parts specified by following conditions: a) When the power-supply cord or plug is grounded so as radiators, heat registers...
XL-MP150 Operation Manual
Page 5
registered mark. 0312 Contents XL-MP150 Page „ General Information Precautions 6 Controls and indicators 7 - 9 „ Preparation for Use System connections 10 - 12 Remote control 13 „ Basic Operation General control 14 Setting the clock 15 Important Instruction „ CD or MP3/WMA disc Playback Listening to a CD or MP3/WMA disc 16 - 18 Advanced CD or MP3/WMA disc playback 19 - 21 MP3/WMA navigation...
registered mark. 0312 Contents XL-MP150 Page „ General Information Precautions 6 Controls and indicators 7 - 9 „ Preparation for Use System connections 10 - 12 Remote control 13 „ Basic Operation General control 14 Setting the clock 15 Important Instruction „ CD or MP3/WMA disc Playback Listening to a CD or MP3/WMA disc 16 - 18 Advanced CD or MP3/WMA disc playback 19 - 21 MP3/WMA navigation...

XL-MP150 Operation Manual
Page 6
... voltage used within the range of accident causing damage. Refer internal service to your system does not work properly, disconnect the AC power cord from direct sunlight, strong magnetic fields, excessive dust, humidity and electronic/electrical equip- Plug the AC power cord back in a fire or other than that specified on this may result in , and then turn on a firm, level surface free...
... voltage used within the range of accident causing damage. Refer internal service to your system does not work properly, disconnect the AC power cord from direct sunlight, strong magnetic fields, excessive dust, humidity and electronic/electrical equip- Plug the AC power cord back in a fire or other than that specified on this may result in , and then turn on a firm, level surface free...
XL-MP150 Operation Manual
Page 7
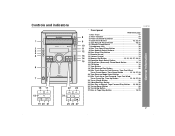
... Wind, Tuner Preset Down, Time Down Button . . . . . 15, 18, 27, 29 20. Disc Trays 17 2. Equalizer Mode Select Button 14 15. Video/Auxiliary Button 36 24. Extra Bass (Surround) /Demo Mode Button 12, 14 16. Tuner (Band) Button 26 23. Controls and indicators XL-MP150 „ Front panel Reference page 1. Remote Sensor 13 12. Power On/Stand-by Button 14 4. Disc Tray Open/Close Button 16 9. Disc Number Select Buttons 16 10. Tape Reverse Mode Select Button 28 21. Timer Indicator 33 3. Disc Play or Repeat, Tape Forward Play Button...
... Wind, Tuner Preset Down, Time Down Button . . . . . 15, 18, 27, 29 20. Disc Trays 17 2. Equalizer Mode Select Button 14 15. Video/Auxiliary Button 36 24. Extra Bass (Surround) /Demo Mode Button 12, 14 16. Tuner (Band) Button 26 23. Controls and indicators XL-MP150 „ Front panel Reference page 1. Remote Sensor 13 12. Power On/Stand-by Button 14 4. Disc Tray Open/Close Button 16 9. Disc Number Select Buttons 16 10. Tape Reverse Mode Select Button 28 21. Timer Indicator 33 3. Disc Play or Repeat, Tape Forward Play Button...

XL-MP150 Operation Manual
Page 8
... Stereo Receiving Indicator 26 14. Disc Play Indicator 17 „ Rear panel Reference page 1. AC Power Cord 12 3. Bass Reflex Duct 1 3 4. MP3 Indicator 17 5. Disc Repeat Play Indicator 20 20. Subwoofer Pre-output Jack 37 „ Speaker system 1. XL-MP150 Controls and indicators (continued) 12 3 45 6 78 9 General Information SPEAKERS SPEAKERS LIGHT-UP LEFT RIGHT 18 19 11 12 13 10 14 20 21 17 15 16 8 1 2 ANTENNA AM FM 75 OHMS GND LOOP VIDEO/AUX...
... Stereo Receiving Indicator 26 14. Disc Play Indicator 17 „ Rear panel Reference page 1. AC Power Cord 12 3. Bass Reflex Duct 1 3 4. MP3 Indicator 17 5. Disc Repeat Play Indicator 20 20. Subwoofer Pre-output Jack 37 „ Speaker system 1. XL-MP150 Controls and indicators (continued) 12 3 45 6 78 9 General Information SPEAKERS SPEAKERS LIGHT-UP LEFT RIGHT 18 19 11 12 13 10 14 20 21 17 15 16 8 1 2 ANTENNA AM FM 75 OHMS GND LOOP VIDEO/AUX...

XL-MP150 Operation Manual
Page 9
..., 35 19. Tape Forward Play Button 28 6 12 22. MP3/WMA Navigation Mode Select Button 23 24. Video/Auxiliary Button 36 17 22 12. Disc Play or Repeat Button 16, 20 21. Tape Record Pause Button 30, 31 23. XL-MP150 General Information 1 „ Remote control Reference page 1. Equalizer Mode Select Button 14 6. Disc Stop Button 18 16. Tape Stop Button 29 4 18. Disc Pause Button 18 5 26 27 28 29 20. MP3/WMA Display Button 18 25. Clock...
..., 35 19. Tape Forward Play Button 28 6 12 22. MP3/WMA Navigation Mode Select Button 23 24. Video/Auxiliary Button 36 17 22 12. Disc Play or Repeat Button 16, 20 21. Tape Record Pause Button 30, 31 23. XL-MP150 General Information 1 „ Remote control Reference page 1. Equalizer Mode Select Button 14 6. Disc Stop Button 18 16. Tape Stop Button 29 4 18. Disc Pause Button 18 5 26 27 28 29 20. MP3/WMA Display Button 18 25. Clock...

XL-MP150 Operation Manual
Page 11
... AC power cord may be placed in the direction where the strongest signal can damage the unit. XL-MP150 Preparation for Use „ Antenna connection Supplied FM antenna: Connect the FM antenna wire to the FM 75 OHMS terminal and position the FM antenna wire in the bass reflex ducts. Place the AM loop antenna on the remote control for 2 seconds or more , as lower im- To turn off the speaker light-up...
... AC power cord may be placed in the direction where the strongest signal can damage the unit. XL-MP150 Preparation for Use „ Antenna connection Supplied FM antenna: Connect the FM antenna wire to the FM 75 OHMS terminal and position the FM antenna wire in the bass reflex ducts. Place the AM loop antenna on the remote control for 2 seconds or more , as lower im- To turn off the speaker light-up...

XL-MP150 Operation Manual
Page 12
... SPEAKER IMPEDANCE: 6 OHMS MIN. Please do not cover the opening of time. X-BASS (SURROUND) /DEMO X-BASS (SURROUND) /DEMO To return to select the surround mode. „ Outdoor FM antenna Use an outdoor FM antenna if you require better reception. ANTENNA AM FM 75 OHMS GND LOOP VIDEO/AUX IN RIGHT LEFT RATED SPEAKER IMPEDANCE: 6 OHMS MIN. Preparation for Use SPEAKERS SPEAKERS LIGHT-UP LEFT RIGHT „ AC power connection After checking all the connections have been made correctly, plug the AC power cord...
... SPEAKER IMPEDANCE: 6 OHMS MIN. Please do not cover the opening of time. X-BASS (SURROUND) /DEMO X-BASS (SURROUND) /DEMO To return to select the surround mode. „ Outdoor FM antenna Use an outdoor FM antenna if you require better reception. ANTENNA AM FM 75 OHMS GND LOOP VIDEO/AUX IN RIGHT LEFT RATED SPEAKER IMPEDANCE: 6 OHMS MIN. Preparation for Use SPEAKERS SPEAKERS LIGHT-UP LEFT RIGHT „ AC power connection After checking all the connections have been made correctly, plug the AC power cord...

XL-MP150 Operation Manual
Page 14
... the EQUALIZER (EQUALIZER MODE) button repeatedly until the desired sound mode appears. To change to turn on/off and on the main unit with the volume set level. ROCK For rock music. „ Speaker light up according to the base level of the music source played back. To cancel this mode, press the X-BASS (SURROUND)/ DEMO [X-BASS (SURROUND)] button again. When it will increase. To turn the power on , light illuminates around the display. The speaker will enter the surround mode and adjust low bass...
... the EQUALIZER (EQUALIZER MODE) button repeatedly until the desired sound mode appears. To change to turn on/off and on the main unit with the volume set level. ROCK For rock music. „ Speaker light up according to the base level of the music source played back. To cancel this mode, press the X-BASS (SURROUND)/ DEMO [X-BASS (SURROUND)] button again. When it will increase. To turn the power on , light illuminates around the display. The speaker will enter the surround mode and adjust low bass...
XL-MP150 Operation Manual
Page 15
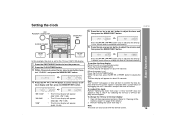
...;rm the time display when the AC power supply is on] Press the CLOCK/TIMER button. Within 10 seconds, press the or button to adjust the hour and then press the MEMORY/SET button. Basic Operation Press the or button once to se- X-BASS (SURROUND) /DEMO In this example, the clock is in 5-minute intervals. 1 Press the ON/STAND-BY button to turn the power on...
...;rm the time display when the AC power supply is on] Press the CLOCK/TIMER button. Within 10 seconds, press the or button to adjust the hour and then press the MEMORY/SET button. Basic Operation Press the or button once to se- X-BASS (SURROUND) /DEMO In this example, the clock is in 5-minute intervals. 1 Press the ON/STAND-BY button to turn the power on...
XL-MP150 Operation Manual
Page 16
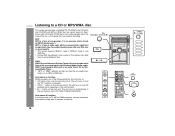
... Media Player. mation on and playback of the last function starts (CD,TAPE,TUNER,VIDEO/AUX). z This system supports MPEG 1 Layer 3, MPEG 2 Layer 3, and X-BASS (SURROUND) /DEMO VBR files. WMA is an acronym which are compressed with MP3 or WMA files, but cannot record on and the "CD" function is a form of compression. Auto power on . z CD / button on the remote control: The unit turns on...
... Media Player. mation on and playback of the last function starts (CD,TAPE,TUNER,VIDEO/AUX). z This system supports MPEG 1 Layer 3, MPEG 2 Layer 3, and X-BASS (SURROUND) /DEMO VBR files. WMA is an acronym which are compressed with MP3 or WMA files, but cannot record on and the "CD" function is a form of compression. Auto power on . z CD / button on the remote control: The unit turns on...

XL-MP150 Operation Manual
Page 27
.../SET (MEMORY) button to enter the preset tuning saving mode. 3 Within 30 seconds, press the PRESET ( or ) button to enter the stand-by mode. 2 While pressing down the button and the X-BASS (SUR- XL-MP150 „ Memorizing a station You can be scanned automatically. (Preset memory scan) 1 Press the PRESET ( or ) button for more than 0.5 seconds. The preset number will flash and the programmed stations will be erased. PRESET „ To erase entire preset...
.../SET (MEMORY) button to enter the preset tuning saving mode. 3 Within 30 seconds, press the PRESET ( or ) button to enter the stand-by mode. 2 While pressing down the button and the X-BASS (SUR- XL-MP150 „ Memorizing a station You can be scanned automatically. (Preset memory scan) 1 Press the PRESET ( or ) button for more than 0.5 seconds. The preset number will flash and the programmed stations will be erased. PRESET „ To erase entire preset...

XL-MP150 Operation Manual
Page 28
..., use C-120 tapes or poor-quality tapes, as they may cause malfunctions. sette compartment with a pen or a pencil. z TAPE button on the remote control: The unit turns on and playback of the last function). z / button on the main unit: The unit turns on and side A playback starts (regardless of the last function starts (CD,TAPE,TUNER,VIDEO/AUX). When playback starts from side A. For endless repeat play Auto power...
..., use C-120 tapes or poor-quality tapes, as they may cause malfunctions. sette compartment with a pen or a pencil. z TAPE button on the remote control: The unit turns on and playback of the last function). z / button on the main unit: The unit turns on and side A playback starts (regardless of the last function starts (CD,TAPE,TUNER,VIDEO/AUX). When playback starts from side A. For endless repeat play Auto power...

XL-MP150 Operation Manual
Page 33
... select the tuner, select a station by mode. The "TIMER" indicator lights up too high. 11Press the ON/STAND-BY button to select "PLAY" or "REC", and press the MEMORY/SET button. lect "ONCE SET" or "DAILY SET", and press the MEMORY/ SET button. 5 Press the or button to enter the power stand- z If a station has not been programmed, "NO PRESET" will be displayed and timer setting will be canceled. 10Adjust the volume using the VOLUME control...
... select the tuner, select a station by mode. The "TIMER" indicator lights up too high. 11Press the ON/STAND-BY button to select "PLAY" or "REC", and press the MEMORY/SET button. lect "ONCE SET" or "DAILY SET", and press the MEMORY/ SET button. 5 Press the or button to enter the power stand- z If a station has not been programmed, "NO PRESET" will be displayed and timer setting will be canceled. 10Adjust the volume using the VOLUME control...

XL-MP150 Operation Manual
Page 34
... it is canceled. XL-MP150 Timer and sleep operation (continued) Advanced Features 12When the preset time is reached, the system will enter the power stand-by mode. This unit will not turn on or enter the power stand-by mode: 1 Press the CLOCK/TIMER button. 2 Within 10 seconds, press the or button to select "ONCE" or "DAILY", and press the MEMORY/SET button. 3 Within 10...
... it is canceled. XL-MP150 Timer and sleep operation (continued) Advanced Features 12When the preset time is reached, the system will enter the power stand-by mode. This unit will not turn on or enter the power stand-by mode: 1 Press the CLOCK/TIMER button. 2 Within 10 seconds, press the or button to select "ONCE" or "DAILY", and press the MEMORY/SET button. 3 Within 10...

XL-MP150 Operation Manual
Page 36
Auto power on function: When you press any of the last function starts (CD,TAPE,TUNER,VIDEO/AUX). „ Headphones z Before plugging in or unplugging the headphones, reduce the volume. AC INPUT RIGHT LEFT SUBWOOFER PRE-OUT X-BASS (SURROUND) /DEMO „ Listening to the playback sounds from the television. „ To record on . to connect the VCR, DVD, etc. z Be sure your system The connection cord is not included. When using the VOLUME control. 36...
Auto power on function: When you press any of the last function starts (CD,TAPE,TUNER,VIDEO/AUX). „ Headphones z Before plugging in or unplugging the headphones, reduce the volume. AC INPUT RIGHT LEFT SUBWOOFER PRE-OUT X-BASS (SURROUND) /DEMO „ Listening to the playback sounds from the television. „ To record on . to connect the VCR, DVD, etc. z Be sure your system The connection cord is not included. When using the VOLUME control. 36...
XL-MP150 Operation Manual
Page 37
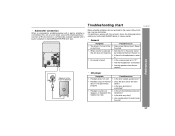
... SPEAKER IMPEDANCE: 6 OHMS MIN. z Is the disc distorted or scratched? z Has condensation formed inside the unit? 37 „ Subwoofer connection When a commercially available speaker with a built-in amplifier is heard. z No sound is connected to this product, check the following before calling your authorized SHARP dealer or service center. „ General Symptom Possible cause z The clock is pressed, z Set the unit to the SUBWOOFER PRE-OUT jack. XL-MP150 SPEAKERS SPEAKERS LIGHT...
... SPEAKER IMPEDANCE: 6 OHMS MIN. z Is the disc distorted or scratched? z Has condensation formed inside the unit? 37 „ Subwoofer connection When a commercially available speaker with a built-in amplifier is heard. z No sound is connected to this product, check the following before calling your authorized SHARP dealer or service center. „ General Symptom Possible cause z The clock is pressed, z Set the unit to the SUBWOOFER PRE-OUT jack. XL-MP150 SPEAKERS SPEAKERS LIGHT...

XL-MP150 Operation Manual
Page 41
... Speakers: 6 ohms Headphones: 16 - 50 ohms (recommended: 32 ohms) Subwoofer pre-out (audio signal): 200 mV/10 k ohms at 70 Hz Video/Auxiliary (audio signal): 500 mV/47 k ohms „ CD player Type Signal readout D/A converter Frequency response Dynamic range 5-disc multi-play compact disc player Non-contact, 3-beam semiconductor laser pickup 1-bit D/A converter 20 - 20,000 Hz 90 dB (1 kHz) „ Tuner Frequency range FM: 87.5 - 108 MHz AM: 530 - 1,720 kHz „ Cassette deck Frequency response Signal...
... Speakers: 6 ohms Headphones: 16 - 50 ohms (recommended: 32 ohms) Subwoofer pre-out (audio signal): 200 mV/10 k ohms at 70 Hz Video/Auxiliary (audio signal): 500 mV/47 k ohms „ CD player Type Signal readout D/A converter Frequency response Dynamic range 5-disc multi-play compact disc player Non-contact, 3-beam semiconductor laser pickup 1-bit D/A converter 20 - 20,000 Hz 90 dB (1 kHz) „ Tuner Frequency range FM: 87.5 - 108 MHz AM: 530 - 1,720 kHz „ Cassette deck Frequency response Signal...


