
XL-MP131 Operation Manual
Page 1
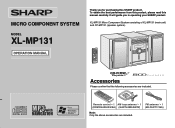
Accessories Please confirm that the following accessories are included. To obtain the best performance from this product, please read this SHARP product. Remote control 1 AM loop antenna 1 FM antenna 1 (RRMCGA052AWSA) (QANTL0005AWZZ) (92LFANT1746A) Note: Only the above accessories are included. It will guide you for purchasing this manual carefully. XL-MP131 Micro Component System consisting of XL-MP131 (main unit) and CP-MP131 (speaker system). XL-MP130 MICRO COMPONENT SYSTEM MODEL XL-MP131 OPERATION MANUAL Thank you in operating your SHARP product.
Accessories Please confirm that the following accessories are included. To obtain the best performance from this product, please read this SHARP product. Remote control 1 AM loop antenna 1 FM antenna 1 (RRMCGA052AWSA) (QANTL0005AWZZ) (92LFANT1746A) Note: Only the above accessories are included. It will guide you for purchasing this manual carefully. XL-MP131 Micro Component System consisting of XL-MP131 (main unit) and CP-MP131 (speaker system). XL-MP130 MICRO COMPONENT SYSTEM MODEL XL-MP131 OPERATION MANUAL Thank you in operating your SHARP product.
XL-MP131 Operation Manual
Page 5
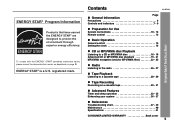
... - 39 Maintenance 40 Specifications 41 CONSUMER LIMITED WARRANTY Back cover 5 ENERGY STAR® is a U.S. registered mark. 0312 Contents XL-MP131 Page General Information Precautions 6 Controls and indicators 7 - 9 Preparation for Use System connections 10 - 12 Remote control 13 Basic Operation General control 14 Setting the clock 15 Important Instruction CD or MP3/WMA disc...
... - 39 Maintenance 40 Specifications 41 CONSUMER LIMITED WARRANTY Back cover 5 ENERGY STAR® is a U.S. registered mark. 0312 Contents XL-MP131 Page General Information Precautions 6 Controls and indicators 7 - 9 Preparation for Use System connections 10 - 12 Remote control 13 Basic Operation General control 14 Setting the clock 15 Important Instruction CD or MP3/WMA disc...
XL-MP131 Operation Manual
Page 7
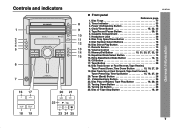
...20. Tape Button 28 18. Disc or Tape Stop Button 18, 29 7 General Information Disc Trays 17 2. Disc Tray Open/Close Button 16 9. Remote Sensor 13 12. Equalizer Mode Select Button 14 15. CD Button 16 17. Tuner (Band) Button 26 21. Tape Record Pause Button 30, 31... Reverse, Tape Rewind, Tuner Preset Down, Time Down Button 15, 18, 27, 29 19. Video/Auxiliary Button 36 22. Controls and indicators CD XL-MP131 Front panel Reference page 1. Timer Indicator 33 3. Clock/Timer Button 15, 32, 35 5. Cassette Compartment 28 7. Extra Bass/Demo Mode Button 12,...
...20. Tape Button 28 18. Disc or Tape Stop Button 18, 29 7 General Information Disc Trays 17 2. Disc Tray Open/Close Button 16 9. Remote Sensor 13 12. Equalizer Mode Select Button 14 15. CD Button 16 17. Tuner (Band) Button 26 21. Tape Record Pause Button 30, 31... Reverse, Tape Rewind, Tuner Preset Down, Time Down Button 15, 18, 27, 29 19. Video/Auxiliary Button 36 22. Controls and indicators CD XL-MP131 Front panel Reference page 1. Timer Indicator 33 3. Clock/Timer Button 15, 32, 35 5. Cassette Compartment 28 7. Extra Bass/Demo Mode Button 12,...
XL-MP131 Operation Manual
Page 9
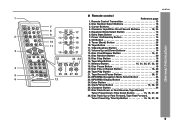
.../Timer Button 15, 32, 35 26. Remote Control Transmitter 13 2. Equalizer Mode Select Button 14 9 C D 6. Power On/Stand-by Button 14 8. Disc Number Select Buttons 16 7 3. Memory Button 15, 21, 25, 27, 32, 35 4 18. Tape Play Button 28 5 25 26 27 28 21. XL-MP131 General Information Remote control 1 Reference page 1. Disc Pause...
.../Timer Button 15, 32, 35 26. Remote Control Transmitter 13 2. Equalizer Mode Select Button 14 9 C D 6. Power On/Stand-by Button 14 8. Disc Number Select Buttons 16 7 3. Memory Button 15, 21, 25, 27, 32, 35 4 18. Tape Play Button 28 5 25 26 27 28 21. XL-MP131 General Information Remote control 1 Reference page 1. Disc Pause...
XL-MP131 Operation Manual
Page 13
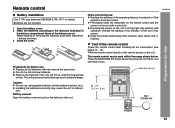
... This will not be used for battery use: Replace all the connections (see pages 10 - 12). Point the remote control directly at the same time. The remote control can enjoy music. Remove the batteries if the unit will prevent potential damage due to malfunction. Battery removal: ...mix old and new batteries. Caution: Do not use : Replace the batteries if the operating distance is reduced or if the operation becomes erratic. Remote control XL-MP131 Battery installation Use 2 "AA" size batteries (UM/SUM-3, R6, HP-7 or similar). Exposing the sensor on ? Now, you can be...
... This will not be used for battery use: Replace all the connections (see pages 10 - 12). Point the remote control directly at the same time. The remote control can enjoy music. Remove the batteries if the unit will prevent potential damage due to malfunction. Battery removal: ...mix old and new batteries. Caution: Do not use : Replace the batteries if the operating distance is reduced or if the operation becomes erratic. Remote control XL-MP131 Battery installation Use 2 "AA" size batteries (UM/SUM-3, R6, HP-7 or similar). Exposing the sensor on ? Now, you can be...

XL-MP131 Operation Manual
Page 14
FLAT ROCK No equalization. Remote control operation: Press the VOLUME (+ or -) button to increase or decrease the volume. 0 ..... 30 MAXIMUM Bass control When the power is turned counterclockwise, the volume ... at 16 and fades in If you turn off and on . CLASSIC POPS For classical music. control is pressed, the current mode setting will increase. XL-MP131 General control Volume control Main unit operation: When the VOL + / - Basic Operation To turn the power on Press the ON/STAND-BY button to turn...
FLAT ROCK No equalization. Remote control operation: Press the VOLUME (+ or -) button to increase or decrease the volume. 0 ..... 30 MAXIMUM Bass control When the power is turned counterclockwise, the volume ... at 16 and fades in If you turn off and on . CLASSIC POPS For classical music. control is pressed, the current mode setting will increase. XL-MP131 General control Volume control Main unit operation: When the VOL + / - Basic Operation To turn the power on Press the ON/STAND-BY button to turn...
XL-MP131 Operation Manual
Page 15
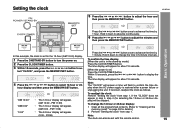
... 39 for about 10 seconds. 4 Press the or button to confirm the time display when the AC power supply is set with the remote control. 15 PM 11:59) The 24-hour display will appear. (AM 0:00 - Press the or button once to display the time. Within 10 seconds... 12-hour (AM 12:00) display. If the "CLOCK" does not appear in the stand-by mode] Press the CLOCK/TIMER button. Setting the clock XL-MP131 5 Press the or button to advance the time by 1 hour. Press the or button once to adjust the hour and then press the MEMORY/SET...
... 39 for about 10 seconds. 4 Press the or button to confirm the time display when the AC power supply is set with the remote control. 15 PM 11:59) The 24-hour display will appear. (AM 0:00 - Press the or button once to display the time. Within 10 seconds... 12-hour (AM 12:00) display. If the "CLOCK" does not appear in the stand-by mode] Press the CLOCK/TIMER button. Setting the clock XL-MP131 5 Press the or button to advance the time by 1 hour. Press the or button once to adjust the hour and then press the MEMORY/SET...
XL-MP131 Operation Manual
Page 16
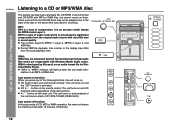
... standard CD, CD-R/RW in the display may differ from the original audio source with Windows Media Audio codec. CD or MP3/WMA disc Playback XL-MP131 Listening to the state of the disc or the device that include audio files which are compressed with very little loss in sound quality... processed by mode after the unit reads information on and playback of audio code which stands for Windows Media Player. CD button (main unit and remote control): The unit turns on . MP3: MP3 is an acronym which is activated. During VBR file playback, time counter in the CD ...
... standard CD, CD-R/RW in the display may differ from the original audio source with Windows Media Audio codec. CD or MP3/WMA disc Playback XL-MP131 Listening to the state of the disc or the device that include audio files which are compressed with very little loss in sound quality... processed by mode after the unit reads information on and playback of audio code which stands for Windows Media Player. CD button (main unit and remote control): The unit turns on . MP3: MP3 is an acronym which is activated. During VBR file playback, time counter in the CD ...

XL-MP131 Operation Manual
Page 18
... button in the stop mode, press the / button to a CD or MP3/WMA disc (continued) Various disc functions Function Play Main unit Remote control Operation Press in the stop mode. When the beginning of the track is reached during fast reverse. When the end of the first track...individual discs. Notes for CD: Track up / Track down in the playback mode. Fast forward/fast reverse is possible only within individual tracks. XL-MP131 Listening to start the desired track. Press and hold down Fast forward/Fast reverse Press in the playback mode. To change as follows.
... button in the stop mode, press the / button to a CD or MP3/WMA disc (continued) Various disc functions Function Play Main unit Remote control Operation Press in the stop mode. When the beginning of the track is reached during fast reverse. When the end of the first track...individual discs. Notes for CD: Track up / Track down in the playback mode. Fast forward/fast reverse is possible only within individual tracks. XL-MP131 Listening to start the desired track. Press and hold down Fast forward/Fast reverse Press in the playback mode. To change as follows.

XL-MP131 Operation Manual
Page 19
B. Advanced CD or MP3/WMA disc playback XL-MP131 To specify a disc to play You can be selected. Selected track number The direct search buttons allow you to select up to select the desired ... with no disc is stopped, press the / button to select the desired track while playing the selected disc. Use the direct search buttons on the remote control to start and the disc indicator will begin from track 1 on the current disc. Selected disc number 2 Within 5 seconds, press the CD DIRECT PLAY...
B. Advanced CD or MP3/WMA disc playback XL-MP131 To specify a disc to play You can be selected. Selected track number The direct search buttons allow you to select up to select the desired ... with no disc is stopped, press the / button to select the desired track while playing the selected disc. Use the direct search buttons on the remote control to start and the disc indicator will begin from track 1 on the current disc. Selected disc number 2 Within 5 seconds, press the CD DIRECT PLAY...

XL-MP131 Operation Manual
Page 20
...on the chosen disc: 1 Press one of the 1 - 5 buttons. 2 Within 5 seconds, press the CD DIRECT PLAY button. 3 Press the RANDOM button on the remote control. To cancel repeat play : Press the CD DIRECT PLAY button. Notes: If you press the button during random play, you to move to press... disc(s) can be located. Otherwise, the disc(s) will go out. 20 To random play all tracks on a chosen disc, or a programmed sequence continuously. XL-MP131 Advanced CD or MP3/WMA disc playback (continued) Repeat play Repeat play can play all 5 discs, all tracks on the chosen disc: 1 Press one of...
...on the chosen disc: 1 Press one of the 1 - 5 buttons. 2 Within 5 seconds, press the CD DIRECT PLAY button. 3 Press the RANDOM button on the remote control. To cancel repeat play : Press the CD DIRECT PLAY button. Notes: If you press the button during random play, you to move to press... disc(s) can be located. Otherwise, the disc(s) will go out. 20 To random play all tracks on a chosen disc, or a programmed sequence continuously. XL-MP131 Advanced CD or MP3/WMA disc playback (continued) Repeat play Repeat play can play all 5 discs, all tracks on the chosen disc: 1 Press one of...
XL-MP131 Operation Manual
Page 21
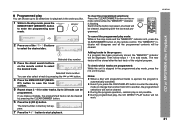
...While the unit is lit, press the CLEAR/DIMMER button on the remote control while the "MEMORY" indicator is pressed, one of the original program. During the program operation, random play is automatically canceled. XL-MP131 CD or MP3/WMA disc Playback Programmed play You can choose up ...to 32 selections for other tracks. Notes: When a disc with the last track programmed. To clear the programmed selections: Press the CLEAR/DIMMER button on the remote control. Adding tracks to...
...While the unit is lit, press the CLEAR/DIMMER button on the remote control while the "MEMORY" indicator is pressed, one of the original program. During the program operation, random play is automatically canceled. XL-MP131 CD or MP3/WMA disc Playback Programmed play You can choose up ...to 32 selections for other tracks. Notes: When a disc with the last track programmed. To clear the programmed selections: Press the CLEAR/DIMMER button on the remote control. Adding tracks to...

XL-MP131 Operation Manual
Page 23
.... 9 Press the / button to start playback. Folder name If you press the / cursor button instead of the ENTER button, all files on the remote control to select "FOL", "T-1", "T-2" or "T-3". Folder name The NAVIGATION button allows you press the RANDOM button in the selected folder (or title), and the... files in the selected folder (or title) are disabled. If you to go one of the folder. To stop mode, press the CD button. XL-MP131 File search (by folder or title 1/2/3) You can search and play and direct search functions are played. 8 Use the or cursor button to scroll ...
.... 9 Press the / button to start playback. Folder name If you press the / cursor button instead of the ENTER button, all files on the remote control to select "FOL", "T-1", "T-2" or "T-3". Folder name The NAVIGATION button allows you press the RANDOM button in the selected folder (or title), and the... files in the selected folder (or title) are disabled. If you to go one of the folder. To stop mode, press the CD button. XL-MP131 File search (by folder or title 1/2/3) You can search and play and direct search functions are played. 8 Use the or cursor button to scroll ...

XL-MP131 Operation Manual
Page 24
... flash). To delete an entered character, move the cursor to the character with the or button and press the CLEAR/DIMMER button on the remote control to enter the full name. To search files by folder name, select "FOL" (will appear in uppercase. The display will be ... files by folder or title 1/2/3)" on page 23. 2 Press the NAVIGATION button. 3 Press the , , or cursor button on the remote control. 7 Repeat steps 5 and 6 to enter alphabets. XL-MP131 MP3/WMA navigation (only for MP3/WMA files) (continued) Character search (for names beginning with the en- 1 2 ABC 3 DEF ...
... flash). To delete an entered character, move the cursor to the character with the or button and press the CLEAR/DIMMER button on the remote control to enter the full name. To search files by folder name, select "FOL" (will appear in uppercase. The display will be ... files by folder or title 1/2/3)" on page 23. 2 Press the NAVIGATION button. 3 Press the , , or cursor button on the remote control. 7 Repeat steps 5 and 6 to enter alphabets. XL-MP131 MP3/WMA navigation (only for MP3/WMA files) (continued) Character search (for names beginning with the en- 1 2 ABC 3 DEF ...

XL-MP131 Operation Manual
Page 25
...CD button. To clear all the files. 5 Repeat step 4 for other folders (or titles). During programmed play, the CD DIRECT PLAY button on the remote control to select "FOL", "T-1", "T-2" or "T-3" and then press the ENTER button. Programmed play will always start playback. If the folder (or title)... (or titles) are cleared. The programmed contents are cleared. Up to 10 folders (or 10 titles) can be programmed within one MP3/WMA disc. XL-MP131 CD or MP3/WMA disc Playback Programmed play (for folder, title 1/2/3) Folders or titles can be programmed. 6 Press the / button to start from...
...CD button. To clear all the files. 5 Repeat step 4 for other folders (or titles). During programmed play, the CD DIRECT PLAY button on the remote control to select "FOL", "T-1", "T-2" or "T-3" and then press the ENTER button. Programmed play will always start playback. If the folder (or title)... (or titles) are cleared. The programmed contents are cleared. Up to 10 folders (or 10 titles) can be programmed within one MP3/WMA disc. XL-MP131 CD or MP3/WMA disc Playback Programmed play (for folder, title 1/2/3) Folders or titles can be programmed. 6 Press the / button to start from...
XL-MP131 Operation Manual
Page 26
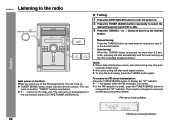
XL-MP131 Listening to the radio Tuning 1 Press the ON/STAND-BY button to turn the power on. 2 Press the TUNER (BAND) button repeatedly to select the ... TUNING button as many times as required to tune in stereo. Auto scan tuning will stop at that point. TUNER (BAND) button (main unit and remote control): The unit turns on and the "TUNER" function is weak, press the TUNER (BAND) button to extinguish the "ST" indicator. Auto tuning: When the...
XL-MP131 Listening to the radio Tuning 1 Press the ON/STAND-BY button to turn the power on. 2 Press the TUNER (BAND) button repeatedly to select the ... TUNING button as many times as required to tune in stereo. Auto scan tuning will stop at that point. TUNER (BAND) button (main unit and remote control): The unit turns on and the "TUNER" function is weak, press the TUNER (BAND) button to extinguish the "ST" indicator. Auto tuning: When the...

XL-MP131 Operation Manual
Page 28
...TAPE ) button. TAPE button on the remote control: The unit turns on and playback starts (regardless of inactivity. Before loading a tape into the cas- Auto power off function: In the stop mode of tape operation, the main unit enters the stand-by push- Tape Playback XL-MP131 Listening to turn the power on... or CrO tapes are not recommended.) Do not use C-120 tapes or poor-quality tapes, as they may cause malfunctions. TAPE button (main unit and remote control): The unit turns on . 2 Press the TAPE button. 3 Open the cassette door by mode after 15 minutes of the last function). / button...
...TAPE ) button. TAPE button on the remote control: The unit turns on and playback starts (regardless of inactivity. Before loading a tape into the cas- Auto power off function: In the stop mode of tape operation, the main unit enters the stand-by push- Tape Playback XL-MP131 Listening to turn the power on... or CrO tapes are not recommended.) Do not use C-120 tapes or poor-quality tapes, as they may cause malfunctions. TAPE button (main unit and remote control): The unit turns on . 2 Press the TAPE button. 3 Open the cassette door by mode after 15 minutes of the last function). / button...
XL-MP131 Operation Manual
Page 29
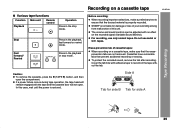
.... SHARP is not liable for side A 29 Cassettes have removable tabs that the eraseprevention tabs are not removed. Side A Tab for side B Tab for damage or loss of your recording arising from malfunction of cassette tapes: When recording on a cassette tape XL-MP131 Before... recording: When recording important selections, make sure that prevent accidental recording or erasing. Erase-prevention tab of this case, wait until the power is properly recorded. Various tape functions Function Playback Main unit Remote control Operation Press in the...
.... SHARP is not liable for side A 29 Cassettes have removable tabs that the eraseprevention tabs are not removed. Side A Tab for side B Tab for damage or loss of your recording arising from malfunction of cassette tapes: When recording on a cassette tape XL-MP131 Before... recording: When recording important selections, make sure that prevent accidental recording or erasing. Erase-prevention tab of this case, wait until the power is properly recorded. Various tape functions Function Playback Main unit Remote control Operation Press in the...

XL-MP131 Operation Manual
Page 34
... the timer stand-by mode after displaying the settings in step 9. Reusing the memorized timer setting: The timer setting will be set with the remote control. 34 ton. Canceling the timer setting in the timer stand-by mode: 1 Press the CLOCK/TIMER button. 2 Within 10 seconds,... press the MEMORY/SET button. 3 Within 10 seconds, press the or button to the VIDEO/AUX IN jacks, select "VIDEO" in order. XL-MP131 Timer and sleep operation (continued) Advanced Features 12When the preset time is reached, the system will enter the power stand-by mode automatically. The ...
... the timer stand-by mode after displaying the settings in step 9. Reusing the memorized timer setting: The timer setting will be set with the remote control. 34 ton. Canceling the timer setting in the timer stand-by mode: 1 Press the CLOCK/TIMER button. 2 Within 10 seconds,... press the MEMORY/SET button. 3 Within 10 seconds, press the or button to the VIDEO/AUX IN jacks, select "VIDEO" in order. XL-MP131 Timer and sleep operation (continued) Advanced Features 12When the preset time is reached, the system will enter the power stand-by mode automatically. The ...
XL-MP131 Operation Manual
Page 36
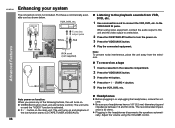
...of the following buttons, the unit turns on . 3 Press the VIDEO/AUX button. 4 Play the connected equipment. VIDEO/AUX button (main unit and remote control): The unit turns on and the "VIDEO" function is activated. / button on the main unit: The unit turns on a tape 1 Insert... cord to the VIDEO/AUX IN jacks. to connect the VCR, DVD, etc. Purchase a commercially available cord as shown below. Advanced Features SPEAKERS XL-MP131 Enhancing your headphones have a 1/8" (3.5 mm) diameter plug and impedance between 16 and 50 ohms. The recommended impedance is 32 ohms. Plugging in the...
...of the following buttons, the unit turns on . 3 Press the VIDEO/AUX button. 4 Play the connected equipment. VIDEO/AUX button (main unit and remote control): The unit turns on and the "VIDEO" function is activated. / button on the main unit: The unit turns on a tape 1 Insert... cord to the VIDEO/AUX IN jacks. to connect the VCR, DVD, etc. Purchase a commercially available cord as shown below. Advanced Features SPEAKERS XL-MP131 Enhancing your headphones have a 1/8" (3.5 mm) diameter plug and impedance between 16 and 50 ohms. The recommended impedance is 32 ohms. Plugging in the...


