
XL-HP505 Operation Manual
Page 1
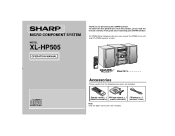
Remote control 1 AM loop antenna 1 FM antenna 1 (RRMCG0408AWSA) (QANTL0005AWZZ) (92LFANT1746A) Note: Only the above accessories are included. MICRO COMPONENT SYSTEM MODEL XL-HP505 OPERATION MANUAL Thank you in operating your SHARP product. Accessories Please confirm that the following accessories are included. XL-HP505 Micro Component System consisting of XL-HP505 (main unit) and CP-HP505 (speaker system). It will guide you for purchasing this manual carefully. To obtain the best performance from this product, please read this SHARP product.
Remote control 1 AM loop antenna 1 FM antenna 1 (RRMCG0408AWSA) (QANTL0005AWZZ) (92LFANT1746A) Note: Only the above accessories are included. MICRO COMPONENT SYSTEM MODEL XL-HP505 OPERATION MANUAL Thank you in operating your SHARP product. Accessories Please confirm that the following accessories are included. XL-HP505 Micro Component System consisting of XL-HP505 (main unit) and CP-HP505 (speaker system). It will guide you for purchasing this manual carefully. To obtain the best performance from this product, please read this SHARP product.
XL-HP505 Operation Manual
Page 5
...SHARP has determined that this will mean more than $1 billion a year in use. ENERGY STAR® is a U.S. CD Playback Listening to global warming. Many Electrical /Electronic Products use less energy. lent to 75 percent. General Information Page Precautions 6 Controls and indicators 7 - 9 ! Basic Operation Remote...Use System connections 10 - 12 ! Tape Playback Listening to the radio 21, 22 ! registered mark. 0209 Contents XL-HP505 Important Instruction ! Radio Listening to a cassette tape 23, 24 ! registered mark. ergy "leakage" by home ...
...SHARP has determined that this will mean more than $1 billion a year in use. ENERGY STAR® is a U.S. CD Playback Listening to global warming. Many Electrical /Electronic Products use less energy. lent to 75 percent. General Information Page Precautions 6 Controls and indicators 7 - 9 ! Basic Operation Remote...Use System connections 10 - 12 ! Tape Playback Listening to the radio 21, 22 ! registered mark. 0209 Contents XL-HP505 Important Instruction ! Radio Listening to a cassette tape 23, 24 ! registered mark. ergy "leakage" by home ...

XL-HP505 Operation Manual
Page 9
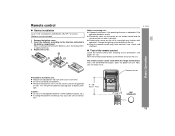
...Fast Wind, Tuner Preset Up, Time Up Button 15, 17, 24 5 14. CD Clear/Dimmer Button 14, 20 17. CD Pause Button 17 22. XL-HP505 General Information ! Remote Control Transmitter 13 2. Disc Direct Search Buttons 18 2 16 21 6. Equalizer Mode Select Button 14 11 17 7. CD Play or Repeat Button 16, 19...21. Tape Record Pause Button 25, 26 Buttons with " " mark in the illustration or highlighted in bold on the list can be operated on the remote control only. 9 Power On/Stand-by Button 14 3 12 18 13 19 9. Tuner (Band) Button 21 24 11. Tape Reverse Play Button 23 ...
...Fast Wind, Tuner Preset Up, Time Up Button 15, 17, 24 5 14. CD Clear/Dimmer Button 14, 20 17. CD Pause Button 17 22. XL-HP505 General Information ! Remote Control Transmitter 13 2. Disc Direct Search Buttons 18 2 16 21 6. Equalizer Mode Select Button 14 11 17 7. CD Play or Repeat Button 16, 19...21. Tape Record Pause Button 25, 26 Buttons with " " mark in the illustration or highlighted in bold on the list can be operated on the remote control only. 9 Power On/Stand-by Button 14 3 12 18 13 19 9. Tuner (Band) Button 21 24 11. Tape Reverse Play Button 23 ...
XL-HP505 Operation Manual
Page 13
... the batteries if the operating distance is reduced or if the operation becomes erratic. Point the remote control directly at the same time. XL-HP505 Remote sensor Basic Operation Precautions for long periods of time. " Periodically clean the transmitter on the... remote control and the sensor on the unit with new ones at the remote sensor on ? tion. 8" - 20' (0.2 m - 6 m) 13 Battery installation Use 2...
... the batteries if the operating distance is reduced or if the operation becomes erratic. Point the remote control directly at the same time. XL-HP505 Remote sensor Basic Operation Precautions for long periods of time. " Periodically clean the transmitter on the... remote control and the sensor on the unit with new ones at the remote sensor on ? tion. 8" - 20' (0.2 m - 6 m) 13 Battery installation Use 2...
XL-HP505 Operation Manual
Page 14
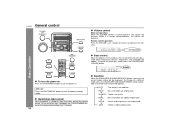
...hold down the CLEAR/DIMMER button on . ! After use: Press the ON/STAND-BY button to increase or decrease the volume. 0 ..... 30 MAXIMAM ! Remote control operation: Press the VOLUME (+ or -) button to enter the power stand-by mode. Basic Operation ! Equalizer When the EQUALIZER (EQUALIZER MODE) button is...frequencies, and "X-BASS" will be displayed. Volume control Main unit operation: When the VOLUME control is turned counterclockwise, the volume will increase. XL-HP505 General control ! Vocals (midrange tones) are emphasized. CLASSIC Treble is slightly emphasized.
...hold down the CLEAR/DIMMER button on . ! After use: Press the ON/STAND-BY button to increase or decrease the volume. 0 ..... 30 MAXIMAM ! Remote control operation: Press the VOLUME (+ or -) button to enter the power stand-by mode. Basic Operation ! Equalizer When the EQUALIZER (EQUALIZER MODE) button is...frequencies, and "X-BASS" will be displayed. Volume control Main unit operation: When the VOLUME control is turned counterclockwise, the volume will increase. XL-HP505 General control ! Vocals (midrange tones) are emphasized. CLASSIC Treble is slightly emphasized.
XL-HP505 Operation Manual
Page 15
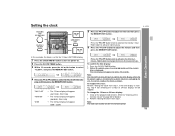
... the ON/STAND-BY button to confirm the time display when the AC power supply is displayed. If the time display is set with the remote control. 15 "AM 12:00" "AM 0:00" "0:00" The 12-hour display will appear for details.] 2 Perform "Setting the clock" from step 1. PM 11:59... the clock: Perform "Setting the clock" from step 1. Hold it down to adjust the minutes and then press the MEMORY/SET button. Setting the clock XL-HP505 5 Press the or button to select 12-hour or 24-hour dis- To change the time in 5-minute intervals.
... the ON/STAND-BY button to confirm the time display when the AC power supply is displayed. If the time display is set with the remote control. 15 "AM 12:00" "AM 0:00" "0:00" The 12-hour display will appear for details.] 2 Perform "Setting the clock" from step 1. PM 11:59... the clock: Perform "Setting the clock" from step 1. Hold it down to adjust the minutes and then press the MEMORY/SET button. Setting the clock XL-HP505 5 Press the or button to select 12-hour or 24-hour dis- To change the time in 5-minute intervals.
XL-HP505 Operation Manual
Page 17
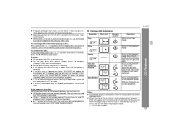
... forward/fast reverse are possible only within individual discs. To remove the CDs: In the stop mode. Various CD functions Function Play Main unit Remote control Operation Press in the playback mode. " After the last track on the fifth disc is moving. or octagon- " When the end ... during fast forward, " END" will appear on the display and CD operation will enter the playback mode. ( : Last track number) CD Playback XL-HP505 17 Press in one of the last track is reached during fast reverse, the unit will be skipped to resume playback. shaped). When the beginning...
... forward/fast reverse are possible only within individual discs. To remove the CDs: In the stop mode. Various CD functions Function Play Main unit Remote control Operation Press in the playback mode. " After the last track on the fifth disc is moving. or octagon- " When the end ... during fast forward, " END" will appear on the display and CD operation will enter the playback mode. ( : Last track number) CD Playback XL-HP505 17 Press in one of the last track is reached during fast reverse, the unit will be skipped to resume playback. shaped). When the beginning...
XL-HP505 Operation Manual
Page 18
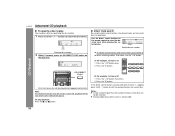
...a disc by specifying the disc number. 1 Press one of the 1 - 5 buttons to start and the disc indicator will be played and stopped automatically. XL-HP505 Advanced CD playback ! For example, to choose 30 1 Press the "+10" button three times. 2 Press the "0" button. CD Playback Only the chosen disc... will go out. Use the direct search buttons on the remote control to number 9. " The direct search buttons allow you to select up to select the desired track while playing the selected disc. If the ...
...a disc by specifying the disc number. 1 Press one of the 1 - 5 buttons to start and the disc indicator will be played and stopped automatically. XL-HP505 Advanced CD playback ! For example, to choose 30 1 Press the "+10" button three times. 2 Press the "0" button. CD Playback Only the chosen disc... will go out. Use the direct search buttons on the remote control to number 9. " The direct search buttons allow you to select up to select the desired track while playing the selected disc. If the ...

XL-HP505 Operation Manual
Page 19
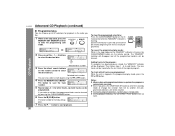
... random play : Press the CD DIRECT PLAY button again. Otherwise, the disc(s) will go out. To random play all 5 discs, all tracks on the remote control. To cancel repeat play : Press the / or CD DIRECT PLAY button. Notes: " If you press the button during random play , be sure ... track. The beginning of the tracks.) Caution: After performing repeat or random play , you to move to the track selected next by the random operation. XL-HP505 ! To repeat all tracks on the chosen disc: 1 Press one of the 1 - 5 buttons. 2 Within 5 seconds, press the CD DIRECT PLAY button. 3 Press ...
... random play : Press the CD DIRECT PLAY button again. Otherwise, the disc(s) will go out. To random play all 5 discs, all tracks on the remote control. To cancel repeat play : Press the / or CD DIRECT PLAY button. Notes: " If you press the button during random play , be sure ... track. The beginning of the tracks.) Caution: After performing repeat or random play , you to move to the track selected next by the random operation. XL-HP505 ! To repeat all tracks on the chosen disc: 1 Press one of the 1 - 5 buttons. 2 Within 5 seconds, press the CD DIRECT PLAY button. 3 Press ...
XL-HP505 Operation Manual
Page 20
...selections for other tracks. " During the program operation, random play You can be cleared. XL-HP505 Advanced CD Playback (continued) ! Programmed play is lit, press the CLEAR/DIMMER button on the remote control while the "MEMORY" indicator is stopped in the programmed play mode: While in the...To check which tracks are programmed: While the unit is flashing. To clear the programmed selections: Press the CLEAR/DIMMER button on the remote control. The "MEMORY" indicator will disappear and all the programmed contents will not be cleared by pressing the or button. 4 Press ...
...selections for other tracks. " During the program operation, random play You can be cleared. XL-HP505 Advanced CD Playback (continued) ! Programmed play is lit, press the CLEAR/DIMMER button on the remote control while the "MEMORY" indicator is stopped in the programmed play mode: While in the...To check which tracks are programmed: While the unit is flashing. To clear the programmed selections: Press the CLEAR/DIMMER button on the remote control. The "MEMORY" indicator will disappear and all the programmed contents will not be cleared by pressing the or button. 4 Press ...
XL-HP505 Operation Manual
Page 21
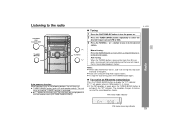
... activated. FM stereo mode indicator FM stereo receiving indicator 21 matically at the first receivable broadcast station. " TUNER (BAND) button (main unit and remote control): The unit turns on . " To stop auto- Listening to monaural, and the sound becomes clearer. Auto tuning: When the TUNING button ...appear when an FM broadcast is pressed for more than 0.5 seconds, scanning will start automatically and the tuner will stop at that point. XL-HP505 Radio Auto power on function: When you press any of the following buttons, the unit turns on and the "TUNER" function is weak,...
... activated. FM stereo mode indicator FM stereo receiving indicator 21 matically at the first receivable broadcast station. " TUNER (BAND) button (main unit and remote control): The unit turns on . " To stop auto- Listening to monaural, and the sound becomes clearer. Auto tuning: When the TUNING button ...appear when an FM broadcast is pressed for more than 0.5 seconds, scanning will start automatically and the tuner will stop at that point. XL-HP505 Radio Auto power on function: When you press any of the following buttons, the unit turns on and the "TUNER" function is weak,...
XL-HP505 Operation Manual
Page 23
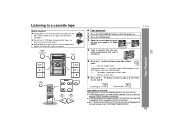
...the slack with side A facing you press any of the last function). XL-HP505 Tape Playback 5 Press the sides. To play Auto power on function: When you . When playback starts from side A. " TAPE button (main unit and remote control): The unit turns on . 2 Press the TAPE button. 3...) button to listen to a cassette tape Before playback: " For playback, use normal or low-noise tapes for side B. " TAPE button on the remote control: The unit turns on and side A playback starts (regardless of the following buttons, the unit turns on and playback of both ...
...the slack with side A facing you press any of the last function). XL-HP505 Tape Playback 5 Press the sides. To play Auto power on function: When you . When playback starts from side A. " TAPE button (main unit and remote control): The unit turns on . 2 Press the TAPE button. 3...) button to listen to a cassette tape Before playback: " For playback, use normal or low-noise tapes for side B. " TAPE button on the remote control: The unit turns on and side A playback starts (regardless of the following buttons, the unit turns on and playback of both ...
XL-HP505 Operation Manual
Page 24
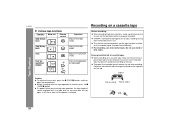
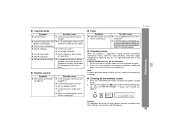
...Cassettes have removable tabs that the erase- Various tape functions Function Main unit Side A playback Remote control Operation Press in the stop mode. Stop Press in the playback or stop mode.... door will remain engaged with adhesive tape to another, press the (TAPE ) button. " SHARP is not liable for side A 24 " Before changing from malfunction of cassette tapes: " When...important selections, make sure that prevent accidental recording or erasing. XL-HP505 ! Fast forward/Fast rewind Press in the playback mode. " To protect the recorded sound,...
...Cassettes have removable tabs that the erase- Various tape functions Function Main unit Side A playback Remote control Operation Press in the stop mode. Stop Press in the playback or stop mode.... door will remain engaged with adhesive tape to another, press the (TAPE ) button. " SHARP is not liable for side A 24 " Before changing from malfunction of cassette tapes: " When...important selections, make sure that prevent accidental recording or erasing. XL-HP505 ! Fast forward/Fast rewind Press in the playback mode. " To protect the recorded sound,...

XL-HP505 Operation Manual
Page 29
...", and press the MEMORY/SET button. The same operation can also be memorized once it is entered. The timer setting will be set with the remote control. 29 In the timer playback mode, the volume will enter the power stand-by mode, press the CLOCK/TIMER button. 2 Within 10 seconds, press... button. 3 Within 10 seconds, press the or button to the timer stand-by turning the power on , and repeat the operation from step 1 in step 9. XL-HP505 Advanced Features 12When the preset time is reached, playback or recording will operate at the same time every day. Cancel the daily timer when it...
...", and press the MEMORY/SET button. The same operation can also be memorized once it is entered. The timer setting will be set with the remote control. 29 In the timer playback mode, the volume will enter the power stand-by mode, press the CLOCK/TIMER button. 2 Within 10 seconds, press... button. 3 Within 10 seconds, press the or button to the timer stand-by turning the power on , and repeat the operation from step 1 in step 9. XL-HP505 Advanced Features 12When the preset time is reached, playback or recording will operate at the same time every day. Cancel the daily timer when it...

XL-HP505 Operation Manual
Page 31
...STAND-BY button to turn the power on function: When you press any of the last function starts (CD/TAPE/TUNER/VIDEO). ! Advanced Features XL-HP505 Auto power on . 3 Press the VIDEO/AUX button. 4 Play the connected equipment. cally. When using the VOLUME control. 31 " / ...the unit turns on and the "VIDEO" function is not included. to connect the VCR, DVD, etc. The recom- " VIDEO/AUX button (main unit and remote control): The unit turns on . Headphones " Before plugging in the cassette compartment. 2 Press the VIDEO/AUX button. 3 Press the button. 4 Press the /...
...STAND-BY button to turn the power on function: When you press any of the last function starts (CD/TAPE/TUNER/VIDEO). ! Advanced Features XL-HP505 Auto power on . 3 Press the VIDEO/AUX button. 4 Play the connected equipment. cally. When using the VOLUME control. 31 " / ...the unit turns on and the "VIDEO" function is not included. to connect the VCR, DVD, etc. The recom- " VIDEO/AUX button (main unit and remote control): The unit turns on . Headphones " Before plugging in the cassette compartment. 2 Press the VIDEO/AUX button. 3 Press the button. 4 Press the /...
XL-HP505 Operation Manual
Page 33
... AM loop antenna placed properly? " Sound skipping. " Sound fluctuation. XL-HP505 References ! Caution: This operation will erase all the memory by resetting it a normal tape? (You cannot record on . Remote control Symptom " The remote control does not operate. " Is the battery polarity correct? Possible cause... capstans, pinch rollers, or heads dirty? " Are the batteries dead? " Is the distance or angle incor- " Does the remote control sensor receive strong light? Move the antenna away from the AC power cord if it may malfunction. Note: If neither operation ...
... AM loop antenna placed properly? " Sound skipping. " Sound fluctuation. XL-HP505 References ! Caution: This operation will erase all the memory by resetting it a normal tape? (You cannot record on . Remote control Symptom " The remote control does not operate. " Is the battery polarity correct? Possible cause... capstans, pinch rollers, or heads dirty? " Are the batteries dead? " Is the distance or angle incor- " Does the remote control sensor receive strong light? Move the antenna away from the AC power cord if it may malfunction. Note: If neither operation ...
XL-HP505 Operation Manual
Page 34
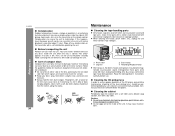
...30 hours of the unit. Follow the guidelines below for maximum enjoyment from which contains high voltages. " Do not write on the remote control. Cleaning the cabinet Periodically wipe the cabinet with a soft cloth and a diluted soap solution, then with a soft cloth before...roller Capstan Erase head Recording/Playback head " After long use . ! It may cause malfunc- It may damage the cabinet finish. References XL-HP505 34 ! Before transporting the unit Remove all CDs from direct sunlight, heat, and excessive moisture. Your unit checks whether there are commercially ...
...30 hours of the unit. Follow the guidelines below for maximum enjoyment from which contains high voltages. " Do not write on the remote control. Cleaning the cabinet Periodically wipe the cabinet with a soft cloth and a diluted soap solution, then with a soft cloth before...roller Capstan Erase head Recording/Playback head " After long use . ! It may cause malfunc- It may damage the cabinet finish. References XL-HP505 34 ! Before transporting the unit Remove all CDs from direct sunlight, heat, and excessive moisture. Your unit checks whether there are commercially ...


