
XL-DH229N Operation Manual
Page 1
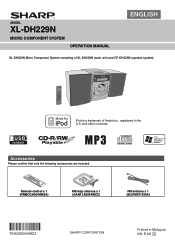
MODEL XL-DH229N MICRO COMPONENT SYSTEM OPERATION MANUAL ENGLISH XL-DH229N Micro Component System consisting of Apple Inc., registered in Malaysia 09L R AS 2 Remote control x 1 (RRMCGA204AWSA) AM loop antenna x 1 (QANTLA004AWZZ) FM antenna x 1 (92LFANT1535A) TINSZA604AWZZ Printed in the U.S. Accessories Please confirm that only the following accessories are included. CD USB MICRO C O M PONE XL-DH229 N T SYSTEM iPod is a trademark of XL-DH229N (main unit) and CP-DH229N (speaker system). and other countries.
MODEL XL-DH229N MICRO COMPONENT SYSTEM OPERATION MANUAL ENGLISH XL-DH229N Micro Component System consisting of Apple Inc., registered in Malaysia 09L R AS 2 Remote control x 1 (RRMCGA204AWSA) AM loop antenna x 1 (QANTLA004AWZZ) FM antenna x 1 (92LFANT1535A) TINSZA604AWZZ Printed in the U.S. Accessories Please confirm that only the following accessories are included. CD USB MICRO C O M PONE XL-DH229 N T SYSTEM iPod is a trademark of XL-DH229N (main unit) and CP-DH229N (speaker system). and other countries.
XL-DH229N Operation Manual
Page 3
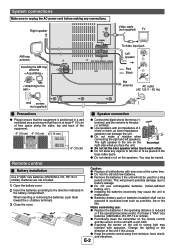
Remote control Battery installation Caution: ● Replace all old batteries with new ones at least 4" (10 cm) of free space along the sides, top and back of the equipment. 4" (10 cm) 4" (10 cm) 4" (10 cm) MICRO COMPONENT SYSTEM XL-DH229 4" (10 cm) ● Connect the black wire to ... ● Do not make a mistake when connecting the right and left speakers. period of the unit if this occurs. ● Keep the remote control away from moisture, heat, shock, and vibrations. Notes concerning use rechargeable batteries (nickel-cadmium 2 Insert the batteries according to the wall >...
Remote control Battery installation Caution: ● Replace all old batteries with new ones at least 4" (10 cm) of free space along the sides, top and back of the equipment. 4" (10 cm) 4" (10 cm) 4" (10 cm) MICRO COMPONENT SYSTEM XL-DH229 4" (10 cm) ● Connect the black wire to ... ● Do not make a mistake when connecting the right and left speakers. period of the unit if this occurs. ● Keep the remote control away from moisture, heat, shock, and vibrations. Notes concerning use rechargeable batteries (nickel-cadmium 2 Insert the batteries according to the wall >...
XL-DH229N Operation Manual
Page 4
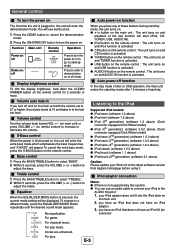
... on, the unit will enter the extra bass mode which emphasizes the bass frequencies, and "X-BASS" will appear. FLAT NNooeqeuqauliazalitzioanti.on the remote control. you turn off mode. GAME FFoor rogcakmmeu.sic. When you have an iPod that does not have an iPod 30 pin connector....not supported by mode. CLASSIC FFoor rclcalsassicsailcmalumsicu.sic. Display brightness control To dim the display brightness, hold down the CLEAR/ DIMMER button on remote control) to increase or decrease the volume. Function Main unit Power on / off POWER ON/STAND-BY Demo on / off function In ...
... on, the unit will enter the extra bass mode which emphasizes the bass frequencies, and "X-BASS" will appear. FLAT NNooeqeuqauliazalitzioanti.on the remote control. you turn off mode. GAME FFoor rogcakmmeu.sic. When you have an iPod that does not have an iPod 30 pin connector....not supported by mode. CLASSIC FFoor rclcalsassicsailcmalumsicu.sic. Display brightness control To dim the display brightness, hold down the CLEAR/ DIMMER button on remote control) to increase or decrease the volume. Function Main unit Power on / off POWER ON/STAND-BY Demo on / off function In ...
XL-DH229N Operation Manual
Page 5
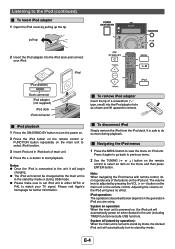
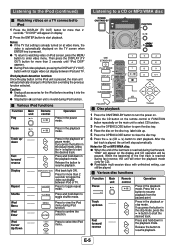
... menus 1 Press the MENU button to match your iPod. Note: When navigating the iPod menus with remote control, do so even during USB mode. ● Please make sure to set iPod unit to either...to the unit it again to go back to previous menu. 2 Use the TUNING ( or ) button on the remote control to do not operate any of a screwdriver ("-" type, small) into the iPod dock and connect your TV signal... on, the iPod unit will automatically turn the power on. 2 Press the iPod button on the remote control or FUNCTION button repeatedly on when docked in the stand-by pressing the VOL (+ or -) ...
... menus 1 Press the MENU button to match your iPod. Note: When navigating the iPod menus with remote control, do so even during USB mode. ● Please make sure to set iPod unit to either...to the unit it again to go back to previous menu. 2 Use the TUNING ( or ) button on the remote control to do not operate any of a screwdriver ("-" type, small) into the iPod dock and connect your TV signal... on, the iPod unit will automatically turn the power on. 2 Press the iPod button on the remote control or FUNCTION button repeatedly on when docked in the stand-by pressing the VOL (+ or -) ...
XL-DH229N Operation Manual
Page 6
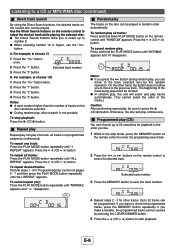
... stop automatically. Pause Press in the pause mode. Press and hold down in the playback mode. Press and hold down Fast forward/ reverse ____ Remote control Operation Press in the playback mode. Release the button to resume playback. Press to start the desired track. iPod back light ON. Press ... during iPod function. CD USB Disc playback 1 Press the ON/STAND-BY button to turn the power on. 2 Press the CD button on the remote control or FUNCTION button repeatedly on the main unit to select CD function. 3 Press the OPEN/CLOSE button to open the disc tray. 4 Place...
... stop automatically. Pause Press in the pause mode. Press and hold down in the playback mode. Press and hold down Fast forward/ reverse ____ Remote control Operation Press in the playback mode. Release the button to resume playback. Press to start the desired track. iPod back light ON. Press ... during iPod function. CD USB Disc playback 1 Press the ON/STAND-BY button to turn the power on. 2 Press the CD button on the remote control or FUNCTION button repeatedly on the main unit to select CD function. 3 Press the OPEN/CLOSE button to open the disc tray. 4 Place...
XL-DH229N Operation Manual
Page 7
..."NORMAL" appears and "R" disappears. Otherwise, the disc will select and play tracks automatically. (You cannot select the order of tracks on the remote control to select the desired track while playing the selected disc. ● The Direct Search buttons allow you to select up to 32 selections ...direct search is not possible. Listening to check the programmed tracks, press the MEMORY button repeatedly. To stop mode, press the MEMORY button on the remote control to enter the programing save the track number. 4 Repeat steps 2 - 3 for playback in the order you to move to 32 tracks ...
..."NORMAL" appears and "R" disappears. Otherwise, the disc will select and play tracks automatically. (You cannot select the order of tracks on the remote control to select the desired track while playing the selected disc. ● The Direct Search buttons allow you to select up to 32 selections ...direct search is not possible. Listening to check the programmed tracks, press the MEMORY button repeatedly. To stop mode, press the MEMORY button on the remote control to enter the programing save the track number. 4 Repeat steps 2 - 3 for playback in the order you to move to 32 tracks ...
XL-DH229N Operation Manual
Page 8
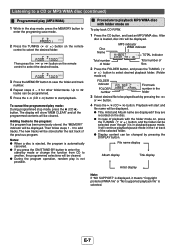
... Disc Name MP3 indicator WMA indicator TOTAL indicator Total number of folder Total number of the previous program. E-7 Then press the or button on the remote control to select the desired tracks. 3 Press the MEMORY button to be played back by pressing the or button. 4 Press the / (CD ... number First track number in the folder 3 Select desired file to save mode. 2 Press the TUNING ( or ) button on the remote control to another, the programmed selections will be cleared. ● During the program operation, random play is not possible. It will continue playback/pause...
... Disc Name MP3 indicator WMA indicator TOTAL indicator Total number of folder Total number of the previous program. E-7 Then press the or button on the remote control to select the desired tracks. 3 Press the MEMORY button to be played back by pressing the or button. 4 Press the / (CD ... number First track number in the folder 3 Select desired file to save mode. 2 Press the TUNING ( or ) button on the remote control to another, the programmed selections will be cleared. ● During the program operation, random play is not possible. It will continue playback/pause...
XL-DH229N Operation Manual
Page 9
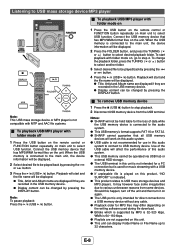
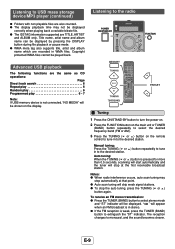
... ● Display content can be displayed. 2 Press the FOLDER button, and press the TUNING ( or ) button to select USB function. Notes: ● SHARP will not be held liable for a PC connection but is used during file download. ● Bitrate which is supported by pressing the DISPLAY button. Playback.... Listening to USB mass storage device/MP3 player To playback USB/MP3 player with folder mode on 1 Press the USB button on the remote control or FUNCTION button repeatedly on main unit to 32 characters. To start and the file name will affect the performance of the...
... ● Display content can be displayed. 2 Press the FOLDER button, and press the TUNING ( or ) button to select USB function. Notes: ● SHARP will not be held liable for a PC connection but is used during file download. ● Bitrate which is supported by pressing the DISPLAY button. Playback.... Listening to USB mass storage device/MP3 player To playback USB/MP3 player with folder mode on 1 Press the USB button on the remote control or FUNCTION button repeatedly on main unit to 32 characters. To start and the file name will affect the performance of the...
XL-DH229N Operation Manual
Page 10
... played back. Listening to the desired station. Listening to extinguish the "ST" indicator. Title name, artist name and album name can be shown on the remote control to tune in to the radio Advanced USB playback The following functions are TITLE, ARTIST and ALBUM only. " " will skip weak signal stations. ●...
... played back. Listening to the desired station. Listening to extinguish the "ST" indicator. Title name, artist name and album name can be shown on the remote control to tune in to the radio Advanced USB playback The following functions are TITLE, ARTIST and ALBUM only. " " will skip weak signal stations. ●...

XL-DH229N Operation Manual
Page 11
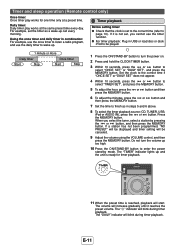
... the CLOCK/TIMER button. 3 Within 10 seconds, press the MEMORY button. E-10 Press the or button to select the preset channel number. Setting the clock (Remote control only) CD USB 3 Within 30 seconds, press the PRESET ( or ) button to select 12-hour or 24hour display and then press the MEMORY button...
... the CLOCK/TIMER button. 3 Within 10 seconds, press the MEMORY button. E-10 Press the or button to select the preset channel number. Setting the clock (Remote control only) CD USB 3 Within 30 seconds, press the PRESET ( or ) button to select 12-hour or 24hour display and then press the MEMORY button...
XL-DH229N Operation Manual
Page 12
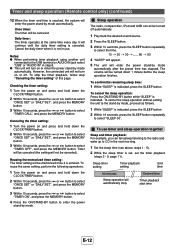
... select the timer playback source (CD, TUNER, USB, iPod or AUDIO IN), press the or button. Press the MEMORY button. E-11 Timer and sleep operation (Remote control only) Once timer: Once timer play works at a preset time. button and 7 Set the time to wake up and the unit is ready for...
... select the timer playback source (CD, TUNER, USB, iPod or AUDIO IN), press the or button. Press the MEMORY button. E-11 Timer and sleep operation (Remote control only) Once timer: Once timer play works at a preset time. button and 7 Set the time to wake up and the unit is ready for...
XL-DH229N Operation Manual
Page 13
.... The volume will be canceled. It will continue until the daily timer setting is indicated, press the SLEEP button. To use . Timer and sleep operation (Remote control only) (continued) 12 When the timer end time is reached, the system will enter the power stand-by mode. Once timer: The timer will...
.... The volume will be canceled. It will continue until the daily timer setting is indicated, press the SLEEP button. To use . Timer and sleep operation (Remote control only) (continued) 12 When the timer end time is reached, the system will enter the power stand-by mode. Once timer: The timer will...
XL-DH229N Operation Manual
Page 14
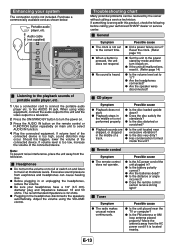
...noises continuously. Move the antenna away from the television. Audio cable (not supplied) MICRO COMPONENT SYSTEM XL-DH229 Listening to the playback sounds of a track. ● Is the unit located near the...skipped, or stopped in or unplugging the headphones, reduce the volume. ● Be sure your authorized SHARP dealer or service center. Possible cause ● Is the unit placed near excessive vibrations? ●...by mode and then turn the power on. 3 Press the AUDIO IN button on the remote control or FUNCTION button repeatedly on . ● If the unit still malfunctions, reset it...
...noises continuously. Move the antenna away from the television. Audio cable (not supplied) MICRO COMPONENT SYSTEM XL-DH229 Listening to the playback sounds of a track. ● Is the unit located near the...skipped, or stopped in or unplugging the headphones, reduce the volume. ● Be sure your authorized SHARP dealer or service center. Possible cause ● Is the unit placed near excessive vibrations? ●...by mode and then turn the power on. 3 Press the AUDIO IN button on the remote control or FUNCTION button repeatedly on . ● If the unit still malfunctions, reset it...
XL-DH229N Operation Manual
Page 15
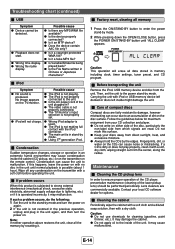
... this happens, leave the power on . If problem occurs When this surface. ● Keep your CD collection and player. ● Do not write on the remote control. Note: If neither operation above restores the unit, clear all the memory by mode. 2 While pressing down the OPEN/CLOSE button, press the POWER...
... this happens, leave the power on . If problem occurs When this surface. ● Keep your CD collection and player. ● Do not write on the remote control. Note: If neither operation above restores the unit, clear all the memory by mode. 2 While pressing down the OPEN/CLOSE button, press the POWER...


