
Operation Manual
Page 2
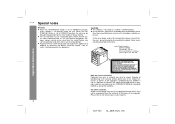
...: continuous Laser Output: max. 0.6 mW Important Instruction Note for a long period. ! XL-35W Special notes Warning: ! Copying or broadcasting such material without the authority of the owner of the copyright. When the ON/STAND-BY button is still present inside the unit. As the laser beam used in this compact disc player is not in use for users in material you...
...: continuous Laser Output: max. 0.6 mW Important Instruction Note for a long period. ! XL-35W Special notes Warning: ! Copying or broadcasting such material without the authority of the owner of the copyright. When the ON/STAND-BY button is still present inside the unit. As the laser beam used in this compact disc player is not in use for users in material you...
Operation Manual
Page 3
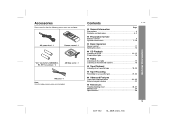
... for Use Remote control 6 System connections 7 - 10 " Basic Operation Sound control 11 Setting the clock 12 " CD Playback Listening to a CD 13 - 15 Programmed play 16 " Radio Listening to the radio 17 Listening to memorised stations 18 " Tape Playback Listening to a cassette tape 19, 20 " Tape Recording Recording to a cassette tape 21, 22 " Advanced Features Timer and sleep operation 23 - 25 Enhancing your system 25 " References Troubleshooting chart 26...
... for Use Remote control 6 System connections 7 - 10 " Basic Operation Sound control 11 Setting the clock 12 " CD Playback Listening to a CD 13 - 15 Programmed play 16 " Radio Listening to the radio 17 Listening to memorised stations 18 " Tape Playback Listening to a cassette tape 19, 20 " Tape Recording Recording to a cassette tape 21, 22 " Advanced Features Timer and sleep operation 23 - 25 Enhancing your system 25 " References Troubleshooting chart 26...
Operation Manual
Page 4
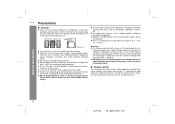
... pickup, and do not touch the pickup directly. " Volume control The sound level at moderate levels. 3 02/11/22 XL_35W_SCA_1.fm If the system does not work properly, unplug and plug it from direct sunlight, strong magnetic fields, excessive dust, humidity and electronic/electrical equipment (home computers, facsimiles, etc.) which can damage internal wires. ! Do not remove the outer cover, as...
... pickup, and do not touch the pickup directly. " Volume control The sound level at moderate levels. 3 02/11/22 XL_35W_SCA_1.fm If the system does not work properly, unplug and plug it from direct sunlight, strong magnetic fields, excessive dust, humidity and electronic/electrical equipment (home computers, facsimiles, etc.) which can damage internal wires. ! Do not remove the outer cover, as...
Operation Manual
Page 5
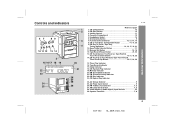
... Indicator 20. CD Play Indicator 23. AC Power Input Socket 9 26. On/Stand-by Button 9 7. Memory/Set Button 16, 18 12. AC Voltage Selector 9 25. AM Loop Aerial Socket 7, 8 28. Speaker Terminals 7, 8 General Information 4 02/11/22 XL_35W_SCA_1.fm CD Track Up or Fast Forward, Tape Fast Forward, Tuner Preset Up Button 14, 15, 18, 20 15. Video/Auxiliary (Audio Signal) Input Sockets 25 29...
... Indicator 20. CD Play Indicator 23. AC Power Input Socket 9 26. On/Stand-by Button 9 7. Memory/Set Button 16, 18 12. AC Voltage Selector 9 25. AM Loop Aerial Socket 7, 8 28. Speaker Terminals 7, 8 General Information 4 02/11/22 XL_35W_SCA_1.fm CD Track Up or Fast Forward, Tape Fast Forward, Tuner Preset Up Button 14, 15, 18, 20 15. Video/Auxiliary (Audio Signal) Input Sockets 25 29...
Operation Manual
Page 7
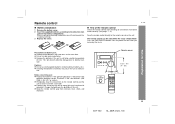
...-BY button. XL-35W Preparation for Use Precautions for long periods of time. Installing the batteries incorrectly may interfere with new ones at the same time. ! Remote control " Battery installation 1 Remove the battery cover. 2 Insert the supplied batteries according to malfunc- Periodically clean the transmitter on the remote control and the sensor on ? Change the lighting or the direction of the remote control Check the remote control after...
...-BY button. XL-35W Preparation for Use Precautions for long periods of time. Installing the batteries incorrectly may interfere with new ones at the same time. ! Remote control " Battery installation 1 Remove the battery cover. 2 Insert the supplied batteries according to malfunc- Periodically clean the transmitter on the remote control and the sensor on ? Change the lighting or the direction of the remote control Check the remote control after...
Operation Manual
Page 10
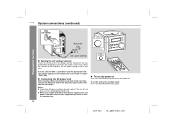
... to turn the power on the rear panel before plugging the unit into the wall socket. " To turn the power on Press the ON/STAND-BY button to the AC power voltage used in use a power lead other than the one supplied may cause an electric shock or fire. Use of a power lead other than the one supplied. To set the unit to the AC power input...
... to turn the power on the rear panel before plugging the unit into the wall socket. " To turn the power on Press the ON/STAND-BY button to the AC power voltage used in use a power lead other than the one supplied may cause an electric shock or fire. Use of a power lead other than the one supplied. To set the unit to the AC power input...
Operation Manual
Page 11
...stations will be adjusted to a 9 kHz AM (50 kHz FM) interval when shipped from a 9 kHz AM (50 kHz FM) interval to a 10 kHz AM (100 kHz FM) interval: 1 Press the ON/STAND-BY button to turn the power on. 2 Press the FUNCTION button until "AM" appears on the display. ! To change from the factory. Release the buttons... between broadcasting frequencies of AM stations and 100 kHz or 50 kHz for at least 4 seconds. To check the tuning span currently selected: 1 Press the ON/STAND-BY button to enter the stand-by mode. 2 Hold down the MEMORY/SET button and the FUNCTION button for FM...
...stations will be adjusted to a 9 kHz AM (50 kHz FM) interval when shipped from a 9 kHz AM (50 kHz FM) interval to a 10 kHz AM (100 kHz FM) interval: 1 Press the ON/STAND-BY button to turn the power on. 2 Press the FUNCTION button until "AM" appears on the display. ! To change from the factory. Release the buttons... between broadcasting frequencies of AM stations and 100 kHz or 50 kHz for at least 4 seconds. To check the tuning span currently selected: 1 Press the ON/STAND-BY button to enter the stand-by mode. 2 Hold down the MEMORY/SET button and the FUNCTION button for FM...
Operation Manual
Page 12
...to adjust the bass. -5 ... 0 ... 5 " Adjusting the treble Main unit operation: 1 Press the BASS/TREBLE button to select "TRE". 2 Within 5 seconds, turn the VOLUME control to adjust the bass. MIN 1 2 ..... 28 29 MAX " Adjusting the bass Main unit operation: 1 Press the BASS/TREBLE button to select "BASS". 2 Within 5 seconds, turn the VOLUME control to increase the volume and the VOLUME - or +) button to decrease the volume. Remote control operation: Press the TREBLE (- Remote control operation: Press the VOLUME + button to adjust the treble. Basic Operation XL-35W Sound control 11...
...to adjust the bass. -5 ... 0 ... 5 " Adjusting the treble Main unit operation: 1 Press the BASS/TREBLE button to select "TRE". 2 Within 5 seconds, turn the VOLUME control to adjust the bass. MIN 1 2 ..... 28 29 MAX " Adjusting the bass Main unit operation: 1 Press the BASS/TREBLE button to select "BASS". 2 Within 5 seconds, turn the VOLUME control to increase the volume and the VOLUME - or +) button to decrease the volume. Remote control operation: Press the TREBLE (- Remote control operation: Press the VOLUME + button to adjust the treble. Basic Operation XL-35W Sound control 11...
Operation Manual
Page 13
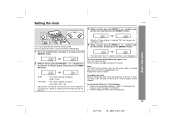
... change the 24-hour or 12-hour display: 1 Clear all the programmed contents. [Refer to "Clearing all the memory (reset)" on : Press the CLOCK button. Readjust the clock as follows. The clock starts from the beginning. Setting the clock XL-35W 3 Within 1 minute, press the PRESET ( or ) button to ad- Basic Operation This may be skipped. The time display will appear for selecting...
... change the 24-hour or 12-hour display: 1 Clear all the programmed contents. [Refer to "Clearing all the memory (reset)" on : Press the CLOCK button. Readjust the clock as follows. The clock starts from the beginning. Setting the clock XL-35W 3 Within 1 minute, press the PRESET ( or ) button to ad- Basic Operation This may be skipped. The time display will appear for selecting...
Operation Manual
Page 14
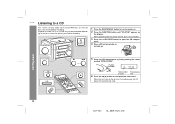
... you used for recording. 1 Press the ON/STAND-BY button to a CD This system can play audio CD-R and CD-RW discs just like CD discs, but cannot perform recording. bel side up. Playback of tracks time 6 Press the ( ) button to open the CD compart- XL-35W Listening to turn the power on. 2 Press the FUNCTION button until "CD STOP" appears on the display.
... you used for recording. 1 Press the ON/STAND-BY button to a CD This system can play audio CD-R and CD-RW discs just like CD discs, but cannot perform recording. bel side up. Playback of tracks time 6 Press the ( ) button to open the CD compart- XL-35W Listening to turn the power on. 2 Press the FUNCTION button until "CD STOP" appears on the display.

Operation Manual
Page 15
... being played: Press the button for maximum enjoyment from the same point, press the button again. To resume playback from your discs away from the same point, press the Remote control operation: Press the button. button. Subjecting the unit to enter the power stand-by pressing the button repeatedly until the desired track number appears. Adjust the volume using the VOLUME control. " Care of compact discs Compact discs are between 16 ohms...
... being played: Press the button for maximum enjoyment from the same point, press the button again. To resume playback from your discs away from the same point, press the Remote control operation: Press the button. button. Subjecting the unit to enter the power stand-by pressing the button repeatedly until the desired track number appears. Adjust the volume using the VOLUME control. " Care of compact discs Compact discs are between 16 ohms...
Operation Manual
Page 18
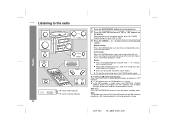
... ) button on the display. Radio XL-35W Listening to the radio FM stereo mode indicator FM stereo receiving indicator 17 1 Press the ON/STAND-BY button to turn the power on. 2 Press the FUNCTION button until "FM" or "AM" appears on the remote control. ! If the FM reception is in stereo. 02/11/22 XL_35W_SCA_2.fm Notes: ! " " will stop the auto tuning, press the TUNING button again. Manual tuning: Press the TUNING button as many times...
... ) button on the display. Radio XL-35W Listening to the radio FM stereo mode indicator FM stereo receiving indicator 17 1 Press the ON/STAND-BY button to turn the power on. 2 Press the FUNCTION button until "FM" or "AM" appears on the remote control. ! If the FM reception is in stereo. 02/11/22 XL_35W_SCA_2.fm Notes: ! " " will stop the auto tuning, press the TUNING button again. Manual tuning: Press the TUNING button as many times...
Operation Manual
Page 19
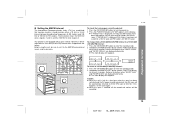
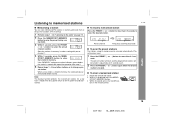
... station is displayed, press the MEMO- set other stations, or to change a pre- ton on page 17. 2 Press the MEMORY/SET (MEMORY) button to enter the preset tuning saving mode. 3 Within 5 seconds, press the PRESET ( or ) button to select the preset channel number. " To clear a memorised station 1 Recall the memorised station. 2 Whilst it is stored in memory, the station previously memorised will be tuned in "Listening to the radio" on the remote control. If...
... station is displayed, press the MEMO- set other stations, or to change a pre- ton on page 17. 2 Press the MEMORY/SET (MEMORY) button to enter the preset tuning saving mode. 3 Within 5 seconds, press the PRESET ( or ) button to select the preset channel number. " To clear a memorised station 1 Recall the memorised station. 2 Whilst it is stored in memory, the station previously memorised will be tuned in "Listening to the radio" on the remote control. If...

Operation Manual
Page 22
... the ON/STAND-BY button to turn the power on. 2 Press the FUNCTION button until "CD STOP" appears on a cassette tape, make a preliminary test to be recorded on the recorded signal (Variable Sound Monitor). ! The volume and sound controls can be adjusted with the adhesive tape to a cassette tape Before recording: ! Erase-prevention tabs of the disc is properly recorded. ! To protect the recorded sound, remove the side B tab...
... the ON/STAND-BY button to turn the power on. 2 Press the FUNCTION button until "CD STOP" appears on a cassette tape, make a preliminary test to be recorded on the recorded signal (Variable Sound Monitor). ! The volume and sound controls can be adjusted with the adhesive tape to a cassette tape Before recording: ! Erase-prevention tabs of the disc is properly recorded. ! To protect the recorded sound, remove the side B tab...
Operation Manual
Page 24
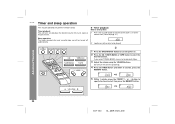
... 1 minute, press the PRESET ( or ) button to specify the hour to the desired station. 3 Adjust the volume using the VOLUME buttons. If you select TUNER (BAND), tune in to start, then press the MEMORY button. 23 02/11/22 XL_35W_SCA_3.fm Do not turn the power on and plays the desired source (CD, tuner, tape) at the preset time. " Timer playback Before setting timer: 1 Press the CLOCK button to check that the...
... 1 minute, press the PRESET ( or ) button to specify the hour to the desired station. 3 Adjust the volume using the VOLUME buttons. If you select TUNER (BAND), tune in to start, then press the MEMORY button. 23 02/11/22 XL_35W_SCA_3.fm Do not turn the power on and plays the desired source (CD, tuner, tape) at the preset time. " Timer playback Before setting timer: 1 Press the CLOCK button to check that the...
Operation Manual
Page 25
... button to turn the power on the display. Note: When performing timer playback using another unit connected to select the desired sleep time. " " will appear and the current time will decrease as follows. XL-35W Advanced Features 6 Within 1 minute, press the PRESET ( or ) button to specify the minutes to start . To reset or change the sleep time: Press the SLEEP button repeatedly to the VIDEO/AUX IN sockets, select "VIDEO/AUX...
... button to turn the power on the display. Note: When performing timer playback using another unit connected to select the desired sleep time. " " will appear and the current time will decrease as follows. XL-35W Advanced Features 6 Within 1 minute, press the PRESET ( or ) button to specify the minutes to start . To reset or change the sleep time: Press the SLEEP button repeatedly to the VIDEO/AUX IN sockets, select "VIDEO/AUX...

Operation Manual
Page 26
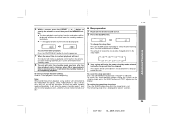
... turn the power on. 3 Press the FUNCTION button until "AUX" appears on a tape from VCR, DVD, etc. 1 Use a connection lead to connect the VCR, DVD, etc. XL-35W Advanced Features Timer and sleep operation (continued) Enhancing your system " To use timer and sleep operation together Example: To fall asleep and wake to the same radio station You can play back the same source only (the function cannot be switched). 1 Set the sleep time...
... turn the power on. 3 Press the FUNCTION button until "AUX" appears on a tape from VCR, DVD, etc. 1 Use a connection lead to connect the VCR, DVD, etc. XL-35W Advanced Features Timer and sleep operation (continued) Enhancing your system " To use timer and sleep operation together Example: To fall asleep and wake to the same radio station You can play back the same source only (the function cannot be switched). 1 Set the sleep time...

Operation Manual
Page 27
... dead? ! Is the distance or angle incorrect? ! Reset the clock to the correct time. (refer to the power stand-by the owner without calling a service technician. Are the speaker wires disconnected? Is the disc loaded upside down? Playback stops in the tape? Is the disc very dirty? ! " Tuner The radio makes un- ! Is the tape stretched? Has condensation formed inside the unit? usual...
... dead? ! Is the distance or angle incorrect? ! Reset the clock to the correct time. (refer to the power stand-by the owner without calling a service technician. Are the speaker wires disconnected? Is the disc loaded upside down? Playback stops in the tape? Is the disc very dirty? ! " Tuner The radio makes un- ! Is the tape stretched? Has condensation formed inside the unit? usual...
Operation Manual
Page 28
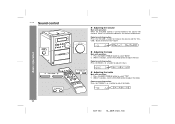
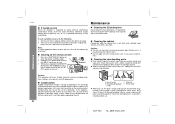
... condensation inside of playing/recording time by resetting it. AC INPUT Caution: This operation will erase all the memory by using a commercial tape head demagnetiser. Condensation can cause poor sound and tape jams. Clean these parts once every 30 hours of the unit. A BC D Erase head Recording/Playback head Capstan Pinch roller ! If such a problem occurs, do the following: 1 Set the unit...
... condensation inside of playing/recording time by resetting it. AC INPUT Caution: This operation will erase all the memory by using a commercial tape head demagnetiser. Condensation can cause poor sound and tape jams. Clean these parts once every 30 hours of the unit. A BC D Erase head Recording/Playback head Capstan Pinch roller ! If such a problem occurs, do the following: 1 Set the unit...
Operation Manual
Page 29
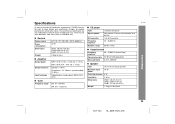
... (5.8 lbs.) " Amplifier Output power Output terminals Input terminals MPO: 15 W (7.5 W + 7.5 W) (10 % T.H.D.) RMS: 10 W (5 W + 5 W) (10 % T.H.D.) Speakers: 4 ohms Headphones: 16 - 50 ohms (recommended: 32 ohms) Video/Auxiliary (audio signal): 500 mV/47 k ohms " Tuner Frequency range FM: 88 - 108 MHz AM: 531 - 1,602 kHz " CD player Type Signal readout D/A converter Frequency response Dynamic range Compact disc player Non-contact, 3-beam semiconductor laser pickup 1-bit D/A converter 20 - 20,000 Hz 90 dB (1 kHz) " Cassette deck Frequency response 50...
... (5.8 lbs.) " Amplifier Output power Output terminals Input terminals MPO: 15 W (7.5 W + 7.5 W) (10 % T.H.D.) RMS: 10 W (5 W + 5 W) (10 % T.H.D.) Speakers: 4 ohms Headphones: 16 - 50 ohms (recommended: 32 ohms) Video/Auxiliary (audio signal): 500 mV/47 k ohms " Tuner Frequency range FM: 88 - 108 MHz AM: 531 - 1,602 kHz " CD player Type Signal readout D/A converter Frequency response Dynamic range Compact disc player Non-contact, 3-beam semiconductor laser pickup 1-bit D/A converter 20 - 20,000 Hz 90 dB (1 kHz) " Cassette deck Frequency response 50...


