
XG-PH70X Operation Manual
Page 3
...to your new SHARP Projector, using the projector, please read this equipment in which case the user may be required to correct the interference at his own expense. DO NOT REMOVE SCREWS EXCEPT SPECIFIED USER SERVICE SCREW. Operation of this operation manual carefully. U.S.A.... Introduction Before using the REGISTRATION CARD packed with the device. Be especially careful that you immediately receive the full benefit of projector. NO USER-SERVICEABLE PARTS EXCEPT LAMP UNIT. REFER SERVICING TO QUALIFIED SERVICE PERSONNEL. In a domestic environment this product to ...
...to your new SHARP Projector, using the projector, please read this equipment in which case the user may be required to correct the interference at his own expense. DO NOT REMOVE SCREWS EXCEPT SPECIFIED USER SERVICE SCREW. Operation of this operation manual carefully. U.S.A.... Introduction Before using the REGISTRATION CARD packed with the device. Be especially careful that you immediately receive the full benefit of projector. NO USER-SERVICEABLE PARTS EXCEPT LAMP UNIT. REFER SERVICING TO QUALIFIED SERVICE PERSONNEL. In a domestic environment this product to ...

XG-PH70X Operation Manual
Page 5
... explanation. Buttons used in this operation Using the Menu Screen The menu can be performed by using thMeenbuuittteomns on the projector. 1 Press . • The "Picture" menu screen for selecting INPUT 4 or INPUT 5. 56 Info ...........Indicates safeguards when using the... ('/"/\/|) MENU button UNDO button Buttons used in this operation Button used in this operation manual, the illustrations and on -screen display. Example: "Picture" screen menu for setting up and operating the projector. This may differ from the actual on -screen displays are eight menu items as ...
... explanation. Buttons used in this operation Using the Menu Screen The menu can be performed by using thMeenbuuittteomns on the projector. 1 Press . • The "Picture" menu screen for selecting INPUT 4 or INPUT 5. 56 Info ...........Indicates safeguards when using the... ('/"/\/|) MENU button UNDO button Buttons used in this operation Button used in this operation manual, the illustrations and on -screen display. Example: "Picture" screen menu for setting up and operating the projector. This may differ from the actual on -screen displays are eight menu items as ...

XG-PH70X Operation Manual
Page 6
Contents Preparing Introduction How to Read This Operation Manual 3 Contents 4 How to Access the PDF Operation Manuals ..... 7 IMPORTANT SAFEGUARDS 8 Accessories 11 Part Names and Functions 13 Using the Remote Control 17 Usable Range 17 Inserting the Batteries 17 ... Control Mode 18 Using the Remote Control as a Wireless Computer Mouse 19 Quick Start Quick Start 20 Setup Setting Up the Projector 22 Setting Up the Projector 22 Projecting a Reversed Image 23 Connections Connections 24 INPUT/OUTPUT Terminals and Connectable Main Equipment 24 Samples of Cables for Connection ...
Contents Preparing Introduction How to Read This Operation Manual 3 Contents 4 How to Access the PDF Operation Manuals ..... 7 IMPORTANT SAFEGUARDS 8 Accessories 11 Part Names and Functions 13 Using the Remote Control 17 Usable Range 17 Inserting the Batteries 17 ... Control Mode 18 Using the Remote Control as a Wireless Computer Mouse 19 Quick Start Quick Start 20 Setup Setting Up the Projector 22 Setting Up the Projector 22 Projecting a Reversed Image 23 Connections Connections 24 INPUT/OUTPUT Terminals and Connectable Main Equipment 24 Samples of Cables for Connection ...
XG-PH70X Operation Manual
Page 9
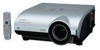
...41 Resetting the Lamp Timer of the folder) that you want to view. 3) Double click the "PH70_" pdf file to access the projector manuals. When you want to view the setup manual 1) Double click the "SETUP" folder. 2) Double click the language (name of the folder) that you want to view. 3) ...Double click the "PH70_" pdf file to access the projector manuals. SETUP MANUAL Refer to access the setup manual. Accessing the PDF manuals For Windows®: 1 Insert the CD-ROM in the CD-ROM drive. 2 Double click the "My Computer" icon. 3 ...
...41 Resetting the Lamp Timer of the folder) that you want to view. 3) Double click the "PH70_" pdf file to access the projector manuals. When you want to view the setup manual 1) Double click the "SETUP" folder. 2) Double click the language (name of the folder) that you want to view. 3) ...Double click the "PH70_" pdf file to access the projector manuals. SETUP MANUAL Refer to access the setup manual. Accessing the PDF manuals For Windows®: 1 Insert the CD-ROM in the CD-ROM drive. 2 Double click the "My Computer" icon. 3 ...
XG-PH70X Operation Manual
Page 12
...mode to prevent overheat damage. If you unplug the power cord from the AC outlet and turning off , the temperature warning indicator on the projector. Refer to direct sunlight or near heat sources. heat due to changes in and turn off the equipment to be connected. ■ Please... read the operation manuals of the projector and the equipment to be connected for the country you attach the lens cap to the projector. (See page 13.) ■ Do not expose the projector to "Maintenance Indicators" on page 94 for details. jector will ...
...mode to prevent overheat damage. If you unplug the power cord from the AC outlet and turning off , the temperature warning indicator on the projector. Refer to direct sunlight or near heat sources. heat due to changes in and turn off the equipment to be connected. ■ Please... read the operation manuals of the projector and the equipment to be connected for the country you attach the lens cap to the projector. (See page 13.) ■ Do not expose the projector to "Maintenance Indicators" on page 94 for details. jector will ...
XG-PH70X Operation Manual
Page 13
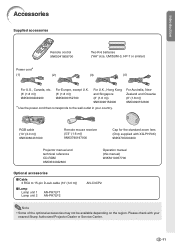
Please check with XG-PH70X) 9NK3797200400 Projector manual and technical reference CD-ROM 9NK3534022800 Optional accessories ■ Cable 3 RCA to the wall outlet in your nearest Sharp Authorized Projector Dealer or Service Center. -11 For Australia, New Zealand and Oceania (6' (1.8 m)) 9NK3090152600 RGB cable (10' (3.0 m)) 9NK3080431000 ... to 15-pin D-sub cable (10' (3.0 m)) ■ Lamp Lamp unit 1 Lamp unit 2 AN-PH7LP1 AN-PH7LP2 Operation manual (this manual) 9NK5010057700 AN-C3CP2 Note • Some of the optional accessories may not be available depending on the region.
Please check with XG-PH70X) 9NK3797200400 Projector manual and technical reference CD-ROM 9NK3534022800 Optional accessories ■ Cable 3 RCA to the wall outlet in your nearest Sharp Authorized Projector Dealer or Service Center. -11 For Australia, New Zealand and Oceania (6' (1.8 m)) 9NK3090152600 RGB cable (10' (3.0 m)) 9NK3080431000 ... to 15-pin D-sub cable (10' (3.0 m)) ■ Lamp Lamp unit 1 Lamp unit 2 AN-PH7LP1 AN-PH7LP2 Operation manual (this manual) 9NK5010057700 AN-C3CP2 Note • Some of the optional accessories may not be available depending on the region.
XG-PH70X Operation Manual
Page 14
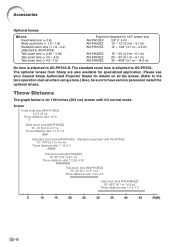
The optional lenses from Sharp are also available for details on all the lenses. (Refer to the lens operation manual when using a lens.) Also, be sure to have service personnel install the optional lenses... AN-PH40EZ AN-PH50EZ AN-PH60EZ 15' - 20' (4.6 m - 6.1 m) 20' - 30' (6.1 m - 9.1 m) 30' - 46'8" (9.1 m - 14.2 m) No lens is attached to XG-PH70X. Please see your nearest Sharp Authorized Projector Dealer for specialized application. Accessories Optional lenses ■ Lens Fixed wide lens (× 0.8) Wide-zoom lens (× 1.5 - 1.8) Standard zoom lens (× 1.8 - 2.2) (attached to...
The optional lenses from Sharp are also available for details on all the lenses. (Refer to the lens operation manual when using a lens.) Also, be sure to have service personnel install the optional lenses... AN-PH40EZ AN-PH50EZ AN-PH60EZ 15' - 20' (4.6 m - 6.1 m) 20' - 30' (6.1 m - 9.1 m) 30' - 46'8" (9.1 m - 14.2 m) No lens is attached to XG-PH70X. Please see your nearest Sharp Authorized Projector Dealer for specialized application. Accessories Optional lenses ■ Lens Fixed wide lens (× 0.8) Wide-zoom lens (× 1.5 - 1.8) Standard zoom lens (× 1.8 - 2.2) (attached to...
XG-PH70X Operation Manual
Page 15
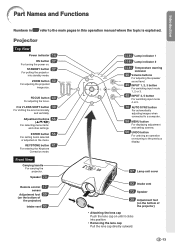
... the lens horizontally and vertically. STANDBY button 37 For putting the projector into position. • Removing the lens cap Pull the lens ...Speaker 73 Remote control 17 sensor Adjustment foot 39 (on the bottom of the projector) Intake vent 93 14·94 Lamp indicator 1 14·94 Lamp indicator...vent 73 Speaker 39 Adjustment foot (on the bottom of the projector) • Attaching the lens cap Push the lens cap on until it... mode. Front View Carrying handle For carrying the projector. FOCUS button 40 For adjusting the focus. Projector Top View Power indicator 14 ON button 37 For...
... the lens horizontally and vertically. STANDBY button 37 For putting the projector into position. • Removing the lens cap Pull the lens ...Speaker 73 Remote control 17 sensor Adjustment foot 39 (on the bottom of the projector) Intake vent 93 14·94 Lamp indicator 1 14·94 Lamp indicator...vent 73 Speaker 39 Adjustment foot (on the bottom of the projector) • Attaching the lens cap Push the lens cap on until it... mode. Front View Carrying handle For carrying the projector. FOCUS button 40 For adjusting the focus. Projector Top View Power indicator 14 ON button 37 For...
XG-PH70X Operation Manual
Page 17
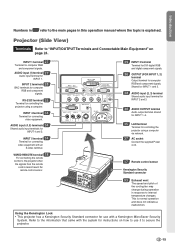
... for controlling the projector using a computer via network. 37 AC socket Connect the supplied Power cord. 17 Remote control sensor Kensington Security Standard connector 93 Exhaust vent The speed and pitch of the cooling fan may change during operation in this operation manual where the topic... is normal operation and does not indicate a malfunction. Projector (Side View) Terminals Refer to secure the projector. -15 RS-232C terminal 35 Terminal for use it to "INPUT/OUTPUT ...
... for controlling the projector using a computer via network. 37 AC socket Connect the supplied Power cord. 17 Remote control sensor Kensington Security Standard connector 93 Exhaust vent The speed and pitch of the cooling fan may change during operation in this operation manual where the topic... is normal operation and does not indicate a malfunction. Projector (Side View) Terminals Refer to secure the projector. -15 RS-232C terminal 35 Terminal for use it to "INPUT/OUTPUT ...
XG-PH70X Operation Manual
Page 18
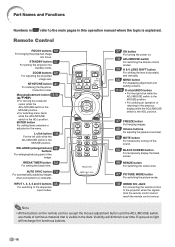
... image into standby mode. ENLARGE (enlarge/reduce) 46 buttons For enlarging/reducing part of luminous material that is visible in this operation manual where the topic is the ADJ. position. 47 FREEZE button For freezing images. 46 Volume buttons For adjusting the speaker sound level....18 WIRED R/C JACK For connecting the remote control to a computer. AUTO SYNC button 70 For automatically adjusting images when connected to the projector when the signals from the remote control cannot reach the remote control sensor. Exposure to light will diminish over time. KEYSTONE button 41 ...
... image into standby mode. ENLARGE (enlarge/reduce) 46 buttons For enlarging/reducing part of luminous material that is visible in this operation manual where the topic is the ADJ. position. 47 FREEZE button For freezing images. 46 Volume buttons For adjusting the speaker sound level....18 WIRED R/C JACK For connecting the remote control to a computer. AUTO SYNC button 70 For automatically adjusting images when connected to the projector when the signals from the remote control cannot reach the remote control sensor. Exposure to light will diminish over time. KEYSTONE button 41 ...
XG-PH70X Operation Manual
Page 24
... on the supplied CD-ROM. Close the curtains and dim the lights when setting up the projector in the middle of the Projection Image Size and Projection Distance For details, refer to "SETUP MANUAL" contained on the screen washes out the colors, making viewing difficult. • For an ...82'm10-"12.07'(1m3.")1-1m2-'431".28 '(m-31).74m'8-" 42.54m'(-7)2.39m'4-" 38.69'(-m141).40'm - 13.4 m) -22 Setting Up the Projector Setting Up the Projector For optimal image quality, position the projector perpendicular to "SETUP MANUAL" contained on the supplied CD-ROM.) Indication of the screen.
... on the supplied CD-ROM. Close the curtains and dim the lights when setting up the projector in the middle of the Projection Image Size and Projection Distance For details, refer to "SETUP MANUAL" contained on the screen washes out the colors, making viewing difficult. • For an ...82'm10-"12.07'(1m3.")1-1m2-'431".28 '(m-31).74m'8-" 42.54m'(-7)2.39m'4-" 38.69'(-m141).40'm - 13.4 m) -22 Setting Up the Projector Setting Up the Projector For optimal image quality, position the projector perpendicular to "SETUP MANUAL" contained on the supplied CD-ROM.) Indication of the screen.

XG-PH70X Operation Manual
Page 27
...not listed below. Equipment Computer Terminal on connected equipment RGB cable (supplied) Cable Terminal on the projector INPUT 1 RGB output terminal 5 BNC to 15-pin D-sub cable (commercially available) INPUT 2...ø3.5 mm stereo or mono audio cable (commercially available or available as Sharp service part QCNWGA038WJPZ) INPUT 3 AUDIO (for INPUT 1) AUDIO (for Connection • For more ...details of connection and cables, refer to the operation manual of Cables for INPUT 2, 3) HDMI output terminal DVI to HDMI cable (commercially available)...
...not listed below. Equipment Computer Terminal on connected equipment RGB cable (supplied) Cable Terminal on the projector INPUT 1 RGB output terminal 5 BNC to 15-pin D-sub cable (commercially available) INPUT 2...ø3.5 mm stereo or mono audio cable (commercially available or available as Sharp service part QCNWGA038WJPZ) INPUT 3 AUDIO (for INPUT 1) AUDIO (for Connection • For more ...details of connection and cables, refer to the operation manual of Cables for INPUT 2, 3) HDMI output terminal DVI to HDMI cable (commercially available)...

XG-PH70X Operation Manual
Page 29
... then the other than those listed may cause some Macintosh computers. Press "Fn" and "F5" keys simultaneously when using a SHARP notebook computer). Connections -27 Ensure the operation manuals of the devices to the projector, the computer, or both. • A Macintosh adaptor may not be projected unless the computer's external output port is switched...
... then the other than those listed may cause some Macintosh computers. Press "Fn" and "F5" keys simultaneously when using a SHARP notebook computer). Connections -27 Ensure the operation manuals of the devices to the projector, the computer, or both. • A Macintosh adaptor may not be projected unless the computer's external output port is switched...

XG-PH70X Operation Manual
Page 34
... video equipment such as DVD players and DTV* decoders to the INPUT 2 terminals. * DTV is only for TTL signal. -32 Please refer to the operation manual of the DTV decoder connected to this way, select "RGB" for details. • The HD/C sync terminal is the umbrella term used to the video... equipment in this projector. See page 63. • The HD/C sync and VD terminals may be used depending on the specifications of the DTV decoder for "Signal Type" in...
... video equipment such as DVD players and DTV* decoders to the INPUT 2 terminals. * DTV is only for TTL signal. -32 Please refer to the operation manual of the DTV decoder connected to this way, select "RGB" for details. • The HD/C sync terminal is the umbrella term used to the video... equipment in this projector. See page 63. • The HD/C sync and VD terminals may be used depending on the specifications of the DTV decoder for "Signal Type" in...
XG-PH70X Operation Manual
Page 37
...cable (commercially available). -35 Refer to the operation manual of the computer for details. • Refer to "SETUP MANUAL" contained on the computer, the computer can be used to control the projector. This may cause excessive voltage. Controlling the Projector by a Computer When the RS-232C terminal on ...the projector to the RS-232C serial terminal on the ...
...cable (commercially available). -35 Refer to the operation manual of the computer for details. • Refer to "SETUP MANUAL" contained on the computer, the computer can be used to control the projector. This may cause excessive voltage. Controlling the Projector by a Computer When the RS-232C terminal on ...the projector to the RS-232C serial terminal on the ...

XG-PH70X Operation Manual
Page 72
... turned on the image of scanned lines available from audio-visual equipment such as a DVD player or Digital Video. • The projector will be achieved with Auto Sync adjustment, use manual adjust- Computer Image Adjustment ("Fine Sync" menu) Checking the Input Signal Menu operation Page 56 Example: "Fine Sync" screen menu for...
... turned on the image of scanned lines available from audio-visual equipment such as a DVD player or Digital Video. • The projector will be achieved with Auto Sync adjustment, use manual adjust- Computer Image Adjustment ("Fine Sync" menu) Checking the Input Signal Menu operation Page 56 Example: "Fine Sync" screen menu for...
XG-PH70X Operation Manual
Page 86
...image Reversed image Reversed and inverted image Note • This function is used for connecting LAN cables. Refer to the "SETUP MANUAL" contained on "Stack Setting", the slave projector cannot be controlled with the one remote control, settings via web browser. (See page 85.) • When "Slave" is ...Normal Master Slave Description The stack setting is selected on the supplied CD-ROM for various applications. To control the slave projector with a reverse/invert image function that allows you to reverse or invert the projected image for details. • Only when controlling two...
...image Reversed image Reversed and inverted image Note • This function is used for connecting LAN cables. Refer to the "SETUP MANUAL" contained on "Stack Setting", the slave projector cannot be controlled with the one remote control, settings via web browser. (See page 85.) • When "Slave" is ...Normal Master Slave Description The stack setting is selected on the supplied CD-ROM for various applications. To control the slave projector with a reverse/invert image function that allows you to reverse or invert the projected image for details. • Only when controlling two...
XG-PH70X Operation Manual
Page 89
... 38400 bps 115200 bps Transmission speed is rapid. Note • Refer to the computer's operation manual for instructions for setting the computer's baud rate. -87 The projector is turned on manually (see page 37), and does not turn on automatically when the power cord is plugged into the...computer are set for RS-232C Specifications and Command Settings. • Refer to the "SETUP MANUAL" contained on . Description of Direct Power On Selectable items ON OFF Description The projector automatically turns on when the power cord is plugged into the AC outlet or the breaker ...
... 38400 bps 115200 bps Transmission speed is rapid. Note • Refer to the computer's operation manual for instructions for setting the computer's baud rate. -87 The projector is turned on manually (see page 37), and does not turn on automatically when the power cord is plugged into the...computer are set for RS-232C Specifications and Command Settings. • Refer to the "SETUP MANUAL" contained on . Description of Direct Power On Selectable items ON OFF Description The projector automatically turns on when the power cord is plugged into the AC outlet or the breaker ...
XG-PH70X Operation Manual
Page 91
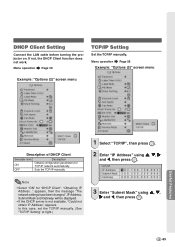
... menu Useful Features Description of DHCP Client Selectable items ON OFF Description Obtains configuration parameters for "DHCP Client". Sets the TCP/IP manually. In this case, set the TCP/IP manually. (See "TCP/IP Setting" at right.) 1 Select "TCP/IP", then press . 2 Enter "IP Address" using ', ", | and \, then press . 3 Enter "Subnet Mask.... • If the DHCP server is not available, "Could not obtain IP Address." appears. Menu operation Page 58 TCP/IP Setting Set the TCP/IP manually. DHCP Client Setting Connect the LAN cable before turning the projector on.
... menu Useful Features Description of DHCP Client Selectable items ON OFF Description Obtains configuration parameters for "DHCP Client". Sets the TCP/IP manually. In this case, set the TCP/IP manually. (See "TCP/IP Setting" at right.) 1 Select "TCP/IP", then press . 2 Enter "IP Address" using ', ", | and \, then press . 3 Enter "Subnet Mask.... • If the DHCP server is not available, "Could not obtain IP Address." appears. Menu operation Page 58 TCP/IP Setting Set the TCP/IP manually. DHCP Client Setting Connect the LAN cable before turning the projector on.
XG-PH70X Operation Manual
Page 103
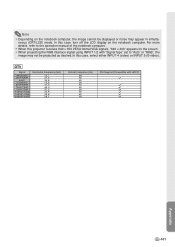
Note • Depending on the notebook computer, the image cannot be projected as desired. In this projector receives 640 × 350 VESA format VGA signals, "640 × 400" appears on the notebook computer. DTV Signal 480I/525I 480P/525P 540P 576I/625I ....8 33.8 28.1 Vertical Frequency (Hz) 60 60 60 50 50 60 50 60 60 50 DVI Support (Compatible with "Signal Type" set to the operation manual of the notebook computer. • When this case, select either INPUT 4 (video) or INPUT 5 (S-video). For more details, refer to "Auto" or "RGB", the image...
Note • Depending on the notebook computer, the image cannot be projected as desired. In this projector receives 640 × 350 VESA format VGA signals, "640 × 400" appears on the notebook computer. DTV Signal 480I/525I 480P/525P 540P 576I/625I ....8 33.8 28.1 Vertical Frequency (Hz) 60 60 60 50 50 60 50 60 60 50 DVI Support (Compatible with "Signal Type" set to the operation manual of the notebook computer. • When this case, select either INPUT 4 (video) or INPUT 5 (S-video). For more details, refer to "Auto" or "RGB", the image...


