

VLWD250U Operation Manual
Page 2
... information, please contact your video world. Please read this unit. REFER SERVICING TO QUALIFIED SERVICE PERSONNEL. BATTERY DISPOSAL CONTAINS LITHIUM-ION RECHARGEABLE BATTERY. Important Information for purchasing this camcorder offers, and expand your local authorities or the Electronics Industries Alliance:... www.eiae.org. This symbol alerts the user that you fully enjoy the many features this camcorder from a SHARP service ...
... information, please contact your video world. Please read this unit. REFER SERVICING TO QUALIFIED SERVICE PERSONNEL. BATTERY DISPOSAL CONTAINS LITHIUM-ION RECHARGEABLE BATTERY. Important Information for purchasing this camcorder offers, and expand your local authorities or the Electronics Industries Alliance:... www.eiae.org. This symbol alerts the user that you fully enjoy the many features this camcorder from a SHARP service ...
VLWD250U Operation Manual
Page 3
...negative end belongs and vice versa), it can overheat and rupture. RESPONSIBLE PARTY: SHARP ELECTRONICS CORPORATION Sharp Plaza, Mahwah, New Jersey 07430 Phone: 1-800-BE-SHARP CAUTION ON LITHIUM BATTERY (MEMORY BACKUP BATTERY) If a battery is connected. • Consult the dealer or an experienced radio/TV technician ... could void the user's authority to comply with Part 15 of SHARP that this equipment. Operation is the intent of the FCC Rules. This has happened when young children install batteries backwards. Warn children not to Part 15 of the following two conditions...
...negative end belongs and vice versa), it can overheat and rupture. RESPONSIBLE PARTY: SHARP ELECTRONICS CORPORATION Sharp Plaza, Mahwah, New Jersey 07430 Phone: 1-800-BE-SHARP CAUTION ON LITHIUM BATTERY (MEMORY BACKUP BATTERY) If a battery is connected. • Consult the dealer or an experienced radio/TV technician ... could void the user's authority to comply with Part 15 of SHARP that this equipment. Operation is the intent of the FCC Rules. This has happened when young children install batteries backwards. Warn children not to Part 15 of the following two conditions...

VLWD250U Operation Manual
Page 4
... a bath tub, wash bowl, kitchen sink, or laundry tub; A product and cart combination should be followed. 5. Power Sources-This product should be operated only from battery power, or other sources, refer to the operating instructions. 12. Do not defeat the safety purpose of power supply to . 11. Heed Warnings-All warnings...
... a bath tub, wash bowl, kitchen sink, or laundry tub; A product and cart combination should be followed. 5. Power Sources-This product should be operated only from battery power, or other sources, refer to the operating instructions. 12. Do not defeat the safety purpose of power supply to . 11. Heed Warnings-All warnings...
VLWD250U Operation Manual
Page 6
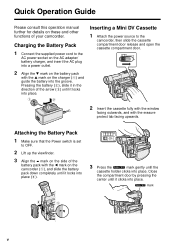
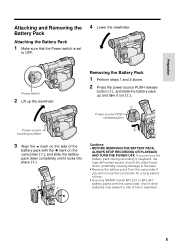
... power cord to the AC power socket on the AC adapter/ battery charger, and insert the AC plug into a power outlet. 2 Align the s mark on the battery pack with the q mark on the camcorder (1), and slide the battery pack down completely until it locks into place. mark on the ...further for details on these and other functions of the arrow (3) until it locks into place (2). Pressing the battery (2), slide it in the direction of your camcorder. W mark v Attaching the Battery Pack 1 Make sure that the Power switch is set to the camcorder, then slide the cassette compartment door ...
... power cord to the AC power socket on the AC adapter/ battery charger, and insert the AC plug into a power outlet. 2 Align the s mark on the battery pack with the q mark on the camcorder (1), and slide the battery pack down completely until it locks into place. mark on the ...further for details on these and other functions of the arrow (3) until it locks into place (2). Pressing the battery (2), slide it in the direction of your camcorder. W mark v Attaching the Battery Pack 1 Make sure that the Power switch is set to the camcorder, then slide the cassette compartment door ...

VLWD250U Operation Manual
Page 8
...-1957TAZZ Remote control RRMCG0101TASA AA battery for remote control K 2 CR2025 type lithium battery Audio/video cable (RCA type) QCNW-2016TAZZ Lens cap GCOVH1271TASA Shoulder strap UBNDS0010TASA * The part numbers for the AC adapter/battery charger and battery pack supplied with this camcorder was... purchased outside of the supplied AC adapter/battery charger and battery pack. If this camcorder are valid only in the U.S. Please refer...
...-1957TAZZ Remote control RRMCG0101TASA AA battery for remote control K 2 CR2025 type lithium battery Audio/video cable (RCA type) QCNW-2016TAZZ Lens cap GCOVH1271TASA Shoulder strap UBNDS0010TASA * The part numbers for the AC adapter/battery charger and battery pack supplied with this camcorder was... purchased outside of the supplied AC adapter/battery charger and battery pack. If this camcorder are valid only in the U.S. Please refer...

VLWD250U Operation Manual
Page 9
For optional and additional accessories, contact your local dealer, call the Sharp Accessories and Supply Center at 1-800-642-2122, or visit SHARP's website (http://www.sharp-usa.com). accessories. viii Optional Accessories Standard-life battery pack BT-L221n Extended-life battery pack BT-L441n Zoom microphone VR-5MCN PixLab Video Capture Software (Lite Version) VR-PK50E Note: The listed model names are for U.S.
For optional and additional accessories, contact your local dealer, call the Sharp Accessories and Supply Center at 1-800-642-2122, or visit SHARP's website (http://www.sharp-usa.com). accessories. viii Optional Accessories Standard-life battery pack BT-L221n Extended-life battery pack BT-L441n Zoom microphone VR-5MCN PixLab Video Capture Software (Lite Version) VR-PK50E Note: The listed model names are for U.S.
VLWD250U Operation Manual
Page 12
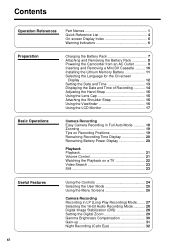
... 8 Powering the Camcorder from an AC Outlet 9 Inserting and Removing a Mini DV Cassette .......... 10 Installing the Lithium Memory Battery 11 Selecting the Language for the On-screen Display 12 Setting the Date and Time 13 Displaying the Date and Time of Recording 14...Basic Operations Camera Recording Easy Camera Recording in Full Auto Mode 18 Zooming 19 Tips on Recording Positions 19 Remaining Recording Time Display 20 Remaining Battery Power Display 20 Playback Playback 21 Volume Control 21 Watching the Playback on a TV 22 Video Search 23 Still 23 Useful Features Using the...
... 8 Powering the Camcorder from an AC Outlet 9 Inserting and Removing a Mini DV Cassette .......... 10 Installing the Lithium Memory Battery 11 Selecting the Language for the On-screen Display 12 Setting the Date and Time 13 Displaying the Date and Time of Recording 14...Basic Operations Camera Recording Easy Camera Recording in Full Auto Mode 18 Zooming 19 Tips on Recording Positions 19 Remaining Recording Time Display 20 Remaining Battery Power Display 20 Playback Playback 21 Volume Control 21 Watching the Playback on a TV 22 Video Search 23 Still 23 Useful Features Using the...

VLWD250U Operation Manual
Page 15
Operation References Left view Viewfinder [p. 16] Zoom microphone mounting hole [p. 50] LCD monitor [p. 17] LCD monitor OPEN release button [p. 17] Lithium battery compartment door [p. 11] Diopter adjustment [p. 16] Power source PUSH release button [pp. 8, 9] Power source mounting surface [pp. 8, 9] Shoulder strap loop [p. 15] Bottom view ;; Tripod socket 2
Operation References Left view Viewfinder [p. 16] Zoom microphone mounting hole [p. 50] LCD monitor [p. 17] LCD monitor OPEN release button [p. 17] Lithium battery compartment door [p. 11] Diopter adjustment [p. 16] Power source PUSH release button [pp. 8, 9] Power source mounting surface [pp. 8, 9] Shoulder strap loop [p. 15] Bottom view ;; Tripod socket 2

VLWD250U Operation Manual
Page 19
... . Dew has formed inside the camcorder. When the vertical rotation of warning, rotate the monitor back to have it with a fully charged battery pack (see page 10). Operation References Warning Indicators If a warning indicator appears on the video cassette has been slid to the record-protect ...page 65). THE TAPE ENDS SOON. DEW DEW L AMP L AMP Note: •N indicates a flashing display. PROT EC T. Call your local authorized Sharp dealer to within 135°. 6 CASSE T T E NOT RE CORDA BL E. To check the type of the LCD monitor is defective and should be...
... . Dew has formed inside the camcorder. When the vertical rotation of warning, rotate the monitor back to have it with a fully charged battery pack (see page 10). Operation References Warning Indicators If a warning indicator appears on the video cassette has been slid to the record-protect ...page 65). THE TAPE ENDS SOON. DEW DEW L AMP L AMP Note: •N indicates a flashing display. PROT EC T. Call your local authorized Sharp dealer to within 135°. 6 CASSE T T E NOT RE CORDA BL E. To check the type of the LCD monitor is defective and should be...

VLWD250U Operation Manual
Page 20
...;C and 20°C). 7 This may vary depending on the ambient temperature and the condition of more information on using the battery pack. Caution: • Charge only SHARP model BT-L221 or BT-L441 battery packs. To limit the deterioration of the arrow (1), and remove it between 50°F and 86°F (10°...
...;C and 20°C). 7 This may vary depending on the ambient temperature and the condition of more information on using the battery pack. Caution: • Charge only SHARP model BT-L221 or BT-L441 battery packs. To limit the deterioration of the arrow (1), and remove it between 50°F and 86°F (10°...
VLWD250U Operation Manual
Page 21
... set to the tape. • Remove the battery pack from the camcorder if you remove the battery pack during recording or playback, the tape will not use the camcorder for a long period of time. • Use only SHARP model BT-L221 or BT-L441 battery packs with the q mark on the side of... fire or explosion. 8 mark on the camcorder (1), and slide the battery pack down completely until it out (2). Power source PUSH release button Power source...
... set to the tape. • Remove the battery pack from the camcorder if you remove the battery pack during recording or playback, the tape will not use the camcorder for a long period of time. • Use only SHARP model BT-L221 or BT-L441 battery packs with the q mark on the side of... fire or explosion. 8 mark on the camcorder (1), and slide the battery pack down completely until it out (2). Power source PUSH release button Power source...

VLWD250U Operation Manual
Page 22
..., ALWAYS STOP RECORDING OR PLAYBACK AND TURN THE POWER OFF. Removing the DC cable from a power outlet by using the supplied AC adapter/ battery charger and DC cable. If you remove the DC cable during recording or playback, the tape will remain wound around the video head drum, ...camcorder Perform steps 1 and 2 above. DC cable connecting plate Note: • When the AC adapter/battery charger is supplied power. Caution: • The supplied AC adapter/battery charger is set to charge the battery pack. DC OUT jack POWER indicator To power outlet 2 Lift up and take it cannot be used...
..., ALWAYS STOP RECORDING OR PLAYBACK AND TURN THE POWER OFF. Removing the DC cable from a power outlet by using the supplied AC adapter/ battery charger and DC cable. If you remove the DC cable during recording or playback, the tape will remain wound around the video head drum, ...camcorder Perform steps 1 and 2 above. DC cable connecting plate Note: • When the AC adapter/battery charger is supplied power. Caution: • The supplied AC adapter/battery charger is set to charge the battery pack. DC OUT jack POWER indicator To power outlet 2 Lift up and take it cannot be used...

VLWD250U Operation Manual
Page 23
... occur, loosen the hand strap and open the cassette compartment door. • A confirmation sound is too low, you are inserting or removing a cassette. Replace the battery pack with a fully charged one. • See page 65 for more information on the video cassette tapes intended for use the camcorder for the cassette... holder in the cassette holder. • Do not apply force to the cassette holder except when pressing the W mark to extend. Notes: • If the battery power is made , and the cassette holder retracts automatically.
... occur, loosen the hand strap and open the cassette compartment door. • A confirmation sound is too low, you are inserting or removing a cassette. Replace the battery pack with a fully charged one. • See page 65 for more information on the video cassette tapes intended for use the camcorder for the cassette... holder in the cassette holder. • Do not apply force to the cassette holder except when pressing the W mark to extend. Notes: • If the battery power is made , and the cassette holder retracts automatically.

VLWD250U Operation Manual
Page 24
...DISASSEMBLE OR DISPOSE OF IN FIRE. 3 Insert the lithium battery into the compartment with a new CR2025 lithium battery when the time indicator of the camcorder starts to store the memory of the Lithium battery REPLACE BATTERY WITH TOSHIBA, MATSUSHITA OR HITACHI MAXELL TYPE CR2025 ONLY. Note...out. • Do not short-circuit, recharge, disassemble, or heat the lithium battery. • Should the lithium battery leak, wipe the battery compartment clean, and then insert a new battery. • The lithium battery will last about one year under normal usage. 4 Replace the compartment door, ...
...DISASSEMBLE OR DISPOSE OF IN FIRE. 3 Insert the lithium battery into the compartment with a new CR2025 lithium battery when the time indicator of the camcorder starts to store the memory of the Lithium battery REPLACE BATTERY WITH TOSHIBA, MATSUSHITA OR HITACHI MAXELL TYPE CR2025 ONLY. Note...out. • Do not short-circuit, recharge, disassemble, or heat the lithium battery. • Should the lithium battery leak, wipe the battery compartment clean, and then insert a new battery. • The lithium battery will last about one year under normal usage. 4 Replace the compartment door, ...

VLWD250U Operation Manual
Page 26
... select "30" (minute), and then press e. • The internal clock now starts operating. Note: • Before performing the procedure below, make sure that the lithium battery has been installed (see page 11). SE TT I NG 12H 24H JAN. 1. 2001 1 2 : 0 0 AM 8 Press d or y to CAMERA. CLOCK SE T D I SPLAY SE T T I NG JUN. 2. 2002...
... select "30" (minute), and then press e. • The internal clock now starts operating. Note: • Before performing the procedure below, make sure that the lithium battery has been installed (see page 11). SE TT I NG 12H 24H JAN. 1. 2001 1 2 : 0 0 AM 8 Press d or y to CAMERA. CLOCK SE T D I SPLAY SE T T I NG JUN. 2. 2002...

VLWD250U Operation Manual
Page 28
... strap. Then, pull the grip strap tight until it through the loop on the left side of the cap. Attaching the Shoulder Strap 1 Remove the battery pack. 2 Hold one end of the strap and thread it fits snugly. Using the Lens Cap Attach the strap of the lens cap to the... loop on the top and bottom of the hand strap, open the hand strap flap, perform the same procedure, and then attach the battery pack. 2 5 Loop Loop 3 6 Buckle 4 Buckle 7 15
... strap. Then, pull the grip strap tight until it through the loop on the left side of the cap. Attaching the Shoulder Strap 1 Remove the battery pack. 2 Hold one end of the strap and thread it fits snugly. Using the Lens Cap Attach the strap of the lens cap to the... loop on the top and bottom of the hand strap, open the hand strap flap, perform the same procedure, and then attach the battery pack. 2 5 Loop Loop 3 6 Buckle 4 Buckle 7 15

VLWD250U Operation Manual
Page 30
.... Closing the LCD monitor Return the LCD monitor to the vertical 90° position with the screen facing in bright daylight. Lock button Notes: • Battery consumption is larger when the LCD monitor is completely opened. • When closing the LCD monitor, do not tilt it clicks into the camcorder until... it ; Cautions: • Do not use excessive force when moving the LCD monitor. • Do not try to an angle that you want to save battery power. • Use the viewfinder if the LCD screen becomes difficult to the camcorder body (2).
.... Closing the LCD monitor Return the LCD monitor to the vertical 90° position with the screen facing in bright daylight. Lock button Notes: • Battery consumption is larger when the LCD monitor is completely opened. • When closing the LCD monitor, do not tilt it clicks into the camcorder until... it ; Cautions: • Do not use excessive force when moving the LCD monitor. • Do not try to an angle that you want to save battery power. • Use the viewfinder if the LCD screen becomes difficult to the camcorder body (2).

VLWD250U Operation Manual
Page 31
... 120 100 • The chart specifies the approximate times in Recording Standby mode for about 4 minutes.) Maximum continuous recording and actual recording times Battery pack Max. Auto mode indicator AUTO PAUSE Lock button Note: If "MANUAL" is now ready to CAMERA. (The camcorder will make a confirmation... sound when it is consumed in Recording Standby mode. Turn off to save battery power and to protect the tape from the lens is now displayed in the viewfinder. • The camcorder is displayed at this time, press...
... 120 100 • The chart specifies the approximate times in Recording Standby mode for about 4 minutes.) Maximum continuous recording and actual recording times Battery pack Max. Auto mode indicator AUTO PAUSE Lock button Note: If "MANUAL" is now ready to CAMERA. (The camcorder will make a confirmation... sound when it is consumed in Recording Standby mode. Turn off to save battery power and to protect the tape from the lens is now displayed in the viewfinder. • The camcorder is displayed at this time, press...

VLWD250U Operation Manual
Page 33
...power source, you set the Power switch to OFF and then back to CAMERA or VCR. • In cold environments, the red remaining battery power indicator may cause the camcorder to suddenly lose power. Also, it varies slightly depending on and off the indicator, press the MENU/ ...0min SP To turn on the length of the zoom functions when the warning indicator is displayed may appear sooner. Prepare a new cassette. If the battery power becomes very low, a warning indicator will appear. During recording, press the MENU/DISPLAY button until the warning indicator appears. • Use of...
...power source, you set the Power switch to OFF and then back to CAMERA or VCR. • In cold environments, the red remaining battery power indicator may cause the camcorder to suddenly lose power. Also, it varies slightly depending on and off the indicator, press the MENU/ ...0min SP To turn on the length of the zoom functions when the warning indicator is displayed may appear sooner. Prepare a new cassette. If the battery power becomes very low, a warning indicator will appear. During recording, press the MENU/DISPLAY button until the warning indicator appears. • Use of...

VLWD250U Operation Manual
Page 50
... cover. 2 Insert the two supplied AA (R6 or UM/ SUM-3) batteries with the battery poles positioned as flowers and insects, or make title frames for your videos. Tripod Power Zoom control Notes: • When you obtain the desired angle ... center will automatically focus on the subject when the lens is in the situations described on it. In these situations, use old and new batteries together or batteries of subjects. The camcorder will be sure that you want to record yourself in a scene, or when the camcorder is within approximately 6 feet (1.8 m) of...
... cover. 2 Insert the two supplied AA (R6 or UM/ SUM-3) batteries with the battery poles positioned as flowers and insects, or make title frames for your videos. Tripod Power Zoom control Notes: • When you obtain the desired angle ... center will automatically focus on the subject when the lens is in the situations described on it. In these situations, use old and new batteries together or batteries of subjects. The camcorder will be sure that you want to record yourself in a scene, or when the camcorder is within approximately 6 feet (1.8 m) of...