
VLWD250U Operation Manual
Page 12
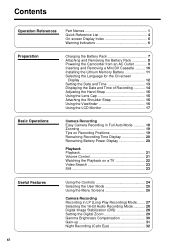
... Removing the Battery Pack 8 Powering the Camcorder from an AC Outlet 9 Inserting and Removing a Mini DV Cassette .......... 10 Installing the Lithium Memory Battery 11 Selecting the Language for the On-screen Display 12 Setting the Date and Time 13 Displaying the Date and Time of Recording 14 Adjusting the Hand Strap 15 Using the Lens Cap 15 Attaching the Shoulder Strap 15 Using the Viewfinder 16 Using the LCD Monitor 17 Basic Operations Camera Recording Easy Camera Recording in Full Auto Mode 18 Zooming...
... Removing the Battery Pack 8 Powering the Camcorder from an AC Outlet 9 Inserting and Removing a Mini DV Cassette .......... 10 Installing the Lithium Memory Battery 11 Selecting the Language for the On-screen Display 12 Setting the Date and Time 13 Displaying the Date and Time of Recording 14 Adjusting the Hand Strap 15 Using the Lens Cap 15 Attaching the Shoulder Strap 15 Using the Viewfinder 16 Using the LCD Monitor 17 Basic Operations Camera Recording Easy Camera Recording in Full Auto Mode 18 Zooming...

VLWD250U Operation Manual
Page 13
... (PHOTO SHOT 36 Auto Focus 37 Macro Shots 37 Using the Remote Control 37 Letting the Subject Monitor the Shot 39 Playback Playback Functions with the Remote Control ......... 40 Using the Time Code 41 Advanced Features Camera Recording Manual Exposure 42 Manual Focus 43 Setting the Shutter Speed 45 White Balance Lock 47 Scene Menu (Program AE 48 Digital Picture Effects 49 Setting the Confirmation Sounds 49 Using the Zoom Microphone (Optional Accessory 50 Playback Playback Zoom 51 Gamma Playback 52 Playback Effects 53 Picture Effect Playback 54 Picture/Backlight Adjustments...
... (PHOTO SHOT 36 Auto Focus 37 Macro Shots 37 Using the Remote Control 37 Letting the Subject Monitor the Shot 39 Playback Playback Functions with the Remote Control ......... 40 Using the Time Code 41 Advanced Features Camera Recording Manual Exposure 42 Manual Focus 43 Setting the Shutter Speed 45 White Balance Lock 47 Scene Menu (Program AE 48 Digital Picture Effects 49 Setting the Confirmation Sounds 49 Using the Zoom Microphone (Optional Accessory 50 Playback Playback Zoom 51 Gamma Playback 52 Playback Effects 53 Picture Effect Playback 54 Picture/Backlight Adjustments...

VLWD250U Operation Manual
Page 20
... AC adapter/ battery charger, and insert the AC plug into place. • The CHARGE indicator lights up . Charging time and maximum continuous recording and playback times Battery pack Charging time Max. continuous Max. PPrerpearpataionration Preparation Charging the Battery Pack Charge the battery pack with the a mark on the charger (1) and guide the battery into the groove. CHARGE indicator • The CHARGE indicator turns off frequently will naturally deteriorate over time. Then, remove the AC plug of the battery...
... AC adapter/ battery charger, and insert the AC plug into place. • The CHARGE indicator lights up . Charging time and maximum continuous recording and playback times Battery pack Charging time Max. continuous Max. PPrerpearpataionration Preparation Charging the Battery Pack Charge the battery pack with the a mark on the charger (1) and guide the battery into the groove. CHARGE indicator • The CHARGE indicator turns off frequently will naturally deteriorate over time. Then, remove the AC plug of the battery...

VLWD250U Operation Manual
Page 25
... turn off the menu screen. 12 OTHERS REMOT E SOUND T I ME CODE T C OUT DEMO MODE L ANGUAGE ENGL I SH Preparation Operation button Setting the Language When using the camcorder for the first time, select the desired language for the on-screen display by performing the procedure below. 1 Press the LCD monitor OPEN release button (1) and open the LCD monitor (2). MENU/DISPLAY button Power switch 3 Press d or y (1) on the LCD screen. Select "LANGUAGE" ("LANGUE" or "IDIOMA") (1), then press r (2). • The language selection screen appears. LCD monitor OPEN release button Changing...
... turn off the menu screen. 12 OTHERS REMOT E SOUND T I ME CODE T C OUT DEMO MODE L ANGUAGE ENGL I SH Preparation Operation button Setting the Language When using the camcorder for the first time, select the desired language for the on-screen display by performing the procedure below. 1 Press the LCD monitor OPEN release button (1) and open the LCD monitor (2). MENU/DISPLAY button Power switch 3 Press d or y (1) on the LCD screen. Select "LANGUAGE" ("LANGUE" or "IDIOMA") (1), then press r (2). • The language selection screen appears. LCD monitor OPEN release button Changing...

VLWD250U Operation Manual
Page 27
... 5 Press the MENU/DISPLAY button to select "DATE" or "DATEHTIME", and then press e. CLOCK SE T D I SPLAY SE T T I ME 4 Press d or y to turn off the menu screen. Preparation Changing to the 24-hour Time Mode 1 After performing step 9 above, press d or y (1) to CAMERA or VCR. 2 Press the MENU/DISPLAY button until the menu screen appears. 3 Select P, then press r on the Operation button. Notes: • The date and time, once set the Power switch to select...
... 5 Press the MENU/DISPLAY button to select "DATE" or "DATEHTIME", and then press e. CLOCK SE T D I SPLAY SE T T I ME 4 Press d or y to turn off the menu screen. Preparation Changing to the 24-hour Time Mode 1 After performing step 9 above, press d or y (1) to CAMERA or VCR. 2 Press the MENU/DISPLAY button until the menu screen appears. 3 Select P, then press r on the Operation button. Notes: • The date and time, once set the Power switch to select...

VLWD250U Operation Manual
Page 31
... camcorder remains in Recording Standby mode for more than 5 minutes, the power will automatically turn the power off Set the Power switch to OFF without pressing the Lock button. To resume recording, set the camcorder to Auto mode. 3 Press the REC START/STOP button to prepare your camcorder for recording. Note: • Using the zoom (see page 19) and other functions or turning the power on pages 7 through 17 to begin recording. continuous recording time LCD closed LCD open Actual recording time LCD closed LCD open...
... camcorder remains in Recording Standby mode for more than 5 minutes, the power will automatically turn the power off Set the Power switch to OFF without pressing the Lock button. To resume recording, set the camcorder to Auto mode. 3 Press the REC START/STOP button to prepare your camcorder for recording. Note: • Using the zoom (see page 19) and other functions or turning the power on pages 7 through 17 to begin recording. continuous recording time LCD closed LCD open Actual recording time LCD closed LCD open...
VLWD250U Operation Manual
Page 40
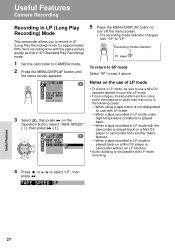
... 4 above. DG T L ZOOM TAPE SPEED SP LP 5 Press the MENU/DISPLAY button to turn off the menu screen. • The recording mode indicator changes from another manufacturer. -When a tape recorded in LP mode is played back on a Mini DV player or camcorder without an LP function. • Audio dubbing is not possible with the same picture quality as that in SP (Standard Play Recording) mode. 1 Set the camcorder to CAMERA mode. 2 Press the MENU/DISPLAY button until the menu screen appears. UUsesfuel fFuealturFeseatures...
... 4 above. DG T L ZOOM TAPE SPEED SP LP 5 Press the MENU/DISPLAY button to turn off the menu screen. • The recording mode indicator changes from another manufacturer. -When a tape recorded in LP mode is played back on a Mini DV player or camcorder without an LP function. • Audio dubbing is not possible with the same picture quality as that in SP (Standard Play Recording) mode. 1 Set the camcorder to CAMERA mode. 2 Press the MENU/DISPLAY button until the menu screen appears. UUsesfuel fFuealturFeseatures...

VLWD250U Operation Manual
Page 41
... 12-bit audio recording mode. AUTO DIS indicator Note: • The DIS function cannot compensate for relatively minor image shaking that is turned off . Note: • When using the camcorder on the Opera- For higher-quality audio recording, select the 16-bit audio recording mode. 1 Set the camcorder to ON. 28 Select "AUDIO MODE" (1), then press r (2). To return to DIS mode Set the DIS switch to CAMERA mode. 2 Press the MENU/DISPLAY button until the menu screen appears...
... 12-bit audio recording mode. AUTO DIS indicator Note: • The DIS function cannot compensate for relatively minor image shaking that is turned off . Note: • When using the camcorder on the Opera- For higher-quality audio recording, select the 16-bit audio recording mode. 1 Set the camcorder to ON. 28 Select "AUDIO MODE" (1), then press r (2). To return to DIS mode Set the DIS switch to CAMERA mode. 2 Press the MENU/DISPLAY button until the menu screen appears...

VLWD250U Operation Manual
Page 49
... press e. OF F DG T L ZOOM PHOTO SHOT TAPE SPEED 2 Press the REC START/STOP button. • The still image of a camera shutter closing by setting the SOUND menu item to CAMERA mode. 2 Press the MENU/DISPLAY button until the menu screen appears. 3 Select Y, then press r on the Operation button. To cancel the still image In SNAP mode, press the STILL button while the camcorder is in step 5 of the subject is recorded following the sound and visual effects of...
... press e. OF F DG T L ZOOM PHOTO SHOT TAPE SPEED 2 Press the REC START/STOP button. • The still image of a camera shutter closing by setting the SOUND menu item to CAMERA mode. 2 Press the MENU/DISPLAY button until the menu screen appears. 3 Select Y, then press r on the Operation button. To cancel the still image In SNAP mode, press the STILL button while the camcorder is in step 5 of the subject is recorded following the sound and visual effects of...

VLWD250U Operation Manual
Page 60
... SP 1 Set the camcorder to CAMERA mode. 2 Press the W/B button to turn off the white balance lock screen. W/B button 4 Press the MENU/DISPLAY button to set to look different depending on the lighting condition. AUTO WH I SP L AY 3 Aim the lens at a white object. • Adjust the distance of the object so that the entire screen is set the white balance lock. • "W/B LOCK" flashes during the locking procedure. Advanced Features Camera Recording White Balance Lock The color of...
... SP 1 Set the camcorder to CAMERA mode. 2 Press the W/B button to turn off the white balance lock screen. W/B button 4 Press the MENU/DISPLAY button to set to look different depending on the lighting condition. AUTO WH I SP L AY 3 Aim the lens at a white object. • Adjust the distance of the object so that the entire screen is set the white balance lock. • "W/B LOCK" flashes during the locking procedure. Advanced Features Camera Recording White Balance Lock The color of...

VLWD250U Operation Manual
Page 63
... the MENU/DISPLAY button to the magnification of Zoom Microphone modes AUTO: The camcorder automatically selects the optimum sound according to turn off the zoom microphone. 5 Press d or y to select the desired zoom microphone mode, then press e. • The selected zoom microphone mode is fixed to the zoom setting. Mounting pin 2 Set the camcorder to CAMERA mode. 2 Turn the screw in the opposite direction than when mounting, and then pull off the menu screen. AUD I O SE T AUD I O MODE ZOOM M I C AUTO TELE OFF...
... the MENU/DISPLAY button to the magnification of Zoom Microphone modes AUTO: The camcorder automatically selects the optimum sound according to turn off the zoom microphone. 5 Press d or y to select the desired zoom microphone mode, then press e. • The selected zoom microphone mode is fixed to the zoom setting. Mounting pin 2 Set the camcorder to CAMERA mode. 2 Turn the screw in the opposite direction than when mounting, and then pull off the menu screen. AUD I O SE T AUD I O MODE ZOOM M I C AUTO TELE OFF...

VLWD250U Operation Manual
Page 71
... source media from Video Equipment 1 Set the camcorder to VCR mode, and insert a Mini DV cassette. 2 Begin playback on the Operation button to begin recording. Advanced Features 58 appears on the camcorder monitor and the recording function is being properly received. 3 Press the REC START/STOP button on the camcorder. • The camcorder enters the Recording Standby mode. 4 Press y on the video equipment connected to the camcorder. • Check the camcorder screen to see if the picture is disabled (see...
... source media from Video Equipment 1 Set the camcorder to VCR mode, and insert a Mini DV cassette. 2 Begin playback on the Operation button to begin recording. Advanced Features 58 appears on the camcorder monitor and the recording function is being properly received. 3 Press the REC START/STOP button on the camcorder. • The camcorder enters the Recording Standby mode. 4 Press y on the video equipment connected to the camcorder. • Check the camcorder screen to see if the picture is disabled (see...
VLWD250U Operation Manual
Page 73
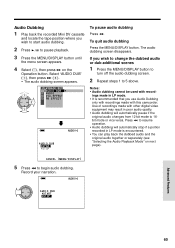
... the MENU/DISPLAY button to turn off the audio dubbing screen. 2 Repeat steps 1 to begin audio dubbing. Use of recordings made with this camcorder. Press e to resume operation. • Audio dubbing will automatically pause if the original audio changes from 12-bit mode to pause playback. 3 Press the MENU/DISPLAY button until the menu screen appears. 4 Select V, then press r on next page). Record your narration. Notes: • Audio dubbing cannot be used with other digital video equipment may...
... the MENU/DISPLAY button to turn off the audio dubbing screen. 2 Repeat steps 1 to begin audio dubbing. Use of recordings made with this camcorder. Press e to resume operation. • Audio dubbing will automatically pause if the original audio changes from 12-bit mode to pause playback. 3 Press the MENU/DISPLAY button until the menu screen appears. 4 Select V, then press r on next page). Record your narration. Notes: • Audio dubbing cannot be used with other digital video equipment may...

VLWD250U Operation Manual
Page 75
... Capture Software, use the AC adapter/battery charger as a power source for PC Connection This camcorder can transfer still playback images in VCR mode or still images in CAMERA mode to a personal computer by using the optional Video Capture Software VR-PK50E. CAMERA mode: Digital Zoom, Digital Picture Effects, Scene Menu • To edit still images transferred with the optional Video Capture Software VR-PK50E. 3 Turn on the "Setup.exe" file. 6 Follow the instructions as shown below. • Before connecting the camcorder to insure that the PC power is complete. VCR mode: Playback...
... Capture Software, use the AC adapter/battery charger as a power source for PC Connection This camcorder can transfer still playback images in VCR mode or still images in CAMERA mode to a personal computer by using the optional Video Capture Software VR-PK50E. CAMERA mode: Digital Zoom, Digital Picture Effects, Scene Menu • To edit still images transferred with the optional Video Capture Software VR-PK50E. 3 Turn on the "Setup.exe" file. 6 Follow the instructions as shown below. • Before connecting the camcorder to insure that the PC power is complete. VCR mode: Playback...

VLWD250U Operation Manual
Page 79
... of its service life. Charging • Charge the battery pack immediately (or a day) before charging) is seen through the window. Note: • Use only SHARP BT-L221 or BT-L441 battery packs. Cautions: • Improper handling of the battery pack may cause loss of fire or explosion. Do not disassemble or repair the battery pack by yourself. - Do not use your estimated recording time. If...
... of its service life. Charging • Charge the battery pack immediately (or a day) before charging) is seen through the window. Note: • Use only SHARP BT-L221 or BT-L441 battery packs. Cautions: • Improper handling of the battery pack may cause loss of fire or explosion. Do not disassemble or repair the battery pack by yourself. - Do not use your estimated recording time. If...

VLWD250U Operation Manual
Page 80
..., turn off in approximately 10 seconds. • When dew forms in a place where dew formation is likely to occur, allow the camcorder and the video tape to acclimate to vibration. • Do not leave the adapter/charger in direct sunlight. • Avoid using the camcorder in your dealer for about one hour. Dew Formation • What is a sealed unit. Appendix AC Adapter/Battery Charger...
..., turn off in approximately 10 seconds. • When dew forms in a place where dew formation is likely to occur, allow the camcorder and the video tape to acclimate to vibration. • Do not leave the adapter/charger in direct sunlight. • Avoid using the camcorder in your dealer for about one hour. Dew Formation • What is a sealed unit. Appendix AC Adapter/Battery Charger...

VLWD250U Operation Manual
Page 81
... watch the video picture by using the AC adapter/battery charger or connecting the camcorder to the casing. • Clean the casing with 50 Hz and 60 Hz electrical systems in the camcorder casing. However, if you are used in the camcorder. 1 Insert a cleaning tape into the camcorder. 2 Set the camcorder to VCR mode. • The video head cleaning screen appears. 3 Press e on the screen. Dirty Video Heads Using the camcorder when the video tape is displayed. 4 Remove the cleaning tape. If the video heads become...
... watch the video picture by using the AC adapter/battery charger or connecting the camcorder to the casing. • Clean the casing with 50 Hz and 60 Hz electrical systems in the camcorder casing. However, if you are used in the camcorder. 1 Insert a cleaning tape into the camcorder. 2 Set the camcorder to VCR mode. • The video head cleaning screen appears. 3 Press e on the screen. Dirty Video Heads Using the camcorder when the video tape is displayed. 4 Remove the cleaning tape. If the video heads become...

VLWD250U Operation Manual
Page 83
... subject Occurs when shooting subject with produces wide vertical strong contrast to Auto Focus mode (p. 44). On-screen displays Camcorder is open. REC START/STOP Erasure protect tab on TV or TV connected TV screen. Set to the background. Automatically zooms out without operating Power Zoom control. cassette is in Demo mode. No image appears on Video input channel on video button does not work . Does not indicate a malfunction. -- automatically change. Charge battery pack sufficiently (p. 7). Before Requesting Service Before calling for...
... subject Occurs when shooting subject with produces wide vertical strong contrast to Auto Focus mode (p. 44). On-screen displays Camcorder is open. REC START/STOP Erasure protect tab on TV or TV connected TV screen. Set to the background. Automatically zooms out without operating Power Zoom control. cassette is in Demo mode. No image appears on Video input channel on video button does not work . Does not indicate a malfunction. -- automatically change. Charge battery pack sufficiently (p. 7). Before Requesting Service Before calling for...

VLWD250U Operation Manual
Page 84
... connected. Remote control does not function. Obstacle between remote control Remove obstacle or use a commercially available video head cleaning tape (p. 68). tape. Viewfinder picture is Inappropriate picture adjustments. LCD monitor picture is hard to see . hard to "ON" (pp. 37, 38). Audio/video or DV cable is set to intense daylight (p. 38). REMOTE menu item is not nected video equipment. Notes: • This unit is recording. Then reconnect the power sources to resume operation. • If the characters displayed in image. Use a new cassette. Stop tape...
... connected. Remote control does not function. Obstacle between remote control Remove obstacle or use a commercially available video head cleaning tape (p. 68). tape. Viewfinder picture is Inappropriate picture adjustments. LCD monitor picture is hard to see . hard to "ON" (pp. 37, 38). Audio/video or DV cable is set to intense daylight (p. 38). REMOTE menu item is not nected video equipment. Notes: • This unit is recording. Then reconnect the power sources to resume operation. • If the characters displayed in image. Use a new cassette. Stop tape...
VLWD250U Operation Manual
Page 92
... beyond the time period described herein on contract, negligence, strict liability or otherwise. Some states do to Obtain Service: VL-WD250U Camcorder (Be sure to you. THIS WARRANTY GIVES YOU SPECIFIC LEGAL RIGHTS. Ship prepaid or carry in the U.S. Valid for warranty service in your Product to the purchaser for parts or labor for the period(s) set forth below...
... beyond the time period described herein on contract, negligence, strict liability or otherwise. Some states do to Obtain Service: VL-WD250U Camcorder (Be sure to you. THIS WARRANTY GIVES YOU SPECIFIC LEGAL RIGHTS. Ship prepaid or carry in the U.S. Valid for warranty service in your Product to the purchaser for parts or labor for the period(s) set forth below...


