
Operation Manual
Page 1
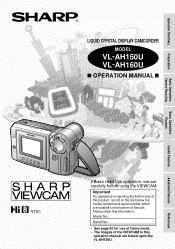
... located on the line below the model number and serial number which are based upon the VL-AH150U. References Please retain this operation manual carefully before using the VIEWCAM. Model No.: Serial No.: • See page 60 for use of Demo mode. • The images ...of the VIEWCAM in reporting the theft or loss of the unit. Operation Summary Preparation LIQUID CRYSTAL DISPLAY CAMCORDER MODEL VL-AH150U VL-AH160U OPERATION MANUAL Basic Operations Camera Recording Basic Operations Playback Useful Features Advanced Features NTSC Please read this information.
... located on the line below the model number and serial number which are based upon the VL-AH150U. References Please retain this operation manual carefully before using the VIEWCAM. Model No.: Serial No.: • See page 60 for use of Demo mode. • The images ...of the VIEWCAM in reporting the theft or loss of the unit. Operation Summary Preparation LIQUID CRYSTAL DISPLAY CAMCORDER MODEL VL-AH150U VL-AH160U OPERATION MANUAL Basic Operations Camera Recording Basic Operations Playback Useful Features Advanced Features NTSC Please read this information.
Operation Manual
Page 2
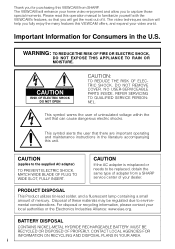
... world. Please read this VIEWCAM offers, and expand your home video enjoyment and allow you fully enjoy the many features this operation manual to capture those special moments. Important Information for purchasing this unit. This symbol alerts the user that there are important operating and... This symbol warns the user of uninsulated voltage within the unit that you for Consumers in the literature accompanying this VIEWCAM from a SHARP service center of your local authorities or the Electronics Industries Alliance: www.eiae.org. CAUTION RISK OF ELECTRIC SHOCK DO NOT OPEN ...
... world. Please read this VIEWCAM offers, and expand your home video enjoyment and allow you fully enjoy the many features this operation manual to capture those special moments. Important Information for purchasing this unit. This symbol alerts the user that there are important operating and... This symbol warns the user of uninsulated voltage within the unit that you for Consumers in the literature accompanying this VIEWCAM from a SHARP service center of your local authorities or the Electronics Industries Alliance: www.eiae.org. CAUTION RISK OF ELECTRIC SHOCK DO NOT OPEN ...
Operation Manual
Page 11
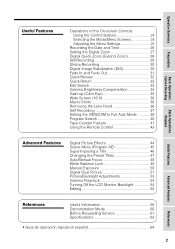
... Useful Features Advanced Features Digital Picture Effects 44 Scene Menu (Program AE 45 Superimposing a Title 46 Changing the Preset Titles 47 Auto/Manual Focus 48 White Balance Lock 49 Manual Exposure 50 Digital Dual Picture 51 Picture/Backlight Adjustments 53 Gamma Playback 54 Turning Off the LCD Monitor Backlight 54 Editing 55...
... Useful Features Advanced Features Digital Picture Effects 44 Scene Menu (Program AE 45 Superimposing a Title 46 Changing the Preset Titles 47 Auto/Manual Focus 48 White Balance Lock 49 Manual Exposure 50 Digital Dual Picture 51 Picture/Backlight Adjustments 53 Gamma Playback 54 Turning Off the LCD Monitor Backlight 54 Editing 55...
Operation Manual
Page 14
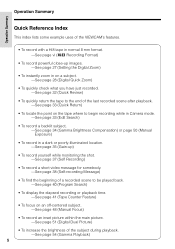
...recording while in Camera mode. -See page 33 (Edit Search) • To record a backlit subject. -See page 34 (Gamma Brightness Compensation) or page 50 (Manual Exposure) • To record in a dark or poorly-illuminated location. -See page 35 (Gain-up) • To record yourself while monitoring the shot. -... the elapsed recording or playback time. -See page 41 (Tape Counter Feature) • To focus on an off-centered subject. -See page 48 (Manual Focus) • To record an inset picture within the main picture. -See page 51 (Digital Dual Picture) • To increase the brightness of the...
...recording while in Camera mode. -See page 33 (Edit Search) • To record a backlit subject. -See page 34 (Gamma Brightness Compensation) or page 50 (Manual Exposure) • To record in a dark or poorly-illuminated location. -See page 35 (Gain-up) • To record yourself while monitoring the shot. -... the elapsed recording or playback time. -See page 41 (Tape Counter Feature) • To focus on an off-centered subject. -See page 48 (Manual Focus) • To record an inset picture within the main picture. -See page 51 (Digital Dual Picture) • To increase the brightness of the...

Operation Manual
Page 21
... or AJUSTE) button (B) (W). EF DES- EF REV T EN. I MA I S E SPA ÑO L SET EX- Note: • The operation procedures in the following sections of this operation manual are based on the use of on -screen display by performing the procedure below. 1 Hold down the Lock Lock button button and slide the Power...
... or AJUSTE) button (B) (W). EF DES- EF REV T EN. I MA I S E SPA ÑO L SET EX- Note: • The operation procedures in the following sections of this operation manual are based on the use of on -screen display by performing the procedure below. 1 Hold down the Lock Lock button button and slide the Power...

Operation Manual
Page 31
Operate the TV as shown. 3 Turn on the TV and set it to the "AV" or "VIDEO" channel. (See the operation manual of the components left turned on the VIEWCAM in VCR mode, and begin tape playback (see page 21). • Close the terminal cover after use. ... channel. Notes: • This VIEWCAM does not have been turned off before you normally do to see the signal from the VCR. (See the operation manuals of your TV (or VCR) with any of your TV.) • When connecting to a TV via a VCR, turn the volume down (see page 21). Basic...
Operate the TV as shown. 3 Turn on the TV and set it to the "AV" or "VIDEO" channel. (See the operation manual of the components left turned on the VIEWCAM in VCR mode, and begin tape playback (see page 21). • Close the terminal cover after use. ... channel. Notes: • This VIEWCAM does not have been turned off before you normally do to see the signal from the VCR. (See the operation manuals of your TV (or VCR) with any of your TV.) • When connecting to a TV via a VCR, turn the volume down (see page 21). Basic...
Operation Manual
Page 46
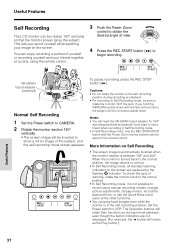
... J button still works as during recording or playback. • For recording in Self Recording mode, be recorded upside down with the lens at a party, using manual recording modes, change picture adjustments, display menus, record the date and time, or use a tripod when recording in Self Recording mode. • In Self Recording...
... J button still works as during recording or playback. • For recording in Self Recording mode, be recorded upside down with the lens at a party, using manual recording modes, change picture adjustments, display menus, record the date and time, or use a tripod when recording in Self Recording mode. • In Self Recording...
Operation Manual
Page 57
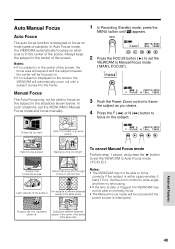
... scene at different distances overlap in the center of the screen. Notes: • If no subject is too bright. SURE Fast-moving subject. To cancel Manual Focus mode Perform step 1 above, and press the D button to set the VIEWCAM to Auto Focus mode ("FOCUS"). Subject is in the same scene.... Manual Focus The Auto Focus may not be able to focus on the subject in the center of the scene. Advanced Features 48 In Auto Focus ...
... scene at different distances overlap in the center of the screen. Notes: • If no subject is too bright. SURE Fast-moving subject. To cancel Manual Focus mode Perform step 1 above, and press the D button to set the VIEWCAM to Auto Focus mode ("FOCUS"). Subject is in the same scene.... Manual Focus The Auto Focus may not be able to focus on the subject in the center of the scene. Advanced Features 48 In Auto Focus ...
Operation Manual
Page 59
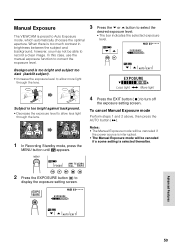
... through the lens. 3 Press the ĭ or İ button to record a clear image. E X POSURE AUTO EX I T E E XPO BAL. To cancel Manual Exposure mode Perform steps 1 and 2 above, then press the AUTO button (B). EXPO SU R E E X POSURE AUTO EXI T Advanced Features 50 SURE 2 Press the... press the MENU button until appears. 4 Press the EXIT button (A) to Auto Exposure mode, which automatically chooses the optimal aperture. Manual Exposure The VIEWCAM is selected thereafter. When there is too much contrast in brightness between the subject and background, however, you may ...
... through the lens. 3 Press the ĭ or İ button to record a clear image. E X POSURE AUTO EX I T E E XPO BAL. To cancel Manual Exposure mode Perform steps 1 and 2 above, then press the AUTO button (B). EXPO SU R E E X POSURE AUTO EXI T Advanced Features 50 SURE 2 Press the... press the MENU button until appears. 4 Press the EXIT button (A) to Auto Exposure mode, which automatically chooses the optimal aperture. Manual Exposure The VIEWCAM is selected thereafter. When there is too much contrast in brightness between the subject and background, however, you may ...
Operation Manual
Page 65
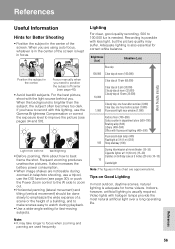
... For clear, good-quality recording, 500 to emphasize the wide expanse of a scene or the height of the screen. Frequent zooming produces unattractive pictures. Focus manually when you have to record with this lighting, use the DIS function (see page 30), or push the Power Zoom control to the W side to...
... For clear, good-quality recording, 500 to emphasize the wide expanse of a scene or the height of the screen. Frequent zooming produces unattractive pictures. Focus manually when you have to record with this lighting, use the DIS function (see page 30), or push the Power Zoom control to the W side to...
Operation Manual
Page 70
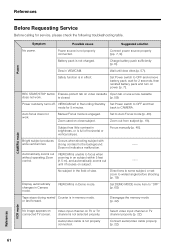
... CAMERA. Charge battery pack sufficiently (p. 8). Safety function is not properly connected. Connect power source properly (pp. 7, 9). Display automatically changes in VIEWCAM. Manual Focus mode is full of view. Subject has little contrast in the field of horizontal or vertical stripes. Focus... manually (p. 48). References Before Requesting Service Before calling for 5 minutes. Battery pack is unable to "OFF" (p. 60). Zoom out from subject (p. 19). VIEWCAM...
... CAMERA. Charge battery pack sufficiently (p. 8). Safety function is not properly connected. Connect power source properly (pp. 7, 9). Display automatically changes in VIEWCAM. Manual Focus mode is full of view. Subject has little contrast in the field of horizontal or vertical stripes. Focus... manually (p. 48). References Before Requesting Service Before calling for 5 minutes. Battery pack is unable to "OFF" (p. 60). Zoom out from subject (p. 19). VIEWCAM...

