
Operation Manual
Page 3
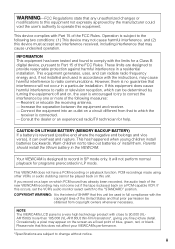
... be determined by turning the equipment off and on a PCM-capable VCR. ii WARNING-FCC Regulations state that any interference received, including interference that may appear on the screen as a fixed point of blue, green, red, or black. This device complies with the limits for help. CAUTION ON LITHIUM BATTERY (MEMORY BACKUP BATTERY) If a battery is played back on , the user is connected. -Consult the...
... be determined by turning the equipment off and on a PCM-capable VCR. ii WARNING-FCC Regulations state that any interference received, including interference that may appear on the screen as a fixed point of blue, green, red, or black. This device complies with the limits for help. CAUTION ON LITHIUM BATTERY (MEMORY BACKUP BATTERY) If a battery is played back on , the user is connected. -Consult the...
Operation Manual
Page 5
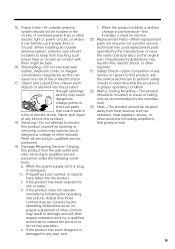
... or circuits. When the power-supply cord or plug is in fire, electric shock, or other products (including amplifiers) that could result in any kind into this product through openings as an improper adjustment of any service or repairs to this product, ask the service technician to perform safety checks to service this indicates a need for service. 20. If liquid has been...
... or circuits. When the power-supply cord or plug is in fire, electric shock, or other products (including amplifiers) that could result in any kind into this product through openings as an improper adjustment of any service or repairs to this product, ask the service technician to perform safety checks to service this indicates a need for service. 20. If liquid has been...
Operation Manual
Page 7
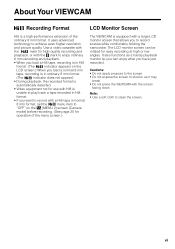
... (MENU 2) screen (Camera mode) before recording. (See page 25 for easy recording at high or low angles. Cautions: • Do not apply pressure to the screen. • Do not expose the screen to record scenes while comfortably holding the camcorder. The LCD monitor screen can enjoy what you to shocks, as a handy playback monitor so you want to record with a Hi8 tape in normal 8 mm format, set the menu...
... (MENU 2) screen (Camera mode) before recording. (See page 25 for easy recording at high or low angles. Cautions: • Do not apply pressure to the screen. • Do not expose the screen to record scenes while comfortably holding the camcorder. The LCD monitor screen can enjoy what you to shocks, as a handy playback monitor so you want to record with a Hi8 tape in normal 8 mm format, set the menu...
Operation Manual
Page 10
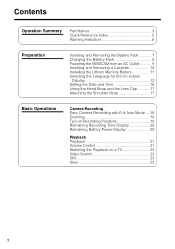
... 7 Charging the Battery Pack 8 Powering the VIEWCAM from an AC Outlet........... 9 Inserting and Removing a Cassette 10 Installing the Lithium Memory Battery 11 Selecting the Language for the On-screen Display 12 Setting the Date and Time 16 Using the Hand Strap and the Lens Cap 17 Attaching the Shoulder Strap 17 Basic Operations Camera Recording Easy Camera Recording with Full Auto Mode ... 18 Zooming 19 Tips on Recording Positions 19 Remaining Recording Time Display 20 Remaining Battery Power Display 20 Playback Playback 21 Volume Control...
... 7 Charging the Battery Pack 8 Powering the VIEWCAM from an AC Outlet........... 9 Inserting and Removing a Cassette 10 Installing the Lithium Memory Battery 11 Selecting the Language for the On-screen Display 12 Setting the Date and Time 16 Using the Hand Strap and the Lens Cap 17 Attaching the Shoulder Strap 17 Basic Operations Camera Recording Easy Camera Recording with Full Auto Mode ... 18 Zooming 19 Tips on Recording Positions 19 Remaining Recording Time Display 20 Remaining Battery Power Display 20 Playback Playback 21 Volume Control...
Operation Manual
Page 11
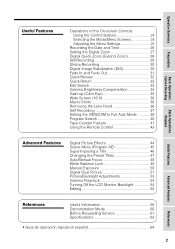
Operation Summary Preparation Basic Operations Camera Recording Useful Features Operations of the On-screen Controls Using the Control Buttons 24 Selecting the Mode/Menu Screens 24 Adjusting the Menu Settings 25 Recording the Date and Time 26 Setting the Digital Zoom 27 Digital Quick Zoom (Extend Zoom 28 Still Recording 29 Strobe Recording 30 Digital Image Stabilization (DIS 30 Fade In and Fade Out 31 Quick Review 32 Quick Return 33 Edit Search 33 Gamma Brightness Compensation 34 Gain-up (Cat's Eye 35 Wide Screen (16...
Operation Summary Preparation Basic Operations Camera Recording Useful Features Operations of the On-screen Controls Using the Control Buttons 24 Selecting the Mode/Menu Screens 24 Adjusting the Menu Settings 25 Recording the Date and Time 26 Setting the Digital Zoom 27 Digital Quick Zoom (Extend Zoom 28 Still Recording 29 Strobe Recording 30 Digital Image Stabilization (DIS 30 Fade In and Fade Out 31 Quick Review 32 Quick Return 33 Edit Search 33 Gamma Brightness Compensation 34 Gain-up (Cat's Eye 35 Wide Screen (16...
Operation Manual
Page 14
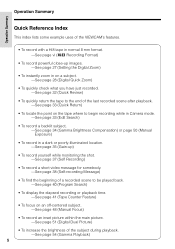
Operation Summary Operation Summary Quick Reference Index This index lists some example uses of the VIEWCAM's features. • To record with a Hi8 tape in normal 8 mm format. -See page vi ( Recording Format) • To record powerful close-up images. -See page 27 (Setting the Digital Zoom) • To instantly zoom in on a subject. -See page 28 (Digital Quick Zoom) • To quickly check what you have just recorded. -See page 32 (Quick Review) • To...
Operation Summary Operation Summary Quick Reference Index This index lists some example uses of the VIEWCAM's features. • To record with a Hi8 tape in normal 8 mm format. -See page vi ( Recording Format) • To record powerful close-up images. -See page 27 (Setting the Digital Zoom) • To instantly zoom in on a subject. -See page 28 (Digital Quick Zoom) • To quickly check what you have just recorded. -See page 32 (Quick Review) • To...

Operation Manual
Page 17
... removing the plugs, grasp the plug, not the cable. 8 DC IN jack To power outlet 4 When the battery is set to OFF. • The battery pack will not charge when the Power switch is fully charged, the CHARGE indicator will light up in red. Preparation Charging the Battery Pack Power switch Charging time and maximum continuous recording and playback times Model Battery pack VL-AH150 VL-AH160 BT-H22 BT-H32 BT-H22 BT-H32 Charging time 180 360 180 360 CHARGE...
... removing the plugs, grasp the plug, not the cable. 8 DC IN jack To power outlet 4 When the battery is set to OFF. • The battery pack will not charge when the Power switch is fully charged, the CHARGE indicator will light up in red. Preparation Charging the Battery Pack Power switch Charging time and maximum continuous recording and playback times Model Battery pack VL-AH150 VL-AH160 BT-H22 BT-H32 BT-H22 BT-H32 Charging time 180 360 180 360 CHARGE...
Operation Manual
Page 27
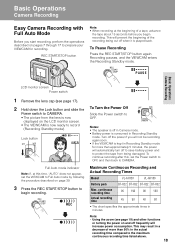
... in Recording Standby mode for recording. P AUS E Basic Operations Camera Recording LCD monitor screen Power switch 1 Remove the lens cap (see page 19) and other functions or turning the power on page 39. 3 Press the REC START/STOP button to OFF. Turn off the power if you will automatically turn off to save battery power and to protect the tape from the lens is consumed in minutes. To continue recording after this time, "AUTO" does not appear, set the Power switch to...
... in Recording Standby mode for recording. P AUS E Basic Operations Camera Recording LCD monitor screen Power switch 1 Remove the lens cap (see page 19) and other functions or turning the power on page 39. 3 Press the REC START/STOP button to OFF. Turn off the power if you will automatically turn off to save battery power and to protect the tape from the lens is consumed in minutes. To continue recording after this time, "AUTO" does not appear, set the Power switch to...
Operation Manual
Page 29
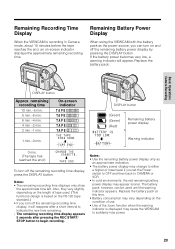
... recording. The battery pack, however, can turn off the remaining battery power display by pressing the DISPLAY button. On-screen indicator TA P E TAPE TA P E TA P E TA P E 1 min.-0 min. Remaining Battery Power Display When using the VIEWCAM with the battery pack as an approximate indication. • The battery power display may change to either a higher or lower level if you can be used . (This function's design is recording in Camera mode, about 10 minutes before the tape...
... recording. The battery pack, however, can turn off the remaining battery power display by pressing the DISPLAY button. On-screen indicator TA P E TAPE TA P E TA P E TA P E 1 min.-0 min. Remaining Battery Power Display When using the VIEWCAM with the battery pack as an approximate indication. • The battery power display may change to either a higher or lower level if you can be used . (This function's design is recording in Camera mode, about 10 minutes before the tape...
Operation Manual
Page 30
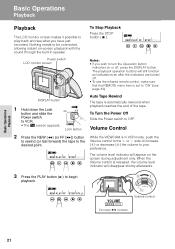
... speaker. Nothing needs to be connected, allowing instant on the screen during adjustment only. DISPLAY button 1 Hold down the Lock button and slide the Power switch to OFF. Lock button Auto Tape Rewind The tape is set to "ON" (see what you wish to turn the Operation button indicators on or off . • To use the infrared remote control, make sure that the REMOTE menu item is automatically rewound when playback reaches the...
... speaker. Nothing needs to be connected, allowing instant on the screen during adjustment only. DISPLAY button 1 Hold down the Lock button and slide the Power switch to OFF. Lock button Auto Tape Rewind The tape is set to "ON" (see what you wish to turn the Operation button indicators on or off . • To use the infrared remote control, make sure that the REMOTE menu item is automatically rewound when playback reaches the...

Operation Manual
Page 31
... connections with the supplied audio/video cable, as you make connections. POWER TV/VCR SET UP PLAY PAUSE /STILL STOP/ EJECT CHANNEL REC Yellow: To VIDEO IN jack White: To AUDIO IN (L) jack Audio/video cable (supplied) To AUDIO/VIDEO jack 22 Terminal cover 2 Connect the VIEWCAM to your TV (or VCR) with any of your TV and VCR.) 4 Turn on the VIEWCAM in VCR mode, and begin tape playback (see page 21). • Close the terminal cover after use. Operate...
... connections with the supplied audio/video cable, as you make connections. POWER TV/VCR SET UP PLAY PAUSE /STILL STOP/ EJECT CHANNEL REC Yellow: To VIDEO IN jack White: To AUDIO IN (L) jack Audio/video cable (supplied) To AUDIO/VIDEO jack 22 Terminal cover 2 Connect the VIEWCAM to your TV (or VCR) with any of your TV and VCR.) 4 Turn on the VIEWCAM in VCR mode, and begin tape playback (see page 21). • Close the terminal cover after use. Operate...
Operation Manual
Page 34
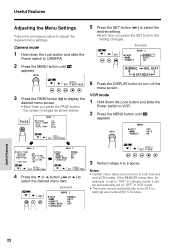
... PAGE button, the screen changes as shown below to 6 above. Example MENU 2 SET FADE NORMA L AUTO REMOT E ON DEMO MODE O F F L ANGUA GE 33 P I CSET TURE PAGE 6 Press the DISPLAY button to display the desired menu screen. • Each time you press the SET button, the setting changes. If the REMOTE menu item, for example, is set to "OFF" in Camera mode, it will be automatically set to "OFF" in VCR mode. • The menu screen automatically turns off the menu screen. 3 Press...
... PAGE button, the screen changes as shown below to 6 above. Example MENU 2 SET FADE NORMA L AUTO REMOT E ON DEMO MODE O F F L ANGUA GE 33 P I CSET TURE PAGE 6 Press the DISPLAY button to display the desired menu screen. • Each time you press the SET button, the setting changes. If the REMOTE menu item, for example, is set to "OFF" in Camera mode, it will be automatically set to "OFF" in VCR mode. • The menu screen automatically turns off the menu screen. 3 Press...
Operation Manual
Page 46
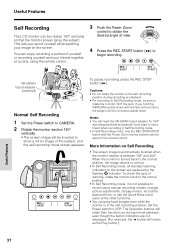
... lens at a party, using manual recording modes, change picture adjustments, display menus, record the date and time, or use a tripod when recording in Self Recording mode. • In Self Recording mode, only the REC START/STOP button and the Power Zoom control buttons can play back images even while the monitor is turned back to the normal position, the image returns to begin recording. To check the type of the other functions. • You can be inverted to VCR. Set the Power switch to show a mirror image of view...
... lens at a party, using manual recording modes, change picture adjustments, display menus, record the date and time, or use a tripod when recording in Self Recording mode. • In Self Recording mode, only the REC START/STOP button and the Power Zoom control buttons can play back images even while the monitor is turned back to the normal position, the image returns to begin recording. To check the type of the other functions. • You can be inverted to VCR. Set the Power switch to show a mirror image of view...

Operation Manual
Page 52
... also turn off the menu screen. 43 REWind/Reverse Search button RECord START/STOP button Power Zoom Telephoto/ Wide angle control buttons Fast Forward/ Forward Search button SLOW button PLAY button STOP button VOLUME buttons PAUSE/STILL button Notes: • Be careful not to allow direct sunlight or bright light from interior illumination to fall onto the VIEWCAM remote sensor, as this may prevent the remote control from a distance, such as a VCR. Useful Features Useful Features (5 m) Using the Remote Control Use the remote control to operate the...
... also turn off the menu screen. 43 REWind/Reverse Search button RECord START/STOP button Power Zoom Telephoto/ Wide angle control buttons Fast Forward/ Forward Search button SLOW button PLAY button STOP button VOLUME buttons PAUSE/STILL button Notes: • Be careful not to allow direct sunlight or bright light from interior illumination to fall onto the VIEWCAM remote sensor, as this may prevent the remote control from a distance, such as a VCR. Useful Features Useful Features (5 m) Using the Remote Control Use the remote control to operate the...
Operation Manual
Page 62
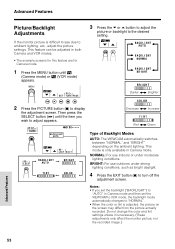
... the EXIT button () to turn off the adjustment screen. This SELECT EX I T mode is adjusted, the picture on the ambient lighting. Do not change the color and tint settings unless it is difficult to see due to adjust appears. Red Green PI CTURE BACKL I CSET TURE PAGE Darker Brighter 2 Press the PICTURE button () to the desired setting. P I GHT AUTO Type of Backlight Modes AUTO: The VIEWCAM automatically switches between...
... the EXIT button () to turn off the adjustment screen. This SELECT EX I T mode is adjusted, the picture on the ambient lighting. Do not change the color and tint settings unless it is difficult to see due to adjust appears. Red Green PI CTURE BACKL I CSET TURE PAGE Darker Brighter 2 Press the PICTURE button () to the desired setting. P I GHT AUTO Type of Backlight Modes AUTO: The VIEWCAM automatically switches between...
Operation Manual
Page 64
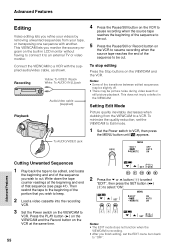
.... To minimize the quality reduction, set the EDIT menu item back to VCR. Press the PLAY button (D) on the VIEWCAM and the Record button on the VIEWCAM to "OFF". Recording Yellow: To VIDEO IN jack White: To AUDIO IN (L) jack POWER TV/VCR SET UP PLAY PAUSE /STILL STOP/ EJECT CHANNEL REC Audio/video cable (supplied) Playback To AUDIO/VIDEO jack 4 Press the Pause/Still button on the VCR to pause recording when the source tape reaches the beginning of the...
.... To minimize the quality reduction, set the EDIT menu item back to VCR. Press the PLAY button (D) on the VIEWCAM and the Record button on the VIEWCAM to "OFF". Recording Yellow: To VIDEO IN jack White: To AUDIO IN (L) jack POWER TV/VCR SET UP PLAY PAUSE /STILL STOP/ EJECT CHANNEL REC Audio/video cable (supplied) Playback To AUDIO/VIDEO jack 4 Press the Pause/Still button on the VCR to pause recording when the source tape reaches the beginning of the...
Operation Manual
Page 68
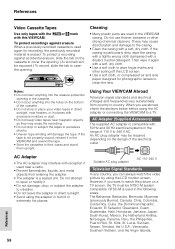
... dry cloth. • Use a soft cloth to open or modify it again with reception if used in the range of 110 V to clean the lens. An AC plug adapter may be required depending on a TV screen, the TV must be exposed.) To record, slide the tab to ...adapter in direct sunlight. • Avoid using the adapter in the cassette. • Do not put anything into the erasure-protection opening . Do not attempt to watch the video picture by using the AC adapter or connecting the VIEWCAM to cover the opening. (A red mark will damage the tape. However, if you want to open the opening...
... dry cloth. • Use a soft cloth to open or modify it again with reception if used in the range of 110 V to clean the lens. An AC plug adapter may be required depending on a TV screen, the TV must be exposed.) To record, slide the tab to ...adapter in direct sunlight. • Avoid using the adapter in the cassette. • Do not put anything into the erasure-protection opening . Do not attempt to watch the video picture by using the AC adapter or connecting the VIEWCAM to cover the opening. (A red mark will damage the tape. However, if you want to open the opening...
Operation Manual
Page 70
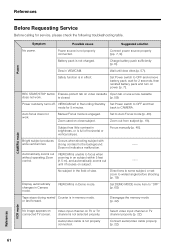
... VCR mode 61 Charge battery pack sufficiently (p. 8). Set Power switch to CAMERA. back to OFF and remove battery pack; Set to the background. Focus manually (p. 48). Disengage the memory mode (p. 42). Connect audio/video cable properly (p. 22). Power source is not properly connected. Auto focus does not work . or fast forward. CAMERA mode No image appears on close subject. Connect power source properly (pp. 7, 9). Power suddenly turns off. Automatically zooms out without operating Zoom control. No subject in VIEWCAM. Zoom used...
... VCR mode 61 Charge battery pack sufficiently (p. 8). Set Power switch to CAMERA. back to OFF and remove battery pack; Set to the background. Focus manually (p. 48). Disengage the memory mode (p. 42). Connect audio/video cable properly (p. 22). Power source is not properly connected. Auto focus does not work . or fast forward. CAMERA mode No image appears on close subject. Connect power source properly (pp. 7, 9). Power suddenly turns off. Automatically zooms out without operating Zoom control. No subject in VIEWCAM. Zoom used...
Operation Manual
Page 71
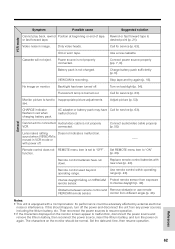
... characters displayed on again. Set the date and time, then resume operation. desired point (p. 21). Cassette will not eject. Charge battery pack sufficiently (p. 8). Call for service (p. 63). Connect audio/video cable properly (p. 55). Set REMOTE menu item to malfunction, disconnect the power source and remove the lithium battery, then reconnect the power source, insert the lithium battery, and turn off . control from any power sources, including the lithium battery, etc. References 62 connected. Remote control batteries have Call for service (p. 63...
... characters displayed on again. Set the date and time, then resume operation. desired point (p. 21). Cassette will not eject. Charge battery pack sufficiently (p. 8). Call for service (p. 63). Connect audio/video cable properly (p. 55). Set REMOTE menu item to malfunction, disconnect the power source and remove the lithium battery, then reconnect the power source, insert the lithium battery, and turn off . control from any power sources, including the lithium battery, etc. References 62 connected. Remote control batteries have Call for service (p. 63...
Operation Manual
Page 80
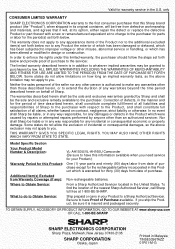
... for warranty service in the Product which were caused by repairs or attempted repairs performed by Sharp and shall be liable, or in its option, either repair the defect or replace the defective Product or part thereof with respect to you. Non-rechargeable batteries. Valid for...warranties may not apply to the servicer. Model Specific Section Your Product Model Number & Description: Warranty Period for thirty (30) days from defective workmanship and materials, and agrees that this limited warranty, the purchaser should follow the steps set forth below and provide proof of...
... for warranty service in the Product which were caused by repairs or attempted repairs performed by Sharp and shall be liable, or in its option, either repair the defect or replace the defective Product or part thereof with respect to you. Non-rechargeable batteries. Valid for...warranties may not apply to the servicer. Model Specific Section Your Product Model Number & Description: Warranty Period for thirty (30) days from defective workmanship and materials, and agrees that this limited warranty, the purchaser should follow the steps set forth below and provide proof of...


