
VECG40U Operation Manual
Page 1
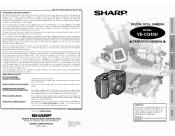
... Service: From a Sharp Authorized Servicer located in the United States. THIS WARRANTY GIVES YOU SPECIFIC LEGAL RIGHTS. TO OBTAIN SUPPLY, ACCESSORY OR PRODUCT INFORMATION, GO TO OUR WEBSITE AT www.sharpusa.com OR CALL 1-800-BE-SHARP SHARP ELECTRONICS CORPORATION Sharp Plaza, Mahwah, New Jersey 07430-2135 SHARP CORPORATION Osaka, Japan Printed in Japan TINSEA013WJZZ 02P09-J-G DIGITAL STILL CAMERA MODEL VE-CG40U OPERATION MANUAL Important...
... Service: From a Sharp Authorized Servicer located in the United States. THIS WARRANTY GIVES YOU SPECIFIC LEGAL RIGHTS. TO OBTAIN SUPPLY, ACCESSORY OR PRODUCT INFORMATION, GO TO OUR WEBSITE AT www.sharpusa.com OR CALL 1-800-BE-SHARP SHARP ELECTRONICS CORPORATION Sharp Plaza, Mahwah, New Jersey 07430-2135 SHARP CORPORATION Osaka, Japan Printed in Japan TINSEA013WJZZ 02P09-J-G DIGITAL STILL CAMERA MODEL VE-CG40U OPERATION MANUAL Important...

VECG40U Operation Manual
Page 5
... service technician has used replacement parts specified by the manufacturer. 23. When the product exhibits a distinct change in the vicinity of any kind into this product through openings as this product, ask the service technician to perform safety checks to this can fall into the product, c. Unauthorized substitutions may expose you to qualified service personnel under the following the operating instructions...
... service technician has used replacement parts specified by the manufacturer. 23. When the product exhibits a distinct change in the vicinity of any kind into this product through openings as this product, ask the service technician to perform safety checks to this can fall into the product, c. Unauthorized substitutions may expose you to qualified service personnel under the following the operating instructions...

VECG40U Operation Manual
Page 6
... Batteries 7 Powering the Camera from an AC Outlet 8 Inserting and Removing a Card 9 Setting the Date and Time 10 Adjusting the Diopter 11 Using the Wrist Strap 12 Using the Lens Cap 12 Basic Operations Capturing Capturing a Still Image in Auto Mode 13 Capturing a Motion Image 14 Zooming 15 Auto Focus 15 Using the Flash 16 Using Macro Shot 16 Previewing Previewing Images 17 Deleting One Stored Image 19 Zooming a Preview Image 19 Previewing on a TV screen 20 Useful Features vi Using the Controls 21 Using the Menu Screen 22 Capturing...
... Batteries 7 Powering the Camera from an AC Outlet 8 Inserting and Removing a Card 9 Setting the Date and Time 10 Adjusting the Diopter 11 Using the Wrist Strap 12 Using the Lens Cap 12 Basic Operations Capturing Capturing a Still Image in Auto Mode 13 Capturing a Motion Image 14 Zooming 15 Auto Focus 15 Using the Flash 16 Using Macro Shot 16 Previewing Previewing Images 17 Deleting One Stored Image 19 Zooming a Preview Image 19 Previewing on a TV screen 20 Useful Features vi Using the Controls 21 Using the Menu Screen 22 Capturing...
VECG40U Operation Manual
Page 7
... Correction 50 Displaying the Date and Time 51 Selecting the Display Style of Date and Time 51 Setting to Factory Presettings 52 Formatting the Card 52 Setting the Time for Automatic Power Off 53 Setting the File Numbering Method 53 Restoring the Latest Image Deleted 54 Turning off the Speaker 54 Turning off the Confirmation Sound 55 Changing the Language for the On-Screen Display ... 56 Transferring Data on Card to Computer 57 Appendix Useful Information 60 Trouble Shooting 62 Specifications 64...
... Correction 50 Displaying the Date and Time 51 Selecting the Display Style of Date and Time 51 Setting to Factory Presettings 52 Formatting the Card 52 Setting the Time for Automatic Power Off 53 Setting the File Numbering Method 53 Restoring the Latest Image Deleted 54 Turning off the Speaker 54 Turning off the Confirmation Sound 55 Changing the Language for the On-Screen Display ... 56 Transferring Data on Card to Computer 57 Appendix Useful Information 60 Trouble Shooting 62 Specifications 64...

VECG40U Operation Manual
Page 9
... remove the card, turn off the power, and disconnect the digital still camera from the power source. • Do not aim the lens at 30% to hard shocks or strong vibrations. Do not drop or otherwise subject the digital still camera to 80% relative humidity. Be sure to strike the digital still camera lens or LCD monitor screen, whether or not recording is turned on. Do not allow direct...
... remove the card, turn off the power, and disconnect the digital still camera from the power source. • Do not aim the lens at 30% to hard shocks or strong vibrations. Do not drop or otherwise subject the digital still camera to 80% relative humidity. Be sure to strike the digital still camera lens or LCD monitor screen, whether or not recording is turned on. Do not allow direct...

VECG40U Operation Manual
Page 14
... times. Check the USB connection and make sure the card is write-protected (see page 9, 57). 4 NO IMAGE S The card has no images recorded in its slot (see pages 9, 60). MAX. TO 9 9 9 IMAGE S D I S SET TO READ ONLY The card is firmly inserted in the format the camera can recognize. In such case, turn the power off, remove the obstruction then power on the screen, follow the specified instructions. Format the card or replace...
... times. Check the USB connection and make sure the card is write-protected (see page 9, 57). 4 NO IMAGE S The card has no images recorded in its slot (see pages 9, 60). MAX. TO 9 9 9 IMAGE S D I S SET TO READ ONLY The card is firmly inserted in the format the camera can recognize. In such case, turn the power off, remove the obstruction then power on the screen, follow the specified instructions. Format the card or replace...

VECG40U Operation Manual
Page 15
... formatted for use with this camera. If the card contains important data, transfer it to the unlocked position and try transferring again. Set the switch to another storage device before formatting the card. 5 The images in the card are corrupted or recorded in a format which is write-protected. Operation References Warning indicators I S CARD SE T TO WR I S CARD MEMORY FUL L? CARD ACCESS ERROR F ORMA T THE CARD Description of warning You cannot transfer data using the transfer button if the card is not compatible...
... formatted for use with this camera. If the card contains important data, transfer it to the unlocked position and try transferring again. Set the switch to another storage device before formatting the card. 5 The images in the card are corrupted or recorded in a format which is write-protected. Operation References Warning indicators I S CARD SE T TO WR I S CARD MEMORY FUL L? CARD ACCESS ERROR F ORMA T THE CARD Description of warning You cannot transfer data using the transfer button if the card is not compatible...

VECG40U Operation Manual
Page 17
...; Using the zoom (see page 15) and other functions or turning the power on and off . 2 Slide the battery compartment door release to insert the supplied AA (R6 or UM/SUM-3) alkaline batteries. Battery type Approximate number of time. • Make sure that the power is not, the batteries may fall out or camera operation may result in a decrease in the actual recording number compared to the numbers...
...; Using the zoom (see page 15) and other functions or turning the power on and off . 2 Slide the battery compartment door release to insert the supplied AA (R6 or UM/SUM-3) alkaline batteries. Battery type Approximate number of time. • Make sure that the power is not, the batteries may fall out or camera operation may result in a decrease in the actual recording number compared to the numbers...

VECG40U Operation Manual
Page 24
... 9). 2 Remove the lens cap. 3 Set the Mode Dial to "=". 4 Press the Power button until the camera turns on the card. Self timer - Exposure value setting - Notes: • You cannot use the zoom, digital zoom and the flash for capturing motion images. • If the card becomes full during motion image capture, the camera automatically stops recording. • The camera captures the motion image in the same way as you do with a video camera and record that image on . 5 Press the Shutter button fully to playback a motion image. •...
... 9). 2 Remove the lens cap. 3 Set the Mode Dial to "=". 4 Press the Power button until the camera turns on the card. Self timer - Exposure value setting - Notes: • You cannot use the zoom, digital zoom and the flash for capturing motion images. • If the card becomes full during motion image capture, the camera automatically stops recording. • The camera captures the motion image in the same way as you do with a video camera and record that image on . 5 Press the Shutter button fully to playback a motion image. •...
VECG40U Operation Manual
Page 26
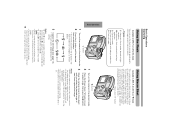
.... Power zoom "W" button Basic Operations "q" button 1 Turn on the camera in or = mode This camera lets you shoot close-ups to focus on the front of view, then capture the image. "%" button 1 Turn on the camera in dark locations. Types s: Automatic flash mode, based on light condition N: Automatic flash mode with red-eye reduction q: Flash on mode L: Flash on mode with red-eye reduction M: Flash off when using Continuous, Auto Bracket and Auto Gamma modes. • The flash sensor on subjects from the "SCENE MENU". • Use...
.... Power zoom "W" button Basic Operations "q" button 1 Turn on the camera in or = mode This camera lets you shoot close-ups to focus on the front of view, then capture the image. "%" button 1 Turn on the camera in dark locations. Types s: Automatic flash mode, based on light condition N: Automatic flash mode with red-eye reduction q: Flash on mode L: Flash on mode with red-eye reduction M: Flash off when using Continuous, Auto Bracket and Auto Gamma modes. • The flash sensor on subjects from the "SCENE MENU". • Use...

VECG40U Operation Manual
Page 27
... a card, turn the power off, remove, and never use the on-screen indicators. Basic Operations (Continued to "w". 2 Press the Power button until the camera turns on. • The last image recorded on the card displays in full screen. [2 4 4 8] F ine 0.0 E V 1/ 5 0 0 F2 . 5 Notes: • Depending on -screen preview. Basic Operations Previewing Previewing Images The LCD monitor screen functions as thumbnails, not full screen. • Images and capture details recorded with a different camera may not match the picture quality setting used during recording. • Images...
... a card, turn the power off, remove, and never use the on-screen indicators. Basic Operations (Continued to "w". 2 Press the Power button until the camera turns on. • The last image recorded on the card displays in full screen. [2 4 4 8] F ine 0.0 E V 1/ 5 0 0 F2 . 5 Notes: • Depending on -screen preview. Basic Operations Previewing Previewing Images The LCD monitor screen functions as thumbnails, not full screen. • Images and capture details recorded with a different camera may not match the picture quality setting used during recording. • Images...

VECG40U Operation Manual
Page 40
When using the digital zoom, you to record powerful close-up pictures with the same operation as normal zooming. 1 Turn on . When you turn off the menu screen. Useful Features 30 Power zoom buttons Zoom range indicator W T D- To use optical zoom only Select "OFF" in the zoom range indicator. mode You can select two different zoom ranges : 13K (optical zoom), 3-9K (digital zoom).The digital zoom allows you have to select "DIGITAL ZOOM", then press the SET button. CAPTURE 1 I MAG E S I Z E I MAG E QUA L I T Y S HOO...
When using the digital zoom, you to record powerful close-up pictures with the same operation as normal zooming. 1 Turn on . When you turn off the menu screen. Useful Features 30 Power zoom buttons Zoom range indicator W T D- To use optical zoom only Select "OFF" in the zoom range indicator. mode You can select two different zoom ranges : 13K (optical zoom), 3-9K (digital zoom).The digital zoom allows you have to select "DIGITAL ZOOM", then press the SET button. CAPTURE 1 I MAG E S I Z E I MAG E QUA L I T Y S HOO...

VECG40U Operation Manual
Page 43
... icon • To protect another image, press j or k to turn off the menu screen. PR E V I EW PROTEC T I MAGONE E E FI MF EACGTE S L I DA EL L S HI MOWA G E S PR I NT ORDER DELETE ALL DUBB I OUS NEXT SET / RESET : SET EXI T : ME NU 00 100-0010 Selecting all images 1 Select "ALL IMAGES" in w mode You can protect your important images recorded on the card from accidental erasure. PREV I NG...
... icon • To protect another image, press j or k to turn off the menu screen. PR E V I EW PROTEC T I MAGONE E E FI MF EACGTE S L I DA EL L S HI MOWA G E S PR I NT ORDER DELETE ALL DUBB I OUS NEXT SET / RESET : SET EXI T : ME NU 00 100-0010 Selecting all images 1 Select "ALL IMAGES" in w mode You can protect your important images recorded on the card from accidental erasure. PREV I NG...

VECG40U Operation Manual
Page 45
... I N T5 OSRE DC E. To stop the Slide Show Press the SET button to stop a Slide Show in order of capture. • The Slide Show ends one image before the image that have been recorded on the card. 1 Set the Mode Dial to "w", then power on camera. 2 Press j or k to select the image from the image selected in step 2, the images display in full-screen view consecutively in progress. 6 Press...
... I N T5 OSRE DC E. To stop the Slide Show Press the SET button to stop a Slide Show in order of capture. • The Slide Show ends one image before the image that have been recorded on the card. 1 Set the Mode Dial to "w", then power on camera. 2 Press j or k to select the image from the image selected in step 2, the images display in full-screen view consecutively in progress. 6 Press...

VECG40U Operation Manual
Page 56
... a specific situation. Types PORTRAIT (F): Captures a subject clearly with "." in the selected mode and a frame guide matching the scene menu selection appears onscreen. way down to focus on the camera. • SCENE MENU screen appears. 2 Press l or m to capture the image. BLACK&WHITE (J): Captures the scene in black and white. 1 Set the Mode Dial to ".", then power on the subject. 5 Press the Shutter button fully to select the desired setting, then press the SET button. •...
... a specific situation. Types PORTRAIT (F): Captures a subject clearly with "." in the selected mode and a frame guide matching the scene menu selection appears onscreen. way down to focus on the camera. • SCENE MENU screen appears. 2 Press l or m to capture the image. BLACK&WHITE (J): Captures the scene in black and white. 1 Set the Mode Dial to ".", then power on the subject. 5 Press the Shutter button fully to select the desired setting, then press the SET button. •...

VECG40U Operation Manual
Page 67
... to the "LIMITED USE SOFTWARE LICENSE" on the first page of disconnecting USB cable in "Installing the USB driver". Transferring Data on the task bar, and choose an applicable hard drive to stop. 3 After the message "Safe To Remove Hardware" appears, disconnect the USB cable or eject the card. Disconnecting the USB cable Windows 2000/Me/XP 1 Quit PixLab. 2 Click the "Safely Remove Hardware" icon that , disconnect the USB cable or eject the card. button to a computer...
... to the "LIMITED USE SOFTWARE LICENSE" on the first page of disconnecting USB cable in "Installing the USB driver". Transferring Data on the task bar, and choose an applicable hard drive to stop. 3 After the message "Safe To Remove Hardware" appears, disconnect the USB cable or eject the card. Disconnecting the USB cable Windows 2000/Me/XP 1 Quit PixLab. 2 Click the "Safely Remove Hardware" icon that , disconnect the USB cable or eject the card. button to a computer...

VECG40U Operation Manual
Page 69
... operations below . Note: • Refer to the PDF manual of data transfer error, disconnect the USB cable, then connect it again, or turn the power off, then turn off the PC or setting it on transferring data While transferring data, the transfer indicator moves. Image, sound and related data are stored in files and on the card will find a new drive called "Removable Disk (F:)" (or other drive letter, depending on /off • Turn off the menu screen. 6 Press the ! (data transfer) button. • Transfer...
... operations below . Note: • Refer to the PDF manual of data transfer error, disconnect the USB cable, then connect it again, or turn the power off, then turn off the PC or setting it on transferring data While transferring data, the transfer indicator moves. Image, sound and related data are stored in files and on the card will find a new drive called "Removable Disk (F:)" (or other drive letter, depending on /off • Turn off the menu screen. 6 Press the ! (data transfer) button. • Transfer...

VECG40U Operation Manual
Page 72
... down the Power button for service (p. 64). The DIGITAL ZOOM menu item is set the flash to Auto mode in to unlocked position. "OFF". Make sure the battery polarity matches rectly. The write protect switch is set the flash to "ON" (p. 30). age. Cannot focus on a subject closer than 1 ft (30 cm). (p. 16). The captured image appears The focus is broken. unclear. Replace them with new one (p. 9). The LCD screen turns off...
... down the Power button for service (p. 64). The DIGITAL ZOOM menu item is set the flash to Auto mode in to unlocked position. "OFF". Make sure the battery polarity matches rectly. The write protect switch is set the flash to "ON" (p. 30). age. Cannot focus on a subject closer than 1 ft (30 cm). (p. 16). The captured image appears The focus is broken. unclear. Replace them with new one (p. 9). The LCD screen turns off...
VECG40U Operation Manual
Page 73
... Replace the card with new one (p. 9) or store 3 or more images. (p. 7). Cannot transfer the data to "ON" (p. 59). the PC. Check the cable connection (p. 57). Appendix 63 more images. mode. The AA batteries are depleted. 30 second movie capture limit has elapsed. Cannot use the digital zoom in = Not a malfunction. Cannot display the image on this camera. The A/V cable is not correctly in full screen. 2448K1632. where you live (p. 61), and set...
... Replace the card with new one (p. 9) or store 3 or more images. (p. 7). Cannot transfer the data to "ON" (p. 59). the PC. Check the cable connection (p. 57). Appendix 63 more images. mode. The AA batteries are depleted. 30 second movie capture limit has elapsed. Cannot use the digital zoom in = Not a malfunction. Cannot display the image on this camera. The A/V cable is not correctly in full screen. 2448K1632. where you live (p. 61), and set...

VECG40U Operation Manual
Page 74
... Specifications Digital still camera Image Capturing Device 1/1.8" CCD image sensor (effective pixels: 4.04 megapixels) Lens F2.0-F2.5, f=7-21mm (35mm film equivalent: 33-99mm) Power zoom 1-3K in optical range, 3-9K in digital range Color Temperature Compensation Auto white balance with daylight, fluorescent or tungsten LCD monitor 1.5" CGSilicon, 134,000pixels Power Source AA size alkaline batteries Ni-MH rechargeable batteries DC 6.0 V with AC adapter Power Consumption 3.2 W Recording Format JPEG for still images/Motion JPEG for motion images Recording Medium SD Memory Card Sound Recording...
... Specifications Digital still camera Image Capturing Device 1/1.8" CCD image sensor (effective pixels: 4.04 megapixels) Lens F2.0-F2.5, f=7-21mm (35mm film equivalent: 33-99mm) Power zoom 1-3K in optical range, 3-9K in digital range Color Temperature Compensation Auto white balance with daylight, fluorescent or tungsten LCD monitor 1.5" CGSilicon, 134,000pixels Power Source AA size alkaline batteries Ni-MH rechargeable batteries DC 6.0 V with AC adapter Power Consumption 3.2 W Recording Format JPEG for still images/Motion JPEG for motion images Recording Medium SD Memory Card Sound Recording...


