

UX-P200 Operation Manual
Page 1
Receiving Faxes 4. Printing Lists 7. Installation 2. Troubleshooting Making Copies 5. Maintenance 8. MODEL UX-P200 FACSIMILE OPERATION MANUAL 1. Sending Faxes 3. Special Functions 6.
Receiving Faxes 4. Printing Lists 7. Installation 2. Troubleshooting Making Copies 5. Maintenance 8. MODEL UX-P200 FACSIMILE OPERATION MANUAL 1. Sending Faxes 3. Special Functions 6.

UX-P200 Operation Manual
Page 3
.... 45 letter-size pages) Replacement roll (not included): UX-5CR 164 ft. (50 m) (one roll yields approx. 150 letter-size pages) 448 KB (approx. 24 average pages) 9,600 bps with automatic fallback to lower speeds. The features and specifications of your new Sharp fax are shown below. Introduction Welcome, and thank you for...
.... 45 letter-size pages) Replacement roll (not included): UX-5CR 164 ft. (50 m) (one roll yields approx. 150 letter-size pages) 448 KB (approx. 24 average pages) 9,600 bps with automatic fallback to lower speeds. The features and specifications of your new Sharp fax are shown below. Introduction Welcome, and thank you for...

UX-P200 Operation Manual
Page 4
Contrast control Automatic/Dark selectable Reception modes TEL/FAX Copy function Single / Multi (99 copies/page) Telephone function Yes (cannot be used if power fails) Power requirements 120 V AC, 60 Hz Operating temperature 41 - .... (2.8 kg) As a part of our policy of production units. copier paper at room temperature; The performance specification figures indicated are nominal values of continuous improvement, SHARP reserves the right to 600 mm) Effective scanning width 8.3" (210 mm) max. There may be higher than the line on the tray) Legal: 5 sheets Recommended...
Contrast control Automatic/Dark selectable Reception modes TEL/FAX Copy function Single / Multi (99 copies/page) Telephone function Yes (cannot be used if power fails) Power requirements 120 V AC, 60 Hz Operating temperature 41 - .... (2.8 kg) As a part of our policy of production units. copier paper at room temperature; The performance specification figures indicated are nominal values of continuous improvement, SHARP reserves the right to 600 mm) Effective scanning width 8.3" (210 mm) max. There may be higher than the line on the tray) Legal: 5 sheets Recommended...

UX-P200 Operation Manual
Page 6
... the Document 24 Adjusting the Resolution and Contrast 25 Sending a Fax by Normal Dialing 27 Sending a Fax by Automatic Dialing 28 Sending a Fax From Memory 34 3. Printing Lists 51 4 Table of Unwanted Faxes 50 6. Receiving Faxes 36 Using FAX Mode 36 Using TEL Mode 37 Optional Reception Settings 39 Substitute ...at the Operation Panel 6 1. Installation 8 Unpacking Checklist 8 Connections 9 Loading the Imaging Film 12 Loading Printing Paper 14 Entering Your Name and Fax Number 16 Setting the Date and Time 18 Setting the Reception Mode 20 Volume Adjustment 21 2.
... the Document 24 Adjusting the Resolution and Contrast 25 Sending a Fax by Normal Dialing 27 Sending a Fax by Automatic Dialing 28 Sending a Fax From Memory 34 3. Printing Lists 51 4 Table of Unwanted Faxes 50 6. Receiving Faxes 36 Using FAX Mode 36 Using TEL Mode 37 Optional Reception Settings 39 Substitute ...at the Operation Panel 6 1. Installation 8 Unpacking Checklist 8 Connections 9 Loading the Imaging Film 12 Loading Printing Paper 14 Entering Your Name and Fax Number 16 Setting the Date and Time 18 Setting the Reception Mode 20 Volume Adjustment 21 2.

UX-P200 Operation Manual
Page 8
... is in the display will point to the currently selected reception mode). 3 Left and right arrow keys Auto-dial numbers: When sending a fax or making a phone call, press these keys to dial numbers, and enter numbers and letters when storing auto-dial numbers. 5 Panel release...available if you operate the machine. 2 RESOLUTION / RECEPTION MODE key When a document is completed. 6 A Look at the Operation Panel 1 2 3 UP TEL FAX Z RESOLUTION/ REDIAL RECEPTION MODE STOP COPY/HELP START/MEMORY FUNCTION DOWN 678 9 10 4 5 ABC DEF 123 GHI JKL MNO 456 A PQRS TUV WXYZ 789 SPEAKER...
... is in the display will point to the currently selected reception mode). 3 Left and right arrow keys Auto-dial numbers: When sending a fax or making a phone call, press these keys to dial numbers, and enter numbers and letters when storing auto-dial numbers. 5 Panel release...available if you operate the machine. 2 RESOLUTION / RECEPTION MODE key When a document is completed. 6 A Look at the Operation Panel 1 2 3 UP TEL FAX Z RESOLUTION/ REDIAL RECEPTION MODE STOP COPY/HELP START/MEMORY FUNCTION DOWN 678 9 10 4 5 ABC DEF 123 GHI JKL MNO 456 A PQRS TUV WXYZ 789 SPEAKER...

UX-P200 Operation Manual
Page 9
... the handset to talk with the other time, press this key to print out the Help List, a quick reference guide to the operation of your fax machine. 8 START/MEMORY key Press this key after pressing the FUNCTION key to scroll through the FUNCTION MODE settings. 11 SPEAKER key Press this key... to listen to the line and fax tones through memory. 9 FUNCTION key Press this key followed by the arrow keys to select special functions and settings. 10 UP and DOWN arrow keys...
... the handset to talk with the other time, press this key to print out the Help List, a quick reference guide to the operation of your fax machine. 8 START/MEMORY key Press this key after pressing the FUNCTION key to scroll through the FUNCTION MODE settings. 11 SPEAKER key Press this key... to listen to the line and fax tones through memory. 9 FUNCTION key Press this key followed by the arrow keys to select special functions and settings. 10 UP and DOWN arrow keys...
UX-P200 Operation Manual
Page 11
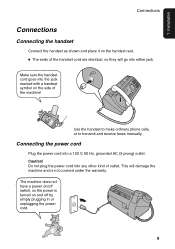
... will damage the machine and is turned on the side of outlet. Use the handset to make ordinary phone calls, or to transmit and receive faxes manually. Make sure the handset cord goes into either jack. Caution! 1. Do not plug the power cord into a 120 V, 60 Hz, grounded AC (3-prong) outlet...
... will damage the machine and is turned on the side of outlet. Use the handset to make ordinary phone calls, or to transmit and receive faxes manually. Make sure the handset cord goes into either jack. Caution! 1. Do not plug the power cord into a 120 V, 60 Hz, grounded AC (3-prong) outlet...
UX-P200 Operation Manual
Page 12
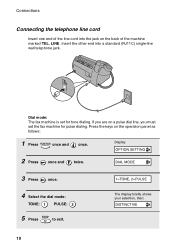
... briefly shows your selection, then: DISTINCTIVE 10 If you are on a pulse dial line, you must set for pulse dialing. Dial mode: The fax machine is set the fax machine for tone dialing. Insert the other end into the jack on the operation panel as follows: 1 Press FUNCTION once and once. Press...
... briefly shows your selection, then: DISTINCTIVE 10 If you are on a pulse dial line, you must set for pulse dialing. Dial mode: The fax machine is set the fax machine for tone dialing. Insert the other end into the jack on the operation panel as follows: 1 Press FUNCTION once and once. Press...

UX-P200 Operation Manual
Page 13
... is not compatible with any of these services, you may experience errors during transmission and reception of facsimile messages. ♦ The fax machine is not designed for the power and telephone lines. Attach the paper tray and paper tray extension Attach the paper tray and paper tray... extension. If you install surge protectors for use the fax machine in conjunction with digital telephone systems. ♦ If your telephone company. If you attempt to use on a line which has call waiting, call ...
... is not compatible with any of these services, you may experience errors during transmission and reception of facsimile messages. ♦ The fax machine is not designed for the power and telephone lines. Attach the paper tray and paper tray extension Attach the paper tray and paper tray... extension. If you install surge protectors for use the fax machine in conjunction with digital telephone systems. ♦ If your telephone company. If you attempt to use on a line which has call waiting, call ...

UX-P200 Operation Manual
Page 14
... a roll of imaging film included with this logo: 1 Remove the paper from the spools. The print head in the fax applies heat to the imaging film to transfer ink to load or replace the film. The initial starter roll of imaging film to Step 4. 2 Remove ... first time, go to create printed text and images. When replacing the film, use a roll of Sharp UX5CR imaging film. DO NOT DISCARD THE TWO GREEN GEARS! 12 Use only Sharp Genuine Supplies with your fax can print about 45 letter-size pages. One roll can print about 150 letter-size pages. Follow...
... a roll of imaging film included with this logo: 1 Remove the paper from the spools. The print head in the fax applies heat to the imaging film to transfer ink to load or replace the film. The initial starter roll of imaging film to Step 4. 2 Remove ... first time, go to create printed text and images. When replacing the film, use a roll of Sharp UX5CR imaging film. DO NOT DISCARD THE TWO GREEN GEARS! 12 Use only Sharp Genuine Supplies with your fax can print about 45 letter-size pages. One roll can print about 150 letter-size pages. Follow...

UX-P200 Operation Manual
Page 17
... once and 3 times. Display: OPTION SETTING 2 Press once and twice. Installation Setting the paper size The fax has been set at the factory to print at the factory to scale received faxes to letter size paper. If you loaded legal paper, you can change the paper size setting to LIGHT...display briefly shows your selection, then: COPY CUT-OFF 5 Press STOP to return to the date and time display. 15 Print contrast setting Your fax has been set at normal contrast. If desired, you must change the print contrast setting to LEGAL. 1 Press FUNCTION once and once. Loading ...
... once and 3 times. Display: OPTION SETTING 2 Press once and twice. Installation Setting the paper size The fax has been set at the factory to print at the factory to scale received faxes to letter size paper. If you loaded legal paper, you can change the paper size setting to LIGHT...display briefly shows your selection, then: COPY CUT-OFF 5 Press STOP to return to the date and time display. 15 Print contrast setting Your fax has been set at normal contrast. If desired, you must change the print contrast setting to LEGAL. 1 Press FUNCTION once and once. Loading ...

UX-P200 Operation Manual
Page 18
... FCC regulations require that your name, telephone/fax number, and the date and time appear on each fax page you enter this information automatically at the top of each fax message you must enter your fax messages. You also need to have the fax machine include this information, it will automatically...0 1 Press FUNCTION once and twice. 2 Press once. 3 Press once. 16 Display: ENTRY MODE OWN NUMBER SET ENTER FAX # Once you send. Enter your name and fax number here and set the date and time as explained in the following section to set the date and time. Entering Your...
... FCC regulations require that your name, telephone/fax number, and the date and time appear on each fax page you enter this information automatically at the top of each fax message you must enter your fax messages. You also need to have the fax machine include this information, it will automatically...0 1 Press FUNCTION once and twice. 2 Press once. 3 Press once. 16 Display: ENTRY MODE OWN NUMBER SET ENTER FAX # Once you send. Enter your name and fax number here and set the date and time as explained in the following section to set the date and time. Entering Your...

UX-P200 Operation Manual
Page 19
... to return to 24 characters can be entered. Up to the date and time display. 17 Example: SHARP = 7777 44 2 777 7 SPACE = G = N = U = A = H = O = V = B = I = P = W = C = J = Q = X = D = K = R = Y = E = L = S = Z = F = M = T = ♦ To enter two letters in the chart below. Installation 4 Enter your fax number by pressing the number keys (max. 20 digits). • To insert a space between digits, press . •...
... to return to 24 characters can be entered. Up to the date and time display. 17 Example: SHARP = 7777 44 2 777 7 SPACE = G = N = U = A = H = O = V = B = I = P = W = C = J = Q = X = D = K = R = Y = E = L = S = Z = F = M = T = ♦ To enter two letters in the chart below. Installation 4 Enter your fax number by pressing the number keys (max. 20 digits). • To insert a space between digits, press . •...

UX-P200 Operation Manual
Page 20
... and Time Setting the Date and Time The date and time appear in the display and are printed at the top of every page you fax. Set the date and time as shown below. DATE&TIME SET 3 Press The currently set date appears (example): DATE 08-15-2001 4 Enter a two-digit...
... and Time Setting the Date and Time The date and time appear in the display and are printed at the top of every page you fax. Set the date and time as shown below. DATE&TIME SET 3 Press The currently set date appears (example): DATE 08-15-2001 4 Enter a two-digit...

UX-P200 Operation Manual
Page 22
...456 789 0 RESOLUTION/ RECEPTION MODE JAN-01 10:30 TEL FAX JAN-01 10:30 TEL FAX For more information on your line. Setting the Reception Mode Setting the Reception Mode Your fax has two modes for receiving incoming faxes: FAX mode: Select this mode when you only want to receive ...both phone calls and faxes on four rings and receive incoming faxes. Setting the reception mode Make sure a document is not loaded...
...456 789 0 RESOLUTION/ RECEPTION MODE JAN-01 10:30 TEL FAX JAN-01 10:30 TEL FAX For more information on your line. Setting the Reception Mode Setting the Reception Mode Your fax has two modes for receiving incoming faxes: FAX mode: Select this mode when you only want to receive ...both phone calls and faxes on four rings and receive incoming faxes. Setting the reception mode Make sure a document is not loaded...

UX-P200 Operation Manual
Page 25
... graphics on the edges of documents that you can load in the shaded area will not be scanned. 0.16"(4 mm) 0.16"(4 mm) 0.2"(5 mm) 23 Sending Faxes Transmittable Documents Size and weight The size and weight of a document will not be scanned. 0.2"(5 mm) Letters in the document feeder depend on whether you... one page at a time: Minimum size Maximum size 5.8" (148 mm) 5.5" (140 mm) 8.5" (216 mm) 23.6" (600 mm) Loading up to 10 pages at once. Sending Faxes 2.
... graphics on the edges of documents that you can load in the shaded area will not be scanned. 0.16"(4 mm) 0.16"(4 mm) 0.2"(5 mm) 23 Sending Faxes Transmittable Documents Size and weight The size and weight of a document will not be scanned. 0.2"(5 mm) Letters in the document feeder depend on whether you... one page at a time: Minimum size Maximum size 5.8" (148 mm) 5.5" (140 mm) 8.5" (216 mm) 23.6" (600 mm) Loading up to 10 pages at once. Sending Faxes 2.

UX-P200 Operation Manual
Page 27
... They are only effective for receiving a document. 2. Use FINE for photographs and illustrations. This setting gives you don't want to use the default settings. Sending Faxes Adjusting the Resolution and Contrast 3 Adjust the resolution and/or contrast settings as explained on page 27. Use HALF TONE for documents containing small letters...
... They are only effective for receiving a document. 2. Use FINE for photographs and illustrations. This setting gives you don't want to use the default settings. Sending Faxes Adjusting the Resolution and Contrast 3 Adjust the resolution and/or contrast settings as explained on page 27. Use HALF TONE for documents containing small letters...

UX-P200 Operation Manual
Page 28
... can be adjusted. 2 RESOLUTION/ Press RECEPTION MODE one or more times until the desired resolution and contrast settings appear in SUPER FINE resolution, the receiving fax machine must also have that resolution. Use DARK for normal documents.
... can be adjusted. 2 RESOLUTION/ Press RECEPTION MODE one or more times until the desired resolution and contrast settings appear in SUPER FINE resolution, the receiving fax machine must also have that resolution. Use DARK for normal documents.

UX-P200 Operation Manual
Page 29
...them ). ABC DEF 123 GHI 4 JKL 5 MNO 6 PQRS 7 TUV 8 WXYZ 9 0 4 Wait for the dial tone. Sending Faxes Sending a Fax by Normal Dialing With Normal Dialing, you to listen to issue a fax tone. 27 RESOLUTION/ • If desired, press RECEPTION MODE to set the resolution and/or contrast. 2 Pick up the... handset to speak with them through the handset before sending the fax. (If you pressed SPEAKER , you must pick up the handset to talk.) ♦ Normal Dialing allows you pick up the handset (or ...
...them ). ABC DEF 123 GHI 4 JKL 5 MNO 6 PQRS 7 TUV 8 WXYZ 9 0 4 Wait for the dial tone. Sending Faxes Sending a Fax by Normal Dialing With Normal Dialing, you to listen to issue a fax tone. 27 RESOLUTION/ • If desired, press RECEPTION MODE to set the resolution and/or contrast. 2 Pick up the... handset to speak with them through the handset before sending the fax. (If you pressed SPEAKER , you must pick up the handset to talk.) ♦ Normal Dialing allows you pick up the handset (or ...

UX-P200 Operation Manual
Page 30
...Several pauses can store up to access a special service or an outside line, press FUNCTION . Sending a Fax by pressing appears in the display, and then START/MEMORY . ENTER FAX # 3 Enter the fax or voice number by Automatic Dialing 5 When you used it. • When transmission is required between ...Automatic Dialing You can be entered.) • To clear a mistake, press SPEAKER . • If a pause is completed, the fax will beep once. Sending a Fax by pressing the number keys. (Note: A space cannot be entered in the machine for automatic dialing 1 Press FUNCTION once and once....
...Several pauses can store up to access a special service or an outside line, press FUNCTION . Sending a Fax by pressing appears in the display, and then START/MEMORY . ENTER FAX # 3 Enter the fax or voice number by Automatic Dialing 5 When you used it. • When transmission is required between ...Automatic Dialing You can be entered.) • To clear a mistake, press SPEAKER . • If a pause is completed, the fax will beep once. Sending a Fax by pressing the number keys. (Note: A space cannot be entered in the machine for automatic dialing 1 Press FUNCTION once and once....


