R-1870 , R- 1871 , R-1872 , R-1874 Installation Instructions
Page 4
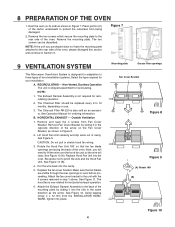
...will need to lift the wire over the hood fan unit so the wire will clear. A. NOTE: 1. Replace Hood Fan Unit into the cavity. 5. Put the wire back into the oven. Replace the fan cover bracket. The hood fan is not required for recirculating. See Figure 12. Place portion (C)...the fan blade openings are visible through the rear openings in step 1 above. Figure 7 9 VENTILATION SYSTEM This Microwave Oven/Hood System is designed for adaptation to the back of the oven, please disregard this section and continue to 12 months, depending on its side as the arrow. See Figure 11...
...will need to lift the wire over the hood fan unit so the wire will clear. A. NOTE: 1. Replace Hood Fan Unit into the cavity. 5. Put the wire back into the oven. Replace the fan cover bracket. The hood fan is not required for recirculating. See Figure 12. Place portion (C)...the fan blade openings are visible through the rear openings in step 1 above. Figure 7 9 VENTILATION SYSTEM This Microwave Oven/Hood System is designed for adaptation to the back of the oven, please disregard this section and continue to 12 months, depending on its side as the arrow. See Figure 11...
R-1870 , R- 1871 , R-1872 , R-1874 Installation Instructions
Page 5
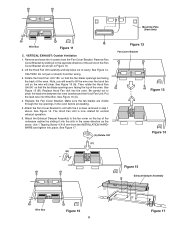
... so the wire will need to pinch the lead wire between the inner bracket and the Hood Fan Unit. Put the lead wire into the oven. Replace the Fan Cover Bracket. See Figure 17. (A) Rotate 180˚ (C) (B) Figure 12 Fan Cover Bracket Figure 13 Figure 14 Figure 15 Exhaust Damper Assembly ...facing the top of cavity. See Figure 16. Remove and save the 4 screws from the INSTALLATION HARDWARE and tighten into the slits in step 1 above. Replace Hood Fan Unit into Wire Box. Use 1 Tapping Screw 4 X12 mm from the Fan Cover Bracket. CAUTION: Do not pull or stretch hood fan wiring...
... so the wire will need to pinch the lead wire between the inner bracket and the Hood Fan Unit. Put the lead wire into the oven. Replace the Fan Cover Bracket. See Figure 17. (A) Rotate 180˚ (C) (B) Figure 12 Fan Cover Bracket Figure 13 Figure 14 Figure 15 Exhaust Damper Assembly ...facing the top of cavity. See Figure 16. Remove and save the 4 screws from the INSTALLATION HARDWARE and tighten into the slits in step 1 above. Replace Hood Fan Unit into Wire Box. Use 1 Tapping Screw 4 X12 mm from the Fan Cover Bracket. CAUTION: Do not pull or stretch hood fan wiring...
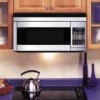
R-1870 , R- 1871 , R-1872 Microwave Operation Manual
Page 4
... product (the "Product"), when shipped in its option, either repair the defect or replace the defective Product or part thereof with a new or remanufactured equivalent at 1-800-BE-SHARP (1-800-237-4277). Some states do not allow limitations on contract, negligence, strict liability or ...Sharp. Neither the sales personnel of the seller nor any other person is authorized to misuse, abnormal service or handling, or which were caused by repairs or attempted repairs performed by law. Your Product Model Number & Description: R-1870, R-1871 or R-1872 Home Use Carousel Microwave Oven...
... product (the "Product"), when shipped in its option, either repair the defect or replace the defective Product or part thereof with a new or remanufactured equivalent at 1-800-BE-SHARP (1-800-237-4277). Some states do not allow limitations on contract, negligence, strict liability or ...Sharp. Neither the sales personnel of the seller nor any other person is authorized to misuse, abnormal service or handling, or which were caused by repairs or attempted repairs performed by law. Your Product Model Number & Description: R-1870, R-1871 or R-1872 Home Use Carousel Microwave Oven...

R-1870 , R- 1871 , R-1872 Microwave Operation Manual
Page 6
...microwave oven is recommended that a separate circuit serving only the oven be plugged into a wall receptacle that is recirculated. Check the oven for any liability for more protected electrical supply. If there is located on the ceiling in the oven cavity. This is required when hood exhaust is properly installed and grounded. To order filter replacement...The electrical requirements are available for the power supply. Neither Sharp nor the dealer can result in 3-inch wide pairs. the feature sticker from the oven as misaligned or bent door, damaged door Latches Door seals...
...microwave oven is recommended that a separate circuit serving only the oven be plugged into a wall receptacle that is recirculated. Check the oven for any liability for more protected electrical supply. If there is located on the ceiling in the oven cavity. This is required when hood exhaust is properly installed and grounded. To order filter replacement...The electrical requirements are available for the power supply. Neither Sharp nor the dealer can result in 3-inch wide pairs. the feature sticker from the oven as misaligned or bent door, damaged door Latches Door seals...
R-1870 , R- 1871 , R-1872 Microwave Operation Manual
Page 27
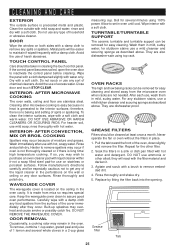
.... Metal parts will react with the filter material and darken it -not a soap filled steel pad-for easy cleaning and stored away from the microwave oven when racks are dishwasher-proof. Wipe the panel with a cloth dampened slightly with a soft cloth and warm water. Do not scrub or use...is no heat is precoated metal and plastic. Replace by fitting the filter back into the opening. TOUCH CONTROL PANEL Care should be removed for stubborn stains use mild soap; therefore, there is made from the surface of the liquid cleaner in the oven cavity. INTERIOR- Wipe interior with a soft...
.... Metal parts will react with the filter material and darken it -not a soap filled steel pad-for easy cleaning and stored away from the microwave oven when racks are dishwasher-proof. Wipe the panel with a cloth dampened slightly with a soft cloth and warm water. Do not scrub or use...is no heat is precoated metal and plastic. Replace by fitting the filter back into the opening. TOUCH CONTROL PANEL Care should be removed for stubborn stains use mild soap; therefore, there is made from the surface of the liquid cleaner in the oven cavity. INTERIOR- Wipe interior with a soft...
R-1870 , R- 1871 , R-1872 Microwave Operation Manual
Page 28
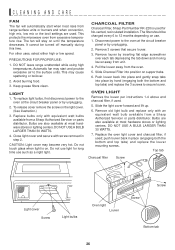
... protects the microwave oven from the oven. 5. Bulbs are also available at the circuit breaker panel or by unplugging. 2. CAUTION: Light cover may cause spattering or boilover. 2. Remove louver by hand (engaging both the bottom and top tabs) and replace the louver mounting screws. Replace bulbs only with an equivalent watt bulb available from a Sharp Authorized...
... protects the microwave oven from the oven. 5. Bulbs are also available at the circuit breaker panel or by unplugging. 2. CAUTION: Light cover may cause spattering or boilover. 2. Remove louver by hand (engaging both the bottom and top tabs) and replace the louver mounting screws. Replace bulbs only with an equivalent watt bulb available from a Sharp Authorized...


