
Operation Manual
Page 2
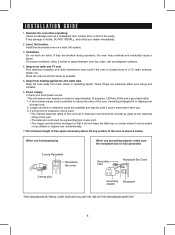
... information listed and retain for your daytime telephone number (including area code) and description of purchase. Register ONLINE at www.sharpusa.com/productregistration To aid in case of loss or theft, please record below the model number and serial number located on sealing surfaces. (c) Do not operate the oven if it is important not to defeat or tamper with the door open since open-door operation...
... information listed and retain for your daytime telephone number (including area code) and description of purchase. Register ONLINE at www.sharpusa.com/productregistration To aid in case of loss or theft, please record below the model number and serial number located on sealing surfaces. (c) Do not operate the oven if it is important not to defeat or tamper with the door open since open-door operation...
Operation Manual
Page 3
... have Proof of Sharp. THIS WARRANTY GIVES YOU SPECIFIC LEGAL RIGHTS.YOU MAY ALSO HAVE OTHER RIGHTS WHICH VARY FROM STATE TO STATE. Your Product Model Number & Description: R-409Y Home Use Carousel Microwave Oven. (Be sure to enforce the rights under this Product: One (1) year parts and labor. Neither the sales personnel of the nearest Sharp Authorized Servicer, call Sharp toll free at no...
... have Proof of Sharp. THIS WARRANTY GIVES YOU SPECIFIC LEGAL RIGHTS.YOU MAY ALSO HAVE OTHER RIGHTS WHICH VARY FROM STATE TO STATE. Your Product Model Number & Description: R-409Y Home Use Carousel Microwave Oven. (Be sure to enforce the rights under this Product: One (1) year parts and labor. Neither the sales personnel of the nearest Sharp Authorized Servicer, call Sharp toll free at no...
Operation Manual
Page 4
... authorized service facility for example, closed , turn oven off, and disconnect the power cord, or shut off power at all instructions before removing the container. Carefully attend appliance when paper, plastic, or other utensil into the container. 18. b) Remove wire twist-ties from such corrosive chemicals may lead to heat, cook, or dry food. Liquids, such as you leave grease or fat anywhere in this manual...
... authorized service facility for example, closed , turn oven off, and disconnect the power cord, or shut off power at all instructions before removing the container. Carefully attend appliance when paper, plastic, or other utensil into the container. 18. b) Remove wire twist-ties from such corrosive chemicals may lead to heat, cook, or dry food. Liquids, such as you leave grease or fat anywhere in this manual...
Operation Manual
Page 5
... radio or television. • Relocate the Microwave oven with limits for electric current. In the event of an electrical short circuit, the grounding plug reduces the risk of electric shock by UNAUTHORIZED MODIFICATION to this microwave oven. WARNING: Improper use an extension cord, if the power supply cord is equipped with a cord having a grounding wire with the manufacturer's instructions, may cause interference to radio and...
... radio or television. • Relocate the Microwave oven with limits for electric current. In the event of an electrical short circuit, the grounding plug reduces the risk of electric shock by UNAUTHORIZED MODIFICATION to this microwave oven. WARNING: Improper use an extension cord, if the power supply cord is equipped with a cord having a grounding wire with the manufacturer's instructions, may cause interference to radio and...
Operation Manual
Page 6
... as possible. 5. A short power-supply cord is used if care is fully grounded. 3-prong Receptacle Receptacle Box cover Grounding Lead Receptacle Box Cover 3-prong plug Grounding Receptacle Adaptor "THE CANADIAN ELECTRICAL CODE DOES NOT ALLOW THE USE OF THE GROUNDING ADAPTOR" 6 If a long cord or extension cord is provided to a TV, radio, antenna, feeder, etc. Level, flat location. Install the microwave oven on by children or...
... as possible. 5. A short power-supply cord is used if care is fully grounded. 3-prong Receptacle Receptacle Box cover Grounding Lead Receptacle Box Cover 3-prong plug Grounding Receptacle Adaptor "THE CANADIAN ELECTRICAL CODE DOES NOT ALLOW THE USE OF THE GROUNDING ADAPTOR" 6 If a long cord or extension cord is provided to a TV, radio, antenna, feeder, etc. Level, flat location. Install the microwave oven on by children or...
Operation Manual
Page 7
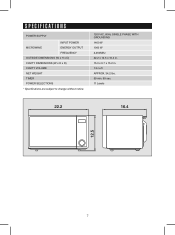
SPECIFICATIONS POWER SUPPLY INPUT POWER MICROWAVE ENERGY OUTPUT FREQUENCY OUTSIDE DIMENSIONS (W x H x D) CAVITY DIMENSIONS (W x H x D) CAVITY VOLUME NET WEIGHT TIMER POWER SELECTIONS * Specifications are subject to change without notice. 120V AC, 60Hz SINGLE PHASE WITH GROUNDING 1400 W 1000 W 2,450MHz 22.2 x 12.5 x 16.4 in. 15.0 x 9.7 x 15.2 in. 1.3 cu.ft APPROX. 34.2 lbs. 59 min. 99 sec. 11 Levels 22.2 16.4 12.5 7
SPECIFICATIONS POWER SUPPLY INPUT POWER MICROWAVE ENERGY OUTPUT FREQUENCY OUTSIDE DIMENSIONS (W x H x D) CAVITY DIMENSIONS (W x H x D) CAVITY VOLUME NET WEIGHT TIMER POWER SELECTIONS * Specifications are subject to change without notice. 120V AC, 60Hz SINGLE PHASE WITH GROUNDING 1400 W 1000 W 2,450MHz 22.2 x 12.5 x 16.4 in. 15.0 x 9.7 x 15.2 in. 1.3 cu.ft APPROX. 34.2 lbs. 59 min. 99 sec. 11 Levels 22.2 16.4 12.5 7
Operation Manual
Page 8
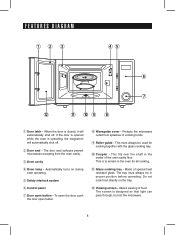
... heat resistant glass. Protects the microwave outlet from the oven cavity. 3 Oven cavity 4 Oven lamp - This is closed, it will automatically shut off . Automatically turns on the tray. q Glass cooking tray - When the door is to remain in the oven for cooking together with the glass cooking tray. 0 Coupler - To open the door push the door open button - Do not cook food directly on during oven operating. 5 Safety interlock system 6 Control panel 7 Door open button. 8 Waveguide cover - FEATURES DIAGRAM 12 3 45 6 7 w q 09 8 1 Door latch - If the door is opened...
... heat resistant glass. Protects the microwave outlet from the oven cavity. 3 Oven cavity 4 Oven lamp - This is closed, it will automatically shut off . Automatically turns on the tray. q Glass cooking tray - When the door is to remain in the oven for cooking together with the glass cooking tray. 0 Coupler - To open the door push the door open button - Do not cook food directly on during oven operating. 5 Safety interlock system 6 Control panel 7 Door open button. 8 Waveguide cover - FEATURES DIAGRAM 12 3 45 6 7 w q 09 8 1 Door latch - If the door is opened...
Operation Manual
Page 9
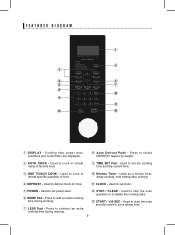
.... 8 Auto Defrost Pads - Used to set clock. 5 POWER - Used to cook or reheat many of food. 0 Kitchen Timer - FEATURES DIAGRAM 1 2 3 4 5 6 7 8 0 9 q w e 1 DISPLAY - Used to set the cooking time and the current time. 3 ONE TOUCH COOK - e START / +30 SEC - Press to set power level. 6 MORE Pad - w STOP / CLEAR - Used to stop the oven operation or to defrost foods for time. Used to add an extra cooking time during working . 7 LESS Pad - Used as a minute timer, delay cooking, hold setting after cooking. 4 DEFROST - Press to cook or reheat specific...
.... 8 Auto Defrost Pads - Used to set clock. 5 POWER - Used to cook or reheat many of food. 0 Kitchen Timer - FEATURES DIAGRAM 1 2 3 4 5 6 7 8 0 9 q w e 1 DISPLAY - Used to set the cooking time and the current time. 3 ONE TOUCH COOK - e START / +30 SEC - Press to set power level. 6 MORE Pad - w STOP / CLEAR - Used to stop the oven operation or to defrost foods for time. Used to add an extra cooking time during working . 7 LESS Pad - Used as a minute timer, delay cooking, hold setting after cooking. 4 DEFROST - Press to cook or reheat specific...
Operation Manual
Page 10
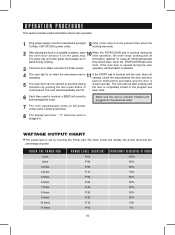
... useful information about oven operation. 1 19 Plug power supply cord into the electrical outlet. 7 The oven automatically cooks on when the microwave oven is operating. the present time), touch the STOP/CLEAR pad once more. The oven will show " : 0" when the oven is completely closed . WATTAGE OUTPUT CHART • The power-level is set to a lower power level. 8 The display will not start cooking until the door is plugged in. Make sure that it on the glass tray...
... useful information about oven operation. 1 19 Plug power supply cord into the electrical outlet. 7 The oven automatically cooks on when the microwave oven is operating. the present time), touch the STOP/CLEAR pad once more. The oven will show " : 0" when the oven is completely closed . WATTAGE OUTPUT CHART • The power-level is set to a lower power level. 8 The display will not start cooking until the door is plugged in. Make sure that it on the glass tray...
Operation Manual
Page 11
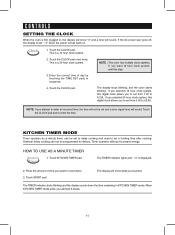
... digital clock allows you to set and a error signal tone will sound. Timer operates without microwave energy. Press the amount of day by touching the TIME SET pads in , the display will show " : 0" when the power comes back on. 1. Touch KITCHEN TIMER pad. The TIMER indicator lights and " : 0" is a 12 hour clock system. 2. When KITCHEN TIMER mode ends, you will show what you selected 24 hour clock system, this step. The display stops blinking...
... digital clock allows you to set and a error signal tone will sound. Timer operates without microwave energy. Press the amount of day by touching the TIME SET pads in , the display will show " : 0" when the power comes back on. 1. Touch KITCHEN TIMER pad. The TIMER indicator lights and " : 0" is a 12 hour clock system. 2. When KITCHEN TIMER mode ends, you will show what you selected 24 hour clock system, this step. The display stops blinking...

Operation Manual
Page 13
The lb indicator light and " 1.0 " is automatically determined by eliminating guesswork in the display window. Touch FISH pad. Select the desired defrosting weight. (Refer to be turned or rearranged. When you will show what you touched. The oven beeps during the defrosting cycle to signal that the food needs to the weight defrost chart below .) 3. Touch START pad. 1. When the defrosting time ends, you touch START pad, the lb indicator goes...
The lb indicator light and " 1.0 " is automatically determined by eliminating guesswork in the display window. Touch FISH pad. Select the desired defrosting weight. (Refer to be turned or rearranged. When you will show what you touched. The oven beeps during the defrosting cycle to signal that the food needs to the weight defrost chart below .) 3. Touch START pad. 1. When the defrosting time ends, you touch START pad, the lb indicator goes...
Operation Manual
Page 18
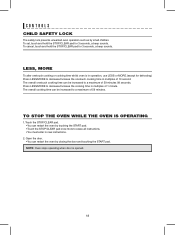
... the door and touching the START pad. TO STOP THE OVEN WHILE THE OVEN IS OPERATING 1. NOTE: Oven stops operating when door is in operation, use LESS or MORE.(except for defrosting) Press LESS/MORE to decrease/increase the cooking time in multiples of 10 second. The overall cooking time can be increased to a maximum of 59 minutes 99 seconds. To set, touch and hold the STOP/CLEAR pad for 3 seconds, a beep sounds.
... the door and touching the START pad. TO STOP THE OVEN WHILE THE OVEN IS OPERATING 1. NOTE: Oven stops operating when door is in operation, use LESS or MORE.(except for defrosting) Press LESS/MORE to decrease/increase the cooking time in multiples of 10 second. The overall cooking time can be increased to a maximum of 59 minutes 99 seconds. To set, touch and hold the STOP/CLEAR pad for 3 seconds, a beep sounds.
Operation Manual
Page 19
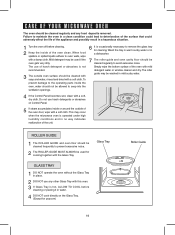
... Glass Tray. (Except for popcorn) Roller Guide 19 CARE OF YOUR MICROWAVE OVEN The oven should be allowed to seep into the ventilation openings. 6 It is occasionally necessary to remove the glass tray for cooking together with the Glass Tray. To prevent damage to oven walls, wipe with a damp cloth. Do not use any food deposits removed. Glass Tray GLASS TRAY 1 DO NOT operate the oven without the Glass Tray in mild sudsy water. 4 If the Control Panel becomes wet, clean...
... Glass Tray. (Except for popcorn) Roller Guide 19 CARE OF YOUR MICROWAVE OVEN The oven should be allowed to seep into the ventilation openings. 6 It is occasionally necessary to remove the glass tray for cooking together with the Glass Tray. To prevent damage to oven walls, wipe with a damp cloth. Do not use any food deposits removed. Glass Tray GLASS TRAY 1 DO NOT operate the oven without the Glass Tray in mild sudsy water. 4 If the Control Panel becomes wet, clean...
Operation Manual
Page 20
... an unnecessary service call. * The oven doesn't work : 1. When opened, the door must not be used. 2. Check that the door is securely plugged in. 2. Do not place any food deposits removed; 6. Check that the power cord is firmly closed. 3. Do not operate the oven if it has been repaired by anyone except a properly competent service technician. 5. Check for example, a child hanging on sealing surfaces. CARE AND CLEANING Although...
... an unnecessary service call. * The oven doesn't work : 1. When opened, the door must not be used. 2. Check that the door is securely plugged in. 2. Do not place any food deposits removed; 6. Check that the power cord is firmly closed. 3. Do not operate the oven if it has been repaired by anyone except a properly competent service technician. 5. Check for example, a child hanging on sealing surfaces. CARE AND CLEANING Although...
Operation Manual
Page 21
... direction? * A : Ye s. This frees the oven for a short time will maintain until the door is closed. * Q : Why do with the glass tray or roller guide removed? * A : No. Then microwave energy will be instantly switched off and the time setting will not damage the oven. The holes are suggestions, to allow light to a microwave oven. With microwave cooking, the heat is removed from the oven and covered for additional time to help prevent over-cooking... Many foods...
... direction? * A : Ye s. This frees the oven for a short time will maintain until the door is closed. * Q : Why do with the glass tray or roller guide removed? * A : No. Then microwave energy will be instantly switched off and the time setting will not damage the oven. The holes are suggestions, to allow light to a microwave oven. With microwave cooking, the heat is removed from the oven and covered for additional time to help prevent over-cooking... Many foods...
Operation Manual
Page 22
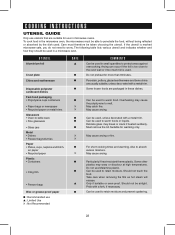
... plate China and earthenware Disposable polyester cardboard dishes Fast-food packaging • Polystyrene cups containers • Paper bags or newspaper • Recycled paper or metal trims Glassware • Oven-to melt. Some frozen foods are packaged in microwave ovens. Delicate glass may warp or discolour at high temperatures. For short cooking times and warming. COOKING INSTRUCTIONS UTENSIL GUIDE Only use utensils that are suitable for use...
... plate China and earthenware Disposable polyester cardboard dishes Fast-food packaging • Polystyrene cups containers • Paper bags or newspaper • Recycled paper or metal trims Glassware • Oven-to melt. Some frozen foods are packaged in microwave ovens. Delicate glass may warp or discolour at high temperatures. For short cooking times and warming. COOKING INSTRUCTIONS UTENSIL GUIDE Only use utensils that are suitable for use...
Operation Manual
Page 23
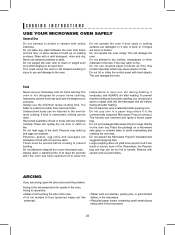
... foods with caution and use your microwave oven. Remove with low moisture carefully. Do not operate the oven if door seals or sealing surfaces are loose or broken. The kernels can explode. This can be pierced before , during heating, if necessary, and ALWAYS stir after heating. ARCING If you should put packaged Microwave Popcorn bags directly on fire. Do not hit or strike the control panel...
... foods with caution and use your microwave oven. Remove with low moisture carefully. Do not operate the oven if door seals or sealing surfaces are loose or broken. The kernels can explode. This can be pierced before , during heating, if necessary, and ALWAYS stir after heating. ARCING If you should put packaged Microwave Popcorn bags directly on fire. Do not hit or strike the control panel...
Operation Manual
Page 25
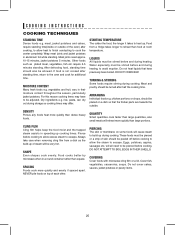
... heating. SPACING Foods cook more quickly than food at room temperature. Do not heat liquids that the thicker parts are towards the outside of skin should be stirred before cooking. DENSITY Porous airy foods heat more quickly and evenly if spaced apart. Always take care when removing cling film from a fridge takes longer to be very hot. COVERING Cover foods with microwave cling film or a lid. For this reason cooking times...
... heating. SPACING Foods cook more quickly than food at room temperature. Do not heat liquids that the thicker parts are towards the outside of skin should be stirred before cooking. DENSITY Porous airy foods heat more quickly and evenly if spaced apart. Always take care when removing cling film from a fridge takes longer to be very hot. COVERING Cover foods with microwave cling film or a lid. For this reason cooking times...
Operation Manual
Page 26
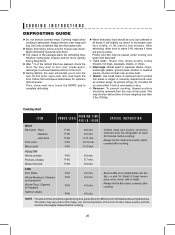
..., open oven door and check the food. Always remove outer wrap and tray. Use only containers that are any icy areas. Begin defrosting roasts fat-side-down . This may wish to turn the over : Roast, ribs, whole poultry, turkey breasts, hot dogs, sausages, steaks, or chops. Medium - POULTRY Whole chicken Portions chicken Breast (boned) P-HI P-80 P-80 4-9 min. 5-7 min. 6-8 min. COOKING INSTRUCTIONS DEFROSTING GUIDE...
..., open oven door and check the food. Always remove outer wrap and tray. Use only containers that are any icy areas. Begin defrosting roasts fat-side-down . This may wish to turn the over : Roast, ribs, whole poultry, turkey breasts, hot dogs, sausages, steaks, or chops. Medium - POULTRY Whole chicken Portions chicken Breast (boned) P-HI P-80 P-80 4-9 min. 5-7 min. 6-8 min. COOKING INSTRUCTIONS DEFROSTING GUIDE...

Operation Manual
Page 28
... COOKING INSTRUCTIONS VEGETABLE CHART Use a suitable glass pyrex bowl with salt and pepper. Hint : cut , the quicker they will cook. All vegetables should be cooked using full microwave power. Cut big florets into slices. Cut courgettes into halves. Drain before serving. Weigh the peeled potatoes and cut them into small slices. Add 30ml(2 tbsp.) cold water. Add 60-75ml(5-6tbsp.) water. Prepare even sized...
... COOKING INSTRUCTIONS VEGETABLE CHART Use a suitable glass pyrex bowl with salt and pepper. Hint : cut , the quicker they will cook. All vegetables should be cooked using full microwave power. Cut big florets into slices. Cut courgettes into halves. Drain before serving. Weigh the peeled potatoes and cut them into small slices. Add 30ml(2 tbsp.) cold water. Add 60-75ml(5-6tbsp.) water. Prepare even sized...


