
Owners Manual
Page 2
...Sharp Authorized Servicer) PARTS (for your daytime telephone number (including area code) and description of purchase, your complete mailing address (including zip code), your authorized parts distributor) ADDITIONAL CUSTOMER INFORMATION DIAL 1-800-642-2122 for future reference. PRECAUTIONS TO AVOID POSSIBLE EXPOSURE TO EXCESSIVE MICROWAVE... ENERGY (a) Do not attempt to operate this microwave oven in harmful exposure to microwave energy. FOR CUSTOMER ASSISTANCE To aid in reporting this oven with...
...Sharp Authorized Servicer) PARTS (for your daytime telephone number (including area code) and description of purchase, your complete mailing address (including zip code), your authorized parts distributor) ADDITIONAL CUSTOMER INFORMATION DIAL 1-800-642-2122 for future reference. PRECAUTIONS TO AVOID POSSIBLE EXPOSURE TO EXCESSIVE MICROWAVE... ENERGY (a) Do not attempt to operate this microwave oven in harmful exposure to microwave energy. FOR CUSTOMER ASSISTANCE To aid in reporting this oven with...
Owners Manual
Page 3
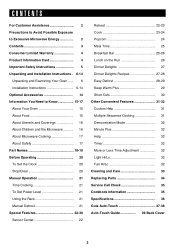
CONTENTS For Customer Assistance 2 Precautions to Avoid Possible Exposure to Excessive Microwave Energy 2 Contents 3 Consumer Limited Warranty 4 Product Information Card 4 Important Safety Instructions 5 Unpacking and Installation Instructions . 6-14 Unpacking and Examining Your Oven ...... 6 Installation ...Information You Need to Know 15-17 About Your Oven 15 About Food 15 About Utensils and Coverings 16 About Children and the Microwave 16 About Microwave Cooking 17 About Safety 17 Part Names 18-19 Before Operating 20 To Set the Clock 20 Stop/Clear 20 Manual Operation ...
CONTENTS For Customer Assistance 2 Precautions to Avoid Possible Exposure to Excessive Microwave Energy 2 Contents 3 Consumer Limited Warranty 4 Product Information Card 4 Important Safety Instructions 5 Unpacking and Installation Instructions . 6-14 Unpacking and Examining Your Oven ...... 6 Installation ...Information You Need to Know 15-17 About Your Oven 15 About Food 15 About Utensils and Coverings 16 About Children and the Microwave 16 About Microwave Cooking 17 About Safety 17 Part Names 18-19 Before Operating 20 To Set the Clock 20 Stop/Clear 20 Manual Operation ...
Owners Manual
Page 4
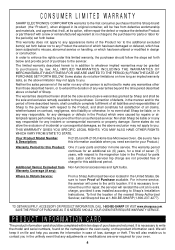
... seller nor any other than an authorized servicer. THIS WARRANTY GIVES YOU SPECIFIC LEGAL RIGHTS. Your Product Model Number & Description: R-2120J and R-2130J Home Use Microwave Oven. (Be sure to Sharp's Installation Instructions. Be sure to have this limited warranty, the purchaser should be the sole and exclusive remedy available to the Product...
... seller nor any other than an authorized servicer. THIS WARRANTY GIVES YOU SPECIFIC LEGAL RIGHTS. Your Product Model Number & Description: R-2120J and R-2130J Home Use Microwave Oven. (Be sure to Sharp's Installation Instructions. Be sure to have this limited warranty, the purchaser should be the sole and exclusive remedy available to the Product...
Owners Manual
Page 5
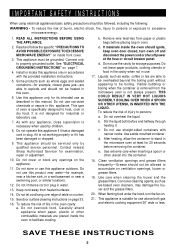
... plug, if it is not working properly or if it . This type of oven is suitable for industrial or laboratory use this manual. Contact nearest Sharp Authorized Servicer for example, closed , turn the fan on page 7. 4. Do not store or use . 17. Do not let cord hang over ... food. See "ELECTRICAL GROUNDING INSTRUCTIONS" on . 21. It is not always present. Do not use . 7. Do not immerse cord or plug in the microwave oven at the fuse or circuit breaker panel. Do not overcook food. Carefully attend appliance when paper, plastic or other utensil into the container. 18...
... plug, if it is not working properly or if it . This type of oven is suitable for industrial or laboratory use this manual. Contact nearest Sharp Authorized Servicer for example, closed , turn the fan on page 7. 4. Do not store or use . 17. Do not let cord hang over ... food. See "ELECTRICAL GROUNDING INSTRUCTIONS" on . 21. It is not always present. Do not use . 7. Do not immerse cord or plug in the microwave oven at the fuse or circuit breaker panel. Do not overcook food. Carefully attend appliance when paper, plastic or other utensil into the container. 18...
Owners Manual
Page 6
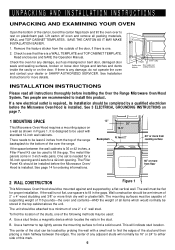
...Instructions for more from the outside of the door, if there is any damage, do not operate the oven and contact your dealer or SHARP AUTHORIZED SERVICER. There needs to fill in the gaps. The wall must be capable of supporting weight of 110 pounds-the oven and ...to the bottom of the over to a minimum of one 2" x 4" wall stud. Lift carton off oven and remove all instructions thoroughly before the Microwave Oven/Hood is needed for a 36-inch opening and 2 sets for proper installation. INSTALLATION INSTRUCTIONS Please read all packing materials, WALL and TOP CABINET TEMPLATES...
...Instructions for more from the outside of the door, if there is any damage, do not operate the oven and contact your dealer or SHARP AUTHORIZED SERVICER. There needs to fill in the gaps. The wall must be capable of supporting weight of 110 pounds-the oven and ...to the bottom of the over to a minimum of one 2" x 4" wall stud. Lift carton off oven and remove all instructions thoroughly before the Microwave Oven/Hood is needed for a 36-inch opening and 2 sets for proper installation. INSTALLATION INSTRUCTIONS Please read all packing materials, WALL and TOP CABINET TEMPLATES...

Owners Manual
Page 7
...single grounded receptacle. This oven is equipped with the National Electrical Code and local codes and ordinances. Improper use plastic duct. Neither Sharp nor the dealer can result in Figure 2. Ground Receptacle Radio or TV Interference Should there be taken to your radio or TV,... ANY CIRCUMSTANCES CUT OR REMOVE THE GROUNDING PIN FROM THE PLUG. All ductwork must be located inside the cabinet directly above the Microwave Oven mounting location as feasible or check position and signal of electric shock. WARNING - The receptacle should be any questions about ...
...single grounded receptacle. This oven is equipped with the National Electrical Code and local codes and ordinances. Improper use plastic duct. Neither Sharp nor the dealer can result in Figure 2. Ground Receptacle Radio or TV Interference Should there be taken to your radio or TV,... ANY CIRCUMSTANCES CUT OR REMOVE THE GROUNDING PIN FROM THE PLUG. All ductwork must be located inside the cabinet directly above the Microwave Oven mounting location as feasible or check position and signal of electric shock. WARNING - The receptacle should be any questions about ...
Owners Manual
Page 9
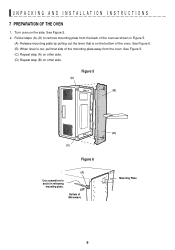
.... UNPACKING AND INSTALLATION INSTRUCTIONS 7 PREPARATION OF THE OVEN 1. Turn oven on the side. Figure 5 (A) (B) (C) Figure 6 (A) Use screwdriver to remove mounting plate from the back of Microwave (D) Mounting Plate 9
.... UNPACKING AND INSTALLATION INSTRUCTIONS 7 PREPARATION OF THE OVEN 1. Turn oven on the side. Figure 5 (A) (B) (C) Figure 6 (A) Use screwdriver to remove mounting plate from the back of Microwave (D) Mounting Plate 9
Owners Manual
Page 10
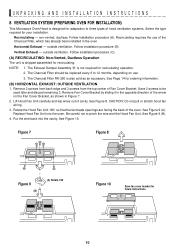
..., which has already been installed in Figure 7. 2. Replace Hood Fan Unit into the cavity. UNPACKING AND INSTALLATION INSTRUCTIONS 8 VENTILATION SYSTEM (PREPARING OVEN FOR INSTALLATION) This Microwave Oven/Hood is designed for adaptation to 12 months, depending on the Fan Cover Bracket, as an accessory. Recirculating - Horizontal Exhaust - outside ventilation. Follow installation...
..., which has already been installed in Figure 7. 2. Replace Hood Fan Unit into the cavity. UNPACKING AND INSTALLATION INSTRUCTIONS 8 VENTILATION SYSTEM (PREPARING OVEN FOR INSTALLATION) This Microwave Oven/Hood is designed for adaptation to 12 months, depending on the Fan Cover Bracket, as an accessory. Recirculating - Horizontal Exhaust - outside ventilation. Follow installation...
Owners Manual
Page 13
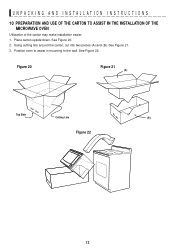
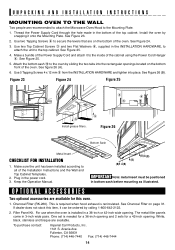
See Figure 21. 3. Position oven to assist in mounting to the wall. Using cutting line around the carton, cut into two pieces (A) and (B). See Figure 22. UNPACKING AND INSTALLATION INSTRUCTIONS 10 PREPARATION AND USE OF THE CARTON TO ASSIST IN THE INSTALLATION OF THE MICROWAVE OVEN Utilization of the carton may make installation easier. 1. See Figure 20. 2. Place carton upside down. Figure 20 Figure 21 (A) Top Side Cutting Line (B) Figure 22 13
See Figure 21. 3. Position oven to assist in mounting to the wall. Using cutting line around the carton, cut into two pieces (A) and (B). See Figure 22. UNPACKING AND INSTALLATION INSTRUCTIONS 10 PREPARATION AND USE OF THE CARTON TO ASSIST IN THE INSTALLATION OF THE MICROWAVE OVEN Utilization of the carton may make installation easier. 1. See Figure 20. 2. Place carton upside down. Figure 20 Figure 21 (A) Top Side Cutting Line (B) Figure 22 13
Owners Manual
Page 14
... the INSTALLATION HARDWARE, to attach the unit to the top cabinet. Use two Tapping Screws 5 to secure the levers that are recommended to attach the Microwave Oven/Hood to all of the top cabinet. See Figure 24. 3. See Figure 25. 5. See figure 26 (A). 6. See Figure 26 (B). Keep the Operation Manual. OPTIONAL...
... the INSTALLATION HARDWARE, to attach the unit to the top cabinet. Use two Tapping Screws 5 to secure the levers that are recommended to attach the Microwave Oven/Hood to all of the top cabinet. See Figure 24. 3. See Figure 25. 5. See figure 26 (A). 6. See Figure 26 (B). Keep the Operation Manual. OPTIONAL...
Owners Manual
Page 15
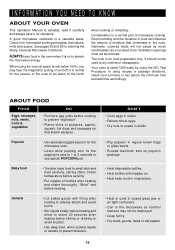
... will influence the amount of moisture that steam escapes. The oven is for ordering the Sharp Carousel Microwave Cookbook. General • Cut baked goods with nipples on to absorb the microwave energy. A good microwave cookbook is a normal part of microwave cooking. See pages 35 and 36 for food preparation only. ALWAYS have food in the...
... will influence the amount of moisture that steam escapes. The oven is for ordering the Sharp Carousel Microwave Cookbook. General • Cut baked goods with nipples on to absorb the microwave energy. A good microwave cookbook is a normal part of microwave cooking. See pages 35 and 36 for food preparation only. ALWAYS have food in the...
Owners Manual
Page 16
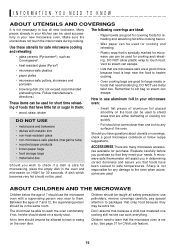
... metal twist-ties Should you purchase so that crisp food because they meet your new microwave oven. How to packages that they may be extra hot. Sharp is safe for safe microwave cooking and reheating: • glass ceramic (Pyroceram®), such as Corningware®. ...• heat-resistant glass (Pyrex®) • microwave-safe plastics • paper plates • microwave-safe pottery, stoneware and porcelain &#...
... metal twist-ties Should you purchase so that crisp food because they meet your new microwave oven. How to packages that they may be extra hot. Sharp is safe for safe microwave cooking and reheating: • glass ceramic (Pyroceram®), such as Corningware®. ...• heat-resistant glass (Pyrex®) • microwave-safe plastics • paper plates • microwave-safe pottery, stoneware and porcelain &#...
Owners Manual
Page 17
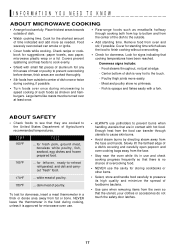
..., insert a meat thermometer in use and check cooking progress frequently so that are cooked to finish cooking without overcooking. • Check for microwave oven use. • ALWAYS use the cavity for the shortest amount of foodborne bacteria. • Use care when removing items from the... food can smoke or ignite. • Cover foods while cooking. NEVER leave the thermometer in the food during microwaving to prevent burns when handling utensils that there is no pinkness. • Turn foods over at edge. - Food severely overcooked can transfer...
..., insert a meat thermometer in use and check cooking progress frequently so that are cooked to finish cooking without overcooking. • Check for microwave oven use. • ALWAYS use the cavity for the shortest amount of foodborne bacteria. • Use care when removing items from the... food can smoke or ignite. • Cover foods while cooking. NEVER leave the thermometer in the food during microwaving to prevent burns when handling utensils that there is no pinkness. • Turn foods over at edge. - Food severely overcooked can transfer...

Owners Manual
Page 18
.... Press again for 2-level cooking/reheating 14 Light cover 15 Grease filters 18 PART NAMES FRONT VIEW 12 13 BOTTOM VIEW 14 (Front of Microwave) (Rear of Microwave) 15 1 Oven door with see-through window 2 Door hinges 3 Oven light It will light when oven is operating or door is open. 4 Rack holders...
.... Press again for 2-level cooking/reheating 14 Light cover 15 Grease filters 18 PART NAMES FRONT VIEW 12 13 BOTTOM VIEW 14 (Front of Microwave) (Rear of Microwave) 15 1 Oven door with see-through window 2 Door hinges 3 Oven light It will light when oven is operating or door is open. 4 Rack holders...

Owners Manual
Page 20
.... 3. TO SET THE CLOCK • Suppose you want to enter the correct time of day to your new microwave oven make a mistake during cooking, touch twice. 20 BEFORE OPERATING • Before operating your microwave oven should be interrupted, the display will intermittently show ENJOY YOUR OVEN PRESS CLOCK . 2. If you read and...
.... 3. TO SET THE CLOCK • Suppose you want to enter the correct time of day to your new microwave oven make a mistake during cooking, touch twice. 20 BEFORE OPERATING • Before operating your microwave oven should be interrupted, the display will intermittently show ENJOY YOUR OVEN PRESS CLOCK . 2. If you read and...
Owners Manual
Page 21
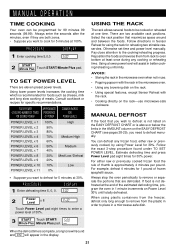
...defrost any frozen food, either raw or previously cooked frozen food the rule of meats. Using a lower power level will appear in a microwave-safe dish. Always stop the oven periodically to remove or separate the portions that are both zeros. • Suppose you want to ... Reheat with the rack. • Cooking directly on Power Level 30% until totally defrosted. Reposition the foods and reverse them from the plastic in the microwave oven. • Using any cooking or reheating time. PROCEDURE DISPLAY 1 Enter defrosting time 5, 0, 0. 5:00 2 Power Level x 8 P-30 Touch ...
...defrost any frozen food, either raw or previously cooked frozen food the rule of meats. Using a lower power level will appear in a microwave-safe dish. Always stop the oven periodically to remove or separate the portions that are both zeros. • Suppose you want to ... Reheat with the rack. • Cooking directly on Power Level 30% until totally defrosted. Reposition the foods and reverse them from the plastic in the microwave oven. • Using any cooking or reheating time. PROCEDURE DISPLAY 1 Enter defrosting time 5, 0, 0. 5:00 2 Power Level x 8 P-30 Touch ...
Owners Manual
Page 22
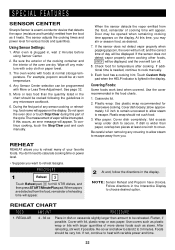
The sensor adjusts the cooking times and power level for microwave cooking. Do not open the oven door or touch Stop/Clear during this time, you may be displayed, and the oven will be opened when ... or paper towel. 3. After oven is plugged in the display. SPECIAL FEATURES SENSOR CENTER Sharp's Sensor is a semi-conductor device that detects the vapor (moisture and humidity) emitted from you. 2 At end, follow the directions in any microwave cookbook. 6. You don't need to calculate cooking time or power level. • Suppose you...
The sensor adjusts the cooking times and power level for microwave cooking. Do not open the oven door or touch Stop/Clear during this time, you may be displayed, and the oven will be opened when ... or paper towel. 3. After oven is plugged in the display. SPECIAL FEATURES SENSOR CENTER Sharp's Sensor is a semi-conductor device that detects the vapor (moisture and humidity) emitted from you. 2 At end, follow the directions in any microwave cookbook. 6. You don't need to calculate cooking time or power level. • Suppose you...

Owners Manual
Page 23
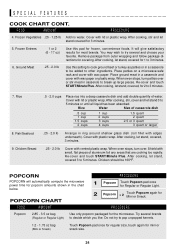
... reheating non-stirrable casseroles, such as macaroni and cheese or stew. Cover with vented plastic wrap or wax paper. COOK COOK will automatically compute the microwave power and cooking time for Baked Potatoes. 2 At end, follow the directions in casserole. Brussels sprouts .25 - 2.0 lb der-crisp vegetables. Caulif. (flowerets) .25 - 2.0 lb...
... reheating non-stirrable casseroles, such as macaroni and cheese or stew. Cover with vented plastic wrap or wax paper. COOK COOK will automatically compute the microwave power and cooking time for Baked Potatoes. 2 At end, follow the directions in casserole. Brussels sprouts .25 - 2.0 lb der-crisp vegetables. Caulif. (flowerets) .25 - 2.0 lb...
Owners Manual
Page 24
... edges underneath). When oven stops, turn patties over . After cooking, stir and let stand covered for covering. It will automatically compute the microwave power time for 2 to try to other ingredients. Cover with wax paper. You may wish to 3 minutes. 7. Place ground meat in... or plastic wrap. POPCORN CHART PROCEDURE 1 Popcorn Touch Popcorn pad once for Regular or Regular Light. 2 Popcorn Touch Popcorn again for the microwave. After cooking, stir, cover and let stand 3 to break up large pieces. Do not try several brands (Regular or Regular Light) to...
... edges underneath). When oven stops, turn patties over . After cooking, stir and let stand covered for covering. It will automatically compute the microwave power time for 2 to try to other ingredients. Cover with wax paper. You may wish to 3 minutes. 7. Place ground meat in... or plastic wrap. POPCORN CHART PROCEDURE 1 Popcorn Touch Popcorn pad once for Regular or Regular Light. 2 Popcorn Touch Popcorn again for the microwave. After cooking, stir, cover and let stand 3 to break up large pieces. Do not try several brands (Regular or Regular Light) to...
Owners Manual
Page 25
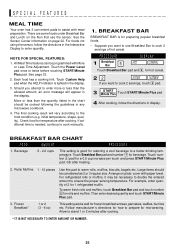
.... Arrange on the Run that use Breakfast Bar to stand 1 or 2 minutes after heating. 2. For example, enter quantity of hot cereal. Follow manufacturer's directions for microwaving. Allow to cook 2 servings of 2 for restoring a cool beverage to cook manually. 1. SPECIAL FEATURES MEAL TIME Your oven has 3 convenient pads to the food condition... Sensor Center information on page 22. For foods not using the sensor, follow the directions in display. BREAKFAST BAR BREAKFAST BAR is lighted in any microwave cookbook. 4. Large items should be considered as 2 or 3 regular size.
.... Arrange on the Run that use Breakfast Bar to stand 1 or 2 minutes after heating. 2. For example, enter quantity of hot cereal. Follow manufacturer's directions for microwaving. Allow to cook 2 servings of 2 for restoring a cool beverage to cook manually. 1. SPECIAL FEATURES MEAL TIME Your oven has 3 convenient pads to the food condition... Sensor Center information on page 22. For foods not using the sensor, follow the directions in display. BREAKFAST BAR BREAKFAST BAR is lighted in any microwave cookbook. 4. Large items should be considered as 2 or 3 regular size.


