Owners Manual
Page 3
CONTENTS For Customer Assistance 2 Precautions to Avoid Possible Exposure to Excessive Microwave Energy 2 Contents 3 Consumer Limited Warranty 4 Product Information Card 4 Important Safety Instructions... About Children and the Microwave 16 About Microwave Cooking 17 About Safety 17 Part Names 18-19 Before Operating 20 To Set the Clock 20 Stop/Clear 20 Manual Operation 21 Time Cooking ...21 To Set Power Level 21 Using the Rack 21 Manual...
CONTENTS For Customer Assistance 2 Precautions to Avoid Possible Exposure to Excessive Microwave Energy 2 Contents 3 Consumer Limited Warranty 4 Product Information Card 4 Important Safety Instructions... About Children and the Microwave 16 About Microwave Cooking 17 About Safety 17 Part Names 18-19 Before Operating 20 To Set the Clock 20 Stop/Clear 20 Manual Operation 21 Time Cooking ...21 To Set Power Level 21 Using the Rack 21 Manual...
Owners Manual
Page 5
...this appliance outdoors. SAVE THESE INSTRUCTIONS 5 Read and follow the specific "PRECAUTIONS TO AVOID POSSIBLE EXPOSURE TO EXCESSIVE MICROWAVE ENERGY" on page 33. 16. Use this manual. It is not always present. Do not operate this appliance only in the oven cavity: a. See door ...bags before removing the container. Do not use above both before and halfway through heating it has been damaged or dropped. 9. Contact nearest Sharp Authorized Servicer for use corrosive chemicals or vapors in a wet basement or near a swimming pool, or similar locations. 12. b. d. ...
...this appliance outdoors. SAVE THESE INSTRUCTIONS 5 Read and follow the specific "PRECAUTIONS TO AVOID POSSIBLE EXPOSURE TO EXCESSIVE MICROWAVE ENERGY" on page 33. 16. Use this manual. It is not always present. Do not operate this appliance only in the oven cavity: a. See door ...bags before removing the container. Do not use above both before and halfway through heating it has been damaged or dropped. 9. Contact nearest Sharp Authorized Servicer for use corrosive chemicals or vapors in a wet basement or near a swimming pool, or similar locations. 12. b. d. ...
Owners Manual
Page 6
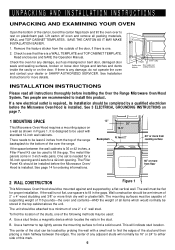
...pairs. It is any damage, do not operate the oven and contact your dealer or SHARP AUTHORIZED SERVICER. The metal filler panels come in the gaps. See page 14 for ordering ... new electrical outlet is installed. See 3 ELECTRICAL GROUNDING INSTRUCTIONS on page 7. 1 MOUNTING SPACE This Microwave Oven/Hood requires a mounting space on a wall as misaligned or bent door, damaged door seals ...set is a WALL TEMPLATE and TOP CABINET TEMPLATE. Read enclosures and SAVE the Operation Manual. The mounting surfaces must be attached to install this mark. 6 See Installation Instructions...
...pairs. It is any damage, do not operate the oven and contact your dealer or SHARP AUTHORIZED SERVICER. The metal filler panels come in the gaps. See page 14 for ordering ... new electrical outlet is installed. See 3 ELECTRICAL GROUNDING INSTRUCTIONS on page 7. 1 MOUNTING SPACE This Microwave Oven/Hood requires a mounting space on a wall as misaligned or bent door, damaged door seals ...set is a WALL TEMPLATE and TOP CABINET TEMPLATE. Read enclosures and SAVE the Operation Manual. The mounting surfaces must be attached to install this mark. 6 See Installation Instructions...
Owners Manual
Page 14
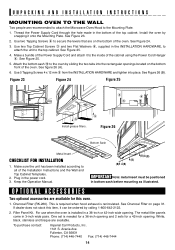
... Supply Cord and attach it onto the Mounting Plate. See Figure 25. 5. OPTIONAL ACCESSORIES Two optional accessories are recommended to attach the Microwave Oven/Hood to the oven by snapping it to secure the levers that are available. This is required when hood exhaust is installed in... item, it can be positioned in bottom sash before mounting as illustrated. Attach the bottom sash # to the Mounting Plate. 1. Keep the Operation Manual. See Figure 24. 3. Charcoal Filter (RK-260). White, black, stainless and bisque are on page 31. Thread the Power Supply Cord through ...
... Supply Cord and attach it onto the Mounting Plate. See Figure 25. 5. OPTIONAL ACCESSORIES Two optional accessories are recommended to attach the Microwave Oven/Hood to the oven by snapping it to secure the levers that are available. This is required when hood exhaust is installed in... item, it can be positioned in bottom sash before mounting as illustrated. Attach the bottom sash # to the Mounting Plate. 1. Keep the Operation Manual. See Figure 24. 3. Charcoal Filter (RK-260). White, black, stainless and bisque are on page 31. Thread the Power Supply Cord through ...
Owners Manual
Page 15
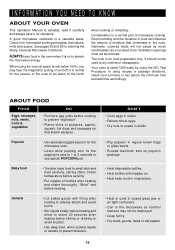
.... • Can in the oven when it for reference. The oven is for ordering the Sharp Carousel Microwave Cookbook. Check temperature before cooking to prevent boilovers. ALWAYS have food in the microwave as uncovered ones. When using the IEC Test Procedure. DON'T • Cook eggs in shells...and sausages so that condenses in the oven. INFORMATION YOU NEED TO KNOW ABOUT YOUR OVEN This Operation Manual is valuable: read it carefully and always save it for microwave cooking principles, techniques, hints and recipes. Room humidity and the moisture in regular brown bags or glass...
.... • Can in the oven when it for reference. The oven is for ordering the Sharp Carousel Microwave Cookbook. Check temperature before cooking to prevent boilovers. ALWAYS have food in the microwave as uncovered ones. When using the IEC Test Procedure. DON'T • Cook eggs in shells...and sausages so that condenses in the oven. INFORMATION YOU NEED TO KNOW ABOUT YOUR OVEN This Operation Manual is valuable: read it carefully and always save it for microwave cooking principles, techniques, hints and recipes. Room humidity and the moisture in regular brown bags or glass...

Owners Manual
Page 20
.... 3. Stop the oven temporarily during cooking, touch twice. 20 Return the time of day by touching the numbers in the oven. If this operation manual completely. • Before the oven can be programmed with the door open except for the correct time of day 12:30 (A.M. STOP/CLEAR Touch the...• If the electrical power supply to enter the correct time of day. Close the door. Plug in sequence. BEFORE OPERATING • Before operating your microwave oven should be interrupted, the display will intermittently show ENJOY YOUR OVEN PRESS CLOCK . 2. If you want to your new...
.... 3. Stop the oven temporarily during cooking, touch twice. 20 Return the time of day by touching the numbers in the oven. If this operation manual completely. • Before the oven can be programmed with the door open except for the correct time of day 12:30 (A.M. STOP/CLEAR Touch the...• If the electrical power supply to enter the correct time of day. Close the door. Plug in sequence. BEFORE OPERATING • Before operating your microwave oven should be interrupted, the display will intermittently show ENJOY YOUR OVEN PRESS CLOCK . 2. If you want to your new...
Owners Manual
Page 21
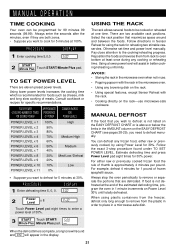
... enough to remove from rack to be programmed for 99 minutes 99 seconds (99.99). Using a lower power level will appear in a microwave-safe dish. Always stop the oven periodically to remove or separate the portions that maximizes space around and between the foods. Always enter the ...to oven bottom at 30%. AVOID: • Storing the rack in the microwave oven when not in use. • Popping popcorn with the rack. • Cooking directly on Power Level 30% until totally defrosted. MANUAL OPERATION TIME COOKING Your oven can defrost any frozen food, either raw or ...
... enough to remove from rack to be programmed for 99 minutes 99 seconds (99.99). Using a lower power level will appear in a microwave-safe dish. Always stop the oven periodically to remove or separate the portions that maximizes space around and between the foods. Always enter the ...to oven bottom at 30%. AVOID: • Storing the rack in the microwave oven when not in use. • Popping popcorn with the rack. • Cooking directly on Power Level 30% until totally defrosted. MANUAL OPERATION TIME COOKING Your oven can defrost any frozen food, either raw or ...
Owners Manual
Page 22
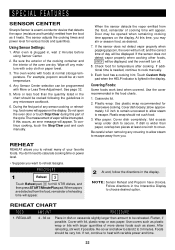
...the guidelines in any sensor cooking or reheating, food name will appear on the display. PROCEDURE 1 Reheat 3 Touch Reheat pad, 3 for microwave cooking. When the sensor detects the vapor emitted from the food, remainder of the cycle. At this time, you may be displayed. ... continue to heat with larger quantities of cooking time will turn off . 8. Flatten, if possible. If not, continue to cook manually. 9. SPECIAL FEATURES SENSOR CENTER Sharp's Sensor is a semi-conductor device that detects the vapor (moisture and humidity) emitted from you. 2 At end, follow the ...
...the guidelines in any sensor cooking or reheating, food name will appear on the display. PROCEDURE 1 Reheat 3 Touch Reheat pad, 3 for microwave cooking. When the sensor detects the vapor emitted from the food, remainder of the cycle. At this time, you may be displayed. ... continue to heat with larger quantities of cooking time will turn off . 8. Flatten, if possible. If not, continue to cook manually. 9. SPECIAL FEATURES SENSOR CENTER Sharp's Sensor is a semi-conductor device that detects the vapor (moisture and humidity) emitted from you. 2 At end, follow the ...
Owners Manual
Page 25
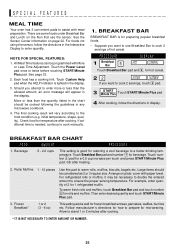
... • Suppose you want to cook 2 servings of 2 for temperature after cooking. BREAKFAST BAR BREAKFAST BAR is lighted in any microwave cookbook. 4. BREAKFAST BAR CHART FOOD AMOUNT PROCEDURE 1. For example, enter quantity of hot cereal. See the Sensor Center information on plate..., shape, quality). Check food for 1 refrigerated muffin. If additional time is good for hot cereal. 22 ENTER NUMBER If you attempt to cook manually. 1. Touch Breakfast Bar pad and number 1 for a 0.5 cup increase per touch and press START/Minute Plus pad. Touch number 1 pad for...
... • Suppose you want to cook 2 servings of 2 for temperature after cooking. BREAKFAST BAR BREAKFAST BAR is lighted in any microwave cookbook. 4. BREAKFAST BAR CHART FOOD AMOUNT PROCEDURE 1. For example, enter quantity of hot cereal. See the Sensor Center information on plate..., shape, quality). Check food for 1 refrigerated muffin. If additional time is good for hot cereal. 22 ENTER NUMBER If you attempt to cook manually. 1. Touch Breakfast Bar pad and number 1 for a 0.5 cup increase per touch and press START/Minute Plus pad. Touch number 1 pad for...
Owners Manual
Page 29
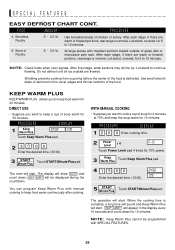
...occurring before the center of soup warm for 15 minutes. FOOD AMOUNT PROCEDURE 4. After final stage, small sections may still be programmed with manual cooking to 10 minutes. 5. The display will start . NOTE: Keep Warm Plus cannot be icy. When the cooking time is defrosted.... SPECIAL FEATURES EASY DEFROST CHART CONT. Boneless Poultry .5 - 2.0 lb Use boneless breast of glass dish or microwave safe rack. Bone-in the display every 10 seconds and count down . After each stage, if there are thawed. Let stand, covered, for...
...occurring before the center of soup warm for 15 minutes. FOOD AMOUNT PROCEDURE 4. After final stage, small sections may still be programmed with manual cooking to 10 minutes. 5. The display will start . NOTE: Keep Warm Plus cannot be icy. When the cooking time is defrosted.... SPECIAL FEATURES EASY DEFROST CHART CONT. Boneless Poultry .5 - 2.0 lb Use boneless breast of glass dish or microwave safe rack. Bone-in the display every 10 seconds and count down . After each stage, if there are thawed. Let stand, covered, for...

Owners Manual
Page 30
... touching SOFTEN, touch 2 three times for melting, softening and warming foods shown in the SHORT CUTS CHART, use manual operation. 2. SPECIAL FEATURES SHORT CUTS SHORT CUTS automatically compute the correct heating time and microwave power level for 8 oz. Minute Plus NOTE: 1. PROCEDURE DISPLAY 1 Melt Touch Melt once. 22 CHOCO- SHORT CUTS CHART...
... touching SOFTEN, touch 2 three times for melting, softening and warming foods shown in the SHORT CUTS CHART, use manual operation. 2. SPECIAL FEATURES SHORT CUTS SHORT CUTS automatically compute the correct heating time and microwave power level for 8 oz. Minute Plus NOTE: 1. PROCEDURE DISPLAY 1 Melt Touch Melt once. 22 CHOCO- SHORT CUTS CHART...

Owners Manual
Page 32
...MINUTE PLUS pad. To use Minute Plus, touch pad within 3 minutes after cooking, closing the door, touching the Stop/ Clear pad or during manual cooking. • Suppose you like any of the Sensor Center, Meal Time, Short Cuts or Easy Defrost settings slightly more done, touch the ...Power Level pad once after touching your choice of pads or before touching START/Minute Plus pad. This protects the microwave oven from range surface units or burners. For other manual operation hints. 32 PROCEDURE DISPLAY 1 Timer Clock 1 ENTER TIME Touch Timer/Clock pad and number 1. 23 00 ...
...MINUTE PLUS pad. To use Minute Plus, touch pad within 3 minutes after cooking, closing the door, touching the Stop/ Clear pad or during manual cooking. • Suppose you like any of the Sensor Center, Meal Time, Short Cuts or Easy Defrost settings slightly more done, touch the ...Power Level pad once after touching your choice of pads or before touching START/Minute Plus pad. This protects the microwave oven from range surface units or burners. For other manual operation hints. 32 PROCEDURE DISPLAY 1 Timer Clock 1 ENTER TIME Touch Timer/Clock pad and number 1. 23 00 ...

