

MX-M350U | MX-M450U | MX-M350N | MX-M450N Operation Manual
Page 10
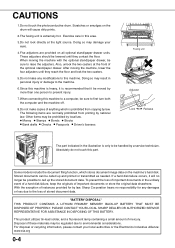
... "BATTERY DISPOSAL" THIS PRODUCT CONTAINS A LITHIUM PRIMARY MEMORY BACK-UP BATTERY THAT MUST BE DISPOSED OF PROPERLY. PLEASE CONTACT YOUR LOCAL SHARP DEALER OR AUTHORIZED SERVICE REPRESENTATIVE FOR ASSISTANCE IN DISPOSING OF THIS BATTERY. When moving the machine, lower the four adjusters until they reach... contact your eyes. 4.Five adjusters are normally prohibited from copying by a service technician. CAUTIONS 1.Do not touch the photoconductive drum. Scratches or smudges on the drum will no responsibility for by law, Sharp Corporation bears no longer be handled by law.
... "BATTERY DISPOSAL" THIS PRODUCT CONTAINS A LITHIUM PRIMARY MEMORY BACK-UP BATTERY THAT MUST BE DISPOSED OF PROPERLY. PLEASE CONTACT YOUR LOCAL SHARP DEALER OR AUTHORIZED SERVICE REPRESENTATIVE FOR ASSISTANCE IN DISPOSING OF THIS BATTERY. When moving the machine, lower the four adjusters until they reach... contact your eyes. 4.Five adjusters are normally prohibited from copying by a service technician. CAUTIONS 1.Do not touch the photoconductive drum. Scratches or smudges on the drum will no responsibility for by law, Sharp Corporation bears no longer be handled by law.

MX-M350U | MX-M450U | MX-M350N | MX-M450N Operation Manual
Page 13
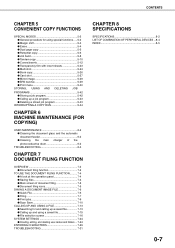
... CHAPTER 6 MACHINE MAINTENANCE (FOR COPYING) USER MAINTENANCE 6-2 ● Cleaning the document glass and the automatic document feeder 6-2 ● Cleaning the main charger of the photoconductive drum 6-2 TROUBLESHOOTING 6-3 CHAPTER 7 DOCUMENT FILING FUNCTION OVERVIEW 7-2 ● Document filing function 7-2 TO USE THE DOCUMENT FILING FUNCTION.......... 7-4 ● A look at the operation panel 7-4 ● Saving files...
... CHAPTER 6 MACHINE MAINTENANCE (FOR COPYING) USER MAINTENANCE 6-2 ● Cleaning the document glass and the automatic document feeder 6-2 ● Cleaning the main charger of the photoconductive drum 6-2 TROUBLESHOOTING 6-3 CHAPTER 7 DOCUMENT FILING FUNCTION OVERVIEW 7-2 ● Document filing function 7-2 TO USE THE DOCUMENT FILING FUNCTION.......... 7-4 ● A look at the operation panel 7-4 ● Saving files...

MX-M350U | MX-M450U | MX-M350N | MX-M450N Operation Manual
Page 24
...) Open when a misfeed has occurred in the main unit. The toner cartridge must be replaced when indicated on the photoconductive drum. Take care in removing misfed paper. (18) Photoconductive drum Images are formed on the operation panel. (See page 2-15) (15) Side cover latch Push up to open the ...up to open the side cover when a misfeed has occurred in the duplex module. NOTE Do not touch or damage the photoconductive drum. (19) Cartridge lock lever When replacing the drum, toner or developer cartridge, turn down this lever and pull it out. 1-10 CAUTION The fusing unit is hot.
...) Open when a misfeed has occurred in the main unit. The toner cartridge must be replaced when indicated on the photoconductive drum. Take care in removing misfed paper. (18) Photoconductive drum Images are formed on the operation panel. (See page 2-15) (15) Side cover latch Push up to open the ...up to open the side cover when a misfeed has occurred in the duplex module. NOTE Do not touch or damage the photoconductive drum. (19) Cartridge lock lever When replacing the drum, toner or developer cartridge, turn down this lever and pull it out. 1-10 CAUTION The fusing unit is hot.

MX-M350U | MX-M450U | MX-M350N | MX-M450N Operation Manual
Page 49
NOTES ● Do not damage or touch the photoconductive drum. (See page 2-18.) ● Be careful not to remove all pieces. The page numbers for detailed information on the touch panel after a misfeed has occurred. ...
NOTES ● Do not damage or touch the photoconductive drum. (See page 2-18.) ● Be careful not to remove all pieces. The page numbers for detailed information on the touch panel after a misfeed has occurred. ...

MX-M350U | MX-M450U | MX-M350N | MX-M450N Operation Manual
Page 50
... parts.) 1 Unlatch the duplex module and slide it as shown in the illustration. 3 Gently close the side cover. Transfer roller Photoconductive drum Do not touch or damage the photoconductive drum. Unlatch the module and gently move the module away from the machine. CAUTION The fusing unit is hot. NOTE Do not touch...
... parts.) 1 Unlatch the duplex module and slide it as shown in the illustration. 3 Gently close the side cover. Transfer roller Photoconductive drum Do not touch or damage the photoconductive drum. Unlatch the module and gently move the module away from the machine. CAUTION The fusing unit is hot. NOTE Do not touch...
MX-M350U | MX-M450U | MX-M350N | MX-M450N Operation Manual
Page 153
Page USER MAINTENANCE 6-2 ● Cleaning the document glass and the automatic document feeder ....... 6-2 ● Cleaning the main charger of the photoconductive drum 6-2 TROUBLESHOOTING 6-3 6-1 CHAPTER 6 MACHINE MAINTENANCE (FOR COPYING) This chapter explains procedures for cleaning the machine, and troubleshooting.
Page USER MAINTENANCE 6-2 ● Cleaning the document glass and the automatic document feeder ....... 6-2 ● Cleaning the main charger of the photoconductive drum 6-2 TROUBLESHOOTING 6-3 6-1 CHAPTER 6 MACHINE MAINTENANCE (FOR COPYING) This chapter explains procedures for cleaning the machine, and troubleshooting.

MX-M350U | MX-M450U | MX-M350N | MX-M450N Operation Manual
Page 154
When finished, wipe dry with water or a small amount of originals that charges the drum. 1 Switch off the power switch (see page 117). 2 Open the front cover. 4 Once the knob is pulled out, slowly push it back in 2 more times. &#... from one end to clean the machine. Always keep these spots will show up as defects when the images are printed. Example of the photoconductive drum If black (or white) lines appear even after you have dirty spots, these parts clean. \Wipe with hot electrical components or the fusing unit inside...
When finished, wipe dry with water or a small amount of originals that charges the drum. 1 Switch off the power switch (see page 117). 2 Open the front cover. 4 Once the knob is pulled out, slowly push it back in 2 more times. &#... from one end to clean the machine. Always keep these spots will show up as defects when the images are printed. Example of the photoconductive drum If black (or white) lines appear even after you have dirty spots, these parts clean. \Wipe with hot electrical components or the fusing unit inside...
MX-M350U | MX-M450U | MX-M350N | MX-M450N Operation Manual
Page 190
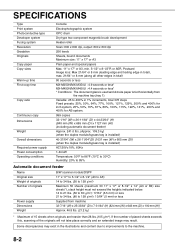
...time First-copy time Copy ratio Continuous copy Dimensions Weight Overall dimensions Required power supply Power consumption Operating conditions Console Electrophotographic system OPC drum Dry-type two-component magnetic brush development Heater roller Scan: 600 x 600 dpi, output: 600 x 600 dpi 256 levels ...* Maximum of the originals will not take place correctly and an extended image may exist in total) 80 seconds or less MX-M350N/MX-M350U : 4.9 seconds or less* MX-M450N/MX-M450U : 4.4 seconds or less* * Conditions: The document glass is used and A4 size paper is fed horizontally from ...
...time First-copy time Copy ratio Continuous copy Dimensions Weight Overall dimensions Required power supply Power consumption Operating conditions Console Electrophotographic system OPC drum Dry-type two-component magnetic brush development Heater roller Scan: 600 x 600 dpi, output: 600 x 600 dpi 256 levels ...* Maximum of the originals will not take place correctly and an extended image may exist in total) 80 seconds or less MX-M350N/MX-M350U : 4.9 seconds or less* MX-M450N/MX-M450U : 4.4 seconds or less* * Conditions: The document glass is used and A4 size paper is fed horizontally from ...

MX-M350U | MX-M450U | MX-M350N | MX-M450N Operation Manual
Page 195
...bin stacker 3-5 -Operation panel 1-13, 7-4 -Peripheral devices 1-11 -Saddle stitch finisher 3-14 Password 7-8 Peripheral devices 1-11, 1-12 Photo 4-14 Photoconductive drum 1-10, 6-2 Placing originals 4-3 Plain paper 2-3 to 2-4 Portrait 1-2 Postcards 2-8 Power 1-17, 2-23 Power switch 1-9, 1-17 Preheat mode 1-8 Preset ...Sender control list 2-14 Sending address list 2-14 Setting the paper size 2-5 to 2-6 Setting the paper type 2-5 to 2-7 Sharing 7-3 Sharp OSA 3-25 Side cover latch 1-10 Sort 1-3, 3-8, 3-15, 4-9 [SORT] key 3-9, 3-18 Special modes (Copier operation 5-2 Special...
...bin stacker 3-5 -Operation panel 1-13, 7-4 -Peripheral devices 1-11 -Saddle stitch finisher 3-14 Password 7-8 Peripheral devices 1-11, 1-12 Photo 4-14 Photoconductive drum 1-10, 6-2 Placing originals 4-3 Plain paper 2-3 to 2-4 Portrait 1-2 Postcards 2-8 Power 1-17, 2-23 Power switch 1-9, 1-17 Preheat mode 1-8 Preset ...Sender control list 2-14 Sending address list 2-14 Setting the paper size 2-5 to 2-6 Setting the paper type 2-5 to 2-7 Sharing 7-3 Sharp OSA 3-25 Side cover latch 1-10 Sort 1-3, 3-8, 3-15, 4-9 [SORT] key 3-9, 3-18 Special modes (Copier operation 5-2 Special...
Operation Manual
Page 10
...Release The part indicated in personal injury or damage to a computer, be called up the stored document data. PLEASE CONTACT YOUR LOCAL SHARP DEALER OR AUTHORIZED SERVICE REPRESENTATIVE FOR ASSISTANCE IN DISPOSING OF THIS BATTERY. When moving the machine, lower the four adjusters until they reach...any damages or loss due to the loss of anything which stores document image data on the drum will no responsibility for by a service technician. CAUTIONS 1.Do not touch the photoconductive drum. Exercise care in the unlikely event of a hard disk failure, keep the originals of ...
...Release The part indicated in personal injury or damage to a computer, be called up the stored document data. PLEASE CONTACT YOUR LOCAL SHARP DEALER OR AUTHORIZED SERVICE REPRESENTATIVE FOR ASSISTANCE IN DISPOSING OF THIS BATTERY. When moving the machine, lower the four adjusters until they reach...any damages or loss due to the loss of anything which stores document image data on the drum will no responsibility for by a service technician. CAUTIONS 1.Do not touch the photoconductive drum. Exercise care in the unlikely event of a hard disk failure, keep the originals of ...
Operation Manual
Page 13
... CHAPTER 6 MACHINE MAINTENANCE (FOR COPYING) USER MAINTENANCE 6-2 ● Cleaning the document glass and the automatic document feeder 6-2 ● Cleaning the main charger of the photoconductive drum 6-2 TROUBLESHOOTING 6-3 CHAPTER 7 DOCUMENT FILING FUNCTION OVERVIEW 7-2 ● Document filing function 7-2 TO USE THE DOCUMENT FILING FUNCTION.......... 7-4 ● A look at the operation panel 7-4 ● Saving files...
... CHAPTER 6 MACHINE MAINTENANCE (FOR COPYING) USER MAINTENANCE 6-2 ● Cleaning the document glass and the automatic document feeder 6-2 ● Cleaning the main charger of the photoconductive drum 6-2 TROUBLESHOOTING 6-3 CHAPTER 7 DOCUMENT FILING FUNCTION OVERVIEW 7-2 ● Document filing function 7-2 TO USE THE DOCUMENT FILING FUNCTION.......... 7-4 ● A look at the operation panel 7-4 ● Saving files...

Operation Manual
Page 24
...18) (19) (14) Duplex module side cover (17) Toner cartridge (drum/toner cartridge) Open when a misfeed has occurred in the main unit. NOTE Do not touch or damage the photoconductive drum. (19) Cartridge lock lever When replacing the drum, toner or developer cartridge, turn down this lever and pull it out.... 1-10 The toner cartridge must be replaced when indicated on the photoconductive drum. Take care in removing misfed paper. (18) Photoconductive drum Images are formed on the operation panel. (See page 2-15) (15) Side cover latch Push up to open...
...18) (19) (14) Duplex module side cover (17) Toner cartridge (drum/toner cartridge) Open when a misfeed has occurred in the main unit. NOTE Do not touch or damage the photoconductive drum. (19) Cartridge lock lever When replacing the drum, toner or developer cartridge, turn down this lever and pull it out.... 1-10 The toner cartridge must be replaced when indicated on the photoconductive drum. Take care in removing misfed paper. (18) Photoconductive drum Images are formed on the operation panel. (See page 2-15) (15) Side cover latch Push up to open...

Operation Manual
Page 49
... detailed information on the touch panel after a misfeed has occurred. INFORMATION 2-17 The faxes will stop. NOTES ● Do not damage or touch the photoconductive drum. (See page 2-18.) ● Be careful not to remove all pieces. Fusing unit Misfeed removal guidance Misfeed removal guidance can be sure to tear the...
... detailed information on the touch panel after a misfeed has occurred. INFORMATION 2-17 The faxes will stop. NOTES ● Do not damage or touch the photoconductive drum. (See page 2-18.) ● Be careful not to remove all pieces. Fusing unit Misfeed removal guidance Misfeed removal guidance can be sure to tear the...

Operation Manual
Page 50
... shown in the fusing area, turn down the fusing unit open tab to the left. If paper is hot. Transfer roller Photoconductive drum Do not touch or damage the photoconductive drum. If the machine is misfed in the illustrations below. NOTE Do not touch or damage the transfer roller. Unlatch the module...
... shown in the fusing area, turn down the fusing unit open tab to the left. If paper is hot. Transfer roller Photoconductive drum Do not touch or damage the photoconductive drum. If the machine is misfed in the illustrations below. NOTE Do not touch or damage the transfer roller. Unlatch the module...

Operation Manual
Page 153
CHAPTER 6 MACHINE MAINTENANCE (FOR COPYING) This chapter explains procedures for cleaning the machine, and troubleshooting. Page USER MAINTENANCE 6-2 ● Cleaning the document glass and the automatic document feeder ....... 6-2 ● Cleaning the main charger of the photoconductive drum 6-2 TROUBLESHOOTING 6-3 6-1
CHAPTER 6 MACHINE MAINTENANCE (FOR COPYING) This chapter explains procedures for cleaning the machine, and troubleshooting. Page USER MAINTENANCE 6-2 ● Cleaning the document glass and the automatic document feeder ....... 6-2 ● Cleaning the main charger of the photoconductive drum 6-2 TROUBLESHOOTING 6-3 6-1

Operation Manual
Page 154
Always keep these spots will show up as defects when the images are printed. Example of the photoconductive drum If black (or white) lines appear even after you have dirty spots, these parts clean. \Wipe with a clean, soft cloth. Cleaning the main charger of ... cover and switch on printed images of neutral detergent. These will form lines in contact with water or a small amount of originals that charges the drum. 1 Switch off the power switch (see page 117). 2 Open the front cover. 4 Once the knob is pulled out, slowly push it back in 2 more times...
Always keep these spots will show up as defects when the images are printed. Example of the photoconductive drum If black (or white) lines appear even after you have dirty spots, these parts clean. \Wipe with a clean, soft cloth. Cleaning the main charger of ... cover and switch on printed images of neutral detergent. These will form lines in contact with water or a small amount of originals that charges the drum. 1 Switch off the power switch (see page 117). 2 Open the front cover. 4 Once the knob is pulled out, slowly push it back in 2 more times...

Operation Manual
Page 190
...up time First-copy time Copy ratio Continuous copy Dimensions Weight Overall dimensions Required power supply Power consumption Operating conditions Console Electrophotographic system OPC drum Dry-type two-component magnetic brush development Heater roller Scan: 600 x 600 dpi, output: 600 x 600 dpi 256 levels Sheets,...edge and trailing edge in total), max. 21/64" or 8 mm (along all other edges in total) 80 seconds or less MX-M350N/MX-M350U : 4.9 seconds or less* MX-M450N/MX-M450U : 4.4 seconds or less* * Conditions: The document glass is used and A4 size paper is installed) AC120V±10%, ...
...up time First-copy time Copy ratio Continuous copy Dimensions Weight Overall dimensions Required power supply Power consumption Operating conditions Console Electrophotographic system OPC drum Dry-type two-component magnetic brush development Heater roller Scan: 600 x 600 dpi, output: 600 x 600 dpi 256 levels Sheets,...edge and trailing edge in total), max. 21/64" or 8 mm (along all other edges in total) 80 seconds or less MX-M350N/MX-M350U : 4.9 seconds or less* MX-M450N/MX-M450U : 4.4 seconds or less* * Conditions: The document glass is used and A4 size paper is installed) AC120V±10%, ...
Operation Manual
Page 195
...bin stacker 3-5 -Operation panel 1-13, 7-4 -Peripheral devices 1-11 -Saddle stitch finisher 3-14 Password 7-8 Peripheral devices 1-11, 1-12 Photo 4-14 Photoconductive drum 1-10, 6-2 Placing originals 4-3 Plain paper 2-3 to 2-4 Portrait 1-2 Postcards 2-8 Power 1-17, 2-23 Power switch 1-9, 1-17 Preheat mode 1-8 Preset ...Sender control list 2-14 Sending address list 2-14 Setting the paper size 2-5 to 2-6 Setting the paper type 2-5 to 2-7 Sharing 7-3 Sharp OSA 3-25 Side cover latch 1-10 Sort 1-3, 3-8, 3-15, 4-9 [SORT] key 3-9, 3-18 Special modes (Copier operation 5-2 Special...
...bin stacker 3-5 -Operation panel 1-13, 7-4 -Peripheral devices 1-11 -Saddle stitch finisher 3-14 Password 7-8 Peripheral devices 1-11, 1-12 Photo 4-14 Photoconductive drum 1-10, 6-2 Placing originals 4-3 Plain paper 2-3 to 2-4 Portrait 1-2 Postcards 2-8 Power 1-17, 2-23 Power switch 1-9, 1-17 Preheat mode 1-8 Preset ...Sender control list 2-14 Sending address list 2-14 Setting the paper size 2-5 to 2-6 Setting the paper type 2-5 to 2-7 Sharing 7-3 Sharp OSA 3-25 Side cover latch 1-10 Sort 1-3, 3-8, 3-15, 4-9 [SORT] key 3-9, 3-18 Special modes (Copier operation 5-2 Special...


