
Operation Manual
Page 6
... ● MISFEED IN THE BYPASS TRAY 30 ● MISFEED IN THE MACHINE 31 ● MISFEED IN TRAY 1 33 ● MISFEED IN TRAY 2 34 REPLACING THE TONER CARTRIDGE ........ 35 CHECKING THE TOTAL OUTPUT COUNT ... 36 CLEANING THE MACHINE 37 ● CLEANING THE DOCUMENT GLASS AND SPF/DOCUMENT COVER 37 ● CLEANING THE...
... ● MISFEED IN THE BYPASS TRAY 30 ● MISFEED IN THE MACHINE 31 ● MISFEED IN TRAY 1 33 ● MISFEED IN TRAY 2 34 REPLACING THE TONER CARTRIDGE ........ 35 CHECKING THE TOTAL OUTPUT COUNT ... 36 CLEANING THE MACHINE 37 ● CLEANING THE DOCUMENT GLASS AND SPF/DOCUMENT COVER 37 ● CLEANING THE...
Operation Manual
Page 8
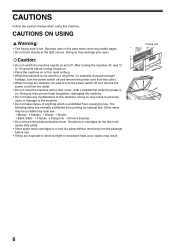
... which is prohibited from the package before turning it back on. • Place the machine on the drum will cause dirty prints. • Store spare toner cartridges in this area when removing misfed paper. • Do not look directly at the light source. After turning the machine off and remove the...
... which is prohibited from the package before turning it back on. • Place the machine on the drum will cause dirty prints. • Store spare toner cartridges in this area when removing misfed paper. • Do not look directly at the light source. After turning the machine off and remove the...
Operation Manual
Page 14
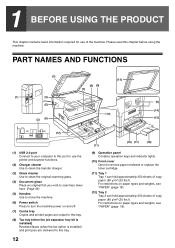
... tray. 12 (16) (17) (18) (11) (9) Operation panel Contains operation keys and indicator lights. (10) Front cover Open to remove paper misfeeds or replace the toner cartridge. (11) Tray 1 Tray 1 can hold approximately 250 sheets of the machine. PART NAMES AND FUNCTIONS (3) (13) (8) (9) (7) (1) (4) (5) (2) (6) (5) (14) (10) (15) (12) (1) USB 2.0 port Connect to...
... tray. 12 (16) (17) (18) (11) (9) Operation panel Contains operation keys and indicator lights. (10) Front cover Open to remove paper misfeeds or replace the toner cartridge. (11) Tray 1 Tray 1 can hold approximately 250 sheets of the machine. PART NAMES AND FUNCTIONS (3) (13) (8) (9) (7) (1) (4) (5) (2) (6) (5) (14) (10) (15) (12) (1) USB 2.0 port Connect to...

Operation Manual
Page 15
... out when feeding large paper such as A3 and B4 (11" x 17" and 8-1/2" x 14"). (19) Toner cartridge lock release lever To replace the toner cartridge, pull out the toner cartridge while pushing on this lever. (20) Toner cartridge Contains toner. (21) Document feeder tray (when the SPF is used. (28) Photoconductive drum Images are formed...
... out when feeding large paper such as A3 and B4 (11" x 17" and 8-1/2" x 14"). (19) Toner cartridge lock release lever To replace the toner cartridge, pull out the toner cartridge while pushing on this lever. (20) Toner cartridge Contains toner. (21) Document feeder tray (when the SPF is used. (28) Photoconductive drum Images are formed...

Operation Manual
Page 18
... until the misfed original is removed and the SPF is interrupted. A4 AUTO 100% A4 AUTO (5) (6) (7) * The display shown is the MX-M200D (when the optional RSPF is highlighted. When "AUTO" appears, the most suitable size of the original scanning mode will not be used after pressing...(2) (3) (4) Ready to 1-sided copy Centre erase copy Edge + Centre erase 2 in 1 copy Sort function 4 in the various modes of paper or toner, or when the drum cartridge reaches its replacement time. • If an original misfeed occurs in the SPF, printing will appear. : One-sided scanning in...
... until the misfed original is removed and the SPF is interrupted. A4 AUTO 100% A4 AUTO (5) (6) (7) * The display shown is the MX-M200D (when the optional RSPF is highlighted. When "AUTO" appears, the most suitable size of the original scanning mode will not be used after pressing...(2) (3) (4) Ready to 1-sided copy Centre erase copy Edge + Centre erase 2 in 1 copy Sort function 4 in the various modes of paper or toner, or when the drum cartridge reaches its replacement time. • If an original misfeed occurs in the SPF, printing will appear. : One-sided scanning in...
Operation Manual
Page 23
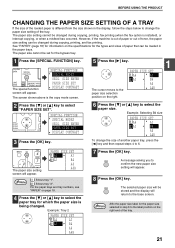
... information on page 18. 4 Press the [ ] or [ ] key to select the paper tray for which the paper size is out of paper or out of toner, the paper size setting can be set for the bypass tray. 1 Press the [SPECIAL FUNCTION] key. OK The selected paper size will be stored and...
... information on page 18. 4 Press the [ ] or [ ] key to select the paper tray for which the paper size is out of paper or out of toner, the paper size setting can be set for the bypass tray. 1 Press the [SPECIAL FUNCTION] key. OK The selected paper size will be stored and...
Operation Manual
Page 26
... of the original stops before it is not clear in the room flickers...27 INDICATORS AND DISPLAY MESSAGES 28 REMOVING MISFEEDS 29 REPLACING THE TONER CARTRIDGE 35 CHECKING THE TOTAL OUTPUT COUNT 36 CLEANING THE MACHINE 37 ADJUSTING THE DISPLAY CONTRAST 39 24 TROUBLESHOOTING MACHINE/COPYING PROBLEMS The machine ...The paper size used for each function. 2 TROUBLESHOOTING AND MAINTENANCE This chapter explains general troubleshooting and maintenance procedures such as removing misfeeds, replacing the toner cartridge, and cleaning the machine, as well as troubleshooting for the copy function.
... of the original stops before it is not clear in the room flickers...27 INDICATORS AND DISPLAY MESSAGES 28 REMOVING MISFEEDS 29 REPLACING THE TONER CARTRIDGE 35 CHECKING THE TOTAL OUTPUT COUNT 36 CLEANING THE MACHINE 37 ADJUSTING THE DISPLAY CONTRAST 39 24 TROUBLESHOOTING MACHINE/COPYING PROBLEMS The machine ...The paper size used for each function. 2 TROUBLESHOOTING AND MAINTENANCE This chapter explains general troubleshooting and maintenance procedures such as removing misfeeds, replacing the toner cartridge, and cleaning the machine, as well as troubleshooting for the copy function.

Operation Manual
Page 30
...If one of the following messages appears in the output tray (centre tray or top tray) has and press [OK]. Maintenance required. Check the toner cartridge. Remove paper from the actual size. (Page 21) Memory is time for service. reached the limit. The memory became full while scanning... the tray is required. "), turn off the power and then turn it back on. Press the [START] key ( ) to see if the toner cartridge has been installed properly. Turn off the power, and promptly contact your authorised service representative as icon) soon as instructed by the message. The...
...If one of the following messages appears in the output tray (centre tray or top tray) has and press [OK]. Maintenance required. Check the toner cartridge. Remove paper from the actual size. (Page 21) Memory is time for service. reached the limit. The memory became full while scanning... the tray is required. "), turn off the power and then turn it back on. Press the [START] key ( ) to see if the toner cartridge has been installed properly. Turn off the power, and promptly contact your authorised service representative as icon) soon as instructed by the message. The...
Operation Manual
Page 34
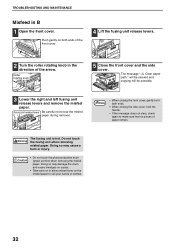
... to soil your hands or clothes. 32 Doing so may damage the drum and cause smudges on copies. • Take care not to allow unfixed toner on both ends. • When closing the side cover, hold the handle. • If the message does not clear, check again to tear the misfed...
... to soil your hands or clothes. 32 Doing so may damage the drum and cause smudges on copies. • Take care not to allow unfixed toner on both ends. • When closing the side cover, hold the handle. • If the message does not clear, check again to tear the misfed...

Operation Manual
Page 37
... During a long copy run or when copying originals with many dark areas, the message "Toner replenishment in the display, little toner remains and thus copies may still appear, indicating that the toner cartridge is correctly installed. • When closing the front cover, make sure that copying ... the cartridge on both ends. Grasp the hand grip when holding the cartridge. • Be sure to resume copying. • When the toner cartridge replacement required icon ( ) appears in progress." Obtain a replacement cartridge as soon as possible. Follow the steps below to leak from the...
... During a long copy run or when copying originals with many dark areas, the message "Toner replenishment in the display, little toner remains and thus copies may still appear, indicating that the toner cartridge is correctly installed. • When closing the front cover, make sure that copying ... the cartridge on both ends. Grasp the hand grip when holding the cartridge. • Be sure to resume copying. • When the toner cartridge replacement required icon ( ) appears in progress." Obtain a replacement cartridge as soon as possible. Follow the steps below to leak from the...
Operation Manual
Page 40
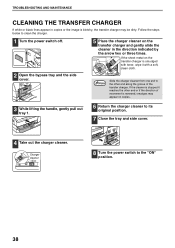
If the sheet metal on the transfer charger and gently slide the cleaner in copies or the image is smudged with toner, wipe it reaches the other end along the groove of the transfer charger. TROUBLESHOOTING AND MAINTENANCE CLEANING THE TRANSFER CHARGER If white or black lines ...
If the sheet metal on the transfer charger and gently slide the cleaner in copies or the image is smudged with toner, wipe it reaches the other end along the groove of the transfer charger. TROUBLESHOOTING AND MAINTENANCE CLEANING THE TRANSFER CHARGER If white or black lines ...

Operation Manual
Page 44
... following the termination of production. GENUINE SUPPLIES For best copying results, be considered as spare parts. Spare parts are paper and toner cartridge. Look for the Genuine Supplies label on end may break down within the scope of the ordinary use of the product ... following the termination of production. 42 Paper stored out of SHARP copiers. Consumables too, are designed, engineered and tested to maximize the life and performance of the wrapper or in packages standing on the toner package. PERIPHERAL DEVICES AND SUPPLIES STORAGE OF SUPPLIES Standard supplies...
... following the termination of production. GENUINE SUPPLIES For best copying results, be considered as spare parts. Spare parts are paper and toner cartridge. Look for the Genuine Supplies label on end may break down within the scope of the ordinary use of the product ... following the termination of production. 42 Paper stored out of SHARP copiers. Consumables too, are designed, engineered and tested to maximize the life and performance of the wrapper or in packages standing on the toner package. PERIPHERAL DEVICES AND SUPPLIES STORAGE OF SUPPLIES Standard supplies...

Operation Manual
Page 47
... use a size of multiple original pages, you are making copies, including selection of copies. If left -hand corner of the original with the tip of toner. Align the upper left open, parts outside of the original will be Note placed on the document glass. An original up to A3 (11" x 17...
... use a size of multiple original pages, you are making copies, including selection of copies. If left -hand corner of the original with the tip of toner. Align the upper left open, parts outside of the original will be Note placed on the document glass. An original up to A3 (11" x 17...

Operation Manual
Page 76
.... 2006) 590 mm (W) x 574 mm (D) (23-15/64" (W) x 22-38/64" (D)) MX-M160: MX-M160D: MX-M200D: Approx. 29.7 kg (65.5 lbs.) (Not including toner cartridge) Approx. 28.1 kg (61.9 lbs.) (Not including toner cartridge) Approx. 33.0 kg (72.8 lbs.) (Not including toner cartridge) MX-M160: MX-M160D: MX-M200D: 590 mm (W) x 574 mm (D) x 470 mm (H) (23-15/64" (W) x 22-38...
.... 2006) 590 mm (W) x 574 mm (D) (23-15/64" (W) x 22-38/64" (D)) MX-M160: MX-M160D: MX-M200D: Approx. 29.7 kg (65.5 lbs.) (Not including toner cartridge) Approx. 28.1 kg (61.9 lbs.) (Not including toner cartridge) Approx. 33.0 kg (72.8 lbs.) (Not including toner cartridge) MX-M160: MX-M160D: MX-M200D: 590 mm (W) x 574 mm (D) x 470 mm (H) (23-15/64" (W) x 22-38...
Operation Manual
Page 79
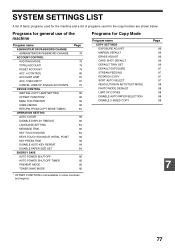
... POINT KEY PRESS TIME DISABLE AUTO KEY REPEAT DISABLE PAPER SIZE SET ENERGY SAVE AUTO POWER SHUT-OFF AUTO POWER SHUT-OFF TIMER PREHEAT MODE TONER SAVE MODE Page 76 79 79 79 80 81 81 81 82 82 82 82 83 83 83 83 83 84 84 84 84 84...
... POINT KEY PRESS TIME DISABLE AUTO KEY REPEAT DISABLE PAPER SIZE SET ENERGY SAVE AUTO POWER SHUT-OFF AUTO POWER SHUT-OFF TIMER PREHEAT MODE TONER SAVE MODE Page 76 79 79 79 80 81 81 81 82 82 82 82 83 83 83 83 83 84 84 84 84 84...
Operation Manual
Page 87
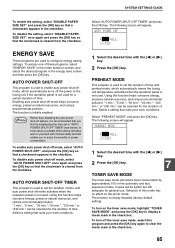
...key. 2 Press the [OK] key. To turn off the power to configure energy saving settings. The following screen will appear. Copies will reduce toner consumption by approximately 10% in the checkbox. Note Rather than disabling the auto power shut-off mode activates when the operation panel is not used... min." AUTO POWER OFF min. (1~240) 1 Select the desired time with the [ ] or [ ] key. 2 Press the [OK] key. 7 TONER SAVE MODE The toner save mode, highlight "TONER SAVE MODE" and press the [OK] key to set the duration of time. PREHEAT MODE This program is not used for the...
...key. 2 Press the [OK] key. To turn off the power to configure energy saving settings. The following screen will appear. Copies will reduce toner consumption by approximately 10% in the checkbox. Note Rather than disabling the auto power shut-off mode activates when the operation panel is not used... min." AUTO POWER OFF min. (1~240) 1 Select the desired time with the [ ] or [ ] key. 2 Press the [OK] key. 7 TONER SAVE MODE The toner save mode, highlight "TONER SAVE MODE" and press the [OK] key to set the duration of time. PREHEAT MODE This program is not used for the...
Operation Manual
Page 92
...Setting the number of supplies 42 Stream feeding 87 Stream feeding mode 46 System settings 75 System settings list 77 T Toner cartridge 13, 35 Toner cartridge lock release lever 13, 35 Toner cartridge replacement required icon 28 Top tray 12 Tray 1 12 Tray 2 12 Troubleshooting - Cleaning 37 - Original ...45 - One-sided copies of two-sided originals 60 - Tray 1 33 - XY zoom copying 54 Removing the document cover 47 Replacing the toner cartridge 35 Reversing tray 13, 29 Right side cover 13, 29 Roller rotating knob 13, 31, 32 Rotation copy 64 RSPF - Preset copy...
...Setting the number of supplies 42 Stream feeding 87 Stream feeding mode 46 System settings 75 System settings list 77 T Toner cartridge 13, 35 Toner cartridge lock release lever 13, 35 Toner cartridge replacement required icon 28 Top tray 12 Tray 1 12 Tray 2 12 Troubleshooting - Cleaning 37 - Original ...45 - One-sided copies of two-sided originals 60 - Tray 1 33 - XY zoom copying 54 Removing the document cover 47 Replacing the toner cartridge 35 Reversing tray 13, 29 Right side cover 13, 29 Roller rotating knob 13, 31, 32 Rotation copy 64 RSPF - Preset copy...


