
Operation Guide
Page 36
MAINTAIN THE MACHINE Clean the machine Replace a toner cartridge Replace the toner collection container
MAINTAIN THE MACHINE Clean the machine Replace a toner cartridge Replace the toner collection container
Operation Guide
Page 39
.... (4) Automatic document feeder This automatically feeds and scans multiple originals. ☞ PLACING THE ORIGINAL (page 1-36) (5) Front cover Open this cover to replace a toner cartridge. ☞ REPLACING THE TONER CARTRIDGES (page 1-49) (6) Output tray Output is delivered to this tray. (7) Operation panel This is used to select functions and enter the number...
.... (4) Automatic document feeder This automatically feeds and scans multiple originals. ☞ PLACING THE ORIGINAL (page 1-36) (5) Front cover Open this cover to replace a toner cartridge. ☞ REPLACING THE TONER CARTRIDGES (page 1-49) (6) Output tray Output is delivered to this tray. (7) Operation panel This is used to select functions and enter the number...

Operation Guide
Page 42
...BY LOGIN NAME / PASSWORD 1-18 HOME SCREEN 1-21 REMOTE OPERATION OF THE MACHINE. . . . . . 1-22 ITEMS RECORDED IN THE JOB LOG 1-23 SHARP OSA 1-26 LOADING PAPER IMPORTANT POINTS ABOUT PAPER 1-29 • NAMES AND LOCATIONS OF TRAYS 1-29 • USEABLE PAPER 1-30 TRAY SETTINGS FOR TRAY 1 ... ROLLER . . . 1-46 • CLEANING THE ORIGINAL FEED ROLLER 1-46 • CLEANING THE LASER UNIT 1-47 REPLACING THE TONER CARTRIDGES 1-49 REPLACING THE TONER COLLECTION CONTAINER 1-52 ENTERING TEXT FUNCTIONS OF THE MAIN KEYS 1-54 • KEYBOARD 1-55 1-1 CHAPTER 1 BEFORE USING THE MACHINE ...
...BY LOGIN NAME / PASSWORD 1-18 HOME SCREEN 1-21 REMOTE OPERATION OF THE MACHINE. . . . . . 1-22 ITEMS RECORDED IN THE JOB LOG 1-23 SHARP OSA 1-26 LOADING PAPER IMPORTANT POINTS ABOUT PAPER 1-29 • NAMES AND LOCATIONS OF TRAYS 1-29 • USEABLE PAPER 1-30 TRAY SETTINGS FOR TRAY 1 ... ROLLER . . . 1-46 • CLEANING THE ORIGINAL FEED ROLLER 1-46 • CLEANING THE LASER UNIT 1-47 REPLACING THE TONER CARTRIDGES 1-49 REPLACING THE TONER COLLECTION CONTAINER 1-52 ENTERING TEXT FUNCTIONS OF THE MAIN KEYS 1-54 • KEYBOARD 1-55 1-1 CHAPTER 1 BEFORE USING THE MACHINE ...

Operation Guide
Page 43
... the outside. (4) Automatic document feeder This automatically feeds and scans multiple originals. ☞ PLACING THE ORIGINAL (page 1-39) (5) Front cover Open this cover to replace a toner cartridge. ☞ REPLACING THE TONER CARTRIDGES (page 1-49) (6) Output tray Output is delivered to this tray. (7) Operation panel This is used to power on the machine.
... the outside. (4) Automatic document feeder This automatically feeds and scans multiple originals. ☞ PLACING THE ORIGINAL (page 1-39) (5) Front cover Open this cover to replace a toner cartridge. ☞ REPLACING THE TONER CARTRIDGES (page 1-49) (6) Output tray Output is delivered to this tray. (7) Operation panel This is used to power on the machine.

Operation Guide
Page 45
... by placing something in a cartridge, the cartridge of the color that remains after printing. ☞ REPLACING THE TONER COLLECTION CONTAINER (page 1-52) Your service technician will collect the toner collection container. (17) Right cover of them or placing the machine close to remove a misfeed. Doing so ... levers to release the pressure when removing misfed paper from inside the fusing area or when feeding an envelope from the bypass tray. When the toner runs out in front of paper feed unit (when a paper feed unit is hot. INTERIOR (13) BEFORE USING THE MACHINE (14) (15) ...
... by placing something in a cartridge, the cartridge of the color that remains after printing. ☞ REPLACING THE TONER COLLECTION CONTAINER (page 1-52) Your service technician will collect the toner collection container. (17) Right cover of them or placing the machine close to remove a misfeed. Doing so ... levers to release the pressure when removing misfed paper from inside the fusing area or when feeding an envelope from the bypass tray. When the toner runs out in front of paper feed unit (when a paper feed unit is hot. INTERIOR (13) BEFORE USING THE MACHINE (14) (15) ...
Operation Guide
Page 73
...that of non-recommended or prohibited paper may result in skewed feeding, misfeeds, poor toner fusing (the toner does not adhere to that can be rubbed off), or machine failure. • The use of SHARP standard paper. to 28 lbs. (60 g/m2 to moisture absorption • Various... for automatic 2-sided printing Paper used with the machine. Contact your dealer or nearest SHARP Service Department for advice on using these types of paper. • The image quality and toner fusibility of paper may change due to ambient conditions, operating conditions, and paper characteristics,...
...that of non-recommended or prohibited paper may result in skewed feeding, misfeeds, poor toner fusing (the toner does not adhere to that can be rubbed off), or machine failure. • The use of SHARP standard paper. to 28 lbs. (60 g/m2 to moisture absorption • Various... for automatic 2-sided printing Paper used with the machine. Contact your dealer or nearest SHARP Service Department for advice on using these types of paper. • The image quality and toner fusibility of paper may change due to ambient conditions, operating conditions, and paper characteristics,...

Operation Guide
Page 79
... or parts less than three layers. • Print quality is a large step-like change of thickness, such as creasing may cause creasing, smudging, misfeeds, poor toner fusing, or machine failure. • Do not use the following envelopes: Envelopes with an adhesive for sealing the envelopes. BEFORE USING THE MACHINE Loading envelopes...
... or parts less than three layers. • Print quality is a large step-like change of thickness, such as creasing may cause creasing, smudging, misfeeds, poor toner fusing, or machine failure. • Do not use the following envelopes: Envelopes with an adhesive for sealing the envelopes. BEFORE USING THE MACHINE Loading envelopes...

Operation Guide
Page 83
... use of the original will be closed correctly in this state. After placing the original, be sure to its normal state, open , parts outside of toner. 3 Caution • Close the automatic document feeder slowly.
... use of the original will be closed correctly in this state. After placing the original, be sure to its normal state, open , parts outside of toner. 3 Caution • Close the automatic document feeder slowly.

Operation Guide
Page 85
... machine, fire or electrical shock may degrade or discolor the housing. Do not use a flammable spray to clean the machine and replace the toner cartridges and the toner collection container. Examples of neutral detergent. CLEANING THE DOCUMENT GLASS AND AUTOMATIC DOCUMENT FEEDER If the document glass or document backplate sheet becomes dirty...
... machine, fire or electrical shock may degrade or discolor the housing. Do not use a flammable spray to clean the machine and replace the toner cartridges and the toner collection container. Examples of neutral detergent. CLEANING THE DOCUMENT GLASS AND AUTOMATIC DOCUMENT FEEDER If the document glass or document backplate sheet becomes dirty...
Operation Guide
Page 86
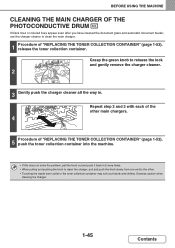
...when cleaning the charger. 1-45 Contents Repeat step 2 and 3 with each of the other . • Touching the waste toner outlet or the toner collection container may soil your hands and clothes. BEFORE USING THE MACHINE CLEANING THE MAIN CHARGER OF THE PHOTOCONDUCTIVE DRUM If black lines... glass and automatic document feeder, use the charger cleaner to the other main chargers. 4 Procedure of "REPLACING THE TONER COLLECTION CONTAINER" (page 1-52), 1 release the toner collection container. Grasp the green knob to release the lock and gently remove the charger cleaner. 2 3 Gently push...
...when cleaning the charger. 1-45 Contents Repeat step 2 and 3 with each of the other . • Touching the waste toner outlet or the toner collection container may soil your hands and clothes. BEFORE USING THE MACHINE CLEANING THE MAIN CHARGER OF THE PHOTOCONDUCTIVE DRUM If black lines... glass and automatic document feeder, use the charger cleaner to the other main chargers. 4 Procedure of "REPLACING THE TONER COLLECTION CONTAINER" (page 1-52), 1 release the toner collection container. Grasp the green knob to release the lock and gently remove the charger cleaner. 2 3 Gently push...

Operation Guide
Page 88
Identifying lines (colored lines) caused by a dirty laser unit. Pull the right side of "REPLACING THE TONER COLLECTION CONTAINER" (page 1-52), 2 release the toner collection container. (2) (1) Take out the cleaning tool for the laser unit. Procedure of the cleaning instrument and unfasten it from the claw. 3 Boss (3) Clean the ...
Identifying lines (colored lines) caused by a dirty laser unit. Pull the right side of "REPLACING THE TONER COLLECTION CONTAINER" (page 1-52), 2 release the toner collection container. (2) (1) Take out the cleaning tool for the laser unit. Procedure of the cleaning instrument and unfasten it from the claw. 3 Boss (3) Clean the ...

Operation Guide
Page 89
... all holes. Clean all holes in step 4. Hook the cleaning tool with the 6 clean side face up. (2) Place the right-hand side of "REPLACING THE TONER COLLECTION CONTAINER" (page 1-52), 7 push the toner collection container into the machine. 1-48 Contents
... all holes. Clean all holes in step 4. Hook the cleaning tool with the 6 clean side face up. (2) Place the right-hand side of "REPLACING THE TONER COLLECTION CONTAINER" (page 1-52), 7 push the toner collection container into the machine. 1-48 Contents

Operation Guide
Page 90
... message will not be possible. • Be sure to replace the toner cartridge when the message "Change the toner cartridge." BEFORE USING THE MACHINE REPLACING THE TONER CARTRIDGES Be sure to install 4 toner cartridges (Y/M/C/Bk). 1-49 Contents If Y, M, or C toner runs out but Bk toner remains, black and white printing will still be possible. appears. Change...
... message will not be possible. • Be sure to replace the toner cartridge when the message "Change the toner cartridge." BEFORE USING THE MACHINE REPLACING THE TONER CARTRIDGES Be sure to install 4 toner cartridges (Y/M/C/Bk). 1-49 Contents If Y, M, or C toner runs out but Bk toner remains, black and white printing will still be possible. appears. Change...

Operation Guide
Page 91
... top and bottom of the toner cartridge, pull the toner cartridge out. 2 • After removing the toner cartridge, do not shake it or tap on it vertically five or six times. 3 When holding the toner cartridge, do not discard them). Insert the toner cartridge along the guides until ...and open it locks in place. Take out the new toner cartridge. Doing so may cause toner to install a toner cartridge of a different color cannot be installed. Push on the toner cartridge, remove it before installing the cartridge. 4 A toner cartridge of the same color. 1-50 Contents If there ...
... top and bottom of the toner cartridge, pull the toner cartridge out. 2 • After removing the toner cartridge, do not shake it or tap on it vertically five or six times. 3 When holding the toner cartridge, do not discard them). Insert the toner cartridge along the guides until ...and open it locks in place. Take out the new toner cartridge. Doing so may cause toner to install a toner cartridge of a different color cannot be installed. Push on the toner cartridge, remove it before installing the cartridge. 4 A toner cartridge of the same color. 1-50 Contents If there ...

Operation Guide
Page 92
...make sure that printing cannot be possible. • Even after a new toner cartridge is installed, the message may still appear, indicating that the toner cartridge is not fed sufficiently). BEFORE USING THE MACHINE Press the center of the toner cartridge until the cartridge locks into place. 5 6 Close the front cover.... In this case, open and close the front cover. The message will be cleared and printing will feed toner again for about two minutes and then copying can be resumed. • Before closing the front cover, gently hold both ends. 1-51 Contents
...make sure that printing cannot be possible. • Even after a new toner cartridge is installed, the message may still appear, indicating that the toner cartridge is not fed sufficiently). BEFORE USING THE MACHINE Press the center of the toner cartridge until the cartridge locks into place. 5 6 Close the front cover.... In this case, open and close the front cover. The message will be cleared and printing will feed toner again for about two minutes and then copying can be resumed. • Before closing the front cover, gently hold both ends. 1-51 Contents
Operation Guide
Page 93
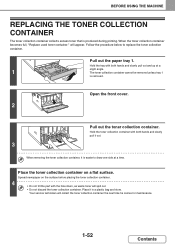
...Hold the tray with both hands and slowly pull it out. 3 When removing the toner collection container, it in a plastic bag and store. Open the front cover. 2 Pull out the toner collection container. Pull out the paper tray 1. Spread newspaper on a flat surface.... Place it is easier to replace the toner collection container. When the toner collection container becomes full, "Replace used toner container." Place the toner collection container on the surface before placing the toner collection container. 4 • Do not tilt the part with both...
...Hold the tray with both hands and slowly pull it out. 3 When removing the toner collection container, it in a plastic bag and store. Open the front cover. 2 Pull out the toner collection container. Pull out the paper tray 1. Spread newspaper on a flat surface.... Place it is easier to replace the toner collection container. When the toner collection container becomes full, "Replace used toner container." Place the toner collection container on the surface before placing the toner collection container. 4 • Do not tilt the part with both...

Operation Guide
Page 94
Caution • Do not throw the toner collection container into a fire. Toner may soil your clothes or the immediate surroundings. 1-53 Contents When replacing the toner collection container, be aware that it may fly and cause burns. • Store the toner collection container out of the reach of small children. Push the toner collection container in completely. 5 Close the front cover. 6 You cannot close the front cover when the toner collection container is not attached. 7 Replace tray 1. BEFORE USING THE MACHINE Install a new toner collection container.
Caution • Do not throw the toner collection container into a fire. Toner may soil your clothes or the immediate surroundings. 1-53 Contents When replacing the toner collection container, be aware that it may fly and cause burns. • Store the toner collection container out of the reach of small children. Push the toner collection container in completely. 5 Close the front cover. 6 You cannot close the front cover when the toner collection container is not attached. 7 Replace tray 1. BEFORE USING THE MACHINE Install a new toner collection container.

Operation Guide
Page 109
... Contents Exposure Auto 2 8½x11 8½x11 Plain 8½x11 Output File Quick File Make sure that cannot be copied black, causing excessive use of toner. Open the automatic document feeder, place the original face down on the document glass scale. • Place the original in the appropriate position for its...
... Contents Exposure Auto 2 8½x11 8½x11 Plain 8½x11 Output File Quick File Make sure that cannot be copied black, causing excessive use of toner. Open the automatic document feeder, place the original face down on the document glass scale. • Place the original in the appropriate position for its...

Operation Guide
Page 113
...; Place the original in the appropriate position for its size as shown above. • After placing the original, be copied black, causing excessive use of toner.
...; Place the original in the appropriate position for its size as shown above. • After placing the original, be copied black, causing excessive use of toner.

Operation Guide
Page 130
... bypass tray extension. BEFORE USING THE MACHINE". Insert the paper with the print side face up in the bypass tray). 2 When loading a large sheet of toner. However, if the paper type is "Letter Head" or "Pre-Printed", load the paper with print side face down on the document glass. 1 When placing...
... bypass tray extension. BEFORE USING THE MACHINE". Insert the paper with the print side face up in the bypass tray). 2 When loading a large sheet of toner. However, if the paper type is "Letter Head" or "Pre-Printed", load the paper with print side face down on the document glass. 1 When placing...


