

LD-23SH1U Operation Manual
Page 2
..., BRACKET, OR TABLE. A PRODUCT AND CART COMBINATION SHOULD BE MOVED WITH CARE. CAUTION: This product satisfies FCC regulations when shielded cables and connectors are located on the rear of the TV. NO USER-SERVICEABLE PARTS INSIDE. CAUTION: TO REDUCE THE RISK OF ELECTRIC SHOCK, DO NOT REMOVE COVER (OR BACK). The lightning flash with electric appliances such as radios and televisions, use...
..., BRACKET, OR TABLE. A PRODUCT AND CART COMBINATION SHOULD BE MOVED WITH CARE. CAUTION: This product satisfies FCC regulations when shielded cables and connectors are located on the rear of the TV. NO USER-SERVICEABLE PARTS INSIDE. CAUTION: TO REDUCE THE RISK OF ELECTRIC SHOCK, DO NOT REMOVE COVER (OR BACK). The lightning flash with electric appliances such as radios and televisions, use...
LD-23SH1U Operation Manual
Page 3
... by turning the equipment off and on, the user is provided to call the CATV system installer's attention to Article 820-40 of the FCC rules. ONLY Declaration of Conformity SHARP 23" LCD color TV LD-23SH1U This device complies with the instructions, may be connected to the grounding system of mercury. Increase the separation between the equipment and receiver. - sharpusa...
... by turning the equipment off and on, the user is provided to call the CATV system installer's attention to Article 820-40 of the FCC rules. ONLY Declaration of Conformity SHARP 23" LCD color TV LD-23SH1U This device complies with the instructions, may be connected to the grounding system of mercury. Increase the separation between the equipment and receiver. - sharpusa...

LD-23SH1U Operation Manual
Page 4
... Common operations Common operations E27 Turning power on/off E27 Switching display modes (INPUT E27 Adjusting the backlight E28 Adjusting the volume E29 Enjoying surround sound (Virtual Dolby Surround E29 Selecting the language on the screen E30 TV/AV mode Watching TV E31 Watching TV E31 Selecting MTS (Multi ch TV Sound E32 Returning to previous channel (FLASHBACK E32 Setting the Closed Caption (CLOSED CAPTION E33 Adjusting the V-chip settings (V-CHIP E34 Enjoying DVDs, games...
... Common operations Common operations E27 Turning power on/off E27 Switching display modes (INPUT E27 Adjusting the backlight E28 Adjusting the volume E29 Enjoying surround sound (Virtual Dolby Surround E29 Selecting the language on the screen E30 TV/AV mode Watching TV E31 Watching TV E31 Selecting MTS (Multi ch TV Sound E32 Returning to previous channel (FLASHBACK E32 Setting the Closed Caption (CLOSED CAPTION E33 Adjusting the V-chip settings (V-CHIP E34 Enjoying DVDs, games...

LD-23SH1U Operation Manual
Page 5
... Menu setting items E45 Installing set-up information and the ICC profile (For Windows E51 Information about the ColorSync profile (For MacOS E54 Other features Other features E55 Changing the screen size (VIEW MODE E55 Checking the current channel and audio mode on screen (DISPLAY E55 Muting the sound (MUTE E56 Changing BRIGHT MODE E56 Preventing changes to adjusted values (ADJUSTMENT LOCK E56 Resetting all adjustment values (ALL RESET E56 Appendix Instructions for attaching a VESA-compliant mount...
... Menu setting items E45 Installing set-up information and the ICC profile (For Windows E51 Information about the ColorSync profile (For MacOS E54 Other features Other features E55 Changing the screen size (VIEW MODE E55 Checking the current channel and audio mode on screen (DISPLAY E55 Muting the sound (MUTE E56 Changing BRIGHT MODE E56 Preventing changes to adjusted values (ADJUSTMENT LOCK E56 Resetting all adjustment values (ALL RESET E56 Appendix Instructions for attaching a VESA-compliant mount...
LD-23SH1U Operation Manual
Page 6
... English When mounting the product on a wall or ceiling, be operated only from tip-over. 13) Unplug this product. Important safety instructions Electricity is damaged, liquid has been spilled or objects have the same characteristics as power-supply cord or plug is used , use attachments/accessories specified by the manufacturer. 12) Use only with the cart, stand, tripod, bracket, or table specified by the...
... English When mounting the product on a wall or ceiling, be operated only from tip-over. 13) Unplug this product. Important safety instructions Electricity is damaged, liquid has been spilled or objects have the same characteristics as power-supply cord or plug is used , use attachments/accessories specified by the manufacturer. 12) Use only with the cart, stand, tripod, bracket, or table specified by the...
LD-23SH1U Operation Manual
Page 8
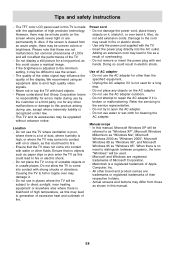
... the AC power cord under the TV set . - To prevent fire or shock hazard, do not expose this equipment during a lightning storm, or when it can fall into such power lines or circuits. An outside antenna is connected to the equipment, be located in wire to an antenna discharge unit, size of grounding conductors, location of the National Electrical Code, ANSI...
... the AC power cord under the TV set . - To prevent fire or shock hazard, do not expose this equipment during a lightning storm, or when it can fall into such power lines or circuits. An outside antenna is connected to the equipment, be located in wire to an antenna discharge unit, size of grounding conductors, location of the National Electrical Code, ANSI...
LD-23SH1U Operation Manual
Page 9
... the display. Do not use the AC adapter outdoors. - Do not damage the power cord, place heavy objects on the screen where pixels never light or are registered trademarks of overheating. - Do not remove or insert the power plug with the application of the TV. - Unplug the AC adapter if it . Refer the servicing to emit high quality video signals. - Adding an extension cord may...
... the display. Do not use the AC adapter outdoors. - Do not damage the power cord, place heavy objects on the screen where pixels never light or are registered trademarks of overheating. - Do not remove or insert the power plug with the application of the TV. - Unplug the AC adapter if it . Refer the servicing to emit high quality video signals. - Adding an extension cord may...

LD-23SH1U Operation Manual
Page 16
....) Remote control buttons MENU ENTER Function Displays the MENU screen. Selects an item by moving the cursor up/down the cursor to select an item. Italiano Español English E15 Corresponding control buttons on the TV MENU* INPUT MENU* VOL/BRIGHT< > ENTER/BRIGHT MODE * On the adjustment screen, moves down . Refer to this manual use primarily the remote control. (Operations requiring the use of control buttons on the TV are specifically identified using control buttons on...
....) Remote control buttons MENU ENTER Function Displays the MENU screen. Selects an item by moving the cursor up/down the cursor to select an item. Italiano Español English E15 Corresponding control buttons on the TV MENU* INPUT MENU* VOL/BRIGHT< > ENTER/BRIGHT MODE * On the adjustment screen, moves down . Refer to this manual use primarily the remote control. (Operations requiring the use of control buttons on the TV are specifically identified using control buttons on...

LD-23SH1U Operation Manual
Page 21
... output terminal (Mini D-sub 15 pin, 3 rows) - When using the TV with a digital connection, automatic screen adjustment is set -up information for the TV. (See page E51.) - If connecting to a D-sub 15 pin 2 row Apple Power Macintosh, attach a Macintosh conversion adapter (commercially available) to it is displaying. Analog connection Connect the supplied PC analog signal cable to a malfunction. Be careful not to over bend the cable or add extension cords...
... output terminal (Mini D-sub 15 pin, 3 rows) - When using the TV with a digital connection, automatic screen adjustment is set -up information for the TV. (See page E51.) - If connecting to a D-sub 15 pin 2 row Apple Power Macintosh, attach a Macintosh conversion adapter (commercially available) to it is displaying. Analog connection Connect the supplied PC analog signal cable to a malfunction. Be careful not to over bend the cable or add extension cords...
LD-23SH1U Operation Manual
Page 24
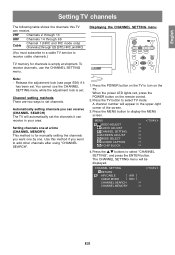
... adjustment lock (see page E56) if it can receive. VHF Channels 2 through 13 UHF Channels 14 through 69 Channel 1 (HRC and IRC mode only) Cable Channels 2 through 125 (STD, HRC, and IRC) (You must subscribe to a cable TV service to receive cable channels.) Displaying the CHANNEL SETTING menu POWER Virtual PC TV AV1 AV2 FREEZE MULTI VIEW MODE SLEEP MENU TV memory for manually setting the channels you want to select "CHANNEL SETTING", and press the ENTER button. MENU VIDEO ADJUST AUDIO ADJUST CHANNEL SETTING SCREEN ADJUST MODE SELECT CLOSED CAPTION...
... adjustment lock (see page E56) if it can receive. VHF Channels 2 through 13 UHF Channels 14 through 69 Channel 1 (HRC and IRC mode only) Cable Channels 2 through 125 (STD, HRC, and IRC) (You must subscribe to a cable TV service to receive cable channels.) Displaying the CHANNEL SETTING menu POWER Virtual PC TV AV1 AV2 FREEZE MULTI VIEW MODE SLEEP MENU TV memory for manually setting the channels you want to select "CHANNEL SETTING", and press the ENTER button. MENU VIDEO ADJUST AUDIO ADJUST CHANNEL SETTING SCREEN ADJUST MODE SELECT CLOSED CAPTION...

LD-23SH1U Operation Manual
Page 27
....) - When "OUT OF ADJUST" is unnecessary. "PC" and "ANALOG" will be set to achieve correct adjustment with an analog connection, specify the horizontal resolution for a 768-line screen in the upper- MENU ADJUSTMENT GAIN CONTROL AUDIO ADJUST COLOR CONTROL MODE SELECT MULTI SCREEN < PC 5. Press the ENTER button. E26 Press the POWER button on the remote control. 2. The ADJUSTMENT menu will return. 7. When the power LED lights red, press the POWER button on the TV to display the MENU screen. right corner of...
....) - When "OUT OF ADJUST" is unnecessary. "PC" and "ANALOG" will be set to achieve correct adjustment with an analog connection, specify the horizontal resolution for a 768-line screen in the upper- MENU ADJUSTMENT GAIN CONTROL AUDIO ADJUST COLOR CONTROL MODE SELECT MULTI SCREEN < PC 5. Press the ENTER button. E26 Press the POWER button on the remote control. 2. The ADJUSTMENT menu will return. 7. When the power LED lights red, press the POWER button on the TV to display the MENU screen. right corner of...
LD-23SH1U Operation Manual
Page 42
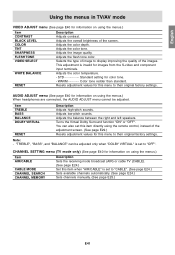
... remote control, instead of the adjustment screen. (See page E29.) Resets adjustment values for this item when "AIR/CABLE" is invalid for images from the S-video and component input terminals. Note: - CHANNEL SETTING menu (TV mode only) (See page E40 for information on using the menus.) Item CONTRAST BLACK LEVEL COLOR TINT SHARPNESS FLESH TONE VIDEO SELECT WHITE BALANCE RESET Description Adjusts contrast. Adjusts the balance between the right and left speakers. Selects the type...
... remote control, instead of the adjustment screen. (See page E29.) Resets adjustment values for this item when "AIR/CABLE" is invalid for images from the S-video and component input terminals. Note: - CHANNEL SETTING menu (TV mode only) (See page E40 for information on using the menus.) Item CONTRAST BLACK LEVEL COLOR TINT SHARPNESS FLESH TONE VIDEO SELECT WHITE BALANCE RESET Description Adjusts contrast. Adjusts the balance between the right and left speakers. Selects the type...

LD-23SH1U Operation Manual
Page 43
... fill the entire screen. You can also set this menu to the TV's original factory setting. MODE SELECT menu (See page E40 for information on using the menus.) Item SLEEP TIMER LANGUAGE RESET Description Specifies how many minutes until the TV switches off or the image may have a black border. Depending on the type of data received or the video software used when "ZOOM1" cuts off captions or telops...
... fill the entire screen. You can also set this menu to the TV's original factory setting. MODE SELECT menu (See page E40 for information on using the menus.) Item SLEEP TIMER LANGUAGE RESET Description Specifies how many minutes until the TV switches off or the image may have a black border. Depending on the type of data received or the video software used when "ZOOM1" cuts off captions or telops...
LD-23SH1U Operation Manual
Page 52
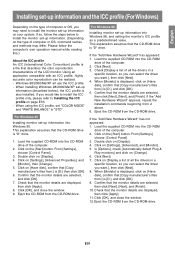
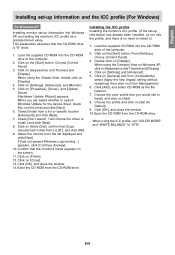
... [Control Panel]. 3. In [Options], check [Automatically detect Plug & Play monitors] and click on [Settings], [Advanced], and [Monitor]. 5. If the "Add New Hardware Wizard" appears, repeat the installation commands beginning from the CD-ROM drive. Click on [Display a list of all use the ICC profile. - Eject the CD-ROM from 2 above. 6. Check that describes the color reproduction characteristics of the LCD monitor. Click [OK], and close...
... [Control Panel]. 3. In [Options], check [Automatically detect Plug & Play monitors] and click on [Settings], [Advanced], and [Monitor]. 5. If the "Add New Hardware Wizard" appears, repeat the installation commands beginning from the CD-ROM drive. Click on [Display a list of all use the ICC profile. - Eject the CD-ROM from 2 above. 6. Check that describes the color reproduction characteristics of the LCD monitor. Click [OK], and close...
LD-23SH1U Operation Manual
Page 53
... on the [Start] button. Load the supplied CD-ROM into the CD-ROM drive of the computer. 2. Check [Display a list of all the drivers in a specific location, so you want .], then click [Next]. 4. Click on [Change]. 6. In [Options], check [Automatically detect Plug & Play monitors] and click on [Close]. 12. From [Settings], choose [Control Panel]. 3. Check that I can select the driver you can choose a specific driver] and click [Next...
... on the [Start] button. Load the supplied CD-ROM into the CD-ROM drive of the computer. 2. Check [Display a list of all the drivers in a specific location, so you want .], then click [Next]. 4. Click on [Change]. 6. In [Options], check [Automatically detect Plug & Play monitors] and click on [Close]. 12. From [Settings], choose [Control Panel]. 3. Check that I can select the driver you can choose a specific driver] and click [Next...
LD-23SH1U Operation Manual
Page 54
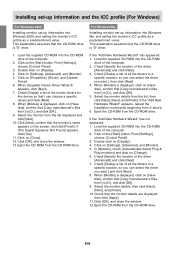
... on [Set As Default]. 9. Click on the [Start] button. Installing the ICC profile Installing the monitor's ICC profile. (If the set "COLOR MODE" and "WHITE BALANCE" to install.] and click [Next]. 8. Click [OK], and close the window. 10. I will choose the driver to "STD". Eject the CD-ROM from the list displayed and click [Next]. Load the supplied CD-ROM into Windows XP, and setting the monitor's ICC...
... on [Set As Default]. 9. Click on the [Start] button. Installing the ICC profile Installing the monitor's ICC profile. (If the set "COLOR MODE" and "WHITE BALANCE" to install.] and click [Next]. 8. Click [OK], and close the window. 10. I will choose the driver to "STD". Eject the CD-ROM from the list displayed and click [Next]. Load the supplied CD-ROM into Windows XP, and setting the monitor's ICC...

LD-23SH1U Operation Manual
Page 57
... output. 1. Channel buttons (0-9 and 100) - Continue to "OFF", you operate the other than the above buttons, release the adjustment lock. When the adjustment lock is set to press the buttons until "LOCK ADJUSTMENT?" Concerning the ALL RESET procedure, refer to the door. 1. Notes: - You can operate MTS, MUTE, Dolby Virtual, and VOL buttons on the TV and remote control other than the above buttons are disabled. turn the power on the TV. 1. POWER button - INPUT button...
... output. 1. Channel buttons (0-9 and 100) - Continue to "OFF", you operate the other than the above buttons, release the adjustment lock. When the adjustment lock is set to press the buttons until "LOCK ADJUSTMENT?" Concerning the ALL RESET procedure, refer to the door. 1. Notes: - You can operate MTS, MUTE, Dolby Virtual, and VOL buttons on the TV and remote control other than the above buttons are disabled. turn the power on the TV. 1. POWER button - INPUT button...
LD-23SH1U Operation Manual
Page 59
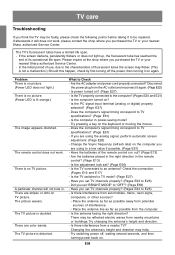
The remote control does not work , please contact the shop where you purchased the TV or your nearest Sharp authorized Service Center. - There are color bands. The picture wavers. Is the computer turned on ? (Page E27) - Is the adjustment lock set TV channels properly? (Pages E23 to "OFF"? (Page E56) - Changing the antenna's height and direction may help. - Please inquire at the shop where you purchased...
The remote control does not work , please contact the shop where you purchased the TV or your nearest Sharp authorized Service Center. - There are color bands. The picture wavers. Is the computer turned on ? (Page E27) - Is the adjustment lock set TV channels properly? (Pages E23 to "OFF"? (Page E56) - Changing the antenna's height and direction may help. - Please inquire at the shop where you purchased...
LD-23SH1U Operation Manual
Page 60
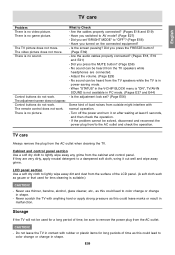
... menu is "ON", TV/AV-IN SOUND is not available in malfunction. There is no video picture. TV care English Français Deutsch Problem There is no game picture. The remote control does not work . Did you press the MUTE button? (Page E56) - Are the audio cables properly connected? (Pages E18, E19 and E21) - Adjust the volume. (Page E29) - No sound can be sure to color change or change...
... menu is "ON", TV/AV-IN SOUND is not available in malfunction. There is no video picture. TV care English Français Deutsch Problem There is no game picture. The remote control does not work . Did you press the MUTE button? (Page E56) - Are the audio cables properly connected? (Pages E18, E19 and E21) - Adjust the volume. (Page E29) - No sound can be sure to color change or change...
LD-23SH1U Operation Manual
Page 61
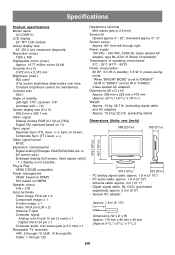
... ratio > 10) Screen display size (H x V) 508.2 mm x 285.7 mm Video signal Analog: Analog RGB (0.7 Vp-p) [75Ω] Digital: DVI standard based on 1.0 Sync signal Separate Sync (TTL level: +/-), Sync on DMPM Speaker output 5 W + 5 W Input terminals Video image: RCA pin x 2 Component image: x 1 S-video image: x 1 Audio: RCA pin (L/R x 2) Antenna: F-type Computer signal: Analog: mini D-sub 15 pin (3 rows) x 1 Digital: DVI-D 24 pin x 1 Computer audio: mini stereo jack (φ 3.5 mm) x 1 Receivable TV channels VHF: 2 through right Power supply 100 VAC...
... ratio > 10) Screen display size (H x V) 508.2 mm x 285.7 mm Video signal Analog: Analog RGB (0.7 Vp-p) [75Ω] Digital: DVI standard based on 1.0 Sync signal Separate Sync (TTL level: +/-), Sync on DMPM Speaker output 5 W + 5 W Input terminals Video image: RCA pin x 2 Component image: x 1 S-video image: x 1 Audio: RCA pin (L/R x 2) Antenna: F-type Computer signal: Analog: mini D-sub 15 pin (3 rows) x 1 Digital: DVI-D 24 pin x 1 Computer audio: mini stereo jack (φ 3.5 mm) x 1 Receivable TV channels VHF: 2 through right Power supply 100 VAC...


