Operation Manual
Page 2
...CAUTION: TO PREVENT ELECTRIC SHOCK, MATCH WIDE BLADE OF PLUG TO WIDE SLOT, FULLY INSERT. The examples used throughout this manual are based on -screen displays in this operation manual are located at the rear of uninsulated "dangerous voltage" within a triangle is intended to alert the user to persons...,. The lightning flash with arrow-head symbol, within an equilateral triangle, is intended to alert the user to the presence of the TV. LC-42D43 LC-46D43 LC-52D43 LiQUiD CRYSTAL TELEViSiON ENGLISH OPERATION MANUAL ,, The illustrations and on the...
...CAUTION: TO PREVENT ELECTRIC SHOCK, MATCH WIDE BLADE OF PLUG TO WIDE SLOT, FULLY INSERT. The examples used throughout this manual are based on -screen displays in this operation manual are located at the rear of uninsulated "dangerous voltage" within a triangle is intended to alert the user to persons...,. The lightning flash with arrow-head symbol, within an equilateral triangle, is intended to alert the user to the presence of the TV. LC-42D43 LC-46D43 LC-52D43 LiQUiD CRYSTAL TELEViSiON ENGLISH OPERATION MANUAL ,, The illustrations and on the...
Operation Manual
Page 5
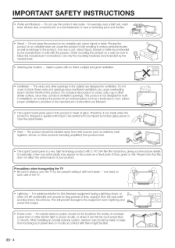
...rpYl_ifiheersa)t sth°autrcpersodsutc_echhaesatr.ad'ators' heat _1 _ ..... ::_--. ]--_1 'J Occasionally, a few non active pixels may appear on the screen as a fixed point of the product. Do not product is not designed for example, near a bath tub, wash q:_r_----_ product...surges. F_"_ ]_ _ ] Ir - .s" I " PfroomwertouLcith?iensg - for builtin installation; Do not place the product on Precautions when transporting the TV each side of time, unplug it is made of glass. When installing an outside antenna system, extreme care should be taken to lightning and [_ ...
...rpYl_ifiheersa)t sth°autrcpersodsutc_echhaesatr.ad'ators' heat _1 _ ..... ::_--. ]--_1 'J Occasionally, a few non active pixels may appear on the screen as a fixed point of the product. Do not product is not designed for example, near a bath tub, wash q:_r_----_ product...surges. F_"_ ]_ _ ] Ir - .s" I " PfroomwertouLcith?iensg - for builtin installation; Do not place the product on Precautions when transporting the TV each side of time, unplug it is made of glass. When installing an outside antenna system, extreme care should be taken to lightning and [_ ...
Operation Manual
Page 9
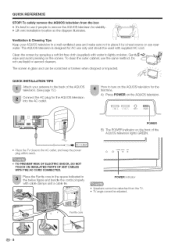
...remove the AQUOS television from the TV. • TV angle cannot be scratched or broken when dropped or impacted. \ _ _ _/ QUICK iNSTALLATiON TiPS Attach your AQUOS television in the below figure and bundle the cords properly with cable clamps and a cable tie. Clean the screen by a heat source or use ... SHOCK, DO NOT TOUCH UN-iNSULATED PARTS OF ANY CABLES WITH THE AC CORD CONNECTED. Gently _ _-_. The screen is designed for the AQUOS television into the AC outlet. Place the TV close to lightly moisten. POWER indicator • Speakers cannot be detached from the box • It's best...
...remove the AQUOS television from the TV. • TV angle cannot be scratched or broken when dropped or impacted. \ _ _ _/ QUICK iNSTALLATiON TiPS Attach your AQUOS television in the below figure and bundle the cords properly with cable clamps and a cable tie. Clean the screen by a heat source or use ... SHOCK, DO NOT TOUCH UN-iNSULATED PARTS OF ANY CABLES WITH THE AC CORD CONNECTED. Gently _ _-_. The screen is designed for the AQUOS television into the AC outlet. Place the TV close to lightly moisten. POWER indicator • Speakers cannot be detached from the box • It's best...
Operation Manual
Page 11
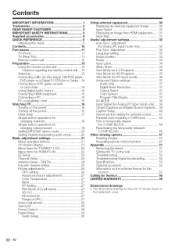
...iMPORTANT iNFORMATiON 1 Trademarks 2 DEAR SHARP CUSTOMER 3 iMPORTANT SAFETY INSTRUCTIONS 3 Supplied accessories 6 QUICK REFERENCE 6 Attaching the stand 6 Contents 10 Part names 1t TV (Front 11 TV (Rear/Top 11 Remote control ... for Service 56 LiMiTED WARRANTY 56 Dimensional drawings ,, The dimensional drawings for the LCD TV set are shown on the power 16 Turning off the power 16 Initial setup ... audio mode 20 Basic adjustment settings 21 Menu operation buttons 21 On-Screen Display 21 Menu items for TV/INPUT 1/2/3 22 Menu items for Analog PC input mode only 32 Fine...
...iMPORTANT iNFORMATiON 1 Trademarks 2 DEAR SHARP CUSTOMER 3 iMPORTANT SAFETY INSTRUCTIONS 3 Supplied accessories 6 QUICK REFERENCE 6 Attaching the stand 6 Contents 10 Part names 1t TV (Front 11 TV (Rear/Top 11 Remote control ... for Service 56 LiMiTED WARRANTY 56 Dimensional drawings ,, The dimensional drawings for the LCD TV set are shown on the power 16 Turning off the power 16 Initial setup ... audio mode 20 Basic adjustment settings 21 Menu operation buttons 21 On-Screen Display 21 Menu items for TV/INPUT 1/2/3 22 Menu items for Analog PC input mode only 32 Fine...
Operation Manual
Page 13
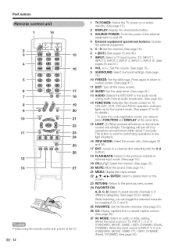
... Select the channek (See page 18.) 20 MUTE: Mute the sound. (See page 19.) 21 MENU: Display the menu screen, 22 A/_'/_/I_/ENTER: screen. Q- 12 1 TV POWER: Switch the TV power on or enters standby. (See page 16.) 2 DISPLAY: Display the channel information. 3 SOURCE POWER: Turns the power ... equipment on the 23 RETURN: Return to the previous menu screen. 24 FAVORITE OH A, B, C, D: Select 4 preset favorite channeb in 4 different categories. (See page 25 for details.) While watching, you need to press FUNCTION and DISPLAY at the TV. Select a desired item on and eft. 4 External equipment...
... Select the channek (See page 18.) 20 MUTE: Mute the sound. (See page 19.) 21 MENU: Display the menu screen, 22 A/_'/_/I_/ENTER: screen. Q- 12 1 TV POWER: Switch the TV power on or enters standby. (See page 16.) 2 DISPLAY: Display the channel information. 3 SOURCE POWER: Turns the power ... equipment on the 23 RETURN: Return to the previous menu screen. 24 FAVORITE OH A, B, C, D: Select 4 preset favorite channeb in 4 different categories. (See page 25 for details.) While watching, you need to press FUNCTION and DISPLAY at the TV. Select a desired item on and eft. 4 External equipment...
Operation Manual
Page 16
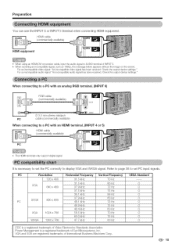
...) When connecting to AUDIO terminal of INPUT 5. • When receiving an incompatible signal, such as 1080p, the message below appears without the image on the screen.
...) When connecting to AUDIO terminal of INPUT 5. • When receiving an incompatible signal, such as 1080p, the message below appears without the image on the screen.
Operation Manual
Page 17
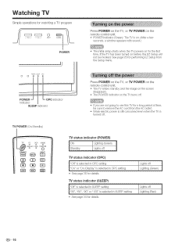
...with sound.) ., The initial setup starts when tile TV powers on for per[orming EZ Setup from the AC outlet. ., Weak electric power is still consumed even when the TV is turned off. The POWER indicator on the screen disappears. TV POWER (On/Standby) O%:!o:o SOURCE LIGHT GE) (3D... REC (3D (3] (E9 (E9 @ TV status indicator (POWER) ON Standby Lighting (Green) 1 m _ TV status indicator (OPC) I ""OOfnf"" iosr s"eOlenc...
...with sound.) ., The initial setup starts when tile TV powers on for per[orming EZ Setup from the AC outlet. ., Weak electric power is still consumed even when the TV is turned off. The POWER indicator on the screen disappears. TV POWER (On/Standby) O%:!o:o SOURCE LIGHT GE) (3D... REC (3D (3] (E9 (E9 @ TV status indicator (POWER) ON Standby Lighting (Green) 1 m _ TV status indicator (OPC) I ""OOfnf"" iosr s"eOlenc...
Operation Manual
Page 18
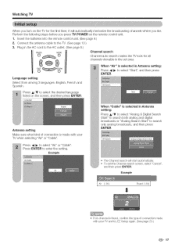
...the AC cord to the AC outlet. (See page 8.) Channel search Channel auto search makes the TV look for the first time, it will start automatically. ., To exit the Channel search screen, select "Cancel" and then press ENTER. When "Air" is selected in the set area....batteries into the remote control unit. (See page 9.) 2. Example ,, The Channel search will automatically memorize the broadcasting channels where you press TV POWER on the screen, and then press ENTER. Language setting Select from among 3 languages: English, French and Spanish. Language Antenna setting Make sure what kind...
...the AC cord to the AC outlet. (See page 8.) Channel search Channel auto search makes the TV look for the first time, it will start automatically. ., To exit the Channel search screen, select "Cancel" and then press ENTER. When "Air" is selected in the set area....batteries into the remote control unit. (See page 9.) 2. Example ,, The Channel search will automatically memorize the broadcasting channels where you press TV POWER on the screen, and then press ENTER. Language setting Select from among 3 languages: English, French and Spanish. Language Antenna setting Make sure what kind...
Operation Manual
Page 20
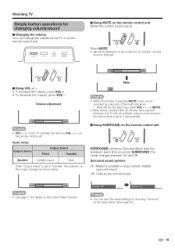
... 30 minutes of the methods below . WatchingTV [] Changing the volume You can change the volume oil the TV or on the remote control unit. Volume adjustment ., VOL-/+ on the screen changes as shown below . -- Mute will be canceled after 30 minutes have the same settings by using ...8226; To increase the volume, press VOL+. • To decrease the volume, press VOL-. Each time you press VOL +/- However, the TV will be displayed oil tile screen for details on the remote control unit Mutes tile current sound output. j voL + • °INPUT L POWE_ [] Using MUTE ...
... 30 minutes of the methods below . WatchingTV [] Changing the volume You can change the volume oil the TV or on the remote control unit. Volume adjustment ., VOL-/+ on the screen changes as shown below . -- Mute will be canceled after 30 minutes have the same settings by using ...8226; To increase the volume, press VOL+. • To decrease the volume, press VOL-. Each time you press VOL +/- However, the TV will be displayed oil tile screen for details on the remote control unit Mutes tile current sound output. j voL + • °INPUT L POWE_ [] Using MUTE ...
Operation Manual
Page 22
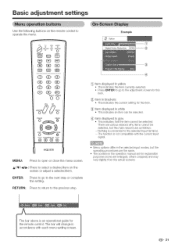
...OH -- ®®@® AQUOS MENU: Press to the selected input terminal. --The function is connected to open or close the menu screen. Item in gray • This indicates that the iterrl cannot be selected. Item displayed in brackets This indicates the current setting for this ...item. Item displayed in yellow This indicates the item currently selected. ., Press ENTER to go to the adjustment screen for the item. beacr tbe°veqilSo_nT_pyryt ir°y_1g1l_iadnfg°i_ rdance with the current input signal. • Menu options ...
...OH -- ®®@® AQUOS MENU: Press to the selected input terminal. --The function is connected to open or close the menu screen. Item in gray • This indicates that the iterrl cannot be selected. Item displayed in brackets This indicates the current setting for this ...item. Item displayed in yellow This indicates the item currently selected. ., Press ENTER to go to the adjustment screen for the item. beacr tbe°veqilSo_nT_pyryt ir°y_1g1l_iadnfg°i_ rdance with the current input signal. • Menu options ...

Operation Manual
Page 24
... Start" and initiate the channel search, the CH Memory for Cable Digital will be deleted. The Channelsearch will start automatically. ,_ To exitthe Channelsearch screen,select "Cancel", and then press ENTER. Press _/1_ to select "Setup". then press _/_ to select "Air" or "Cable". Press MENU ...to enter the setting. Channel search Channel auto search makes the TV look for all channels viewable in Antenna setting: Press _/_ to select "EZ Setup", and then press ENTER. ,, if you already set the ...
... Start" and initiate the channel search, the CH Memory for Cable Digital will be deleted. The Channelsearch will start automatically. ,_ To exitthe Channelsearch screen,select "Cancel", and then press ENTER. Press _/1_ to select "Setup". then press _/_ to select "Air" or "Cable". Press MENU ...to enter the setting. Channel search Channel auto search makes the TV look for all channels viewable in Antenna setting: Press _/_ to select "EZ Setup", and then press ENTER. ,, if you already set the ...
Operation Manual
Page 25
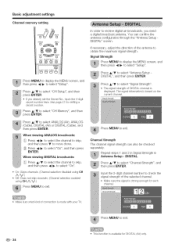
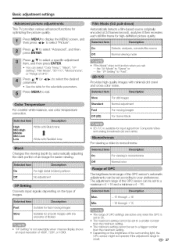
...Signal Strength". - Channel Strength The channel signal strength can confirm the antenna configuration through the "Antenna Setup DIGITAL" screen. Make sure the signal is made with your TV. Press &/Y to select "On", and then press ENTER. Press &/Y to skip, and then press _11/1_to... channels.(Channelselection disabled using CH A/V.) • off: Does not skip channels.(Channelselectionenabled using OH A/V.) Press MENU to display the MENU screen, and then press _11/1_to select "Setup". OhanneJStrength Make sure what kind of the antenna to select "Setup". Basic adjustment settings ...
...Signal Strength". - Channel Strength The channel signal strength can confirm the antenna configuration through the "Antenna Setup DIGITAL" screen. Make sure the signal is made with your TV. Press &/Y to select "On", and then press ENTER. Press &/Y to skip, and then press _11/1_to... channels.(Channelselection disabled using CH A/V.) • off: Does not skip channels.(Channelselectionenabled using OH A/V.) Press MENU to display the MENU screen, and then press _11/1_to select "Setup". OhanneJStrength Make sure what kind of the antenna to select "Setup". Basic adjustment settings ...
Operation Manual
Page 26
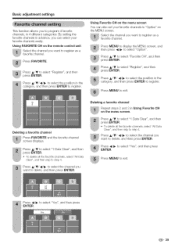
... and then press ENTER to register as a favorite channel. Deleting a favorite channel Press FAVORITE and the favorite channel screen displays. Using Favorite ON on the menu screen You can select your favorite channels in 4 different categories. Select the channel you want to register as a favorite... adjustment settings This function allows you to select "Option". Press MENU to display the MENU screen, and then press _1/1_ to program 4 favorite channels, in "Option" on the menu screen. Deleting a favorite channel Repeat steps 2 and 3 in the category, and then press ENTER...
... and then press ENTER to register as a favorite channel. Deleting a favorite channel Press FAVORITE and the favorite channel screen displays. Using Favorite ON on the menu screen You can select your favorite channels in 4 different categories. Select the channel you want to register as a favorite... adjustment settings This function allows you to select "Option". Press MENU to display the MENU screen, and then press _1/1_ to program 4 favorite channels, in "Option" on the menu screen. Deleting a favorite channel Repeat steps 2 and 3 in the category, and then press ENTER...
Operation Manual
Page 27
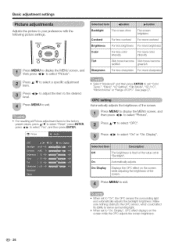
... press _11/1_to select "Picture". Automatically adjusts Displays the ()PC effect on the screen while the ()PC adjusts the screen brightness. (D- 26 Backlight Contrast Brightness Color Tint Press MENU to select "OPC". Sharpness Tile screen dims For less contrast The screen brig htens For more contrast For less brightness For more brightness For less color...
... press _11/1_to select "Picture". Automatically adjusts Displays the ()PC effect on the screen while the ()PC adjusts the screen brightness. (D- 26 Backlight Contrast Brightness Color Tint Press MENU to select "OPC". Sharpness Tile screen dims For less contrast The screen brig htens For more contrast For less brightness For more brightness For less color...
Operation Manual
Page 28
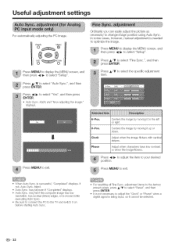
... the OPC sensor's automatic adjustments can be set : -- The brightness level range of images. Basic adjustment settings This TV provides various advanced functions for high-definition picture quality. Press MENU to display the MENU screen, and then press _/_ to "Fast". Press A/Y to exit. Press MENU to select "Advanced", and then press ENTER...
... the OPC sensor's automatic adjustments can be set : -- The brightness level range of images. Basic adjustment settings This TV provides various advanced functions for high-definition picture quality. Press MENU to display the MENU screen, and then press _/_ to "Fast". Press A/Y to exit. Press MENU to select "Advanced", and then press ENTER...

Operation Manual
Page 29
Press MENU to display the MENU screen, and then press _1/_ to select "Surround", and then press ENTER. (_ Audio -- Press _./Y to select "Audio". Press 4/_ to exit. Q- 28 Press MENU to select "On", ... select a specific adjustment iter'n. VOL CH FREEZE 0 MENU O Surround function allows you to select "Audio". FAVORITE CH -- ®®@@ Press MENU to display the MENU screen, and then press _/_ to enjoy realistic "live" sound. Basic adjustment settings You can choose Surround by pressing SURROUND on the remote control unit. (See page...
Press MENU to display the MENU screen, and then press _1/_ to select "Surround", and then press ENTER. (_ Audio -- Press _./Y to select "Audio". Press 4/_ to exit. Q- 28 Press MENU to select "On", ... select a specific adjustment iter'n. VOL CH FREEZE 0 MENU O Surround function allows you to select "Audio". FAVORITE CH -- ®®@@ Press MENU to display the MENU screen, and then press _/_ to enjoy realistic "live" sound. Basic adjustment settings You can choose Surround by pressing SURROUND on the remote control unit. (See page...
Operation Manual
Page 30
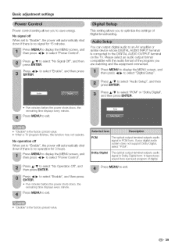
... signal in PCM form. Press MENU to exit. • "Disable" is no signal for 3 hours. Press MENU to display the MENU screen, and then press _11/1_to select "Power Control". It reproduces sound from surround program of Digital broadcasting. This setting allows you are watching and... Five minutes before the power shuts down if there is the factory preset value. ,, When a TV program finishes, this function may not operate. No operation off When set to display the MENU screen, and then press _11/1_to select "Power Control". Press MENU to "Enable", the power will ...
... signal in PCM form. Press MENU to exit. • "Disable" is no signal for 3 hours. Press MENU to display the MENU screen, and then press _11/1_to select "Power Control". It reproduces sound from surround program of Digital broadcasting. This setting allows you are watching and... Five minutes before the power shuts down if there is the factory preset value. ,, When a TV program finishes, this function may not operate. No operation off When set to display the MENU screen, and then press _11/1_to select "Power Control". Press MENU to "Enable", the power will ...
Operation Manual
Page 32
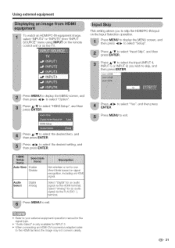
Press A/Y to select "Option". Input 4 (HDMI) Press MENU to display the MENU screen, and then press _11/_-to select "Input Skip", and then press ENTER. Press A/Y to select "...signal via the HDMI terminal. Refer to your external equipment operation manual for INPUT 5. Q- 31 Press MENU to display the MENU screen, and then press _/_ to select the desired item, and then press ENTER. Press _/_ to exit. Auto View Enable Disable... "INPUTS" from "INPUT SOURCE" menu using iNPUT on the remote control unit or on the TV. _I_ INPUT4 This setting allows you wish to skip, and then press ENTER.
Press A/Y to select "Option". Input 4 (HDMI) Press MENU to display the MENU screen, and then press _11/_-to select "Input Skip", and then press ENTER. Press A/Y to select "...signal via the HDMI terminal. Refer to your external equipment operation manual for INPUT 5. Q- 31 Press MENU to display the MENU screen, and then press _/_ to select the desired item, and then press ENTER. Press _/_ to exit. Auto View Enable Disable... "INPUTS" from "INPUT SOURCE" menu using iNPUT on the remote control unit or on the TV. _I_ INPUT4 This setting allows you wish to skip, and then press ENTER.
Operation Manual
Page 33
... low contrast or when the image flickers. When Auto Sync. Auto Sync. Press A/Y to exit. V-Pos. Centers the image by moving it to the TV and switch it cannot be selected. is not necessary to your desired position. failed. ,, Auto Sync. Be sure to connect the PC to the left...to select "Fine Sync.", and then press ENTER. In some cases, however, manual adjustment is needed to select "Setup". Press MENU to display the MENU screen, and then press _ll/l_ to optimize the image. starts and "Now adjusting tile image." displays. !! Centers the image by moving it up or down...
... low contrast or when the image flickers. When Auto Sync. Auto Sync. Press A/Y to exit. V-Pos. Centers the image by moving it to the TV and switch it cannot be selected. is not necessary to your desired position. failed. ,, Auto Sync. Be sure to connect the PC to the left...to select "Fine Sync.", and then press ENTER. In some cases, however, manual adjustment is needed to select "Setup". Press MENU to display the MENU screen, and then press _ll/l_ to optimize the image. starts and "Now adjusting tile image." displays. !! Centers the image by moving it up or down...
Operation Manual
Page 34
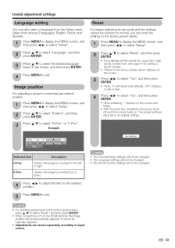
...", and then press ENTER. ,_ if you can also select a language from among 3 languages: English, French and Spanish. Press _1/1_ to its original settings. The screen will have returned to select "Yes", and then press ENTER. ,, "Now, TVwill restart automatically. Press MENU to display the MENU...it up or down. Press MENU to select "Position", and then press ENTER. Press A/Y to display the MENU screen, and then press _11/1_to select "Setup". Press MENU to display the MENU screen, and then press _1/1_ to the desired position. OK?" Press _1/1_ to adjust the item to select...
...", and then press ENTER. ,_ if you can also select a language from among 3 languages: English, French and Spanish. Press _1/1_ to its original settings. The screen will have returned to select "Yes", and then press ENTER. ,, "Now, TVwill restart automatically. Press MENU to display the MENU...it up or down. Press MENU to select "Position", and then press ENTER. Press A/Y to display the MENU screen, and then press _11/1_to select "Setup". Press MENU to display the MENU screen, and then press _1/1_ to the desired position. OK?" Press _1/1_ to adjust the item to select...


