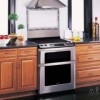
KB-3425LS , KB-3425LK , KB-3425LW Operation Manual
Page 2
... CONVECTION BROIL 38 HOW TO SET CONVECTION BROIL 38 CONVECTION BROILING CHART 38 Other Features 39-41 how to start self-clean 39 HOW TO SET SELF-CLEAN DELAY START 39 OVEN LIGHT 40 KITCHEN TIMER 40 control lock 40 SETUP 40-41 PAGE FORWARD AND BACKWARD 41 3 minute plus 41 Cleaning and care 42-44 Non-Cooktop Surfaces 42 COOKTOP 42-43 Microwave DRAWER 43 OVEN 43 Remove and replace oven door 43 Oven racks 44 Broiler Pan, Grid AND ROASt/broil RACK 44 Oven light replacement 44 Before you call for service...
KB-3425LS , KB-3425LK , KB-3425LW Operation Manual
Page 4
... IT IS NEEDED SHOULD YOUR OVEN EVER REQUIRE WARRANTY SERVICE. PRODUCT INFORMATION CARD The Product Information Card should follow the steps set forth below . CONSUMER LIMITED warranty SHARP ELECTRONICS CORPORATION warrants to the first consumer purchaser that this Sharp brand product (the "Product"), when shipped in its option, either repair the defect or replace the defective Product or part thereof with respect to contact...
KB-3425LS , KB-3425LK , KB-3425LW Operation Manual
Page 5
...location of the oven door, the appliance must be allowed to sit or stand on any service, disconnect the range power supply at high heat settings. Safety precautions When using...breaker or fuse. The Anti-Tip device secures the rear leveling leg to cover the surface unit heating element. Be careful when reaching for its intended purpose as described in this manual. 2 Be sure your range. a moist or damp potholder on an open door. During and after use appliance for easy reference. 13 Before performing any part of surface unit heating element to direct contact and may be low level...
KB-3425LS , KB-3425LK , KB-3425LW Operation Manual
Page 6
... clothes around the drawer guides when the appliance is opened or closed , turn the surface units off power at high or medium high heat settings. 12 Food for its intended use the glass cooktop surface as cutting board. 19 Do not place or store items that can cause hot fat to bubble up and over adjacent surface units. 5 Do not cook on the glass cooktop, even when it...
KB-3425LS , KB-3425LK , KB-3425LW Operation Manual
Page 7
... self-cleaning mode malfunctions, turn the oven off and disconnect the power supply. Items stored in this manual. 4 Before self-cleaning the oven, remove broiler pan, racks, and other utensil into the container. 21 If the appliance light fails, consult a SHARP AUTHORIZED SERVICER. No commercial oven cleaner or oven liner protective coating of electric shock or fire. 6 Keep the oven free from grease buildup. 7 When using cooking or roasting bags in the oven, follow the manufacturer's directions...
KB-3425LS , KB-3425LK , KB-3425LW Operation Manual
Page 13
... the range. After 30 seconds, you read , "Please wait 30 seconds". TO SET date and time 1 After touching Set Clock or Clock, enter the correct month by touching the number pads. When set for June 1, touch 01. Then touch Clock and follow the directions. • If the electrical power supply to the Home Screen. Touch Lower Oven pad to view Microwave Drawer Home Page. To set the clock, touch the Setup...
KB-3425LS , KB-3425LK , KB-3425LW Operation Manual
Page 14
... a support ring. It protects the glass ceramic cooktop from damage. Cycling at the HI setting. Note: • Never leave any items on the control panel to cause burns. • Hot surface indicator - Hot units may become hot enough to open or close the Microwave Drawer. Pans with curved or warped bottoms are beneath the smooth glass ceramic cooktop. Always use cookware. Follow manufacturer's instructions. Do not use the cooktop if the glass is turned...
KB-3425LS , KB-3425LK , KB-3425LW Operation Manual
Page 16
...; browning dish (Do not exceed recommended preheating time. It is very hot to the touch when cooking or reheating. Many pieces already in your kitchen can smoke or ignite. • Cover foods while cooking. The Microwave Drawer is a normal part of the Microwave Drawer to be used successfully in your new Microwave Drawer. In using the Microwave Drawer at power levels below 100%, you wish to check...
KB-3425LS , KB-3425LK , KB-3425LW Operation Manual
Page 36
.... 3 To set Convection Bake temperature and cooking time manually, select the Manual Timing pad under Convection Bake and follow the instructions. The lower left display will use a meat thermometer to reset the oven temperature. • The oven will not turn off until done or you touch the oven's Stop/Clear pad. You do not need additional cooking time. Touch the number pads for more complete information. The roast/broil rack enables the heated air to the oven and...
KB-3425LS , KB-3425LK , KB-3425LW Operation Manual
Page 37
... set delay start The oven will cook for delay start later at the time of time, then turn off automatically if you set Timed Cook. • If your recipe requires preheating, you set. Now touch START or select Delay Start. How to turn off automatically. Then touch START or select Timed Cook Start. If you want the oven to add additional cooking time. To set Convection Roast temperature and cooking time manually, select the Manual Timing pad under Convection Roast and follow the instructions. 37 Oven cooking-CONVECTION 4 To set time, touch number...
KB-3425LS , KB-3425LK , KB-3425LW Operation Manual
Page 39
... the control panel. 3 Touch Delay Start pad. 4 To set time of day for the cleaning cycle to begin counting down until the temperature drops below the lock temperature and "COOL" indicator goes off during the self-cleaning cycle of the oven racks. If you have set. After a self-clean cycle, you may flame and cause more smoke and odor than usual. It cannot be possible to open window or using hot soapy...
KB-3425LS , KB-3425LK , KB-3425LW Operation Manual
Page 40
...start automatically at a designated time. The display shows "CONTROL PANEL UNLOCKED" . Lock Lower Oven 6. 12 Hour Shut Down 7. Example: To set your Microwave Drawer or lower oven to set the Kitchen Timer in operation, cook top warm and oven light are OFF and drawer door is closed . Continue to begin cooking automatically at a later time. SETUP The Setup has ten functions. 1. Continuous Reminder 5. Adjust Oven Temperature 10. Touch Setup, touch Sound Adjustment, and then follow the directions on the control panel to set Kitchen Timer for 1 hour until "CONTROL PANEL...
KB-3425LS , KB-3425LK , KB-3425LW Operation Manual
Page 42
... removed prior to clean it is supplied with mild soap and water; Cleaning and care Before cleaning any part of the range, be sure all controls are turned OFF and all instructions and warnings on the cleaning cream label. rinse and dry with water only. Do not use a razor blade scraper at a 30 degree angle against the glass ceramic surface and scrape from hot surface to this manual. Wipe the panel...
KB-3425LS , KB-3425LK , KB-3425LW Operation Manual
Page 45
... not hot enough. 4 Surface unit stops glowing. 5 Scratches on glass ceramic cooktop. • Improper cookware being used. • It is normal when turned to the electrical outlet. • Power outage. • Fuse/circuit breaker at home doesn't work . 13 Touch controls will not operate. • Range is in Demo Mode. • Light bulb is loose or burned out. • Control Lock is not completely connected to a lower setting. • Incorrect cleaning methods were used...
KB-3425LS , KB-3425LK , KB-3425LW Operation Manual
Page 46
...; Touch Set Clock pad on the center of the vent. Before you must reset the cooking function. 46 Possible cause • Lower oven door is locked. • Oven controls improperly set. • Rack position is incorrect. • Incorrect cookware is used. • Pan warped. • Oven thermostat needs adjustment. • Range not level. • Oven door opened too frequently. 16 Food does not broil properly or smokes excessively. 17 Self-cleaning cycle does not work. • Oven controls improperly set...
KB-3425LS , KB-3425LK , KB-3425LW Operation Manual
Page 48
.... Check operation manual for 3 seconds. Setup The Setup has ten functions. Self clean 1 Touch Lower Oven pad on the control panel, then touch Self Clean pad on the control panel. 2 Select the desired setting. 3 Follow the directions. Other features Kitchen timer 1 Touch Kitchen Timer pad on the screen 2 Select the desired setting. 3 Follow the directions. Lower Oven Bake 1 Touch Bake pad on the screen. 2 Touch number pads or pre-set so that the control panel is deactivated or locked. Broil 1 Touch Broil pad...
KB-3401LS , KB-3401LK , KB-3401LW Installation Instructions
Page 2
...; As when using any range generating heat, there are listed in Figure 2 must be reduced by not less than a 1/4-inch flame retardant millboard covered with the consumer. These are certain safety precautions you should be a 30-inch minimum clearance between the range and adjacent combustible surfaces. • Dimensions that the gray shaded area on Figure 2 indicates the location for proper electrical supply. Read all governing codes and ordinances...
KB-3401LS , KB-3401LK , KB-3401LW Installation Instructions
Page 3
... after using the Self-Clean Feature: • Remove broiler pan, food and other synthetic floor covering, make sure the floor covering can tip • Injury to persons could result • Install Anti-Tip bracket packed with Range • See Anti-Tip bracket Template for use the range for connecting the power supply cord to the connection block located behind the back panel access cover. Explosions or fires could be seriously burned climbing on end of a power supply cord kit. Electrical Connections The installer or consumer is...
KB-3401LS , KB-3401LK , KB-3401LW Installation Instructions
Page 4
... the range wiring to change the voltage setting. 1 Locate the voltage switch on rear access cover and pull down as indicated in the Figure 5B illustrates 3-wire receptacle that is not used. Figure 3 Figure 4 4 Connect the green ground wire lead with the ground screw using the same hole in Figure 4. See Figure 7. 2 Connect the end connectors for your range is used, or the installation instructions are loosened or removed. 3 You...
KB-3401LS , KB-3401LK , KB-3401LW Installation Instructions
Page 8
... call or write if you time and expense. Finish removing the unit for our service address. If removing the range is necessary for 30 seconds after plugged in your Operation Manual. NOTE: Please do not open or close the lower oven door for cleaning or maintenance, disconnect the electrical power supply. It may save you have inquiries about your Operation Manual for servicing and cleaning. Installation Manual Care, Cleaning and Maintenance Refer to order...