

KB-3000JS , KB-3300JK , KB-3300JW Operation Manual
Page 8
PARTS NAME ELECTRIC RANGE WITH MICROWAVE DRAWER 9 10 1 11 2 6 3 12 4 13 5 14 6 15 7 16 8 1 Hot surface indicator 2 Control panel 3 Cooktop-on indicator 4 Waveguide cover DO NOT REMOVE 5 Drawer sealing surfaces 6 Microwave Drawer guides 7 Oven 8 Gasket 9 Adjustable backsplash 10 Glass ceramic cooktop 11 Control knobs 12 Drawer light 13 Microwave Drawer Menu Label 14 Microwave Drawer™ 15 Rack supports 16 Oven door 17 Top heating element 18 Oven door lock 19 Oven light 20 Bottom heating element 21 Broiler pan grid 22 Broiler pan 23 Standard rack 24 EZ Pull rack 8
PARTS NAME ELECTRIC RANGE WITH MICROWAVE DRAWER 9 10 1 11 2 6 3 12 4 13 5 14 6 15 7 16 8 1 Hot surface indicator 2 Control panel 3 Cooktop-on indicator 4 Waveguide cover DO NOT REMOVE 5 Drawer sealing surfaces 6 Microwave Drawer guides 7 Oven 8 Gasket 9 Adjustable backsplash 10 Glass ceramic cooktop 11 Control knobs 12 Drawer light 13 Microwave Drawer Menu Label 14 Microwave Drawer™ 15 Rack supports 16 Oven door 17 Top heating element 18 Oven door lock 19 Oven light 20 Bottom heating element 21 Broiler pan grid 22 Broiler pan 23 Standard rack 24 EZ Pull rack 8

KB-3000JS , KB-3300JK , KB-3300JW Operation Manual
Page 10
... keysheet illustration indicate pages on which there are feature descriptions and usage information. PARTS NAME GLASS CERAMIC COOKTOP CONTROL KNOBS OFF LO HI OFF LO HI Cooktop MED MED HOT SURFACE INDICATOR LIGHTS CONTROL PANEL CONTROL KNOBS OFF LO HI OFF SMALL LARGE HI HI MED MED Cooktop MED LO LO 13 13 OVEN KEYSHEET...
... keysheet illustration indicate pages on which there are feature descriptions and usage information. PARTS NAME GLASS CERAMIC COOKTOP CONTROL KNOBS OFF LO HI OFF LO HI Cooktop MED MED HOT SURFACE INDICATOR LIGHTS CONTROL PANEL CONTROL KNOBS OFF LO HI OFF SMALL LARGE HI HI MED MED Cooktop MED LO LO 13 13 OVEN KEYSHEET...

KB-3000JS , KB-3300JK , KB-3300JW Operation Manual
Page 12
... limiter that allows the unit to cycle on it can occur when improper cookware is on, the cooktop-on indicator, next to the surface cooking control knob, comes on . Follow manufacturerʼs instructions.
... limiter that allows the unit to cycle on it can occur when improper cookware is on, the cooktop-on indicator, next to the surface cooking control knob, comes on . Follow manufacturerʼs instructions.

KB-3000JS , KB-3300JK , KB-3300JW Operation Manual
Page 13
... and type of the cooktop, will glow when a radiant unit is turned on the radiant surface unit. 2 To use the large surface unit, push the knob in fluence the setting needed. 13 Remove pan. Note for deep fat frying or to OFF. If possible, turn it to the right, clockwise... OFF LO HI OFF SMALL LARGE HI HI MED MED Cooktop MED LO LO RADIANT SURFACE UNITS Surface units are using the control knobs. It will in and turn the knob to cook. It may be necessary to remove the pan from the unit to about 150˚F. Always reduce setting to a lower...
... and type of the cooktop, will glow when a radiant unit is turned on the radiant surface unit. 2 To use the large surface unit, push the knob in fluence the setting needed. 13 Remove pan. Note for deep fat frying or to OFF. If possible, turn it to the right, clockwise... OFF LO HI OFF SMALL LARGE HI HI MED MED Cooktop MED LO LO RADIANT SURFACE UNITS Surface units are using the control knobs. It will in and turn the knob to cook. It may be necessary to remove the pan from the unit to about 150˚F. Always reduce setting to a lower...

KB-3000JS , KB-3300JK , KB-3300JW Operation Manual
Page 26
... cleaners. Metal parts will be sure all controls are turned OFF and all pans immediately. 2 Wearing an oven mitt, use a new, sharp razor scraper. 26 CONTROL KNOBS The control knobs may stain, streak or dull the door surface. See the Control Lock information on the cleaning cream label. ... TOUCH START . 2 Touch START pad. Call an authorized servicer. NON-COOKTOP SURFACES EXTERIOR The outside with mild soap and water; TOUCH CONTROL PANEL If desired, the touch pads may interact and damage the surface. There are cool. Clean with a soft cloth dampened with a ...
... cleaners. Metal parts will be sure all controls are turned OFF and all pans immediately. 2 Wearing an oven mitt, use a new, sharp razor scraper. 26 CONTROL KNOBS The control knobs may stain, streak or dull the door surface. See the Control Lock information on the cleaning cream label. ... TOUCH START . 2 Touch START pad. Call an authorized servicer. NON-COOKTOP SURFACES EXTERIOR The outside with mild soap and water; TOUCH CONTROL PANEL If desired, the touch pads may interact and damage the surface. There are cool. Clean with a soft cloth dampened with a ...
Service Manual
Page 25
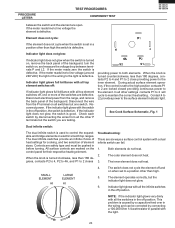
...If indicator light glows full brilliance with all the infinite switches in a position other P terminals but the indicator light does not glow. 6. Controls are marked on all the other than 180 degrees, contacts P2 to 4 and P1 to 2 close providing power to the light is defective.... and the element are testing. Contact 4 to L2 provides power to the element. PROCEDURE LETTER TEST PROCEDURES COMPONENT TEST KB-3300JS KB-3300JK KB-3300JW between terminals P and L2. When the knob is turned on, remove the back panel of heat settings for their respective heating element.
...If indicator light glows full brilliance with all the infinite switches in a position other P terminals but the indicator light does not glow. 6. Controls are marked on all the other than 180 degrees, contacts P2 to 4 and P1 to 2 close providing power to the light is defective.... and the element are testing. Contact 4 to L2 provides power to the element. PROCEDURE LETTER TEST PROCEDURES COMPONENT TEST KB-3300JS KB-3300JK KB-3300JW between terminals P and L2. When the knob is turned on, remove the back panel of heat settings for their respective heating element.
Service Manual
Page 40
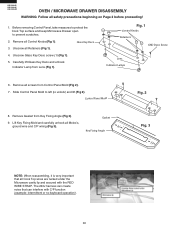
... Key Deco and unhook Indicator Lamp from Control Panel Mold (Fig 2). 7. Lift Key Fixing Mold and carefully unhook all Control Knobs (Fig 1). 3. Unscrew Glass Key Deco screw (1) (Fig 1). 5. Fig. 1 Control Knobs Retainers GND Deco Screw Lens Indicator Lamps 6. Slide Control Panel Mold to left (to prevent scratches...that can interfere with the RED WIRE STRAP. Unscrew all safety precautions beginning on Page 2 before proceeding! 1. KB-3300JS KB-3300JK KB-3300JW OVEN / MICROWAVE DRAWER DISASSEMBLY WARNING: Follow all Retainers (Fig 1). Control Panel Mold Fig. 2 8.
... Key Deco and unhook Indicator Lamp from Control Panel Mold (Fig 2). 7. Lift Key Fixing Mold and carefully unhook all Control Knobs (Fig 1). 3. Unscrew Glass Key Deco screw (1) (Fig 1). 5. Fig. 1 Control Knobs Retainers GND Deco Screw Lens Indicator Lamps 6. Slide Control Panel Mold to left (to prevent scratches...that can interfere with the RED WIRE STRAP. Unscrew all safety precautions beginning on Page 2 before proceeding! 1. KB-3300JS KB-3300JK KB-3300JW OVEN / MICROWAVE DRAWER DISASSEMBLY WARNING: Follow all Retainers (Fig 1). Control Panel Mold Fig. 2 8.

Service Manual
Page 60
...[KB3300JS] [KB3300JK] Glass key unit [KB3300JW] Glass key deco [KB3300JS] Glass key deco [KB3300JK] Glass key deco [KB3300JW] Retainer [KB3300JS] [KB3300JK] Retainer [KB3300JW] Control knob [KB3300JS] [KB3300JK] Control knob [KB3300JW] C/P frame [KB3300JS] [KB3300JK] C/P frame [KB3300JW] C/P support R [KB3300JS] [KB3300JK] C/P support R [KB3300JW] C/P support L [KB3300JS] [KB3300JK] ...PARTS DELIVERY SECTION REF. The parts marked "*" are used in voltage more than 250V. KB-3300JS KB-3300JK KB-3300JW CONTROL PANEL PARTS LIST Note: The parts marked "∆" may cause undue microwave exposure.
...[KB3300JS] [KB3300JK] Glass key unit [KB3300JW] Glass key deco [KB3300JS] Glass key deco [KB3300JK] Glass key deco [KB3300JW] Retainer [KB3300JS] [KB3300JK] Retainer [KB3300JW] Control knob [KB3300JS] [KB3300JK] Control knob [KB3300JW] C/P frame [KB3300JS] [KB3300JK] C/P frame [KB3300JW] C/P support R [KB3300JS] [KB3300JK] C/P support R [KB3300JW] C/P support L [KB3300JS] [KB3300JK] ...PARTS DELIVERY SECTION REF. The parts marked "*" are used in voltage more than 250V. KB-3300JS KB-3300JK KB-3300JW CONTROL PANEL PARTS LIST Note: The parts marked "∆" may cause undue microwave exposure.


