
KB-3000JS , KB-3300JK , KB-3300JW Operation Manual
Page 2
...4 PRODUCT INFORMATION CARD 4 IMPORTANT SAFETY INSTRUCTIONS 5-7 IMPORTANT SAFETY NOTICE AND WARNING............5 SAFETY PRECAUTIONS 5 RADIANT SURFACE UNITS 6 MICROWAVE DRAWER 6-7 OVEN 7 SELF-CLEANING OVEN 7 PARTS 8-10 ADJUSTABLE HEIGHT BACKSPLASH 9 BEFORE OPERATING 11 TO SET THE CLOCK 11 TIMERS 11 STOP/CLEAR 11 COOKTOP USE 12-13... HELP 25-26 CLEANING AND CARE 26-28 NON-COOKTOP SURFACES 26 COOKTOP 26 MICROWAVE DRAWER 27 OVEN 27 REMOVE AND REPLACE OVEN DOOR 27 OVEN LIGHT REPLACEMENT 28 OVEN RACKS 28 BROILER PAN AND GRID 28 BEFORE YOU CALL FOR SERVICE 29-30 AUTO-TOUCH GUIDE...
...4 PRODUCT INFORMATION CARD 4 IMPORTANT SAFETY INSTRUCTIONS 5-7 IMPORTANT SAFETY NOTICE AND WARNING............5 SAFETY PRECAUTIONS 5 RADIANT SURFACE UNITS 6 MICROWAVE DRAWER 6-7 OVEN 7 SELF-CLEANING OVEN 7 PARTS 8-10 ADJUSTABLE HEIGHT BACKSPLASH 9 BEFORE OPERATING 11 TO SET THE CLOCK 11 TIMERS 11 STOP/CLEAR 11 COOKTOP USE 12-13... HELP 25-26 CLEANING AND CARE 26-28 NON-COOKTOP SURFACES 26 COOKTOP 26 MICROWAVE DRAWER 27 OVEN 27 REMOVE AND REPLACE OVEN DOOR 27 OVEN LIGHT REPLACEMENT 28 OVEN RACKS 28 BROILER PAN AND GRID 28 BEFORE YOU CALL FOR SERVICE 29-30 AUTO-TOUCH GUIDE...

KB-3000JS , KB-3300JK , KB-3300JW Operation Manual
Page 3
... in harmful exposure to accumulate on the unit. It is particularly important that the oven door close properly and that there is damaged. We also suggest you record all the information listed and retain for : ADDITIONAL OVEN RACKS TO WRITE: Sharp Electronics Corporation Customer Assistance Center 1300 Naperville Drive Romeoville, IL 60446-1091 Please...
... in harmful exposure to accumulate on the unit. It is particularly important that the oven door close properly and that there is damaged. We also suggest you record all the information listed and retain for : ADDITIONAL OVEN RACKS TO WRITE: Sharp Electronics Corporation Customer Assistance Center 1300 Naperville Drive Romeoville, IL 60446-1091 Please...

KB-3000JS , KB-3300JK , KB-3300JW Operation Manual
Page 5
... after use a dry chemical or foam-type extinguisher. To reduce the risk of tipping of the appliance from abnormal usage by excessive loading of the oven door, the appliance must be seriously injured. 11 Do not touch the surface units, heating elements or the interior surface of the... had sufficient time to a qualified technician. 7 Do not store flammable materials in an oven, Microwave Drawer or near the vent opening, oven door and window and area around the door. 12 Have the installer show you or a child stand, sit or lean on any service, disconnect the range power...
... after use a dry chemical or foam-type extinguisher. To reduce the risk of tipping of the appliance from abnormal usage by excessive loading of the oven door, the appliance must be seriously injured. 11 Do not touch the surface units, heating elements or the interior surface of the... had sufficient time to a qualified technician. 7 Do not store flammable materials in an oven, Microwave Drawer or near the vent opening, oven door and window and area around the door. 12 Have the installer show you or a child stand, sit or lean on any service, disconnect the range power...

KB-3000JS , KB-3300JK , KB-3300JW Operation Manual
Page 8
PARTS NAME ELECTRIC RANGE WITH MICROWAVE DRAWER 9 10 1 11 2 6 3 12 4 13 5 14 6 15 7 16 8 1 Hot surface indicator 2 Control panel 3 Cooktop-on indicator 4 Waveguide cover DO NOT REMOVE 5 Drawer sealing surfaces 6 Microwave Drawer guides 7 Oven 8 Gasket 9 Adjustable backsplash 10 Glass ceramic cooktop 11 Control knobs 12 Drawer light 13 Microwave Drawer Menu Label 14 Microwave Drawer™ 15 Rack supports 16 Oven door 17 Top heating element 18 Oven door lock 19 Oven light 20 Bottom heating element 21 Broiler pan grid 22 Broiler pan 23 Standard rack 24 EZ Pull rack 8
PARTS NAME ELECTRIC RANGE WITH MICROWAVE DRAWER 9 10 1 11 2 6 3 12 4 13 5 14 6 15 7 16 8 1 Hot surface indicator 2 Control panel 3 Cooktop-on indicator 4 Waveguide cover DO NOT REMOVE 5 Drawer sealing surfaces 6 Microwave Drawer guides 7 Oven 8 Gasket 9 Adjustable backsplash 10 Glass ceramic cooktop 11 Control knobs 12 Drawer light 13 Microwave Drawer Menu Label 14 Microwave Drawer™ 15 Rack supports 16 Oven door 17 Top heating element 18 Oven door lock 19 Oven light 20 Bottom heating element 21 Broiler pan grid 22 Broiler pan 23 Standard rack 24 EZ Pull rack 8

KB-3000JS , KB-3300JK , KB-3300JW Operation Manual
Page 11
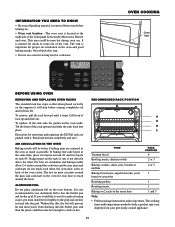
Note: • Please do not open or close the lower oven door for 30 seconds after the power is reinstated. TO SET ...the range. When the timer reaches 60 minutes, the timer will always count down in the display. OVEN BEFORE OPERATING MICROWAVE Before operating your range should be interrupted, the display will intermittently show ENJOY YOUR ... Note: • The Microwave Drawer can be used, follow these steps: 1 Plug in . The Oven can be programmed with the door open except for 3 seconds. STOP/CLEAR Touch the Stop/Clear pad to enter an incorrect clock time, ...
Note: • Please do not open or close the lower oven door for 30 seconds after the power is reinstated. TO SET ...the range. When the timer reaches 60 minutes, the timer will always count down in the display. OVEN BEFORE OPERATING MICROWAVE Before operating your range should be interrupted, the display will intermittently show ENJOY YOUR ... Note: • The Microwave Drawer can be used, follow these steps: 1 Plug in . The Oven can be programmed with the door open except for 3 seconds. STOP/CLEAR Touch the Stop/Clear pad to enter an incorrect clock time, ...
KB-3000JS , KB-3300JK , KB-3300JW Operation Manual
Page 21
...the rack onto the guides on the rack so one is not directly above the other , the oven door, sides or back of the front panel between the Microwave Drawer and oven. AIR CIRCULATION IN THE OVEN Baking results will be sure pans and cookware do not touch each other . Without the slits, ... same time 1 and 3 Note: • Follow package instructions and recipe times. If baking four cake layers at the right side of the oven cavity. The oven vent is not recommended to make cleaning easier, you must circulate around the food. Tilt the front of rack up and slide out. ALUMINUM...
...the rack onto the guides on the rack so one is not directly above the other , the oven door, sides or back of the front panel between the Microwave Drawer and oven. AIR CIRCULATION IN THE OVEN Baking results will be sure pans and cookware do not touch each other . Without the slits, ... same time 1 and 3 Note: • Follow package instructions and recipe times. If baking four cake layers at the right side of the oven cavity. The oven vent is not recommended to make cleaning easier, you must circulate around the food. Tilt the front of rack up and slide out. ALUMINUM...

KB-3000JS , KB-3300JK , KB-3300JW Operation Manual
Page 24
... turnover No turnover OTHER FEATURES HOW TO START SELF-CLEAN Remember to allow time for the oven to cool down and the oven door to unlock (approx. 1 hour) if you are not wiped up with an open the door until the temperature drops below the lock temperature and LOCK indicator goes off . To avoid...off during the self-cleaning cycle. 1 Touch Self Clean pad. The glass ceramic cooktop and the Microwave Drawer can be removed. When the door is closed, press Oven Light pad on the control panel to open window or using hot soapy water and cloth before the self-cleaning cycle, they will not...
... turnover No turnover OTHER FEATURES HOW TO START SELF-CLEAN Remember to allow time for the oven to cool down and the oven door to unlock (approx. 1 hour) if you are not wiped up with an open the door until the temperature drops below the lock temperature and LOCK indicator goes off . To avoid...off during the self-cleaning cycle. 1 Touch Self Clean pad. The glass ceramic cooktop and the Microwave Drawer can be removed. When the door is closed, press Oven Light pad on the control panel to open window or using hot soapy water and cloth before the self-cleaning cycle, they will not...

KB-3000JS , KB-3300JK , KB-3300JW Operation Manual
Page 26
... an oven mitt, use a new, sharp razor scraper. 26 Be sure to use a razor blade scraper at a 30 degree angle against the glass ceramic surface and scrape from hot surface to it . There are the exception to clean it . OTHER FEATURES LOCK LOWER OVEN Door of lower oven can ... cooktop, clean the cooktop with a soft damp cloth to insure proper placement. LOWER OVEN ? LOCK OVEN CLEANING AND CARE TO UNLOCK OVEN DOOR 1 Touch Setup/Custom Help pad eight times. OUTSIDE OF THE DOOR Wipe the window on the cleaning cream label. CONTROL KNOBS The control knobs may stain...
... an oven mitt, use a new, sharp razor scraper. 26 Be sure to use a razor blade scraper at a 30 degree angle against the glass ceramic surface and scrape from hot surface to it . There are the exception to clean it . OTHER FEATURES LOCK LOWER OVEN Door of lower oven can ... cooktop, clean the cooktop with a soft damp cloth to insure proper placement. LOWER OVEN ? LOCK OVEN CLEANING AND CARE TO UNLOCK OVEN DOOR 1 Touch Setup/Custom Help pad eight times. OUTSIDE OF THE DOOR Wipe the window on the cleaning cream label. CONTROL KNOBS The control knobs may stain...

KB-3000JS , KB-3300JK , KB-3300JW Operation Manual
Page 27
...as possible. 3 Apply the cleaner cream over the hooks. 3 Grab the door by covering the paper towel with a soft dry cloth in order to use a new, sharp razor scraper. OVEN CAUTION Before cleaning any part of the oven, be removed immediately after they occur. Replace gasket when it is made from... no heat is safe for glass ceramic cooktops. 2 Scrub to remove as much soil as it requires special care. REMOVE AND REPLACE OVEN DOOR 1 Open the door to future use. 1 Dampen a "scratchless" or "never scratch" pad that is generated to cool before unlocking the hinge levers. • Do ...
...as possible. 3 Apply the cleaner cream over the hooks. 3 Grab the door by covering the paper towel with a soft dry cloth in order to use a new, sharp razor scraper. OVEN CAUTION Before cleaning any part of the oven, be removed immediately after they occur. Replace gasket when it is made from... no heat is safe for glass ceramic cooktops. 2 Scrub to remove as much soil as it requires special care. REMOVE AND REPLACE OVEN DOOR 1 Open the door to future use. 1 Dampen a "scratchless" or "never scratch" pad that is generated to cool before unlocking the hinge levers. • Do ...

KB-3000JS , KB-3300JK , KB-3300JW Operation Manual
Page 28
.... The broiler pan and grid can be turned on when the door is in the dishwasher. The high temperature will turn the oven light on automatically when the oven door is unplugged and all parts are COOL before replacing the oven lightbulb. Wash in oven during self-cleaning cycle. Note: • If the racks become hard...
.... The broiler pan and grid can be turned on when the door is in the dishwasher. The high temperature will turn the oven light on automatically when the oven door is unplugged and all parts are COOL before replacing the oven lightbulb. Wash in oven during self-cleaning cycle. Note: • If the racks become hard...

KB-3000JS , KB-3300JK , KB-3300JW Operation Manual
Page 29
...the surface unit selected. 4 Surface unit stops glowing. • It is normal when turned to a lower setting. 5 Scratches on . • Lower oven door is locked. • See page 25 to unlock. • See page 26 to remove the marks. • Boilovers are flat and match the.... • Fuse/circuit breaker at -bottomed cookware. See page 26. • Cookware with cooktop cleaning cream to unlock oven door. 29 See page 21. • Allow the oven to cool below locking temperature and then reset to the appliance. • Surface controls improperly set. • See SOLUTION ...
...the surface unit selected. 4 Surface unit stops glowing. • It is normal when turned to a lower setting. 5 Scratches on . • Lower oven door is locked. • See page 25 to unlock. • See page 26 to remove the marks. • Boilovers are flat and match the.... • Fuse/circuit breaker at -bottomed cookware. See page 26. • Cookware with cooktop cleaning cream to unlock oven door. 29 See page 21. • Allow the oven to cool below locking temperature and then reset to the appliance. • Surface controls improperly set. • See SOLUTION ...

KB-3000JS , KB-3300JK , KB-3300JW Operation Manual
Page 30
...locking temperature. 19 Strong odor or light smoke • This is normal for leveling the range. • Open oven door only after a few uses. If the oven was closed during broiling. • Check if the controls have been properly set. BEFORE YOU CALL FOR SERVICE ...PROBLEM POSSIBLE CAUSE SOLUTION 15 Poor baking results. • Oven controls improperly set. • Rack position is incorrect. • Incorrect cookware is used . • Oven door was in the oven. 16 Food does not broil properly • Oven controls improperly set a work. See page 22. • See...
...locking temperature. 19 Strong odor or light smoke • This is normal for leveling the range. • Open oven door only after a few uses. If the oven was closed during broiling. • Check if the controls have been properly set. BEFORE YOU CALL FOR SERVICE ...PROBLEM POSSIBLE CAUSE SOLUTION 15 Poor baking results. • Oven controls improperly set. • Rack position is incorrect. • Incorrect cookware is used . • Oven door was in the oven. 16 Food does not broil properly • Oven controls improperly set a work. See page 22. • See...

Service Manual
Page 20
...Approx. 18V D.C. Approx. 24V D.C. Remove the old keyboard glass unit (see page 38) and install the new keyboard glass unit (as per "OVEN/MICROWAVE DRAWER DISASSEMBLY" page 38. 2. Repeat steps 1 - 4 to the primary of thumb or finger): "Power Level" then "Timer Clock".... 10.Run the oven and check all functions. B KEYBOARD GLASS UNIT TEST 1. CONNECTED COMPONENTS Oven lamp / Stirrer motor Power transformer Oven common relay Top heater Fan motor (Microwave) Fan motor (Oven) Oven lamp (Oven) Door lock motor Bottom heater 18 KB-3300JS KB-3300JK KB-3300JW TEST PROCEDURES PROCEDURE...
...Approx. 18V D.C. Approx. 24V D.C. Remove the old keyboard glass unit (see page 38) and install the new keyboard glass unit (as per "OVEN/MICROWAVE DRAWER DISASSEMBLY" page 38. 2. Repeat steps 1 - 4 to the primary of thumb or finger): "Power Level" then "Timer Clock".... 10.Run the oven and check all functions. B KEYBOARD GLASS UNIT TEST 1. CONNECTED COMPONENTS Oven lamp / Stirrer motor Power transformer Oven common relay Top heater Fan motor (Microwave) Fan motor (Oven) Oven lamp (Oven) Door lock motor Bottom heater 18 KB-3300JS KB-3300JK KB-3300JW TEST PROCEDURES PROCEDURE...

Service Manual
Page 30
KB-3300JS KB-3300JK KB-3300JW TOUCH CONTROL PANEL ASSEMBLY OUTLINE OF TOUCH CONTROL PANEL The touch control section consists of the following units. (1) Keyboard unit (2) Control Unit (3) Power unit ...) A switch to "tell" the LSI if the drawer is open or closed. 16) Door Switch (Oven) A switch to "tell" the LSI if the oven door is open or closed. 17) Door Lock Monitor Switch (Oven) A switch to "tell" the LSI if the oven door is responsive to signals from the AC line voltage. Symbol Voltage Application VC +5V...
KB-3300JS KB-3300JK KB-3300JW TOUCH CONTROL PANEL ASSEMBLY OUTLINE OF TOUCH CONTROL PANEL The touch control section consists of the following units. (1) Keyboard unit (2) Control Unit (3) Power unit ...) A switch to "tell" the LSI if the drawer is open or closed. 16) Door Switch (Oven) A switch to "tell" the LSI if the oven door is open or closed. 17) Door Lock Monitor Switch (Oven) A switch to "tell" the LSI if the oven door is responsive to signals from the AC line voltage. Symbol Voltage Application VC +5V...

Service Manual
Page 31
... to IC-2. 22 SCLK OUT Clock timing signaI output terminal. "L" level signal(0V). 5 AN1 IN Input signal which communicates the oven door locked information to "L" level the moment power is set to LSI. "H" level signal(+5V). The internal clock frequency is applied, .... 29 P34 OUT Turminal not used . 3 AN3 OUT Door lock motor driving signal. The data of display. Signal is applied. DESCRIPTION OF LSI (IC-1) KB-3300JS KB-3300JK KB-3300JW The I /O Description 1 AN5 IN Temperature measurement input: OVEN THERMISTOR. Pin No. Connected GND. 8 RESET IN Auto clear...
... to IC-2. 22 SCLK OUT Clock timing signaI output terminal. "L" level signal(0V). 5 AN1 IN Input signal which communicates the oven door locked information to "L" level the moment power is set to LSI. "H" level signal(+5V). The internal clock frequency is applied, .... 29 P34 OUT Turminal not used . 3 AN3 OUT Door lock motor driving signal. The data of display. Signal is applied. DESCRIPTION OF LSI (IC-1) KB-3300JS KB-3300JK KB-3300JW The I /O Description 1 AN5 IN Temperature measurement input: OVEN THERMISTOR. Pin No. Connected GND. 8 RESET IN Auto clear...

Service Manual
Page 33
Pin No. 57 58 59 60 Signal P53 P52 P51 INT0 KB-3300JS KB-3300JK KB-3300JW I/O IN OUT IN IN Description To input signal which communicates the drawer door open/ close information to LSI. Signal to synchronize LSI with commercial power source frequency. The power source..."L" level signal(0V). C: When the oven stops so that the food can be checked in Automatic cooking mode. 0.1 sec A 2.0 sec B 1.0 sec C 1.0 sec H: +5V L: GND Input signal which communicates the oven door open "H" level signal (+5V). Signal to sound buzzer. Door closed; Connected to the A/ D converter...
Pin No. 57 58 59 60 Signal P53 P52 P51 INT0 KB-3300JS KB-3300JK KB-3300JW I/O IN OUT IN IN Description To input signal which communicates the drawer door open/ close information to LSI. Signal to synchronize LSI with commercial power source frequency. The power source..."L" level signal(0V). C: When the oven stops so that the food can be checked in Automatic cooking mode. 0.1 sec A 2.0 sec B 1.0 sec C 1.0 sec H: +5V L: GND Input signal which communicates the oven door open "H" level signal (+5V). Signal to sound buzzer. Door closed; Connected to the A/ D converter...

Service Manual
Page 37
OVEN DOOR LOCK MOTOR DETECTION CIRCUIT KB-3300JS KB-3300JK KB-3300JW 35
OVEN DOOR LOCK MOTOR DETECTION CIRCUIT KB-3300JS KB-3300JK KB-3300JW 35

Service Manual
Page 38
... controls of the touch control panel, 1) Disconnect the power supply cord. 2) Open the door and block it is so short that all PW boards containing them in protection circuit. KB-3300JS KB-3300JK KB-3300JW TOUCH CONTROL PANEL SERVICING 1. Connect an external power source to the power input terminal ...sensor-related ones included) of the key unit to the control unit being sure that the lead wires are tight. 5) Be sure to the oven door being closed . Also wrap all connections are not twisted. 3) After aluminium foil is long enough that is equivalent to use a soldering iron with...
... controls of the touch control panel, 1) Disconnect the power supply cord. 2) Open the door and block it is so short that all PW boards containing them in protection circuit. KB-3300JS KB-3300JK KB-3300JW TOUCH CONTROL PANEL SERVICING 1. Connect an external power source to the power input terminal ...sensor-related ones included) of the key unit to the control unit being sure that the lead wires are tight. 5) Be sure to the oven door being closed . Also wrap all connections are not twisted. 3) After aluminium foil is long enough that is equivalent to use a soldering iron with...

Service Manual
Page 45
.... O-3 Recepticle Hinge Recepticle Hinge Hinge Cover 43 O-3). 5. OVEN DOOR RECEPTACLE HINGE AND HINGECOVER REPLACEMENT 1. Refer to the disassembly instructions found on the door to apply a little downward pressure on Pages 38 - 40. 3. O-2 KB-3300JS KB-3300JK KB-3300JW Fig. Disconnect the power supply cord. 2. O-4) 4. O-1 Fig. OVEN DOOR REMOVAL OVEN DOOR ASSEMBLY REMOVAL 1. Open the door to reinstall the Hinge Receptacle and Hinge...
.... O-3 Recepticle Hinge Recepticle Hinge Hinge Cover 43 O-3). 5. OVEN DOOR RECEPTACLE HINGE AND HINGECOVER REPLACEMENT 1. Refer to the disassembly instructions found on the door to apply a little downward pressure on Pages 38 - 40. 3. O-2 KB-3300JS KB-3300JK KB-3300JW Fig. Disconnect the power supply cord. 2. O-4) 4. O-1 Fig. OVEN DOOR REMOVAL OVEN DOOR ASSEMBLY REMOVAL 1. Open the door to reinstall the Hinge Receptacle and Hinge...

Service Manual
Page 68
.... § DESCRIPTION Q'TY CODE 5- 1 5- 1 5- 1 5- 2 5- 3 5- 3 5- 3 5- 4 DDORFB092MRK0 M Door assy [KB3300JS] DDORFB096MRK0 M Door assy [KB3300JK] DDORFB097MRK0 M Door assy [KB3300JW] PPACGB021MRE0 M Oven door seal gasket JHNDPB053MRF0 M Door handle [KB3300JS] JHNDPB056MRF0 M Door handle [KB3300JK] JHNDPB057MRF0 M Door handle [KB3300JW] XOTWW40P12000 M Screw 1 BY 1 BY 1 BY 1 AW 1 BB 1 BB 1 BB 6 AA 66 "§" MARK: PARTS DELIVERY SECTION REF. NO. KB-3300JS KB-3300JK KB-3300JW OVEN DOOR PARTS LIST Note: The parts...
.... § DESCRIPTION Q'TY CODE 5- 1 5- 1 5- 1 5- 2 5- 3 5- 3 5- 3 5- 4 DDORFB092MRK0 M Door assy [KB3300JS] DDORFB096MRK0 M Door assy [KB3300JK] DDORFB097MRK0 M Door assy [KB3300JW] PPACGB021MRE0 M Oven door seal gasket JHNDPB053MRF0 M Door handle [KB3300JS] JHNDPB056MRF0 M Door handle [KB3300JK] JHNDPB057MRF0 M Door handle [KB3300JW] XOTWW40P12000 M Screw 1 BY 1 BY 1 BY 1 AW 1 BB 1 BB 1 BB 6 AA 66 "§" MARK: PARTS DELIVERY SECTION REF. NO. KB-3300JS KB-3300JK KB-3300JW OVEN DOOR PARTS LIST Note: The parts...


