
HT-X1 Operation Manual
Page 6
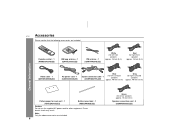
Fire or electric shock may result. Note: Only the above accessories are included. HT-X1 Accessories Please confirm that the following accessories are included. 6 Green (for other equipment. Remote control 1 (RRMCGA027SJZZ) AM loop antenna 1 (QANTL0008SJZZ) FM antenna 1 (QANTWA001SJZZ) White (for left front speaker) approx. 16 feet (5 m) Red (for right front speaker) approx. 16 feet...
Fire or electric shock may result. Note: Only the above accessories are included. HT-X1 Accessories Please confirm that the following accessories are included. 6 Green (for other equipment. Remote control 1 (RRMCGA027SJZZ) AM loop antenna 1 (QANTL0008SJZZ) FM antenna 1 (QANTWA001SJZZ) White (for left front speaker) approx. 16 feet (5 m) Red (for right front speaker) approx. 16 feet...
HT-X1 Operation Manual
Page 7
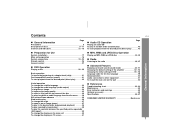
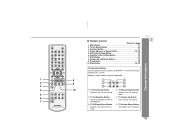
... Page Precautions 8 Description of discs 9 - 11 Controls and indicators 12 - 16 " Preparation for Use System installation 17 Main unit preparation 18 System connections 19 - 25 Remote control 26 General control 27 " DVD Operation Playing a disc 28 - 30 Basic operation To locate the beginning of a chapter/track (skip 31 Fast forward/Fast... " References Troubleshooting chart 63, 64 Maintenance 65 Error indicators and warnings 65 Optional accessory 65 Specifications 66, 67 CONSUMER LIMITED WARRANTY Back cover General Information HT-X1 7
... Page Precautions 8 Description of discs 9 - 11 Controls and indicators 12 - 16 " Preparation for Use System installation 17 Main unit preparation 18 System connections 19 - 25 Remote control 26 General control 27 " DVD Operation Playing a disc 28 - 30 Basic operation To locate the beginning of a chapter/track (skip 31 Fast forward/Fast... " References Troubleshooting chart 63, 64 Maintenance 65 Error indicators and warnings 65 Optional accessory 65 Specifications 66, 67 CONSUMER LIMITED WARRANTY Back cover General Information HT-X1 7
HT-X1 Operation Manual
Page 12
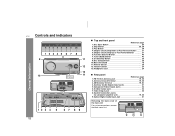
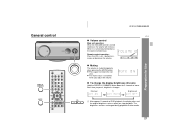
... 19, 20 2. Function Selector Button 49 7. AM Antenna Terminal 19, 20 4. S-video Output Jack 23 7. Stop Button 28, 29 3. Remote Sensor 26 12. Auxiliary (Audio Signal) Input Jacks 61 5. System Connection Jacks (to subwoofer/amplifier unit 19, 20 9. Volume Control 27 13...Tuner (Band) Button 46 8. Disc Eject Button 29 2. Chapter (Track) Skip Down or Fast Reverse Button . . . . . 31 5. On/Stand-by Button 25 9. HT-X1 Controls and indicators 123 45 6 7 8 9 11 12 13 10 11 Display General Information 12 3 4 5 67 8 9 12 " Top and front panel Reference page 1....
... 19, 20 2. Function Selector Button 49 7. AM Antenna Terminal 19, 20 4. S-video Output Jack 23 7. Stop Button 28, 29 3. Remote Sensor 26 12. Auxiliary (Audio Signal) Input Jacks 61 5. System Connection Jacks (to subwoofer/amplifier unit 19, 20 9. Volume Control 27 13...Tuner (Band) Button 46 8. Disc Eject Button 29 2. Chapter (Track) Skip Down or Fast Reverse Button . . . . . 31 5. On/Stand-by Button 25 9. HT-X1 Controls and indicators 123 45 6 7 8 9 11 12 13 10 11 Display General Information 12 3 4 5 67 8 9 12 " Top and front panel Reference page 1....
HT-X1 Operation Manual
Page 14
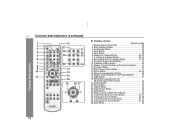
Remote Control Transmitter 26 2. Direct Number Buttons 32 3. Unit Display Select or Dimmer Button 27, 40 9. Angle Button 37 18. Direct Button 32 21. Zoom Button ... Button 39, 40 8. Super Picture Button 35 23. Enter Button 32 14 HT-X1 Controls and indicators (continued) 1 12 2 3 17 21 4 18 22 5 19 23 6 7 20 24 8 9 13 10 14 11 15 16 25 26 27 General Information 28 29 " Remote control Reference page 1. Top Menu or Menu Button 36 11. Multi Channel...
Remote Control Transmitter 26 2. Direct Number Buttons 32 3. Unit Display Select or Dimmer Button 27, 40 9. Angle Button 37 18. Direct Button 32 21. Zoom Button ... Button 39, 40 8. Super Picture Button 35 23. Enter Button 32 14 HT-X1 Controls and indicators (continued) 1 12 2 3 17 21 4 18 22 5 19 23 6 7 20 24 8 9 13 10 14 11 15 16 25 26 27 General Information 28 29 " Remote control Reference page 1. Top Menu or Menu Button 36 11. Multi Channel...
HT-X1 Operation Manual
Page 15
... operated. 1 8 1 4 2 9 2 5 3 3 6 4 10 TV Channel Up Button TV Channel Down Button Switches the TV channel up the TV volume. 7 "STAND-BY". HT-X1 " Remote control Reference page 1. However, some functions of SHARP's TVs with the remote control of this system. Switches the TV channel 5 down the TV volume. 15 Shift Button 33 8. Mute Button 27 2. Auxiliary...
... operated. 1 8 1 4 2 9 2 5 3 3 6 4 10 TV Channel Up Button TV Channel Down Button Switches the TV channel up the TV volume. 7 "STAND-BY". HT-X1 " Remote control Reference page 1. However, some functions of SHARP's TVs with the remote control of this system. Switches the TV channel 5 down the TV volume. 15 Shift Button 33 8. Mute Button 27 2. Auxiliary...
HT-X1 Operation Manual
Page 22
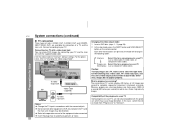
...! Images may cause image distortion. Insert the plugs fully to "Changing the video output mode". Caution: To enjoy images on the remote control. The conventional TV system displays 30 frames of still images per second) to realize less-flicker, high-density images. Connect according... and video output mode. To video input jack Compatibility of a second (60 frames per second to complete sequential movement (interlaced scanning). HT-X1 System connections (continued) Preparation for Use " TV connection Three types of jacks (VIDEO OUT, S-VIDEO OUT and COMPONENT VIDEO OUT) are...
...! Images may cause image distortion. Insert the plugs fully to "Changing the video output mode". Caution: To enjoy images on the remote control. The conventional TV system displays 30 frames of still images per second) to realize less-flicker, high-density images. Connect according... and video output mode. To video input jack Compatibility of a second (60 frames per second to complete sequential movement (interlaced scanning). HT-X1 System connections (continued) Preparation for Use " TV connection Three types of jacks (VIDEO OUT, S-VIDEO OUT and COMPONENT VIDEO OUT) are...
HT-X1 Operation Manual
Page 26
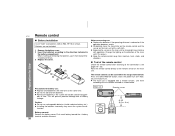
...Remove the batteries if the system will prevent potential damage due to mal- ods of time. Main unit Remote sensor 8"-20' (0.2 m - 6 m) Battery removal: Remove the battery cover. Point the remote control directly at the same time. ! Preparation for battery use: ! When inserting or removing the ... to the direction indicated in the battery compartment. Does the power turn on the main unit. Do not use : ! Precautions for Use HT-X1 26 Remote control " Battery installation Use 2 "AAA" size batteries (UM-4, R03, HP-16 or similar). Replace all the connections (see pages 19...
...Remove the batteries if the system will prevent potential damage due to mal- ods of time. Main unit Remote sensor 8"-20' (0.2 m - 6 m) Battery removal: Remove the battery cover. Point the remote control directly at the same time. ! Preparation for battery use: ! When inserting or removing the ... to the direction indicated in the battery compartment. Does the power turn on the main unit. Do not use : ! Precautions for Use HT-X1 26 Remote control " Battery installation Use 2 "AAA" size batteries (UM-4, R03, HP-16 or similar). Replace all the connections (see pages 19...
HT-X1 Operation Manual
Page 27
... DISPLAY/(-DIMMER) button down for Use " Muting The volume is muted temporarily when pressing the MUTE button. ! ume. ! Remote control operation: Press the VOL (+ or -) button to restore the vol- General control HT-X1 (U) TINSEA050SJZZ HT-X1 " Volume control Main unit operation: When the VOLUME control is turned clockwise, the volume will decrease. crease or...
... DISPLAY/(-DIMMER) button down for Use " Muting The volume is muted temporarily when pressing the MUTE button. ! ume. ! Remote control operation: Press the VOL (+ or -) button to restore the vol- General control HT-X1 (U) TINSEA050SJZZ HT-X1 " Volume control Main unit operation: When the VOLUME control is turned clockwise, the volume will decrease. crease or...

HT-X1 Operation Manual
Page 29
... 3" (8 cm) discs with scratches or fingerprints may result. fer to the main unit. ! DVD Operation HT-X1 29 trol. To remove the disc: 1. Play indicator Chapter or track number Playing time When the menu appears on the remote con- Insert or remove the disc straight. Do not insert two or more discs in...
... 3" (8 cm) discs with scratches or fingerprints may result. fer to the main unit. ! DVD Operation HT-X1 29 trol. To remove the disc: 1. Play indicator Chapter or track number Playing time When the menu appears on the remote con- Insert or remove the disc straight. Do not insert two or more discs in...
HT-X1 Operation Manual
Page 57
...saver (On) or not (Off). Off: Cancel the screen saver setting. Reference page P. 37 P. 58 P. 58 P. 58 Advanced Features HT-X1 57 Setting Video Setup Display Setup System Setup Selectable parameters (* indicates initial settings.) Picture mode Auto Film Video Smart* Angle mark On* Off...on a TV. Auto: Images are automatically optimized according to display the closed caption data (subtitles) appear on the main unit or remote control. Select for progressive video output. Smart: Optimize special effects for DVD movies, etc. Off: Cancel the closed caption data when...
...saver (On) or not (Off). Off: Cancel the screen saver setting. Reference page P. 37 P. 58 P. 58 P. 58 Advanced Features HT-X1 57 Setting Video Setup Display Setup System Setup Selectable parameters (* indicates initial settings.) Picture mode Auto Film Video Smart* Angle mark On* Off...on a TV. Auto: Images are automatically optimized according to display the closed caption data (subtitles) appear on the main unit or remote control. Select for progressive video output. Smart: Optimize special effects for DVD movies, etc. Off: Cancel the closed caption data when...
HT-X1 Operation Manual
Page 63
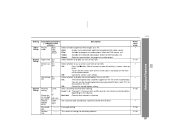
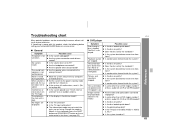
... Is condensation formed inside the system? if the power is not heard.) ! Are the video and audio cables connected improperly? ! References HT-X1 63 Interference or noise occurs on the remote control a few times (see page 22). Is the display in the dimmer mode? ! Does the disc satisfy the standards? ! are ...? ! Are the system connection cords discon- Is the system located near TV with this product, check the following before calling your authorized SHARP dealer or service center. Troubleshooting chart Many potential problems can be played back. (Sound is on.
... Is condensation formed inside the system? if the power is not heard.) ! Are the video and audio cables connected improperly? ! References HT-X1 63 Interference or noise occurs on the remote control a few times (see page 22). Is the display in the dimmer mode? ! Does the disc satisfy the standards? ! are ...? ! Are the system connection cords discon- Is the system located near TV with this product, check the following before calling your authorized SHARP dealer or service center. Troubleshooting chart Many potential problems can be played back. (Sound is on.
HT-X1 Operation Manual
Page 64
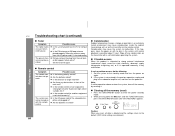
... strong light (inverter fluorescent light, direct sunlight, etc.)? ! " If trouble occurs When this happens, leave the power on with the remote control. " Clearing all the memory (reset) 1 Press the ON/STAND-BY button to lightning, etc.) or if it may cause ...? ! Is the distance or angle incorrect? ! Possible cause ! " Remote control Symptom The remote control does not operate. Note: If neither operation above restores the system, clear all data is possible (about 1 hour). HT-X1 Troubleshooting chart (continued) References " Tuner Symptom The radio makes unusual noises ...
... strong light (inverter fluorescent light, direct sunlight, etc.)? ! " If trouble occurs When this happens, leave the power on with the remote control. " Clearing all the memory (reset) 1 Press the ON/STAND-BY button to lightning, etc.) or if it may cause ...? ! Is the distance or angle incorrect? ! Possible cause ! " Remote control Symptom The remote control does not operate. Note: If neither operation above restores the system, clear all data is possible (about 1 hour). HT-X1 Troubleshooting chart (continued) References " Tuner Symptom The radio makes unusual noises ...


