
ECS5170 Operation Manual
Page 1
MODELS EC-S5170 EC-T5180 EC-T5180A EC-T5180B OPERATION MANUAL VACUUM CLEANER CONTENTS PAGE • IMPORTANT SAFETY INSTRUCTIONS .... 2 • PARTS IDENTIFICATION 4 • SPECIFICATIONS 4 • OPERATING INSTRUCTIONS 6 • MAINTENANCE INSTRUCTIONS 10 • REPLACEMENT INSTRUCTIONS 15 • BEFORE REQUESTING SERVICE 18 • DESCRIPTION OF ACCESSORIES .......... 19 • CONSUMER LIMITED WARRANTY .......... 20 • SPANISH DIGEST 21 Thank you very much for buying SHARP Before using your SHARP vacuum cleaner, please read this operation manual carefully to obtain ...
MODELS EC-S5170 EC-T5180 EC-T5180A EC-T5180B OPERATION MANUAL VACUUM CLEANER CONTENTS PAGE • IMPORTANT SAFETY INSTRUCTIONS .... 2 • PARTS IDENTIFICATION 4 • SPECIFICATIONS 4 • OPERATING INSTRUCTIONS 6 • MAINTENANCE INSTRUCTIONS 10 • REPLACEMENT INSTRUCTIONS 15 • BEFORE REQUESTING SERVICE 18 • DESCRIPTION OF ACCESSORIES .......... 19 • CONSUMER LIMITED WARRANTY .......... 20 • SPANISH DIGEST 21 Thank you very much for buying SHARP Before using your SHARP vacuum cleaner, please read this operation manual carefully to obtain ...
ECS5170 Operation Manual
Page 2
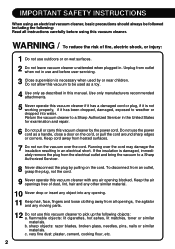
... all instructions carefully before user-servicing. 3 Close supervision is necessary when used as a toy. 4 Use only as a handle, close a door on wet surfaces. 2 Do not leave vacuum cleaner unattended when plugged in this manual. Keep the air openings free of fire, electric shock, or injury: 1 Do not use the power cord as described in . Do not use outdoors or on the cord, or pull the cord around sharp edges or corners. b. very fine dust...
... all instructions carefully before user-servicing. 3 Close supervision is necessary when used as a toy. 4 Use only as a handle, close a door on wet surfaces. 2 Do not leave vacuum cleaner unattended when plugged in this manual. Keep the air openings free of fire, electric shock, or injury: 1 Do not use the power cord as described in . Do not use outdoors or on the cord, or pull the cord around sharp edges or corners. b. very fine dust...

ECS5170 Operation Manual
Page 3
... this vacuum cleaner. SAVE THESE INSTRUCTIONS This vacuum cleaner is intended for household use . IMPORTANT SAFETY INSTRUCTIONS 13 Never operate this vacuum cleaner without turning off the switch. Empty the dirt compartment before reaching the "Max Fill Line" and clean the filters often. 14 Before removing the plug from the outlet, turn off to the "OFF" position. 15 Use extra caution when cleaning on stairs. 16 Never handle plug, cord or vacuum cleaner with wet hands. 17...
... this vacuum cleaner. SAVE THESE INSTRUCTIONS This vacuum cleaner is intended for household use . IMPORTANT SAFETY INSTRUCTIONS 13 Never operate this vacuum cleaner without turning off the switch. Empty the dirt compartment before reaching the "Max Fill Line" and clean the filters often. 14 Before removing the plug from the outlet, turn off to the "OFF" position. 15 Use extra caution when cleaning on stairs. 16 Never handle plug, cord or vacuum cleaner with wet hands. 17...
ECS5170 Operation Manual
Page 4
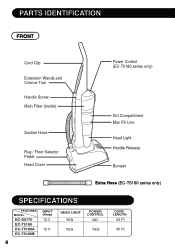
PARTS IDENTIFICATION FRONT Cord Clip Extension Wands and Crevice Tool Handle Screw Main Filter (Inside) Suction Hose Rug / Floor Selector Pedal Head Cover Power Control (EC-T5180 series only) Dirt Compartment Max Fill Line Head Light Handle Release Bumper Extra Hose (EC-T5180 series only) SPECIFICATIONS FEATURES MODEL EC-S5170 EC-T5180 EC-T5180A EC-T5180B INPUT (Amp) 12.0 12.0 4 HEAD LIGHT YES POWER CONTROL NO YES YES CORD LENGTH 24 Ft 35 Ft
PARTS IDENTIFICATION FRONT Cord Clip Extension Wands and Crevice Tool Handle Screw Main Filter (Inside) Suction Hose Rug / Floor Selector Pedal Head Cover Power Control (EC-T5180 series only) Dirt Compartment Max Fill Line Head Light Handle Release Bumper Extra Hose (EC-T5180 series only) SPECIFICATIONS FEATURES MODEL EC-S5170 EC-T5180 EC-T5180A EC-T5180B INPUT (Amp) 12.0 12.0 4 HEAD LIGHT YES POWER CONTROL NO YES YES CORD LENGTH 24 Ft 35 Ft

ECS5170 Operation Manual
Page 5
REAR Dirt Compartment Handle (Upper) Dirt Compartment Handle (Lower) Dirt Compartment Max Fill Line Exhaust Filter (Inside) Bumper Cord Storage Hook Carrying Handle Power Cord Upholstery Tool with Detachable Brush Name Plate ON/OFF Switch WARNING: Operate vacuum cleaner only at the voltage specified on the nameplate. 5
REAR Dirt Compartment Handle (Upper) Dirt Compartment Handle (Lower) Dirt Compartment Max Fill Line Exhaust Filter (Inside) Bumper Cord Storage Hook Carrying Handle Power Cord Upholstery Tool with Detachable Brush Name Plate ON/OFF Switch WARNING: Operate vacuum cleaner only at the voltage specified on the nameplate. 5

ECS5170 Operation Manual
Page 6
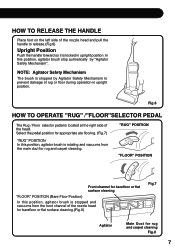
... with the hole on the handle with cleaning. (Fig. 4) Upper cord storage hook Fig.3 Lower hook HOW TO RELEASE POWER CORD Rotate the upper cord storage hook downward for quick cord release. (Fig. 5) Upper cord storage hook 6 Fig.5 Fig.4 OPERATING INSTRUCTIONS HOW TO ATTACH THE HANDLE TO VACUUM CLEANER 1 First remove the handle screw. Then slide the base of the handle to the body of the vacuum cleaner and insert the screw...
... with the hole on the handle with cleaning. (Fig. 4) Upper cord storage hook Fig.3 Lower hook HOW TO RELEASE POWER CORD Rotate the upper cord storage hook downward for quick cord release. (Fig. 5) Upper cord storage hook 6 Fig.5 Fig.4 OPERATING INSTRUCTIONS HOW TO ATTACH THE HANDLE TO VACUUM CLEANER 1 First remove the handle screw. Then slide the base of the handle to the body of the vacuum cleaner and insert the screw...
ECS5170 Operation Manual
Page 7
... the nozzle head and pull the handle to prevent damage of rug or floor during operation in upright position. In this position, agitator brush is stopped by "Agitator Safety Mechanism". "RUG" POSITION "FLOOR" POSITION Front channel for barefloor or flat surface cleaning "FLOOR" POSITION (Bare Floor Position) In this position, agitator brush stop autmatically by Agitator Safety Mechanism to release.(Fig.6) Upright Position Push the handle forward so it is located at...
... the nozzle head and pull the handle to prevent damage of rug or floor during operation in upright position. In this position, agitator brush is stopped by "Agitator Safety Mechanism". "RUG" POSITION "FLOOR" POSITION Front channel for barefloor or flat surface cleaning "FLOOR" POSITION (Bare Floor Position) In this position, agitator brush stop autmatically by Agitator Safety Mechanism to release.(Fig.6) Upright Position Push the handle forward so it is located at...

ECS5170 Operation Manual
Page 8
... the "L" position. (Fig.10) HIGH: Greatest suction power for delicate cleaning jobs. POWER HIGH LOW: Low suction power for heavy vacuuming jobs. Medium power levels are positioned between "H" and "L". OPERATING INSTRUCTIONS ON/OFF SWITCH At the back lower left of cleaning power from low "L" to high "H". LOW Fig.10 8 To increase the suction power; The ON/OFF switch is located. (Fig.9) ON/OFF Switch Fig.9 POWER CONTROL SWITCH (EC-T5180 series only) A slide switch allows selection of vacuum cleaner.
... the "L" position. (Fig.10) HIGH: Greatest suction power for delicate cleaning jobs. POWER HIGH LOW: Low suction power for heavy vacuuming jobs. Medium power levels are positioned between "H" and "L". OPERATING INSTRUCTIONS ON/OFF SWITCH At the back lower left of cleaning power from low "L" to high "H". LOW Fig.10 8 To increase the suction power; The ON/OFF switch is located. (Fig.9) ON/OFF Switch Fig.9 POWER CONTROL SWITCH (EC-T5180 series only) A slide switch allows selection of vacuum cleaner.

ECS5170 Operation Manual
Page 9
... overheating such as a full dirt compartment or clogged filters. If the vacuum cleaner suddenly shuts off, turn off the vacuum and unplug the cleaner. Check the vacuum cleaner for draperies, mattresses, clothing, carpeted stairs, etc. (Fig.15) Fig.12 Pull to Detach brush from tool Fig.14-1 Fig.14-2 Fig.13 Turn to each other.(Fig.14-2) SUCTION HOSE For using ON BOARD tools, remove the suction hose from the nozzle head. (Fig.11) UPHOLSTERY TOOL...
... overheating such as a full dirt compartment or clogged filters. If the vacuum cleaner suddenly shuts off, turn off the vacuum and unplug the cleaner. Check the vacuum cleaner for draperies, mattresses, clothing, carpeted stairs, etc. (Fig.15) Fig.12 Pull to Detach brush from tool Fig.14-1 Fig.14-2 Fig.13 Turn to each other.(Fig.14-2) SUCTION HOSE For using ON BOARD tools, remove the suction hose from the nozzle head. (Fig.11) UPHOLSTERY TOOL...

ECS5170 Operation Manual
Page 10
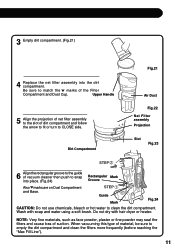
... parts: Dirt Compartment Release Upper Handle Filter Compartment Air Duct Net Filter Assembly Lower Handle Max Fill Line Dirt Compartment Rectangular Groove Fig.17 1 Press down dirt compartment release button to remove dirt compartment from vacuum cleaner. (Fig.19) Filter Clamp Top Handle Grip Filter Cover Main Filter Filter Compartment Fig.18 2 Hold lower handle on dust cup and turn top handle grip slightly to left Remove net filter 2 assembly from the electrical outlet before servicing. MAINTENANCE INSTRUCTIONS Unplug this vacuum cleaner from dirt compartment. (Fig.20) OPEN...
... parts: Dirt Compartment Release Upper Handle Filter Compartment Air Duct Net Filter Assembly Lower Handle Max Fill Line Dirt Compartment Rectangular Groove Fig.17 1 Press down dirt compartment release button to remove dirt compartment from vacuum cleaner. (Fig.19) Filter Clamp Top Handle Grip Filter Cover Main Filter Filter Compartment Fig.18 2 Hold lower handle on dust cup and turn top handle grip slightly to left Remove net filter 2 assembly from the electrical outlet before servicing. MAINTENANCE INSTRUCTIONS Unplug this vacuum cleaner from dirt compartment. (Fig.20) OPEN...
ECS5170 Operation Manual
Page 11
... vacuum cleaner then push to the guide of suction. STEP 1 Guide Mark Fig.24 CAUTION: Do not use chemicals, bleach or hot water to match the marks of the Filter Compartment and Dust Cup. Do not dry with soap and water using a soft brush. Dirt Compartment Fig.22 Net Filter assembly Projection Slot Fig.23 STEP 2 6 Align the rectangular groove to snap into the dirt compartment. Upper Handle OPEN CLOSE Air...
... vacuum cleaner then push to the guide of suction. STEP 1 Guide Mark Fig.24 CAUTION: Do not use chemicals, bleach or hot water to match the marks of the Filter Compartment and Dust Cup. Do not dry with soap and water using a soft brush. Dirt Compartment Fig.22 Net Filter assembly Projection Slot Fig.23 STEP 2 6 Align the rectangular groove to snap into the dirt compartment. Upper Handle OPEN CLOSE Air...

ECS5170 Operation Manual
Page 12
... dry with water, using a soft sponge. Unscrew 5 Allow net filter assembly to clean the dirt compartment. CAUTION: Do not use a washing machine for cleaning. Be sure the filter is set in the filter compartment. 5 Replace the filter cover onto the filter compartment, interlocking the latch portions. MAINTENANCE INSTRUCTIONS HOW TO CLEAN THE NET FILTER ASSEMBLY 1 Slide net filter assembly out of dirt compartment. 2 Unscrew the filter element from the assembly. (Fig.25) 3 Wipe excess dust from the filter...
... dry with water, using a soft sponge. Unscrew 5 Allow net filter assembly to clean the dirt compartment. CAUTION: Do not use a washing machine for cleaning. Be sure the filter is set in the filter compartment. 5 Replace the filter cover onto the filter compartment, interlocking the latch portions. MAINTENANCE INSTRUCTIONS HOW TO CLEAN THE NET FILTER ASSEMBLY 1 Slide net filter assembly out of dirt compartment. 2 Unscrew the filter element from the assembly. (Fig.25) 3 Wipe excess dust from the filter...
ECS5170 Operation Manual
Page 13
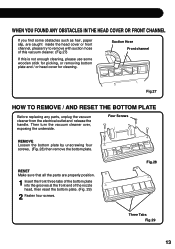
... HOW TO REMOVE / AND RESET THE BOTTOM PLATE Before replacing any parts, unplug the vacuum cleaner from the electrical outlet and release the handle. RESET Make sure that all the parts are caught inside the head cover or front channel, please try to remove with suction hose of the nozzle head, then reset the bottom plate. (Fig. 29) 2 Fasten four screws. WHEN YOU FOUND ANY OBSTACLES IN THE HEAD COVER OR...
... HOW TO REMOVE / AND RESET THE BOTTOM PLATE Before replacing any parts, unplug the vacuum cleaner from the electrical outlet and release the handle. RESET Make sure that all the parts are caught inside the head cover or front channel, please try to remove with suction hose of the nozzle head, then reset the bottom plate. (Fig. 29) 2 Fasten four screws. WHEN YOU FOUND ANY OBSTACLES IN THE HEAD COVER OR...

ECS5170 Operation Manual
Page 14
... at the nozzle head. (Fig.31) 4 Lift the top tab of the head cover and remove. The head cover is secured by two screws from the bottom side. 1 Remove the bottom plate, following the instructions on page 13. Top Tab Head Cover 2 Remove the agitator assembly and the belt, following the instructions on page17. Two screws secure the head cover Fig.31 5 When resetting the head cover...
... at the nozzle head. (Fig.31) 4 Lift the top tab of the head cover and remove. The head cover is secured by two screws from the bottom side. 1 Remove the bottom plate, following the instructions on page 13. Top Tab Head Cover 2 Remove the agitator assembly and the belt, following the instructions on page17. Two screws secure the head cover Fig.31 5 When resetting the head cover...
ECS5170 Operation Manual
Page 15
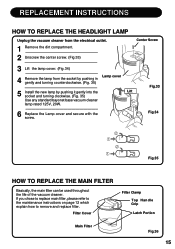
... maintenance instructions on page 12 which explain how to remove and replace filter. REPLACEMENT INSTRUCTIONS HOW TO REPLACE THE HEADLIGHT LAMP Unplug the vacuum cleaner from the electrical outlet. 1 Remove the dirt compartment. 2 Unscrew the center screw. (Fig.33) Center Screw 3 Lift the lamp cover. (Fig.34) Lamp cover 4 Remove the lamp from the socket by pushing in gently and turning counterclockwise. (Fig. 35) 5 Install the new...
... maintenance instructions on page 12 which explain how to remove and replace filter. REPLACEMENT INSTRUCTIONS HOW TO REPLACE THE HEADLIGHT LAMP Unplug the vacuum cleaner from the electrical outlet. 1 Remove the dirt compartment. 2 Unscrew the center screw. (Fig.33) Center Screw 3 Lift the lamp cover. (Fig.34) Lamp cover 4 Remove the lamp from the socket by pushing in gently and turning counterclockwise. (Fig. 35) 5 Install the new...
ECS5170 Operation Manual
Page 16
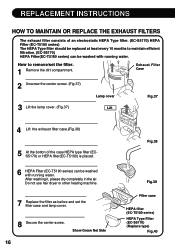
... use hair dryer or other heating machine. 7 Replace the filter as before and set the filter. 1 Remove the dirt compartment. REPLACEMENT INSTRUCTIONS HOW TO MAINTAIN OR REPLACE THE EXHAUST FILTERS The exhaust filter consists of the case HEPA type filter (ECS5170) or HEPA filter(EC-T5180) is placed. 6 HEPA Filter (EC-T5180 series) can be washed with running water. After washing it, please dry completely in the air. How to maintain efficient filtration. (EC-S5170) HEPA Filter(EC-T5180 series) can be washed with running water...
... use hair dryer or other heating machine. 7 Replace the filter as before and set the filter. 1 Remove the dirt compartment. REPLACEMENT INSTRUCTIONS HOW TO MAINTAIN OR REPLACE THE EXHAUST FILTERS The exhaust filter consists of the case HEPA type filter (ECS5170) or HEPA filter(EC-T5180) is placed. 6 HEPA Filter (EC-T5180 series) can be washed with running water. After washing it, please dry completely in the air. How to maintain efficient filtration. (EC-S5170) HEPA Filter(EC-T5180 series) can be washed with running water...
ECS5170 Operation Manual
Page 17
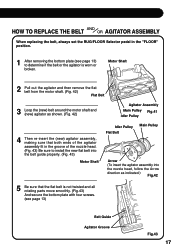
... TO REPLACE THE BELT AND OR AGITATOR ASSEMBLY When replacing the belt, always set the RUG/FLOOR Selector pedal in the groove of the agitator assembly fit in the "FLOOR" position. 1 After removing the bottom plate (see page 13) Belt Guide Agitator Groove Fig.43 17 Motor Shaft 2 Pull out the agitator and then remove the flat belt from the motor shaft. (Fig. 42) Flat Belt 3 Loop the (new) belt around the motor shaft and (new) agitator...
... TO REPLACE THE BELT AND OR AGITATOR ASSEMBLY When replacing the belt, always set the RUG/FLOOR Selector pedal in the groove of the agitator assembly fit in the "FLOOR" position. 1 After removing the bottom plate (see page 13) Belt Guide Agitator Groove Fig.43 17 Motor Shaft 2 Pull out the agitator and then remove the flat belt from the motor shaft. (Fig. 42) Flat Belt 3 Loop the (new) belt around the motor shaft and (new) agitator...
ECS5170 Operation Manual
Page 18
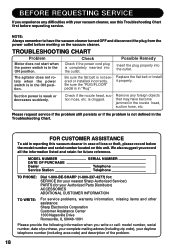
... telephone number (including area code) and description of the problem. 18 MODEL NUMBER DATE OF PURCHASE Dealer Service Station SERIAL NUMBER Telephone Telephone TO PHONE: Dial 1-800-BE-SHARP (1-800-237-4277) for: SERVICE (for your nearest Sharp Authorized Servicer) PARTS (for future reference. The agitator does not rotate when the power switch is in the ON position. Replace the flat belt or install it properly. Check if the nozzle head, suction hose, etc...
... telephone number (including area code) and description of the problem. 18 MODEL NUMBER DATE OF PURCHASE Dealer Service Station SERIAL NUMBER Telephone Telephone TO PHONE: Dial 1-800-BE-SHARP (1-800-237-4277) for: SERVICE (for your nearest Sharp Authorized Servicer) PARTS (for future reference. The agitator does not rotate when the power switch is in the ON position. Replace the flat belt or install it properly. Check if the nozzle head, suction hose, etc...

ECS5170 Operation Manual
Page 19
... TOOL AGITATOR ASSEMBLY UPHOLSTERY TOOL DETACHABLE BRUSH NET FILTERS PART NUMBER RLMP-A003VBE0 PPIPPA164VBFC PPIPPA163VBFE UCATSA057VBFE DRTR-A018VBKZ FCAT-A102VBKZ PBRS-A061VBEB FDUC-A019VBKA 1 2 3 4 5 6 7 8 9 10 11 12 19 If your local dealer or call the Sharp Accessories and Supply Center at 1-800-642-2122, or visit Sharp's web site at www.sharp-usa.com. ITEM 1 2 3 4 PARTS DESCRIPTION FLAT BELT EXHAUST FILTER (EC-S5170) EXHAUST FILTER (EC-T5180 series...
... TOOL AGITATOR ASSEMBLY UPHOLSTERY TOOL DETACHABLE BRUSH NET FILTERS PART NUMBER RLMP-A003VBE0 PPIPPA164VBFC PPIPPA163VBFE UCATSA057VBFE DRTR-A018VBKZ FCAT-A102VBKZ PBRS-A061VBEB FDUC-A019VBKA 1 2 3 4 5 6 7 8 9 10 11 12 19 If your local dealer or call the Sharp Accessories and Supply Center at 1-800-642-2122, or visit Sharp's web site at www.sharp-usa.com. ITEM 1 2 3 4 PARTS DESCRIPTION FLAT BELT EXHAUST FILTER (EC-S5170) EXHAUST FILTER (EC-T5180 series...
ECS5170 Operation Manual
Page 20
... or construction. Model Specific Section Your Product Model Number & Description: Warranty Period for any way responsible for your Product to Obtain Service: EC-S5170, EC-T5180,T5180A. or T5180B Home Use Vacuum Cleaner. (Be sure to have Proof of Purchase available. Be sure to make any printed materials. To find the location of the nearest Sharp Authorized Servicer, call Sharp toll free at no event shall Sharp be the sole...
... or construction. Model Specific Section Your Product Model Number & Description: Warranty Period for any way responsible for your Product to Obtain Service: EC-S5170, EC-T5180,T5180A. or T5180B Home Use Vacuum Cleaner. (Be sure to have Proof of Purchase available. Be sure to make any printed materials. To find the location of the nearest Sharp Authorized Servicer, call Sharp toll free at no event shall Sharp be the sole...

