
CV-10NH Operation Manual
Page 3
...CONSUMER LIMITED WARRANTY E-3 • PRECAUTIONS E-4 • LOCATION E-7 • INCLUDED E-7 • PART NAMES E-8 • INSTALL WINDOW PANEL E-10 • INSTALLATION AND REMOVAL OF EXHAUST HOSE .........E-14 • PRE-OPERATION CHECKS E-16 • COOL MODE E-18 • ...DEHUMIDIFICATION MODE E-19 • FAN MODE E-20 • VENTILATION MODE E-20 • TO CHANGE AIR FLOW DIRECTION E-21 • MEGA COOL OPERATION E-22 • ONE-HOUR OFF TIMER E-22 • TIMER OPERATION E-23 &#... manual explains the proper use of your new air conditioner.
...CONSUMER LIMITED WARRANTY E-3 • PRECAUTIONS E-4 • LOCATION E-7 • INCLUDED E-7 • PART NAMES E-8 • INSTALL WINDOW PANEL E-10 • INSTALLATION AND REMOVAL OF EXHAUST HOSE .........E-14 • PRE-OPERATION CHECKS E-16 • COOL MODE E-18 • ...DEHUMIDIFICATION MODE E-19 • FAN MODE E-20 • VENTILATION MODE E-20 • TO CHANGE AIR FLOW DIRECTION E-21 • MEGA COOL OPERATION E-22 • ONE-HOUR OFF TIMER E-22 • TIMER OPERATION E-23 &#... manual explains the proper use of your new air conditioner.
CV-10NH Operation Manual
Page 7
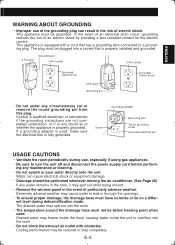
... the air conditioner. (See Page 26) If any circumstances cut or remove the round grounding pin from this plug. Water can result in through the openings. • To ensure proper drainage, the drainage hose must have no kinks or be grounded. Cooling performance may spill out while being moved. • Remove the window panel...
... the air conditioner. (See Page 26) If any circumstances cut or remove the round grounding pin from this plug. Water can result in through the openings. • To ensure proper drainage, the drainage hose must have no kinks or be grounded. Cooling performance may spill out while being moved. • Remove the window panel...
CV-10NH Operation Manual
Page 9
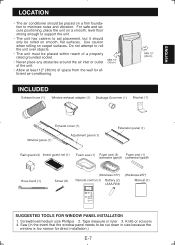
... or scissors 4. MIN.12" (30cm) INCLUDED MIN.12" (30cm) SUGGESTED TOOLS FOR WINDOW PANEL INSTALLATION 1. Tape measure or ruler 3. ENGLISH LOCATION • The air conditioner should only be cut down in size because the window is too narrow for efficient air-conditioning. For safe and secure positioning, place the unit on a smooth, level fl...
... or scissors 4. MIN.12" (30cm) INCLUDED MIN.12" (30cm) SUGGESTED TOOLS FOR WINDOW PANEL INSTALLATION 1. Tape measure or ruler 3. ENGLISH LOCATION • The air conditioner should only be cut down in size because the window is too narrow for efficient air-conditioning. For safe and secure positioning, place the unit on a smooth, level fl...
CV-10NH Operation Manual
Page 12
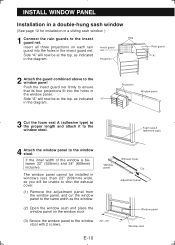
... the window is between 22" (559mm) and 24" (609mm) inclusive. net Side "A" will be at the top, as the window. (2) Open the window sash and place the window panel on each rain Insect guard guard into the holes in the diagram. Hole Insert all three projections on the window stool (3) Secure the window panel to the window stool. E-10 Cut Window panel Window...
... the window is between 22" (559mm) and 24" (609mm) inclusive. net Side "A" will be at the top, as the window. (2) Open the window sash and place the window panel on each rain Insect guard guard into the holes in the diagram. Hole Insert all three projections on the window stool (3) Secure the window panel to the window stool. E-10 Cut Window panel Window...
CV-10NH Operation Manual
Page 13
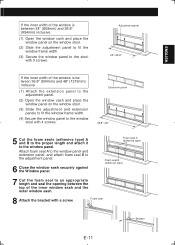
... the window panel and extension panel, and attach foam seal B to the window panel. ENGLISH If the inner width of the window is between 36.8" (934mm) and 48" (1219mm) inclusive. (1) Attach the extension panel to the adjustment panel. (2) Open the window sash and place the window panel on the window stool. (2) Slide the adjustment panel to fit the window frame width. (3) Secure the window panel to...
... the window panel and extension panel, and attach foam seal B to the window panel. ENGLISH If the inner width of the window is between 36.8" (934mm) and 48" (1219mm) inclusive. (1) Attach the extension panel to the adjustment panel. (2) Open the window sash and place the window panel on the window stool. (2) Slide the adjustment panel to fit the window frame width. (3) Secure the window panel to...

CV-10NH Operation Manual
Page 14
...) to the proper length and attach it is between 22" (559mm) and 24" (609mm) inclusive. INSTALL WINDOW PANEL Installation in a sliding sash window (See page 10 for installation in a double-hung window.) 1 Connect the rain guards to the window panel. Insect guard net Hole Projection 2 Attach the guard combined above to the insect guard net. If the...
...) to the proper length and attach it is between 22" (559mm) and 24" (609mm) inclusive. INSTALL WINDOW PANEL Installation in a sliding sash window (See page 10 for installation in a double-hung window.) 1 Connect the rain guards to the window panel. Insect guard net Hole Projection 2 Attach the guard combined above to the insect guard net. If the...

CV-10NH Operation Manual
Page 15
... between 36.8" (934mm) and 48" (1219mm) inclusive. (1) Attach the extension panel to the adjustment panel. (2) Open the window sash and place the window panel on the window frame. (2) Slide the adjustment panel to fit the window frame height. (3) Secure the window panel to the window frame with a screw. Foam seal Foam seal B (adhesive type) Foam seal A (adhesive type) Bracket E-13 Adjustment...
... between 36.8" (934mm) and 48" (1219mm) inclusive. (1) Attach the extension panel to the adjustment panel. (2) Open the window sash and place the window panel on the window frame. (2) Slide the adjustment panel to fit the window frame height. (3) Secure the window panel to the window frame with a screw. Foam seal Foam seal B (adhesive type) Foam seal A (adhesive type) Bracket E-13 Adjustment...
CV-10NH Operation Manual
Page 16
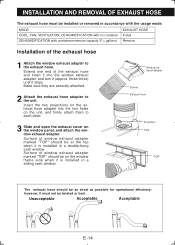
however, it stops. Extend one end of the exhaust hose 1 Attach the window exhaust adapter to the exhaust hose. Surface of window exhaust adapter marked "TOP" should be on the window panel, and attach the window exhaust adapter. Make sure they are securely attached. 2 Attach the exhaust hose adapter to each other. 3 Slide and open the...
however, it stops. Extend one end of the exhaust hose 1 Attach the window exhaust adapter to the exhaust hose. Surface of window exhaust adapter marked "TOP" should be on the window panel, and attach the window exhaust adapter. Make sure they are securely attached. 2 Attach the exhaust hose adapter to each other. 3 Slide and open the...
CV-10NH Operation Manual
Page 17
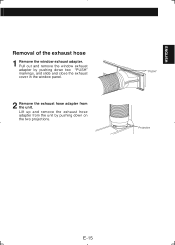
Lift up and remove the exhaust hose adapter from the unit. ENGLISH Removal of the exhaust hose 1 Remove the window exhaust adapter. "PUSH" Projection E-15 Pull out and remove the window exhaust adapter by pushing down two "PUSH" markings, and slide and close the exhaust cover in the window panel. 2 Remove the exhaust hose adapter from the unit by pushing down on the two projections.
Lift up and remove the exhaust hose adapter from the unit. ENGLISH Removal of the exhaust hose 1 Remove the window exhaust adapter. "PUSH" Projection E-15 Pull out and remove the window exhaust adapter by pushing down two "PUSH" markings, and slide and close the exhaust cover in the window panel. 2 Remove the exhaust hose adapter from the unit by pushing down on the two projections.
CV-10NH Operation Manual
Page 29
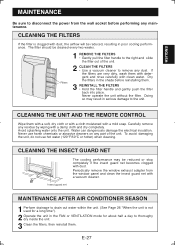
ENGLISH MAINTENANCE Be sure to disconnect the power from the window panel and clean the insect guard net with a vacuum cleaner. If the filters are very dirty, wash them with a soft, dry cloth or with a cloth ... before performing any maintenance. E-27 Avoid splashing water onto the unit. Periodically remove the window exhaust adapter from the wall socket before reinstalling them . Never operate the unit without the filter. Insect guard net MAINTENANCE AFTER AIR CONDITIONER SEASON 1 Perform drainage to thoroughy dry inside the unit. 3 Clean the filters, then...
ENGLISH MAINTENANCE Be sure to disconnect the power from the window panel and clean the insect guard net with a vacuum cleaner. If the filters are very dirty, wash them with a soft, dry cloth or with a cloth ... before performing any maintenance. E-27 Avoid splashing water onto the unit. Periodically remove the window exhaust adapter from the wall socket before reinstalling them . Never operate the unit without the filter. Insect guard net MAINTENANCE AFTER AIR CONDITIONER SEASON 1 Perform drainage to thoroughy dry inside the unit. 3 Clean the filters, then...


