
CV-P10NC Operation Manual
Page 3
...; INSTALLATION AND REMOVAL OF EXHAUST HOSE .........E-14 • PRE-OPERATION CHECKS E-16 • COOL MODE E-18 • DEHUMIDIFICATION MODE E-19 • FAN MODE E-20 • VENTILATION MODE E-20 • TO CHANGE AIR FLOW DIRECTION E-21 • PLASMACLUSTER OPERATION E-22 • MEGA COOL OPERATION E-23 • ONE-HOUR OFF TIMER E-23 • TIMER OPERATION E-24 • MAIN UNIT OPERATION E-26 • DRAINAGE E-27 • MAINTENANCE E-28 • BEFORE CALLING FOR SERVICE E-29 Declaration of Conformity SHARP ROOM AIR CONDITIONER CV-P10NC This...
...; INSTALLATION AND REMOVAL OF EXHAUST HOSE .........E-14 • PRE-OPERATION CHECKS E-16 • COOL MODE E-18 • DEHUMIDIFICATION MODE E-19 • FAN MODE E-20 • VENTILATION MODE E-20 • TO CHANGE AIR FLOW DIRECTION E-21 • PLASMACLUSTER OPERATION E-22 • MEGA COOL OPERATION E-23 • ONE-HOUR OFF TIMER E-23 • TIMER OPERATION E-24 • MAIN UNIT OPERATION E-26 • DRAINAGE E-27 • MAINTENANCE E-28 • BEFORE CALLING FOR SERVICE E-29 Declaration of Conformity SHARP ROOM AIR CONDITIONER CV-P10NC This...
CV-P10NC Operation Manual
Page 5
... apply to have Proof of change for the Sealed Cooling System parts; Some states do not allow the exclusion of the seller nor any ): Where to Obtain Service: What to Do to improper voltage or other than an authorized servicer. Be sure to you. Product which has been subjected to Obtain Service: CV-P10NC Portable Air Conditioner. THIS WARRANTY GIVES YOU SPECIFlC LEGAL...
... apply to have Proof of change for the Sealed Cooling System parts; Some states do not allow the exclusion of the seller nor any ): Where to Obtain Service: What to Do to improper voltage or other than an authorized servicer. Be sure to you. Product which has been subjected to Obtain Service: CV-P10NC Portable Air Conditioner. THIS WARRANTY GIVES YOU SPECIFlC LEGAL...
CV-P10NC Operation Manual
Page 6
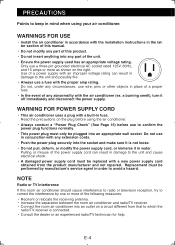
.... Replacement must be replaced with the proper amp rating. E-4 Use of a power supply with an improper voltage rating can result in damage to the unit and cause electrical shock. • A damaged power supply cord must be plugged into any extension cords. • Push the power plug securely into an outlet on the plug before use in conjunction with the air conditioner (ex. NOTE Radio or TV Interference If this product...
.... Replacement must be replaced with the proper amp rating. E-4 Use of a power supply with an improper voltage rating can result in damage to the unit and cause electrical shock. • A damaged power supply cord must be plugged into any extension cords. • Push the power plug securely into an outlet on the plug before use in conjunction with the air conditioner (ex. NOTE Radio or TV Interference If this product...
CV-P10NC Operation Manual
Page 7
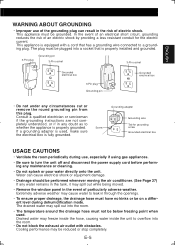
... exhaust air outlet with a cord that is fully grounded. The plug must be reduced or stop completely. ENGLISH WARNING ABOUT GROUNDING • Improper use , especially if using gas appliances. • Be sure to turn the unit off and disconnect the power supply cord before performing any maintenance or cleaning. • Do not splash or pour water directly onto the unit. Screw Grounding adapter Grounding wire Tab for the electric...
... exhaust air outlet with a cord that is fully grounded. The plug must be reduced or stop completely. ENGLISH WARNING ABOUT GROUNDING • Improper use , especially if using gas appliances. • Be sure to turn the unit off and disconnect the power supply cord before performing any maintenance or cleaning. • Do not splash or pour water directly onto the unit. Screw Grounding adapter Grounding wire Tab for the electric...
CV-P10NC Operation Manual
Page 8
... use . • Turn off any openings into the room. • When cooling operation is normal and does not indicate a problem with the unit. • This air conditioner blows the warm air generated by your air conditioner work harder and less efficiently. PRECAUTIONS NOTES ON OPERATION • Allow 3 minutes for the compressor to freeze. ENERGY EFFICIENCY TIPS • Avoid direct sunlight. This protective device will blink. Setting the unit to a higher temperature...
... use . • Turn off any openings into the room. • When cooling operation is normal and does not indicate a problem with the unit. • This air conditioner blows the warm air generated by your air conditioner work harder and less efficiently. PRECAUTIONS NOTES ON OPERATION • Allow 3 minutes for the compressor to freeze. ENERGY EFFICIENCY TIPS • Avoid direct sunlight. This protective device will blink. Setting the unit to a higher temperature...
CV-P10NC Operation Manual
Page 9
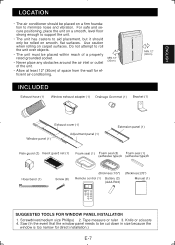
...) INCLUDED MIN.12" (30cm) SUGGESTED TOOLS FOR WINDOW PANEL INSTALLATION 1. Screwdriver(medium size Phillips) 2. Knife or scissors 4. Tape measure or ruler 3. Saw (In the event that the window panel needs to roll the unit over objects. • The unit must be cut down in size because the window is too narrow for efficient air-conditioning. Use caution when rolling on carpet surfaces.
...) INCLUDED MIN.12" (30cm) SUGGESTED TOOLS FOR WINDOW PANEL INSTALLATION 1. Screwdriver(medium size Phillips) 2. Knife or scissors 4. Tape measure or ruler 3. Saw (In the event that the window panel needs to roll the unit over objects. • The unit must be cut down in size because the window is too narrow for efficient air-conditioning. Use caution when rolling on carpet surfaces.
CV-P10NC Operation Manual
Page 10
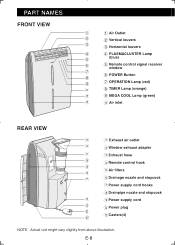
PART NAMES FRONT VIEW 1 1 Air Outlet 2 2 Vertical louvers 3 3 Horizontal louvers 4 4 PLASMACLUSTER Lamp 5 (blue) 6 5 Remote control signal receiver window 7 6 POWER Button 8 9 7 OPERATION Lamp (red) 0 8 TIMER Lamp (orange) 0 9 MEGA COOL Lamp (green) 0 0 Air inlet REAR VIEW q q Exhaust air outlet w w Window exhaust adapter e e Exhaust hose r r Remote control hook t t Air filters y u y Drainage nozzle and stopcock u Power supply cord hooks i Drainpipe nozzle and stopcock i o Power supply cord o p Power plug p a a Casters(4) NOTE: Actual unit ...
PART NAMES FRONT VIEW 1 1 Air Outlet 2 2 Vertical louvers 3 3 Horizontal louvers 4 4 PLASMACLUSTER Lamp 5 (blue) 6 5 Remote control signal receiver window 7 6 POWER Button 8 9 7 OPERATION Lamp (red) 0 8 TIMER Lamp (orange) 0 9 MEGA COOL Lamp (green) 0 0 Air inlet REAR VIEW q q Exhaust air outlet w w Window exhaust adapter e e Exhaust hose r r Remote control hook t t Air filters y u y Drainage nozzle and stopcock u Power supply cord hooks i Drainpipe nozzle and stopcock i o Power supply cord o p Power plug p a a Casters(4) NOTE: Actual unit ...
CV-P10NC Operation Manual
Page 11
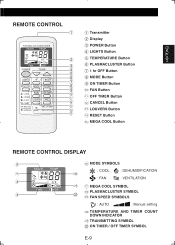
ENGLISH REMOTE CONTROL 1 2 3 4 5 6 7 8 9 0 q w e r t 1 Transmitter 2 Display 3 POWER Button 4 LIGHTS Button 5 TEMPERATURE Button 6 PLASMACLUSTER Button 7 1 hr OFF Button 8 MODE Button 9 ON TIMER Button 0 FAN Button q OFF TIMER Button w CANCEL Button e LOUVERS Button r RESET Button t MEGA COOL Button REMOTE CONTROL DISPLAY y y MODE SYMBOLS : COOL : DEHUMIDIFICATION u p : FAN : VENTILATION i a u MEGA COOL SYMBOL i PLASMACLUSTER SYMBOL o s o FAN SPEED SYMBOLS : AUTO : Manual setting p TEMPERATURE AND TIMER COUNT DOWN INDICATOR a TRANSMITTING SYMBOL s ON TIMER / OFF TIMER SYMBOL...
ENGLISH REMOTE CONTROL 1 2 3 4 5 6 7 8 9 0 q w e r t 1 Transmitter 2 Display 3 POWER Button 4 LIGHTS Button 5 TEMPERATURE Button 6 PLASMACLUSTER Button 7 1 hr OFF Button 8 MODE Button 9 ON TIMER Button 0 FAN Button q OFF TIMER Button w CANCEL Button e LOUVERS Button r RESET Button t MEGA COOL Button REMOTE CONTROL DISPLAY y y MODE SYMBOLS : COOL : DEHUMIDIFICATION u p : FAN : VENTILATION i a u MEGA COOL SYMBOL i PLASMACLUSTER SYMBOL o s o FAN SPEED SYMBOLS : AUTO : Manual setting p TEMPERATURE AND TIMER COUNT DOWN INDICATOR a TRANSMITTING SYMBOL s ON TIMER / OFF TIMER SYMBOL...
CV-P10NC Operation Manual
Page 18
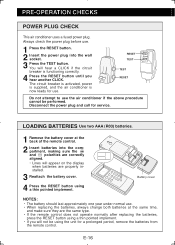
...-OPERATION CHECKS POWER PLUG CHECK This air conditioner uses a fused power plug. RESET TEST TEST RESET Do not attempt to use . polarities are correctly aligned. • Lines will appear on the display when batteries are the same type. • If the remote control does not operate normally after replacing the batteries, press the RESET button using a thin pointed implement. The circuit breaker is activated, power is supplied, and the air conditioner is functioning correctly. 4 Press the RESET button...
...-OPERATION CHECKS POWER PLUG CHECK This air conditioner uses a fused power plug. RESET TEST TEST RESET Do not attempt to use . polarities are correctly aligned. • Lines will appear on the display when batteries are the same type. • If the remote control does not operate normally after replacing the batteries, press the RESET button using a thin pointed implement. The circuit breaker is activated, power is supplied, and the air conditioner is functioning correctly. 4 Press the RESET button...
CV-P10NC Operation Manual
Page 20
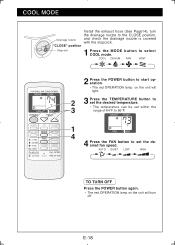
... the MODE button to the CLOSE position, Drainage nozzle and check the drainage nozzle is covered with the stopcock. COOL DEHUM FAN VENT 2 Press the POWER button to start operation. • The red OPERATION lamp on the unit will light. 2 3 Press the TEMPERATURE button to set the desired temperature. 3 • The temperature can be set within the range of 64°F to 86°F. 1 4 4 Press the FAN button to set the desired fan speed. E-18 AUTO...
... the MODE button to the CLOSE position, Drainage nozzle and check the drainage nozzle is covered with the stopcock. COOL DEHUM FAN VENT 2 Press the POWER button to start operation. • The red OPERATION lamp on the unit will light. 2 3 Press the TEMPERATURE button to set the desired temperature. 3 • The temperature can be set within the range of 64°F to 86°F. 1 4 4 Press the FAN button to set the desired fan speed. E-18 AUTO...
CV-P10NC Operation Manual
Page 21
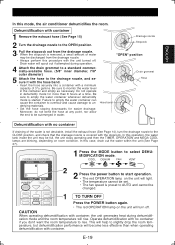
... unit will light. • The temperature cannot be set. • The fan speed is removed, a small amount of water may be changed. 1 TO TURN OFF Press the POWER button again. • The red OPERATION lamp on room condition. Be sure to un- Dehumidification with a minimum capacity of the water is not desirable, install the exhaust hose (See Page 14), turn off . DEHUMIDIFICATION MODE Drain water will rise. In this mode, the air conditioner...
... unit will light. • The temperature cannot be set. • The fan speed is removed, a small amount of water may be changed. 1 TO TURN OFF Press the POWER button again. • The red OPERATION lamp on room condition. Be sure to un- Dehumidification with a minimum capacity of the water is not desirable, install the exhaust hose (See Page 14), turn off . DEHUMIDIFICATION MODE Drain water will rise. In this mode, the air conditioner...
CV-P10NC Operation Manual
Page 22
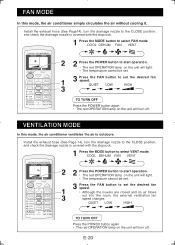
... FAN VENT 2 2 Press the POWER button to start operation. • The red OPERATION lamp on the unit will light. • The temperature cannot be set. 1 3 Press the FAN button to select FAN mode. Install the exhaust hose (See Page 14), turn off . E-20 QUIET LOW HIGH TO TURN OFF Press the POWER button again. • The red OPERATION lamp on the unit will turn the drainage nozzle to the CLOSE position, and check the drainage nozzle is covered...
... FAN VENT 2 2 Press the POWER button to start operation. • The red OPERATION lamp on the unit will light. • The temperature cannot be set. 1 3 Press the FAN button to select FAN mode. Install the exhaust hose (See Page 14), turn off . E-20 QUIET LOW HIGH TO TURN OFF Press the POWER button again. • The red OPERATION lamp on the unit will turn the drainage nozzle to the CLOSE position, and check the drainage nozzle is covered...
CV-P10NC Operation Manual
Page 24
... PLASMACLUSTER button during VENTILATION mode. NOTES: • Use of positive and negative ions released into the room. Approximately the same numbers of the PLASMACLUSTER function will be memorized and it will be activated the next time you turn on the air conditioner. • To turn off the PLASMACLUSTER Lamp, press the LIGHTS button. • PLASMACLUSTER operation cannot be set during operation. • The remote control will display...
... PLASMACLUSTER button during VENTILATION mode. NOTES: • Use of positive and negative ions released into the room. Approximately the same numbers of the PLASMACLUSTER function will be memorized and it will be activated the next time you turn on the air conditioner. • To turn off the PLASMACLUSTER Lamp, press the LIGHTS button. • PLASMACLUSTER operation cannot be set during operation. • The remote control will display...
CV-P10NC Operation Manual
Page 25
... the unit will light. TO CANCEL Press the MEGA COOL button again. 1 • MEGA COOL operation is also cancelled when the mode is changed, or when the unit is not operating, the unit will turn off by pressing the POWER button. • The red OPERATION lamp and the orange TIMER lamp on the unit will stop operating after one hour. ENGLISH MEGA COOL OPERATION In this operation, the air conditioner fan works at the formerly set condition. •...
... the unit will light. TO CANCEL Press the MEGA COOL button again. 1 • MEGA COOL operation is also cancelled when the mode is changed, or when the unit is not operating, the unit will turn off by pressing the POWER button. • The red OPERATION lamp and the orange TIMER lamp on the unit will stop operating after one hour. ENGLISH MEGA COOL OPERATION In this operation, the air conditioner fan works at the formerly set condition. •...

CV-P10NC Operation Manual
Page 26
... on the remote control display the next time you press the button as you set the OFF TIMER or ON TIMER. • The OFF TIMER and ON TIMER can not be retrieved even after the power is set, the TIMER setting will be cancelled and will not be set together. Point the remote control at the signal receiver window on the unit. 1 Press the OFF TIMER button and set the time...
... on the remote control display the next time you press the button as you set the OFF TIMER or ON TIMER. • The OFF TIMER and ON TIMER can not be retrieved even after the power is set, the TIMER setting will be cancelled and will not be set together. Point the remote control at the signal receiver window on the unit. 1 Press the OFF TIMER button and set the time...
CV-P10NC Operation Manual
Page 27
... time display. • If you set the unit to show in 1-hour increments. Hold the button down to turn on 6.5 hours later. nal. • The time setting will count down to your setting. Point the remote control at the signal receiver window on automatically according to speed through the settings. • The orange TIMER lamp on the unit will turn off. Select the mode, temperature, fan speed setting...
... time display. • If you set the unit to show in 1-hour increments. Hold the button down to turn on 6.5 hours later. nal. • The time setting will count down to your setting. Point the remote control at the signal receiver window on automatically according to speed through the settings. • The orange TIMER lamp on the unit will turn off. Select the mode, temperature, fan speed setting...
CV-P10NC Operation Manual
Page 28
... it was last operated, it will turn off. • Upon starting MAIN UNIT operation, the drainage pump inside the unit runs for about a minute, which may produce an audible gurgling sound. E-26 MAIN UNIT OPERATION Use this mode when the remote control is not available. 1 Press the POWER button on the unit. • The red OPERATION lamp on the unit will resume operation in the cooling mode, set to AUTO. The fan speed set at 68˚...
... it was last operated, it will turn off. • Upon starting MAIN UNIT operation, the drainage pump inside the unit runs for about a minute, which may produce an audible gurgling sound. E-26 MAIN UNIT OPERATION Use this mode when the remote control is not available. 1 Press the POWER button on the unit. • The red OPERATION lamp on the unit will resume operation in the cooling mode, set to AUTO. The fan speed set at 68˚...
CV-P10NC Operation Manual
Page 29
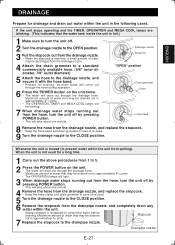
... discharged from spilling). Drainage nozzle Stopcock "OPEN" position Drain grommet Hose Hose band 8 Remove the hose from the hose, turn the unit off by pressing POWER button. • This will drain out through the drainage hose. Maximum amount of water that may be blinking. 7 When drainage water stops running out from the drainage nozzle, and replace the stopcock. • Keep the hose band and drain grommet in case of re-used. 9 Turn the drainage nozzle to the...
... discharged from spilling). Drainage nozzle Stopcock "OPEN" position Drain grommet Hose Hose band 8 Remove the hose from the hose, turn the unit off by pressing POWER button. • This will drain out through the drainage hose. Maximum amount of water that may be blinking. 7 When drainage water stops running out from the drainage nozzle, and replace the stopcock. • Keep the hose band and drain grommet in case of re-used. 9 Turn the drainage nozzle to the...
CV-P10NC Operation Manual
Page 30
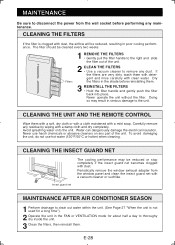
.... Insect guard net MAINTENANCE AFTER AIR CONDITIONER SEASON 1 Perform drainage to drain out water within the unit. (See Page 27 "When the unit is clogged with clean water. Carefully remove any maintenance. Water can dangerously damage the electrical insulation. The filter should be reduced, resulting in the FAN or VENTILATION mode for about half a day to the unit. CLEANING THE INSECT GUARD NET The cooling performance may result...
.... Insect guard net MAINTENANCE AFTER AIR CONDITIONER SEASON 1 Perform drainage to drain out water within the unit. (See Page 27 "When the unit is clogged with clean water. Carefully remove any maintenance. Water can dangerously damage the electrical insulation. The filter should be reduced, resulting in the FAN or VENTILATION mode for about half a day to the unit. CLEANING THE INSECT GUARD NET The cooling performance may result...
CV-P10NC Operation Manual
Page 31
... the window exposed to direct sunlight? E-29 These ozone emissions are installed with the fan speed set to "HIGH" until all ice dissipates. • Is the temperature set to 3 minutes when the unit is the circuit breaker tripped? • Did you restarted the air conditioner, a protective device may be heard for a service. The exhaust hose must be cancelled and will blow out if the cooling coil is generating...
... the window exposed to direct sunlight? E-29 These ozone emissions are installed with the fan speed set to "HIGH" until all ice dissipates. • Is the temperature set to 3 minutes when the unit is the circuit breaker tripped? • Did you restarted the air conditioner, a protective device may be heard for a service. The exhaust hose must be cancelled and will blow out if the cooling coil is generating...


