
CV-P09FX Operation Manual
Page 3
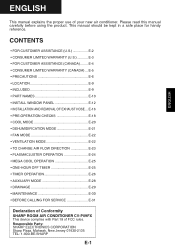
... MODE E-21 • FAN MODE E-22 • VENTILATION MODE E-22 • TO CHANGE AIR FLOW DIRECTION E-23 • PLASMACLUSTER OPERATION E-24 • MEGA COOL OPERATION E-25 • ONE-HOUR OFF TIMER E-25 • TIMER OPERATION E-26 • AUXILIARY MODE E-28 • DRAINAGE E-29 • MAINTENANCE E-30 • BEFORE CALLING FOR SERVICE E-31 Declaration of Conformity SHARP ROOM AIR CONDITIONER CV-P09FX This device complies with Part 18 of your new air conditioner. ENGLISH ENGLISH This manual explains...
... MODE E-21 • FAN MODE E-22 • VENTILATION MODE E-22 • TO CHANGE AIR FLOW DIRECTION E-23 • PLASMACLUSTER OPERATION E-24 • MEGA COOL OPERATION E-25 • ONE-HOUR OFF TIMER E-25 • TIMER OPERATION E-26 • AUXILIARY MODE E-28 • DRAINAGE E-29 • MAINTENANCE E-30 • BEFORE CALLING FOR SERVICE E-31 Declaration of Conformity SHARP ROOM AIR CONDITIONER CV-P09FX This device complies with Part 18 of your new air conditioner. ENGLISH ENGLISH This manual explains...

CV-P09FX Operation Manual
Page 5
... to Obtain Service: CV-P09FX Portable Air Conditioner. Product which were caused by repairs or attempted repairs performed by Sharp and shall be liable or in the United States. The warranty period continues for a total of five (5) yeares from date of purchase for this additional period. Be sure to the purchaser. Your Product Model Number & Description: Warranty Period for the Sealed Cooling System parts; Nor shall Sharp be the...
... to Obtain Service: CV-P09FX Portable Air Conditioner. Product which were caused by repairs or attempted repairs performed by Sharp and shall be liable or in the United States. The warranty period continues for a total of five (5) yeares from date of purchase for this additional period. Be sure to the purchaser. Your Product Model Number & Description: Warranty Period for the Sealed Cooling System parts; Nor shall Sharp be the...

CV-P09FX Operation Manual
Page 7
..., remote controls, AC adapters, batteries, temperature probe, stylus, trays, filters, belts, ribbons, cables and paper. (e) Any cosmetic damage to the surface or exterior that this warranty on contract, negligence, strict liability or otherwise. This warranty shall not apply to: (a) Any defects caused or repairs required as a result of abusive operation, negligence, accident, improper installation or inappropriate use as outlined in the owner's manual...
..., remote controls, AC adapters, batteries, temperature probe, stylus, trays, filters, belts, ribbons, cables and paper. (e) Any cosmetic damage to the surface or exterior that this warranty on contract, negligence, strict liability or otherwise. This warranty shall not apply to: (a) Any defects caused or repairs required as a result of abusive operation, negligence, accident, improper installation or inappropriate use as outlined in the owner's manual...

CV-P09FX Operation Manual
Page 8
... 15 amps or more of any part of the power supply cord can result in damage to the unit and cause electrical shock. • A damaged power supply cord must be replaced with the proper amp rating. Use of a power supply with the installation instructions in the latter section of this manual. • Do not modify any abnormality with the air conditioner (ex. Pulling or misuse of this room air conditioner should...
... 15 amps or more of any part of the power supply cord can result in damage to the unit and cause electrical shock. • A damaged power supply cord must be replaced with the proper amp rating. Use of a power supply with the installation instructions in the latter section of this manual. • Do not modify any abnormality with the air conditioner (ex. Pulling or misuse of this room air conditioner should...

CV-P09FX Operation Manual
Page 9
... window panel in the risk of the grounding plug can cause electrical shock or equipment damage. • Drainage should be below freezing point when used , make sure the socket box is properly grounded. The drained water may spill out into the room. • The temperature around the drainage hose must have no kinks or be plugged into the room. • Do not block the exhaust air...
... window panel in the risk of the grounding plug can cause electrical shock or equipment damage. • Drainage should be below freezing point when used , make sure the socket box is properly grounded. The drained water may spill out into the room. • The temperature around the drainage hose must have no kinks or be plugged into the room. • Do not block the exhaust air...

CV-P09FX Operation Manual
Page 10
.... OPERATING CONDITIONS • The air conditioner must remove the heat produced by the unit outside through any lights or appliances that blown out will rise. A dirty filter blocks the flow of a power failure during dehumidification mode and the room temperature will enter the room from freezing. • Dehumidification mode increases room temperature. Turn off and immediately restart it from outside the room via the exhaust hose while in cooling mode. • Keep the filter clean...
.... OPERATING CONDITIONS • The air conditioner must remove the heat produced by the unit outside through any lights or appliances that blown out will rise. A dirty filter blocks the flow of a power failure during dehumidification mode and the room temperature will enter the room from freezing. • Dehumidification mode increases room temperature. Turn off and immediately restart it from outside the room via the exhaust hose while in cooling mode. • Keep the filter clean...

CV-P09FX Operation Manual
Page 11
... air-conditioning. Do not attempt to minimize noise and vibration. Knife or scissors 4. ENGLISH LOCATION • The air conditioner should only be rolled on smooth, flat surfaces. Saw (In the event that the window panel needs to aid placement, but it should be placed on carpet surfaces. Screwdriver(medium size Phillips) 2. MIN.12" (30cm) MIN.12" (30cm) INCLUDED Exhaust hose (1) Window exhaust adapter (1) Drainage Grommet (1) Bracket (1) Exhaust cover (1) Window panel (1) Adjustment panel...
... air-conditioning. Do not attempt to minimize noise and vibration. Knife or scissors 4. ENGLISH LOCATION • The air conditioner should only be rolled on smooth, flat surfaces. Saw (In the event that the window panel needs to aid placement, but it should be placed on carpet surfaces. Screwdriver(medium size Phillips) 2. MIN.12" (30cm) MIN.12" (30cm) INCLUDED Exhaust hose (1) Window exhaust adapter (1) Drainage Grommet (1) Bracket (1) Exhaust cover (1) Window panel (1) Adjustment panel...

CV-P09FX Operation Manual
Page 12
... Vertical louvers 3 3 Horizontal louvers 4 4 PLASMACLUSTER Lamp (blue) 5 5 Remote control signal receiver 6 window 7 6 AUX. E-10 Button 8 7 OPERATION Lamp (red) 9 0 8 TIMER Lamp (orange) 0 9 MEGA COOL Lamp (green) 0 0 Air inlet REAR VIEW q q Exhaust air outlet w w Window exhaust adapter e e Exhaust hose r r Remote control hook t t Air filters y u y Drainage nozzle and stopcock u Power supply cord hooks i Drainpipe nozzle and stopcock i o Power supply cord o p Power plug p a a Casters(4) NOTE: Actual unit might vary slightly from above illustration.
... Vertical louvers 3 3 Horizontal louvers 4 4 PLASMACLUSTER Lamp (blue) 5 5 Remote control signal receiver 6 window 7 6 AUX. E-10 Button 8 7 OPERATION Lamp (red) 9 0 8 TIMER Lamp (orange) 0 9 MEGA COOL Lamp (green) 0 0 Air inlet REAR VIEW q q Exhaust air outlet w w Window exhaust adapter e e Exhaust hose r r Remote control hook t t Air filters y u y Drainage nozzle and stopcock u Power supply cord hooks i Drainpipe nozzle and stopcock i o Power supply cord o p Power plug p a a Casters(4) NOTE: Actual unit might vary slightly from above illustration.

CV-P09FX Operation Manual
Page 13
REMOTE CONTROL 1 2 3 4 5 6 7 8 9 0 q w e r t 1 Transmitter 2 Display 3 POWER Button 4 LIGHTS Button 5 TEMPERATURE Button 6 PLASMACLUSTER Button 7 1 hr OFF Button 8 MODE Button 9 ON TIMER Button 0 FAN Button q OFF TIMER Button w CANCEL Button e LOUVERS Button r RESET Button t MEGA COOL Button ENGLISH REMOTE CONTROL DISPLAY y y MODE SYMBOLS : COOL : DEHUMIDIFICATION u p : FAN : VENTILATION i a u MEGA COOL SYMBOL i PLASMACLUSTER SYMBOL o s o FAN SPEED SYMBOLS : AUTO : Manual setting p TEMPERATURE AND TIMER COUNT DOWN INDICATOR a TRANSMITTING SYMBOL s ON TIMER / OFF TIMER SYMBOL...
REMOTE CONTROL 1 2 3 4 5 6 7 8 9 0 q w e r t 1 Transmitter 2 Display 3 POWER Button 4 LIGHTS Button 5 TEMPERATURE Button 6 PLASMACLUSTER Button 7 1 hr OFF Button 8 MODE Button 9 ON TIMER Button 0 FAN Button q OFF TIMER Button w CANCEL Button e LOUVERS Button r RESET Button t MEGA COOL Button ENGLISH REMOTE CONTROL DISPLAY y y MODE SYMBOLS : COOL : DEHUMIDIFICATION u p : FAN : VENTILATION i a u MEGA COOL SYMBOL i PLASMACLUSTER SYMBOL o s o FAN SPEED SYMBOLS : AUTO : Manual setting p TEMPERATURE AND TIMER COUNT DOWN INDICATOR a TRANSMITTING SYMBOL s ON TIMER / OFF TIMER SYMBOL...

CV-P09FX Operation Manual
Page 20
...-OPERATION CHECKS POWER PLUG CHECK This air conditioner uses a fused power plug. RESET TEST Do not attempt to use . 1 Press the RESET button. 2 Insert the power plug into the compartment, making sure the ± and - The circuit breaker is activated, power is supplied, and the air conditioner is now ready for a prolonged period, remove the batteries from the remote control. polarities are correctly aligned. • Lines will not be using the unit for use . • When replacing...
...-OPERATION CHECKS POWER PLUG CHECK This air conditioner uses a fused power plug. RESET TEST Do not attempt to use . 1 Press the RESET button. 2 Insert the power plug into the compartment, making sure the ± and - The circuit breaker is activated, power is supplied, and the air conditioner is now ready for a prolonged period, remove the batteries from the remote control. polarities are correctly aligned. • Lines will not be using the unit for use . • When replacing...

CV-P09FX Operation Manual
Page 22
..., Drainage nozzle and check the drainage nozzle is covered "CLOSE" position with the stopcock. E-20 COOL DEHUM FAN VENT 32 Press the POWER button to start operation. • The red OPERATION lamp on the unit will light. 2 3 Press the TEMPERATURE button to set the desired temperature. • The temperature can be set within the range 3 of 64°F to 86°F. 1 4 4 Press the FAN button to set the de- COOL MODE 1 Install the exhaust hose (See Page16), turn...
..., Drainage nozzle and check the drainage nozzle is covered "CLOSE" position with the stopcock. E-20 COOL DEHUM FAN VENT 32 Press the POWER button to start operation. • The red OPERATION lamp on the unit will light. 2 3 Press the TEMPERATURE button to set the desired temperature. • The temperature can be set within the range 3 of 64°F to 86°F. 1 4 4 Press the FAN button to set the de- COOL MODE 1 Install the exhaust hose (See Page16), turn...
CV-P09FX Operation Manual
Page 23
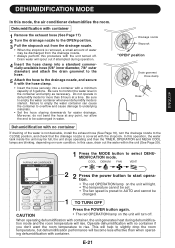
... unit may be set. • The fan speed is started. COOL DEHUM FAN VENT 2 2 Press the power button to be submerged in dehumidify mode for easier drainage. In this case, drain out the water within the unit (See Page 29). 1 Press the MODE button to AUTO and cannot be full, the unit stops operating and then the TIMER, OPERATION and MEGA COOL lamps are blinking, depending on room condition. DEHUMIDIFICATION MODE ENGLISH In this procedure with the unit turned...
... unit may be set. • The fan speed is started. COOL DEHUM FAN VENT 2 2 Press the power button to be submerged in dehumidify mode for easier drainage. In this case, drain out the water within the unit (See Page 29). 1 Press the MODE button to AUTO and cannot be full, the unit stops operating and then the TIMER, OPERATION and MEGA COOL lamps are blinking, depending on room condition. DEHUMIDIFICATION MODE ENGLISH In this procedure with the unit turned...

CV-P09FX Operation Manual
Page 24
... unit will turn off . Install the exhaust hose (See Page 16), turn the drainage nozzle to the CLOSE position, and check the drainage nozzle is covered with the stopcock. 1 Press the MODE button to outdoors. COOL DEHUM FAN VENT 2 2 Press the POWER button to start operation. 25 • The red OPERATION lamp on the unit will light. • The temperature cannot be set the desired fan 3 speed. • Although the louvers are closed and no air blows...
... unit will turn off . Install the exhaust hose (See Page 16), turn the drainage nozzle to the CLOSE position, and check the drainage nozzle is covered with the stopcock. 1 Press the MODE button to outdoors. COOL DEHUM FAN VENT 2 2 Press the POWER button to start operation. 25 • The red OPERATION lamp on the unit will light. • The temperature cannot be set the desired fan 3 speed. • Although the louvers are closed and no air blows...

CV-P09FX Operation Manual
Page 26
... ion generator inside the air conditioner will light. tive and negative ions released into the room. E-24 Approximately the same numbers of the PLASMACLUSTER function will be memorized and it will be activated the next time you turn on the air conditioner. • To turn off the PLASMACLUSTER Lamp, press the LIGHTS button. • PLASMACLUSTER operation cannot be set during operation. • The remote control will display " ". •...
... ion generator inside the air conditioner will light. tive and negative ions released into the room. E-24 Approximately the same numbers of the PLASMACLUSTER function will be memorized and it will be activated the next time you turn on the air conditioner. • To turn off the PLASMACLUSTER Lamp, press the LIGHTS button. • PLASMACLUSTER operation cannot be set during operation. • The remote control will display " ". •...

CV-P09FX Operation Manual
Page 27
... MEGA COOL OPERATION In this operation, the air conditioner fan works at the formerly set condition. • If you wish to protect the unit. TO CANCEL Press the CANCEL button. 1 • The orange TIMER lamp on the unit will turn off . ENGLISH ONE-HOUR OFF TIMER When the ONE-HOUR OFF TIMER is activated, press the 1hr OFF TIMER button again during cooling mode. • The remote control will display " " . • The temperature display will...
... MEGA COOL OPERATION In this operation, the air conditioner fan works at the formerly set condition. • If you wish to protect the unit. TO CANCEL Press the CANCEL button. 1 • The orange TIMER lamp on the unit will turn off . ENGLISH ONE-HOUR OFF TIMER When the ONE-HOUR OFF TIMER is activated, press the 1hr OFF TIMER button again during cooling mode. • The remote control will display " " . • The temperature display will...

CV-P09FX Operation Manual
Page 28
Point the remote control at the signal receiver window on the unit will light. 1 • The unit will emit a beep when it receives the signal. • The time setting will count down to speed through the settings. • The orange TIMER lamp on the unit. 1 Press the OFF TIMER button and set the unit to turn off 2.5 hours later. Display shown when you set the time as desired...
Point the remote control at the signal receiver window on the unit will light. 1 • The unit will emit a beep when it receives the signal. • The time setting will count down to speed through the settings. • The orange TIMER lamp on the unit. 1 Press the OFF TIMER button and set the unit to turn off 2.5 hours later. Display shown when you set the time as desired...

CV-P09FX Operation Manual
Page 29
.... • The time setting will turn off. ENGLISH ON TIMER The unit will operate using the most recent setting. Point the remote control at the signal receiver window on the unit. 1 Press the ON TIMER button. • The time setting will change the setting, the unit will turn on automatically according to the time display. • If you do not change as you set with the ON TIMER, the temperature will show the...
.... • The time setting will turn off. ENGLISH ON TIMER The unit will operate using the most recent setting. Point the remote control at the signal receiver window on the unit. 1 Press the ON TIMER button. • The time setting will change the setting, the unit will turn on automatically according to the time display. • If you do not change as you set with the ON TIMER, the temperature will show the...

CV-P09FX Operation Manual
Page 30
... light and the unit will start operating in COOL 1 mode. • The fan speed is set to AUTO. • The temperature setting is not available. 1 Press the AUX. button on the unit. • The red OPERATION lamp on the unit will turn off . • Upon starting AUXILIARY operation, the drainage pump inside the unit runs for about a minute, which may produce an audible gurgling sound. E-28 AUXILIARY MODE Use this mode when the remote control is automatically set...
... light and the unit will start operating in COOL 1 mode. • The fan speed is set to AUTO. • The temperature setting is not available. 1 Press the AUX. button on the unit. • The red OPERATION lamp on the unit will turn off . • Upon starting AUXILIARY operation, the drainage pump inside the unit runs for about a minute, which may produce an audible gurgling sound. E-28 AUXILIARY MODE Use this mode when the remote control is automatically set...

CV-P09FX Operation Manual
Page 32
... with clean water. Never use hot water (120°F/50°C or hotter) when cleaning. Water can dangerously damage the electrical insulation. Filters 1 REMOVE THE FILTERS • Gently pull the filter handle to the right and slide the filter out of the unit. 2 CLEAN THE FILTERS • Use a vacuum cleaner to remove any part of the unit. Carefully remove any maintenance. Insect guard net MAINTENANCE AFTER AIR CONDITIONER SEASON 1 Perform drainage to drain out water within the unit...
... with clean water. Never use hot water (120°F/50°C or hotter) when cleaning. Water can dangerously damage the electrical insulation. Filters 1 REMOVE THE FILTERS • Gently pull the filter handle to the right and slide the filter out of the unit. 2 CLEAN THE FILTERS • Use a vacuum cleaner to remove any part of the unit. Carefully remove any maintenance. Insect guard net MAINTENANCE AFTER AIR CONDITIONER SEASON 1 Perform drainage to drain out water within the unit...

CV-P09FX Operation Manual
Page 33
.... • This air conditioner evaporates water condensed during operation. Clean and replace the filters. • Is the cooling coil frozen? This is sound of the compressor starting AUXILIARY mode. This is the sound of running drainage pump inside the unit. • An audible gurgling sound may produce an odor. This is turned on a gently sloping floor. Cooling does not take place in the remote control. For efficient operation, make the hose as short...
.... • This air conditioner evaporates water condensed during operation. Clean and replace the filters. • Is the cooling coil frozen? This is sound of the compressor starting AUXILIARY mode. This is the sound of running drainage pump inside the unit. • An audible gurgling sound may produce an odor. This is turned on a gently sloping floor. Cooling does not take place in the remote control. For efficient operation, make the hose as short...


