Operation Manual
Page 3
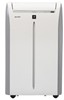
...: 1-800-BE-SHARP EN-1 CV-2P13SX_en.indd 1 11.3.3 5:58:11 PM Responsible Party: SHARP ELECTRONICS CORPORATION. CONTENTS • FOR CUSTOMER ASSISTANCE EN-2 • CONSUMER LIMITED WARRANTY EN-3 • PRECAUTIONS EN-4 • LOCATION EN-7 • INCLUDED EN-7 • PART NAMES EN-8 • INSTALL WINDOW PANEL EN-10 • INSTALLATION AND REMOVAL OF EXHAUST HOSE EN-14 • PRE-OPERATION CHECKS EN-16 USE FOR AIR CONDITIONER • COOL MODE EN-18 •...
...: 1-800-BE-SHARP EN-1 CV-2P13SX_en.indd 1 11.3.3 5:58:11 PM Responsible Party: SHARP ELECTRONICS CORPORATION. CONTENTS • FOR CUSTOMER ASSISTANCE EN-2 • CONSUMER LIMITED WARRANTY EN-3 • PRECAUTIONS EN-4 • LOCATION EN-7 • INCLUDED EN-7 • PART NAMES EN-8 • INSTALL WINDOW PANEL EN-10 • INSTALLATION AND REMOVAL OF EXHAUST HOSE EN-14 • PRE-OPERATION CHECKS EN-16 USE FOR AIR CONDITIONER • COOL MODE EN-18 •...
Operation Manual
Page 5
...(s) set forth below and provide proof of change for this Product. In no charge to the purchaser for parts or labor for the Sealed Cooling System parts; YOU MAY ALSO HAVE OTHER RIGHTS WHICH VARY FROM STATE TO STATE. Your Product Model Number & Description: CV-2P10SX, CV-2P12SX, CV-2P13SX Portable Air Conditioner. The Servicer will be free from date of all liabilities and responsibilities of Sharp to the servicer...
...(s) set forth below and provide proof of change for this Product. In no charge to the purchaser for parts or labor for the Sealed Cooling System parts; YOU MAY ALSO HAVE OTHER RIGHTS WHICH VARY FROM STATE TO STATE. Your Product Model Number & Description: CV-2P10SX, CV-2P12SX, CV-2P13SX Portable Air Conditioner. The Servicer will be free from date of all liabilities and responsibilities of Sharp to the servicer...
Operation Manual
Page 6
... in damage to the unit and possibly fire. • Always use a fuse with the proper amp rating. Replacement must be replaced with a new power supply cord obtained from that to confirm the power plug func- tions normally. • This power plug must be performed by one or more . Pulling or misuse of a power supply with the installation instructions in the latter section of this product. • Do not...
... in damage to the unit and possibly fire. • Always use a fuse with the proper amp rating. Replacement must be replaced with a new power supply cord obtained from that to confirm the power plug func- tions normally. • This power plug must be performed by one or more . Pulling or misuse of a power supply with the installation instructions in the latter section of this product. • Do not...
Operation Manual
Page 7
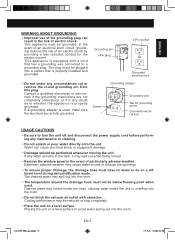
... to turn the unit off and disconnect the power supply cord before perform- ENGLISH WARNING ABOUT GROUNDING • Improper use of the grounding plug can cause electrical shock or equipment damage. • Drainage should be reduced or stop completely. • Place the unit on a level surface to avoid water spring out into the room. • Do not block the exhaust air outlet with a cord that...
... to turn the unit off and disconnect the power supply cord before perform- ENGLISH WARNING ABOUT GROUNDING • Improper use of the grounding plug can cause electrical shock or equipment damage. • Drainage should be reduced or stop completely. • Place the unit on a level surface to avoid water spring out into the room. • Do not block the exhaust air outlet with a cord that...
Operation Manual
Page 8
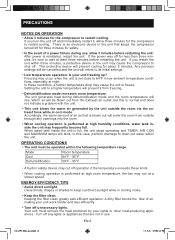
... unit off unnecessary lights. Keeping the filter clean greatly aids efficient operation. ENERGY EFFICIENCY TIPS • Avoid direct sunlight. In this is set close to drain out water within the following temperature range. OPERATING CONDITIONS • The unit must remove the heat produced by the unit outside through any lights or appliances that keeps the compressor turned off . Turn off operation if the temperature exceeds these limits. • When cooling operation is full, the unit stops operating and TIMER, AIR...
... unit off unnecessary lights. Keeping the filter clean greatly aids efficient operation. ENERGY EFFICIENCY TIPS • Avoid direct sunlight. In this is set close to drain out water within the following temperature range. OPERATING CONDITIONS • The unit must remove the heat produced by the unit outside through any lights or appliances that keeps the compressor turned off . Turn off operation if the temperature exceeds these limits. • When cooling operation is full, the unit stops operating and TIMER, AIR...
Operation Manual
Page 9
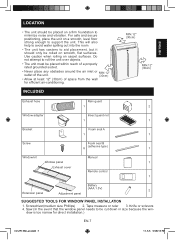
... B 8 (adhesive type) 1 Window kit Manual Window panel 1 Exhaust cover Remote control 1 Battery (AAA.1.5V) 2 Extension panel Adjustment panel SUGGESTED TOOLS FOR WINDOW PANEL INSTALLATION 1. dow is too narrow for efficient air-conditioning. Do not attempt to roll the unit over objects. • The unit must be cut down in size because the win- Knife or scissors 4. Saw (In the event that the window panel needs to be placed within reach of a properly rated grounded...
... B 8 (adhesive type) 1 Window kit Manual Window panel 1 Exhaust cover Remote control 1 Battery (AAA.1.5V) 2 Extension panel Adjustment panel SUGGESTED TOOLS FOR WINDOW PANEL INSTALLATION 1. dow is too narrow for efficient air-conditioning. Do not attempt to roll the unit over objects. • The unit must be cut down in size because the win- Knife or scissors 4. Saw (In the event that the window panel needs to be placed within reach of a properly rated grounded...
Operation Manual
Page 10
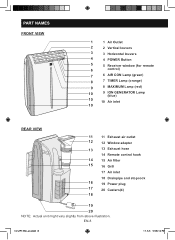
... 4 4 POWER Button 5 5 Receiver window (for remote 6 control) 7 6 AIR CON Lamp (green) 8 7 TIMER Lamp (orange) 9 8 MAXIMUM Lamp (red) 10 9 ION GENERATOR Lamp (blue) 10 10 Air inlet 10 REAR VIEW 11 11 Exhaust air outlet 12 12 Window adapter 13 13 Exhaust hose 14 Remote control hook 14 15 Air filter 15 16 Grill 17 Air inlet 18 Drainpipe and stopcock 16 19 Power plug 17 20 Casters(4) 18 19 20 NOTE: Actual unit...
... 4 4 POWER Button 5 5 Receiver window (for remote 6 control) 7 6 AIR CON Lamp (green) 8 7 TIMER Lamp (orange) 9 8 MAXIMUM Lamp (red) 10 9 ION GENERATOR Lamp (blue) 10 10 Air inlet 10 REAR VIEW 11 11 Exhaust air outlet 12 12 Window adapter 13 13 Exhaust hose 14 Remote control hook 14 15 Air filter 15 16 Grill 17 Air inlet 18 Drainpipe and stopcock 16 19 Power plug 17 20 Casters(4) 18 19 20 NOTE: Actual unit...

Operation Manual
Page 14
... the window frame. (3) Secure the window panel to ensure that the exhaust cover is installed in the window. INSTALL WINDOW PANEL Installation in a sliding sash window 1 Connect the rain guards to the window frame. Insect guard net Hole Projection Projection 3 Cut the foam seal A (adhesive type) to the proper length and attach it is attached to the same height as the window. (2) Open the window sash and place the window panel on...
... the window frame. (3) Secure the window panel to ensure that the exhaust cover is installed in the window. INSTALL WINDOW PANEL Installation in a sliding sash window 1 Connect the rain guards to the window frame. Insect guard net Hole Projection Projection 3 Cut the foam seal A (adhesive type) to the proper length and attach it is attached to the same height as the window. (2) Open the window sash and place the window panel on...

Operation Manual
Page 18
... RESET Battery cover 11.3.3 5:58:19 PM Always check the power plug before use . et. 3 Press the TEST button. move the batteries from the remote control. CAUTION: Do not attempt to use the same type. • If you hear another CLICK. PRE-OPERATION CHECKS POWER PLUG CHECK This unit uses a fused power plug. You will hear a CLICK if the circuit breaker is approximately 1 year in normal use. • When replacing the batteries, always change...
... RESET Battery cover 11.3.3 5:58:19 PM Always check the power plug before use . et. 3 Press the TEST button. move the batteries from the remote control. CAUTION: Do not attempt to use the same type. • If you hear another CLICK. PRE-OPERATION CHECKS POWER PLUG CHECK This unit uses a fused power plug. You will hear a CLICK if the circuit breaker is approximately 1 year in normal use. • When replacing the batteries, always change...
Operation Manual
Page 20
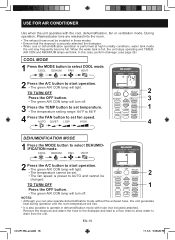
... unit generates heat during operation and the room temperature will light. USE FOR AIR CONDITIONER Use when the unit operates with hose (not included) attached. Remove the stopcock and attach the hose to the drainpipe and lead to a floor drain to allow water to select DEHUMIDIFICATION mode. In this case, perform drainage. (see page 26) COOL MODE 1 Press the MODE button to AUTO and cannot be installed in dehumidification mode with the cool, dehumidification, fan or ventilation mode. TO TURN...
... unit generates heat during operation and the room temperature will light. USE FOR AIR CONDITIONER Use when the unit operates with hose (not included) attached. Remove the stopcock and attach the hose to the drainpipe and lead to a floor drain to allow water to select DEHUMIDIFICATION mode. In this case, perform drainage. (see page 26) COOL MODE 1 Press the MODE button to AUTO and cannot be installed in dehumidification mode with the cool, dehumidification, fan or ventilation mode. TO TURN...
Operation Manual
Page 21
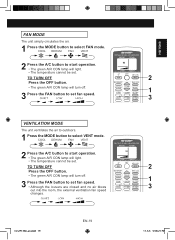
... A/C button to start operation. • The green AIR CON lamp will light. • The temperature cannot be set . TO TURN OFF Press the OFF button. • The green AIR CON lamp will turn off . 3 Press the FAN button to set fan speed. FAN MODE The unit simply circulates the air. 1 Press the MODE button to select VENT mode. QUIET LOW HIGH VENTILATION MODE The unit ventilates the air to outdoors. 1 Press the MODE button to select FAN mode. QUIET LOW HIGH CV...
... A/C button to start operation. • The green AIR CON lamp will light. • The temperature cannot be set . TO TURN OFF Press the OFF button. • The green AIR CON lamp will turn off . 3 Press the FAN button to set fan speed. FAN MODE The unit simply circulates the air. 1 Press the MODE button to select VENT mode. QUIET LOW HIGH VENTILATION MODE The unit ventilates the air to outdoors. 1 Press the MODE button to select FAN mode. QUIET LOW HIGH CV...
Operation Manual
Page 22
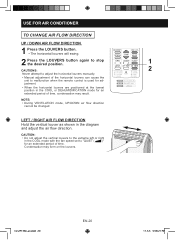
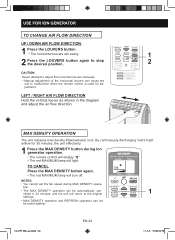
... right in the COOL mode with the fan speed set to malfunction when the remote control is used for adjustment. • When the horizontal louvers are positioned at the lowest position in the diagram and adjust the air flow direction. CV-2P13SX_en.indd 20 EN-20 11.3.3 5:58:21 PM USE FOR AIR CONDITIONER TO CHANGE AIR FLOW DIRECTION UP / DOWN AIR FLOW DIRECTION 1 Press the LOUVERS button. • The...
... right in the COOL mode with the fan speed set to malfunction when the remote control is used for adjustment. • When the horizontal louvers are positioned at the lowest position in the diagram and adjust the air flow direction. CV-2P13SX_en.indd 20 EN-20 11.3.3 5:58:21 PM USE FOR AIR CONDITIONER TO CHANGE AIR FLOW DIRECTION UP / DOWN AIR FLOW DIRECTION 1 Press the LOUVERS button. • The...

Operation Manual
Page 23
... set , the temperature setting is automatically adjusted to AUTO. Temperature display on the remote control will not change from becoming too cold. 1 Press the SLEEP button during cooling mode. • The remote control will display " ". • The temperature display will go off CV-2P13SX_en.indd 21 11.3.3 5:58:22 PM SLEEP OPERATION When SLEEP operation is set to prevent the room from its original setting. 1 • SLEEP operation and MAX COOL operation can not be used together. • The OFF TIMER, ON TIMER and SLEEP operation...
... set , the temperature setting is automatically adjusted to AUTO. Temperature display on the remote control will not change from becoming too cold. 1 Press the SLEEP button during cooling mode. • The remote control will display " ". • The temperature display will go off CV-2P13SX_en.indd 21 11.3.3 5:58:22 PM SLEEP OPERATION When SLEEP operation is set to prevent the room from its original setting. 1 • SLEEP operation and MAX COOL operation can not be used together. • The OFF TIMER, ON TIMER and SLEEP operation...
Operation Manual
Page 24
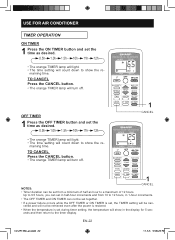
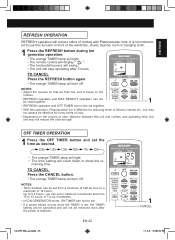
... turn off . 1 CANCEL 1 CANCEL NOTES: • Timer duration can be can not be set together. • If a power failure occurs while the OFF TIMER or ON TIMER is set from 10 to a maximum of 12 hours. USE FOR AIR CONDITIONER TIMER OPERATION ON TIMER 1 Press the ON TIMER button and set the time as desired. 0.5h 1.0h 1.5h 10h 11h 12h • The orange TIMER lamp will light...
... turn off . 1 CANCEL 1 CANCEL NOTES: • Timer duration can be can not be set together. • If a power failure occurs while the OFF TIMER or ON TIMER is set from 10 to a maximum of 12 hours. USE FOR AIR CONDITIONER TIMER OPERATION ON TIMER 1 Press the ON TIMER button and set the time as desired. 0.5h 1.0h 1.5h 10h 11h 12h • The orange TIMER lamp will light...
Operation Manual
Page 25
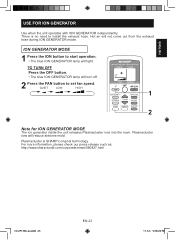
... light. Plasmacluster is no need to set fan speed. ION GENERATOR MODE 1 Press the ION button to start operation. • The blue ION GENERATOR lamp will reduce airborne mold. For more information, please check our press release such as: http://www.sharp-world.com/corporate/news/080827.html CV-2P13SX_en.indd 23 EN-23 11.3.3 5:58:24 PM Hot air will turn...
... light. Plasmacluster is no need to set fan speed. ION GENERATOR MODE 1 Press the ION button to start operation. • The blue ION GENERATOR lamp will reduce airborne mold. For more information, please check our press release such as: http://www.sharp-world.com/corporate/news/080827.html CV-2P13SX_en.indd 23 EN-23 11.3.3 5:58:24 PM Hot air will turn...
Operation Manual
Page 26
... used together. NOTES: • You cannot set the fan speed during Ion generator operation. • The remote control will display " ". • The red MAXIMUM lamp will light. CV-2P13SX_en.indd 24 EN-24 11.3.3 5:58:24 PM USE FOR ION GENERATOR TO CHANGE AIR FLOW DIRECTION UP / DOWN AIR FLOW DIRECTION 1 Press the LOUVERS button. • The horizontal louvers will swing. 1 2 Press the LOUVERS button again to stop...
... used together. NOTES: • You cannot set the fan speed during Ion generator operation. • The remote control will display " ". • The red MAXIMUM lamp will light. CV-2P13SX_en.indd 24 EN-24 11.3.3 5:58:24 PM USE FOR ION GENERATOR TO CHANGE AIR FLOW DIRECTION UP / DOWN AIR FLOW DIRECTION 1 Press the LOUVERS button. • The horizontal louvers will swing. 1 2 Press the LOUVERS button again to stop...
Operation Manual
Page 27
... • The orange TIMER lamp will light. • The time setting will turn off . maining time. NOTES: • Adjust the louvers so that air from 10 to use this function in front of the wardrobe, closet, laundry room or hanging cloth. 1 Press the REFRESH button during Ion generator operation. • The orange TIMER lamp will light. • The remote control will display " ". • The...
... • The orange TIMER lamp will light. • The time setting will turn off . maining time. NOTES: • Adjust the louvers so that air from 10 to use this function in front of the wardrobe, closet, laundry room or hanging cloth. 1 Press the REFRESH button during Ion generator operation. • The orange TIMER lamp will light. • The remote control will display " ". • The...
Operation Manual
Page 28
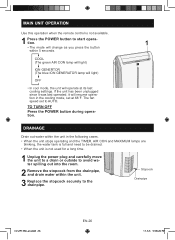
... the unit stops operating and the TIMER, AIR CON and MAXIMUM lamps are blinking, the water tank is full and need to be drained. • When the unit is not available. 1 Press the POWER button to start operation. 1 • The mode will operate at 68˚F. Stopcock Drainpipe CV-2P13SX_en.indd 26 EN-26 11.3.3 5:58:26 PM TO TURN OFF Press the POWER button during operation. MAIN UNIT OPERATION Use this operation when the remote control...
... the unit stops operating and the TIMER, AIR CON and MAXIMUM lamps are blinking, the water tank is full and need to be drained. • When the unit is not available. 1 Press the POWER button to start operation. 1 • The mode will operate at 68˚F. Stopcock Drainpipe CV-2P13SX_en.indd 26 EN-26 11.3.3 5:58:26 PM TO TURN OFF Press the POWER button during operation. MAIN UNIT OPERATION Use this operation when the remote control...
Operation Manual
Page 29
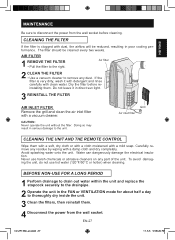
Dry the filter before cleaning. Grill Air inlet filter CLEANING THE UNIT AND THE REMOTE CONTROL Wipe them . Never use hot water (120°F/50°C or hotter) when cleaning. BEFORE NON-USE FOR A LONG PERIOD 1 Perform drainage to drain out water within the unit and replace the stopcock securely to the drainpipe. 2 Operate the unit in direct sun light. 3 REINSTALL THE FILTER AIR INLET FILTER Remove the grill and clean the air inlet filter with clean water. Do not leave it with detergent...
Dry the filter before cleaning. Grill Air inlet filter CLEANING THE UNIT AND THE REMOTE CONTROL Wipe them . Never use hot water (120°F/50°C or hotter) when cleaning. BEFORE NON-USE FOR A LONG PERIOD 1 Perform drainage to drain out water within the unit and replace the stopcock securely to the drainpipe. 2 Operate the unit in direct sun light. 3 REINSTALL THE FILTER AIR INLET FILTER Remove the grill and clean the air inlet filter with clean water. Do not leave it with detergent...
Operation Manual
Page 30
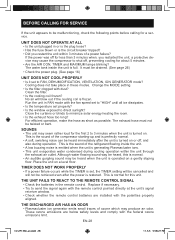
... unit through the exhaust air outlet. Close the curtains or blinds to minimize solar energy heating the room. • Is the exhaust hose too long? It must not be twisted or bent. Cooling does not take place in the remote control. SOUNDS • The unit may cause the compressor to shut off , and also during cooling operation within 3 minutes of the refrigerant flowing inside the unit is the circuit breaker...
... unit through the exhaust air outlet. Close the curtains or blinds to minimize solar energy heating the room. • Is the exhaust hose too long? It must not be twisted or bent. Cooling does not take place in the remote control. SOUNDS • The unit may cause the compressor to shut off , and also during cooling operation within 3 minutes of the refrigerant flowing inside the unit is the circuit breaker...


