
BD-HP21U Operation Manual
Page 4
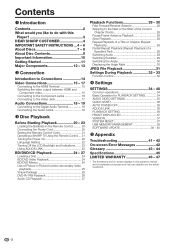
Contents n Introduction Contents 2 What would you like to do with this Player 3 DEAR SHARP CUSTOMER 4 IMPORTANT SAFETY INSTRUCTIONS ... 4 - 6 About Discs 7 - 8 About Disc Contents 9 Important Information 10 Getting Started 11 Major Components 12 - 13 o Connection Introduction to Connections 14 Video ...PLAYBACK SETTING 34 AUDIO VIDEO SETTINGS 35 QUICK START 36 AUTO POWER OFF 36 AQUOS LINK 36 PLAYBACK SETTING 36 FRONT DISPLAY/LED 37 VERSION 37 SYSTEM RESET 37 USB MEMORY MANAGEMENT 38 SOFTWARE UPDATE 39 - 40 r Appendix Troubleshooting 41 - 42 On-screen Error Messages 42...
Contents n Introduction Contents 2 What would you like to do with this Player 3 DEAR SHARP CUSTOMER 4 IMPORTANT SAFETY INSTRUCTIONS ... 4 - 6 About Discs 7 - 8 About Disc Contents 9 Important Information 10 Getting Started 11 Major Components 12 - 13 o Connection Introduction to Connections 14 Video ...PLAYBACK SETTING 34 AUDIO VIDEO SETTINGS 35 QUICK START 36 AUTO POWER OFF 36 AQUOS LINK 36 PLAYBACK SETTING 36 FRONT DISPLAY/LED 37 VERSION 37 SYSTEM RESET 37 USB MEMORY MANAGEMENT 38 SOFTWARE UPDATE 39 - 40 r Appendix Troubleshooting 41 - 42 On-screen Error Messages 42...
BD-HP21U Operation Manual
Page 25
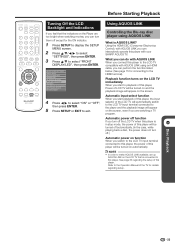
Using AQUOS LINK Controlling the Blu-ray disc player using an HDMI cable, you can perform the function listed below. (See page 15 for details regarding the setup of the LCD TV will automatically switch to the LCD TV input terminal connected to this player. See page 36 ... turns on the LCD TV immediately. p Disc Playback 23 When you start playback of this player, the input selector of this player. AUDIO VIDEO SETTINGS QUICK START AUTO POWER OFF AQUOS LINK PLAYBACK SETTING FRONT DISPLAY/LED VERSION USB MEMORY MANAGEMENT SOFTWARE UPDATE SYSTEM RESET 4 Press c/d to select "...
Using AQUOS LINK Controlling the Blu-ray disc player using an HDMI cable, you can perform the function listed below. (See page 15 for details regarding the setup of the LCD TV will automatically switch to the LCD TV input terminal connected to this player. See page 36 ... turns on the LCD TV immediately. p Disc Playback 23 When you start playback of this player, the input selector of this player. AUDIO VIDEO SETTINGS QUICK START AUTO POWER OFF AQUOS LINK PLAYBACK SETTING FRONT DISPLAY/LED VERSION USB MEMORY MANAGEMENT SOFTWARE UPDATE SYSTEM RESET 4 Press c/d to select "...
BD-HP21U Operation Manual
Page 36
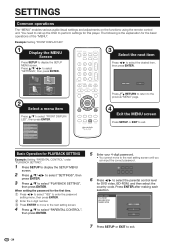
... to exit. AUDIO VIDEO SETTINGS QUICK START AUTO POWER OFF AQUOS LINK PLAYBACK SETTING FRONT DISPLAY/LED VERSION USB MEMORY MANAGEMENT SOFTWARE UPDATE SYSTEM RESET ON OFF Press n RETURN to return to the... select "PLAYBACK SETTING", then press ENTER. Press ENTER after making each selection. PARENTAL CONTROL DISC LANGUAGE ANGLE MARK DISPLAY PASSWORD SETTING LEVEL 3 0 USA 7 Press SETUP or EXIT to select...adjustments on the functions using the remote control unit. When setting the password for this player. Example: Setting "FRONT DISPLAY/LED" 1 Display the MENU Screen Press SETUP to...
... to exit. AUDIO VIDEO SETTINGS QUICK START AUTO POWER OFF AQUOS LINK PLAYBACK SETTING FRONT DISPLAY/LED VERSION USB MEMORY MANAGEMENT SOFTWARE UPDATE SYSTEM RESET ON OFF Press n RETURN to return to the... select "PLAYBACK SETTING", then press ENTER. Press ENTER after making each selection. PARENTAL CONTROL DISC LANGUAGE ANGLE MARK DISPLAY PASSWORD SETTING LEVEL 3 0 USA 7 Press SETUP or EXIT to select...adjustments on the functions using the remote control unit. When setting the password for this player. Example: Setting "FRONT DISPLAY/LED" 1 Display the MENU Screen Press SETUP to...
BD-HP21U Operation Manual
Page 40
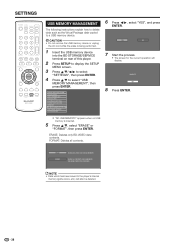
...the USB memory device into the BD STORAGE/SERVICE terminal on rear of this player. 2 Press SETUP to display the SETUP MENU screen. 3 Press a/b/c/d to select "SETTINGS", then press ENTER. 4 Press a/b to the player's internal memory (game score, etc.) will display. ERASE ALL CONTENTS ON...Press ENTER. • "NO USB MEMORY!" FORMAT: Deletes all contents. AUDIO VIDEO SETTINGS QUICK START AUTO POWER OFF AQUOS LINK PLAYBACK SETTING FRONT DISPLAY/LED VERSION USB MEMORY MANAGEMENT SOFTWARE UPDATE SYSTEM RESET 6 Press c/d, select "YES", and press ENTER. YES NO 7 Start the process. • The...
...the USB memory device into the BD STORAGE/SERVICE terminal on rear of this player. 2 Press SETUP to display the SETUP MENU screen. 3 Press a/b/c/d to select "SETTINGS", then press ENTER. 4 Press a/b to the player's internal memory (game score, etc.) will display. ERASE ALL CONTENTS ON...Press ENTER. • "NO USB MEMORY!" FORMAT: Deletes all contents. AUDIO VIDEO SETTINGS QUICK START AUTO POWER OFF AQUOS LINK PLAYBACK SETTING FRONT DISPLAY/LED VERSION USB MEMORY MANAGEMENT SOFTWARE UPDATE SYSTEM RESET 6 Press c/d, select "YES", and press ENTER. YES NO 7 Start the process. • The...
BD-HP21U Operation Manual
Page 41
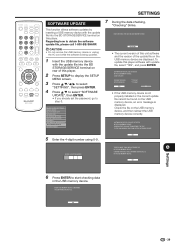
... POWER OFF AQUOS LINK PLAYBACK SETTING FRONT DISPLAY/LED VERSION USB MEMORY MANAGEMENT SOFTWARE UPDATE SYSTEM RESET 7 During the data checking, "Checking" blinks. CONFIRM THAT YOU HAVE TRANSFERRED THE FILE TO THE USB MEMORY DEVICE AND RETRY SOFTWARE UPDATE. OK 5... SOFTWARE UPDATE FILE. OK 6 Press ENTER to obtain the software update file, please call 1-800-BE-SHARP. SOFTWARE UPDATE FILE IS DETECTED IN THE USB MEMORY DEVICE. START UPDATE? To update this player. SETTINGS SOFTWARE UPDATE This function allows software updates by inserting a USB memory device with the update...
... POWER OFF AQUOS LINK PLAYBACK SETTING FRONT DISPLAY/LED VERSION USB MEMORY MANAGEMENT SOFTWARE UPDATE SYSTEM RESET 7 During the data checking, "Checking" blinks. CONFIRM THAT YOU HAVE TRANSFERRED THE FILE TO THE USB MEMORY DEVICE AND RETRY SOFTWARE UPDATE. OK 5... SOFTWARE UPDATE FILE. OK 6 Press ENTER to obtain the software update file, please call 1-800-BE-SHARP. SOFTWARE UPDATE FILE IS DETECTED IN THE USB MEMORY DEVICE. START UPDATE? To update this player. SETTINGS SOFTWARE UPDATE This function allows software updates by inserting a USB memory device with the update...
BD-HP21U Operation Manual
Page 42
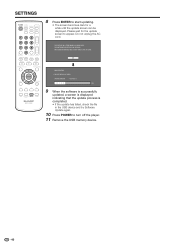
... try Software Update again. 10 Press POWER to appear. Please wait for a while until the update screen can be displayed. WAIT SEVERAL MINUTES AND DO NOT UNPLUG THE AC CORD. Do not unplug the AC cord. SETTINGS 8 Press ENTER to start updating. • The screen becomes dark for the update screen to turn off the player...
... try Software Update again. 10 Press POWER to appear. Please wait for a while until the update screen can be displayed. WAIT SEVERAL MINUTES AND DO NOT UNPLUG THE AC CORD. Do not unplug the AC cord. SETTINGS 8 Press ENTER to start updating. • The screen becomes dark for the update screen to turn off the player...
BD-HP21U Operation Manual
Page 47
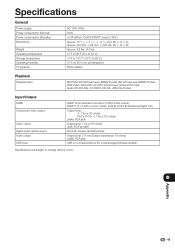
... 131°F (-20°C to 55°C) 10 % to 80 % (no condensation) NTSC system Playback Playable discs BD-ROM, BD-RE Dual Layer (BDMV format), BD-R Dual Layer (BDMV format), DVD Video, DVD+RW/+R/-RW...Input/Output HDMI Component video output Video output Digital audio optical output Audio output USB input HDMI 19-pin standard connector (1080p 24Hz output) HDMI™ (V.1.3 with x.v.Color, Dolby TrueHD, DTS-HD Advanced Digital Out ) Output level: Y:...: 1K ohms) Jacks: RCA jack USB 2.0 correspondence (for Local storage/Software update) Specifications are subject to change without notice.
... 131°F (-20°C to 55°C) 10 % to 80 % (no condensation) NTSC system Playback Playable discs BD-ROM, BD-RE Dual Layer (BDMV format), BD-R Dual Layer (BDMV format), DVD Video, DVD+RW/+R/-RW...Input/Output HDMI Component video output Video output Digital audio optical output Audio output USB input HDMI 19-pin standard connector (1080p 24Hz output) HDMI™ (V.1.3 with x.v.Color, Dolby TrueHD, DTS-HD Advanced Digital Out ) Output level: Y:...: 1K ohms) Jacks: RCA jack USB 2.0 correspondence (for Local storage/Software update) Specifications are subject to change without notice.


