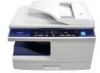

AL-2030 | AL-2040CS Operation Manual
Page 3
...the package before turning it to direct sunlight humidity changes, e.g., near the unit and shall be easily accessible. Do not expose the drum cartridge to 15 seconds before use of the product are available for at the light source. Consumables also, are not considered spare parts. After... or performance of this area when removing misfed paper. • Do not look directly at least 7 years following the termination of the drum cartridge, causing smudges on copies. Exercise care in a humid or dusty location. • When the unit is hot. Store spare supplies such as...
...the package before turning it to direct sunlight humidity changes, e.g., near the unit and shall be easily accessible. Do not expose the drum cartridge to 15 seconds before use of the product are available for at the light source. Consumables also, are not considered spare parts. After... or performance of this area when removing misfed paper. • Do not look directly at least 7 years following the termination of the drum cartridge, causing smudges on copies. Exercise care in a humid or dusty location. • When the unit is hot. Store spare supplies such as...

AL-2030 | AL-2040CS Operation Manual
Page 5
... MODE 54 USER PROGRAMS 55 DISPLAYING TOTAL NUMBER 2 OF COPIES 56 COMPONENTS AND ACCESSORIES 8 7 MAINTENANCE PREPARING THE UNIT FOR INSTALLATION 8 INSTALLING THE TD CARTRIDGE REPLACEMENT 57 3 DRUM CARTRIDGE TD CARTRIDGE 10 REPLACEMENT 58 POWER ON 12 CLEANING THE UNIT 59 3 LOADING PAPER 8 TROUBLESHOOTING THE UNIT 4 PAPER 14 TROUBLESHOOTING 61 LOADING THE PAPER TRAY...
... MODE 54 USER PROGRAMS 55 DISPLAYING TOTAL NUMBER 2 OF COPIES 56 COMPONENTS AND ACCESSORIES 8 7 MAINTENANCE PREPARING THE UNIT FOR INSTALLATION 8 INSTALLING THE TD CARTRIDGE REPLACEMENT 57 3 DRUM CARTRIDGE TD CARTRIDGE 10 REPLACEMENT 58 POWER ON 12 CLEANING THE UNIT 59 3 LOADING PAPER 8 TROUBLESHOOTING THE UNIT 4 PAPER 14 TROUBLESHOOTING 61 LOADING THE PAPER TRAY...

AL-2030 | AL-2040CS Operation Manual
Page 7
... feeder cover 1 Exit area Peep hole Document feeder tray Interface Interface USB connector LAN connector (AL-2040CS only) 1 2 7 10 3 8 11 9 4 12 5 13 14 6 TD cartridge Drum cartridge 7 15 3 1 Document glass 2 Operation panel 3 Front cover 4 Paper tray 1 5 Paper tray 2 (AL-2040CS only) 6 Multi-bypass tray 7 Side cover 8 Side cover open button 9 Bypass tray paper guides...
... feeder cover 1 Exit area Peep hole Document feeder tray Interface Interface USB connector LAN connector (AL-2040CS only) 1 2 7 10 3 8 11 9 4 12 5 13 14 6 TD cartridge Drum cartridge 7 15 3 1 Document glass 2 Operation panel 3 Front cover 4 Paper tray 1 5 Paper tray 2 (AL-2040CS only) 6 Multi-bypass tray 7 Side cover 8 Side cover open button 9 Bypass tray paper guides...

AL-2030 | AL-2040CS Operation Manual
Page 8
... key and indicators Use to sequentially select the exposure modes: AUTO, MANUAL or PHOTO. For description of copies made to date. (p.56) * AL-2040CS only 6 Selected mode is 50% to 200%.) (p.51) 17 Copy quantity keys • Use to select the desired copy quantity (1 ...• Press to start and terminate user program setting. (p.55) 4 Alarm indicators Drum replacement required indicator (p.58) Misfeed indicator (p.63) TD cartridge replacement required indicator (p.57) 5 SPF indicator (p.48) 6 SPF misfeed indicator (p.67) 7 Copy ratio selector key and indicators Use to sequentially select...
... key and indicators Use to sequentially select the exposure modes: AUTO, MANUAL or PHOTO. For description of copies made to date. (p.56) * AL-2040CS only 6 Selected mode is 50% to 200%.) (p.51) 17 Copy quantity keys • Use to select the desired copy quantity (1 ...• Press to start and terminate user program setting. (p.55) 4 Alarm indicators Drum replacement required indicator (p.58) Misfeed indicator (p.63) TD cartridge replacement required indicator (p.57) 5 SPF indicator (p.48) 6 SPF misfeed indicator (p.67) 7 Copy ratio selector key and indicators Use to sequentially select...

AL-2030 | AL-2040CS Operation Manual
Page 9
... installation procedure below . 1 Open the package, and make sure that all the accessories are supplied with the unit. (p.8) 2 Remove the protective materials. (p.9) 3 Install the TD cartridge. (p.10) 4 Load the paper in the paper tray (p.15) or the multi-bypass tray . (p.17) 5 Plug the other end of the power cord into the...) or scan*2 (p.36) your document. *1 If you are only using the unit for copying, skip this step. *2 The scanner function is only available on the AL-2040CS. 7 If the unit does not function properly during setup or use the unit properly.
... installation procedure below . 1 Open the package, and make sure that all the accessories are supplied with the unit. (p.8) 2 Remove the protective materials. (p.9) 3 Install the TD cartridge. (p.10) 4 Load the paper in the paper tray (p.15) or the multi-bypass tray . (p.17) 5 Plug the other end of the power cord into the...) or scan*2 (p.36) your document. *1 If you are only using the unit for copying, skip this step. *2 The scanner function is only available on the AL-2040CS. 7 If the unit does not function properly during setup or use the unit properly.

AL-2030 | AL-2040CS Operation Manual
Page 10
If anything is not included or is damaged, contact our Technical Assistance Department at 1-(630)378-3590 in unit) TD cartridge PREPARING THE UNIT FOR INSTALLATION 1 Be sure to hold the handles on both sides of the unit to unpack the unit and carry it to the installation location. 8 Operation manual Software CD-ROM Drum cartridge (installed in the USA. CHECKING PACKED COMPONENTS AND ACCESSORIES Open the carton and check if the following components and accessories are included.
If anything is not included or is damaged, contact our Technical Assistance Department at 1-(630)378-3590 in unit) TD cartridge PREPARING THE UNIT FOR INSTALLATION 1 Be sure to hold the handles on both sides of the unit to unpack the unit and carry it to the installation location. 8 Operation manual Software CD-ROM Drum cartridge (installed in the USA. CHECKING PACKED COMPONENTS AND ACCESSORIES Open the carton and check if the following components and accessories are included.

AL-2030 | AL-2040CS Operation Manual
Page 11
After that, take out the bag containing the TD cartridge. 2 AL-2040CS AL-2030 3 Release the scan head locking switch. The scan head locking switch is locked ( ), the unit will not operate. Lock A Unlock To lock the scan head ...
After that, take out the bag containing the TD cartridge. 2 AL-2040CS AL-2030 3 Release the scan head locking switch. The scan head locking switch is locked ( ), the unit will not operate. Lock A Unlock To lock the scan head ...

AL-2030 | AL-2040CS Operation Manual
Page 12
... four or five times. Remove the protective paper. Hold the tab of the front cover to remove the cover. 4 or 5 times 10 INSTALLING THE TD CARTRIDGE 1 Open the multi-bypass tray, and then open the cover. CAUTION tape 3 Push gently on both sides of the protective cover and pull the tab... the side cover. 2 Remove the CAUTION tape from the front cover and remove the two protective pins from the bag. Protective pins 4 Remove the TD cartridge from the fusing unit by pulling the strings upward one at a time.
... four or five times. Remove the protective paper. Hold the tab of the front cover to remove the cover. 4 or 5 times 10 INSTALLING THE TD CARTRIDGE 1 Open the multi-bypass tray, and then open the cover. CAUTION tape 3 Push gently on both sides of the protective cover and pull the tab... the side cover. 2 Remove the CAUTION tape from the front cover and remove the two protective pins from the bag. Protective pins 4 Remove the TD cartridge from the fusing unit by pulling the strings upward one at a time.
AL-2030 | AL-2040CS Operation Manual
Page 13
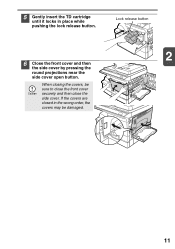
When closing the covers, be damaged. 11 If the covers are closed in place while pushing the lock release button. Lock release button 2 6 Close the front cover and then the side cover by pressing the round projections near the side cover open button. 5 Gently insert the TD cartridge until it locks in the wrong order, the covers may be sure to close the front cover securely and then close the side cover.
When closing the covers, be damaged. 11 If the covers are closed in place while pushing the lock release button. Lock release button 2 6 Close the front cover and then the side cover by pressing the round projections near the side cover open button. 5 Gently insert the TD cartridge until it locks in the wrong order, the covers may be sure to close the front cover securely and then close the side cover.

AL-2030 | AL-2040CS Operation Manual
Page 49
... has been folded or a crumpled original, press down on the document glass. When this is done, the print data remaining in the computer is finished. (AL-2040CS only) ORIGINAL PLACEMENT Using the document glass • The document glass can read up to 8-1/2" x 14" original. • Image loss 5/32" (...SPF, and place the original. 2 Place an original face down the SPF lightly. In addition, toner may scatter inside the machine or the drum cartridge may be sure to close the SPF. Original scale mark 47 After placing the original, be striped or blurred. • When using the paper...
... has been folded or a crumpled original, press down on the document glass. When this is done, the print data remaining in the computer is finished. (AL-2040CS only) ORIGINAL PLACEMENT Using the document glass • The document glass can read up to 8-1/2" x 14" original. • Image loss 5/32" (...SPF, and place the original. 2 Place an original face down the SPF lightly. In addition, toner may scatter inside the machine or the drum cartridge may be sure to close the SPF. Original scale mark 47 After placing the original, be striped or blurred. • When using the paper...

AL-2030 | AL-2040CS Operation Manual
Page 59
...SHARP parts and supplies. To install the new cartridge, see "The multi-bypass tray" (p.17). Be sure to clean the unit. The unit will light up to restart copying. 1 Open the multi-bypass tray, side cover, and front cover, in the new toner cartridge package. 3 Install a new TD cartridge. Please read "COPIER TONER CARTRIDGE... RECYCLING PROGRAM", which is needed. Replace the old TD cartridge by following the procedure below. • After the ...
...SHARP parts and supplies. To install the new cartridge, see "The multi-bypass tray" (p.17). Be sure to clean the unit. The unit will light up to restart copying. 1 Open the multi-bypass tray, side cover, and front cover, in the new toner cartridge package. 3 Install a new TD cartridge. Please read "COPIER TONER CARTRIDGE... RECYCLING PROGRAM", which is needed. Replace the old TD cartridge by following the procedure below. • After the ...

AL-2030 | AL-2040CS Operation Manual
Page 60
...When the internal counter reaches approximately 17,000 copies, the drum replacement required ( ) indicator will light up indicating that replacement of the drum cartridge will light up. Do not remove the protective cover on copying onto letter size paper at this time. *Based on the drum portion (... ( ) indicator will be needed soon. If the covers are closed in the wrong order, the covers may cause smudges on purchasing the drum cartridge, see step 1 and 2 in accordance with local regulations. When the indicator begins to close the front cover securely and then close the side cover...
...When the internal counter reaches approximately 17,000 copies, the drum replacement required ( ) indicator will light up indicating that replacement of the drum cartridge will light up. Do not remove the protective cover on copying onto letter size paper at this time. *Based on the drum portion (... ( ) indicator will be needed soon. If the covers are closed in the wrong order, the covers may cause smudges on purchasing the drum cartridge, see step 1 and 2 in accordance with local regulations. When the indicator begins to close the front cover securely and then close the side cover...

AL-2030 | AL-2040CS Operation Manual
Page 61
...of fire or electrical shock. • Before cleaning, be copied. 4 Gently install the TD cartridge. CLEANING THE UNIT Proper care is essential in order to turn the power switch off and ...the covers are closed in the wrong order, the covers may come in "INSTALLING THE TD CARTRIDGE" (p.11). 5 Close the front cover and then the side cover by pressing the round...side cover open button. Doing so may cause deformation, discoloration, deterioration or malfunction. To install the TD cartridge, see step 5 in contact with a soft, clean cloth. The drum replacement required ( ) indicator will...
...of fire or electrical shock. • Before cleaning, be copied. 4 Gently install the TD cartridge. CLEANING THE UNIT Proper care is essential in order to turn the power switch off and ...the covers are closed in the wrong order, the covers may come in "INSTALLING THE TD CARTRIDGE" (p.11). 5 Close the front cover and then the side cover by pressing the round...side cover open button. Doing so may cause deformation, discoloration, deterioration or malfunction. To install the TD cartridge, see step 5 in contact with a soft, clean cloth. The drum replacement required ( ) indicator will...

AL-2030 | AL-2040CS Operation Manual
Page 64
...projections near the side - Remove the misfed paper. 15, 17 63 A letter and a number appear The scan head locking switch is steadily lit. Drum cartridge must be needed Drum replacement required indicator lit Blinking soon. A misfeed has occurred in the USA. 62 Turn the power switch A letter and a number... the auto power 54 shut-off , remove the power cord from the outlet, and alternately. Press any key to use only genuine SHARP parts and supplies. contact our Technical Assistance Department at - 1-(630)378-3590 in the paper tray or multi-bypass tray.
...projections near the side - Remove the misfed paper. 15, 17 63 A letter and a number appear The scan head locking switch is steadily lit. Drum cartridge must be needed Drum replacement required indicator lit Blinking soon. A misfeed has occurred in the USA. 62 Turn the power switch A letter and a number... the auto power 54 shut-off , remove the power cord from the outlet, and alternately. Press any key to use only genuine SHARP parts and supplies. contact our Technical Assistance Department at - 1-(630)378-3590 in the paper tray or multi-bypass tray.

AL-2030 | AL-2040CS Operation Manual
Page 66
..., and the misfed paper is hot. Doing so may cause a burn or other injury. • Do not touch the surface (green portion) of the drum cartridge when removing the misfed paper.
..., and the misfed paper is hot. Doing so may cause a burn or other injury. • Do not touch the surface (green portion) of the drum cartridge when removing the misfed paper.

AL-2030 | AL-2040CS Operation Manual
Page 67
... paper from above the fusing unit. Doing so may cause a burn or other injury. • Do not touch the surface (green portion) of the drum cartridge when removing the misfed paper. Unfixed toner on copies. • Do not remove the misfed paper from under the fusing unit as shown in smudges...
... paper from above the fusing unit. Doing so may cause a burn or other injury. • Do not touch the surface (green portion) of the drum cartridge when removing the misfed paper. Unfixed toner on copies. • Do not remove the misfed paper from under the fusing unit as shown in smudges...

AL-2030 | AL-2040CS Operation Manual
Page 68
... the lower side cover. 3 Close the side cover by pressing the round projections near the side cover open the front cover, see "INSTALLING THE TD CARTRIDGE" (p.10). 3 Rotate the roller rotating knob in the transport area 1 Lower the fusing unit release lever. D: Misfeed in the fusing area" (p.65). 2 Open the front...
... the lower side cover. 3 Close the side cover by pressing the round projections near the side cover open the front cover, see "INSTALLING THE TD CARTRIDGE" (p.10). 3 Rotate the roller rotating knob in the transport area 1 Lower the fusing unit release lever. D: Misfeed in the fusing area" (p.65). 2 Open the front...

AL-2030 | AL-2040CS Operation Manual
Page 72
... machine operating conditions and ambient conditions such as temperature. *8 Not including TD and drum cartridges. The performance specification figures indicated are nominal values of continuous improvement, SHARP reserves the right to make design and specification changes for product improvement without prior notice. ... first-copy time may be some deviations from these values in the user programs (8-1/2" x 11" (A4), paper fed from paper tray). AL-2030 AL-2040CS Bit depth 1 bit or 8 bit/pixel Sensor Color CCD Scanning speed Max. 2.88ms/line Memory 8 MB 16 MB Power supply...
... machine operating conditions and ambient conditions such as temperature. *8 Not including TD and drum cartridges. The performance specification figures indicated are nominal values of continuous improvement, SHARP reserves the right to make design and specification changes for product improvement without prior notice. ... first-copy time may be some deviations from these values in the user programs (8-1/2" x 11" (A4), paper fed from paper tray). AL-2030 AL-2040CS Bit depth 1 bit or 8 bit/pixel Sensor Color CCD Scanning speed Max. 2.88ms/line Memory 8 MB 16 MB Power supply...
AL-2030 | AL-2040CS Operation Manual
Page 73
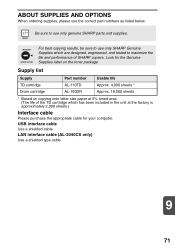
... (The life of SHARP copiers. Be sure to maximize the life and performance of the TD cartridge which are designed, engineered, and tested to use the correct part numbers as listed below. LAN interface cable (AL-2040CS only) Use a shielded type cable. 9 71 Supply list Supply TD cartridge Drum cartridge Part number AL-110TD AL-100DR Usable life...
... (The life of SHARP copiers. Be sure to maximize the life and performance of the TD cartridge which are designed, engineered, and tested to use the correct part numbers as listed below. LAN interface cable (AL-2040CS only) Use a shielded type cable. 9 71 Supply list Supply TD cartridge Drum cartridge Part number AL-110TD AL-100DR Usable life...

AL-2030 | AL-2040CS Operation Manual
Page 74
When shipping the unit, the scan head locking switch must be sure to remove the TD cartridge in advance. 1 Turn the power switch off and remove the power cord from the outlet. 2 Open the side cover and front cover, in that order. ...See "CHECKING PACKED COMPONENTS AND ACCESSORIES" (p.8). When moving the unit, follow the procedure below. Remove the TD cartridge and close the side cover and front cover, and to remove the TD cartridge, see "TD CARTRIDGE REPLACEMENT" (p.57). 3 Raise the handle of the paper tray and pull the paper tray out until it stops...
When shipping the unit, the scan head locking switch must be sure to remove the TD cartridge in advance. 1 Turn the power switch off and remove the power cord from the outlet. 2 Open the side cover and front cover, in that order. ...See "CHECKING PACKED COMPONENTS AND ACCESSORIES" (p.8). When moving the unit, follow the procedure below. Remove the TD cartridge and close the side cover and front cover, and to remove the TD cartridge, see "TD CARTRIDGE REPLACEMENT" (p.57). 3 Raise the handle of the paper tray and pull the paper tray out until it stops...


