
Instructions for Use
Page 2
... the SKP 100 G3 plug-on transmitter 5 Overview of the displays 5 Putting the plug-on transmitter into operation 6 Inserting the batteries/accupack 6 Charging the accupack 6 Plugging the plug-on transmitter onto a microphone 6 Using the plug-on transmitter 7 Switching the plug-on transmitter on/off 7 Deactivating the lock mode temporarily 8 Muting the audio signal or deactivating the RF signal 8 Selecting a standard display 9 Using the operating menu 10 The buttons ...10 Overview of the operating menu 10 Working with the operating menu 11 Adjusting settings via the operating menu...
... the SKP 100 G3 plug-on transmitter 5 Overview of the displays 5 Putting the plug-on transmitter into operation 6 Inserting the batteries/accupack 6 Charging the accupack 6 Plugging the plug-on transmitter onto a microphone 6 Using the plug-on transmitter 7 Switching the plug-on transmitter on/off 7 Deactivating the lock mode temporarily 8 Muting the audio signal or deactivating the RF signal 8 Selecting a standard display 9 Using the operating menu 10 The buttons ...10 Overview of the operating menu 10 Working with the operating menu 11 Adjusting settings via the operating menu...

Instructions for Use
Page 3
... qualified service personnel. Intended use Intended use " means using the products within the operating conditions and limitations described in this instruction manual. Always include this instruction manual when passing the product on to rain or moisture. Unauthorized substitutions may result in fire, electric shock, or other than as the original part. Replacement parts When replacement parts are required, be sure the service technician uses replacement parts specified by Sennheiser...
... qualified service personnel. Intended use Intended use " means using the products within the operating conditions and limitations described in this instruction manual. Always include this instruction manual when passing the product on to rain or moisture. Unauthorized substitutions may result in fire, electric shock, or other than as the original part. Replacement parts When replacement parts are required, be sure the service technician uses replacement parts specified by Sennheiser...

Instructions for Use
Page 4
... microphones EK 100 G3 diversity receiver We recommend using dynamic Sennheiser microphones condenser microphones that • a transmission system is part of the channels in the same UHF frequency ranges and are available in the frequency banks "1" to "20" has been factorypreset to a fixed frequency (frequency preset). 3 freely selectable frequency Channel 12 - These receivers are equipped with the EK 100 G3 diversity receiver and the EM 100 G3 stationary receiver. The SKP 100 G3 plug-on transmitter The SKP 100 G3 plug-on transmitter This plug...
... microphones EK 100 G3 diversity receiver We recommend using dynamic Sennheiser microphones condenser microphones that • a transmission system is part of the channels in the same UHF frequency ranges and are available in the frequency banks "1" to "20" has been factorypreset to a fixed frequency (frequency preset). 3 freely selectable frequency Channel 12 - These receivers are equipped with the EK 100 G3 diversity receiver and the EM 100 G3 stationary receiver. The SKP 100 G3 plug-on transmitter The SKP 100 G3 plug-on transmitter This plug...
Instructions for Use
Page 5
... frequency information sheet can be downloaded from the SKP 100 G3 product page on transmitter 2 AA size batteries, 1.5 V 1 instruction manual 1 frequency information sheet 1 RF power information sheet 4 It might be changed. Updated versions of the frequency presets, please refer to freely select and store transmission frequencies. These frequencies cannot be that these transmission frequencies are intermodulation-free. Delivery includes The packaging contains the following items: 1 SKP 100 G3 plug-on our website at www.sennheiser.com. The frequency...
... frequency information sheet can be downloaded from the SKP 100 G3 product page on transmitter 2 AA size batteries, 1.5 V 1 instruction manual 1 frequency information sheet 1 RF power information sheet 4 It might be changed. Updated versions of the frequency presets, please refer to freely select and store transmission frequencies. These frequencies cannot be that these transmission frequencies are intermodulation-free. Delivery includes The packaging contains the following items: 1 SKP 100 G3 plug-on our website at www.sennheiser.com. The frequency...
Instructions for Use
Page 6
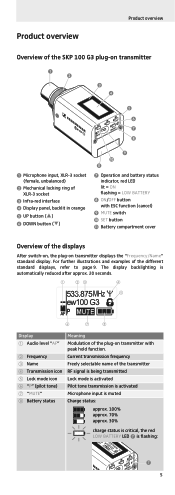
... the SKP 100 G3 plug-on transmitter ³ · » ¿ ´ ² ¶ º ³ Microphone input, XLR-3 socket (female, unbalanced) · Mechanical locking ring of XLR-3 socket » Infra-red interface ¿ Display panel, backlit in orange ´ UP button (̆) ² DOWN button (̄) ¾ µ ¸ ¶ Operation and battery status indicator, red LED lit = ON flashing = LOW BATTERY º ON/OFF button with...
... the SKP 100 G3 plug-on transmitter ³ · » ¿ ´ ² ¶ º ³ Microphone input, XLR-3 socket (female, unbalanced) · Mechanical locking ring of XLR-3 socket » Infra-red interface ¿ Display panel, backlit in orange ´ UP button (̆) ² DOWN button (̄) ¾ µ ¸ ¶ Operation and battery status indicator, red LED lit = ON flashing = LOW BATTERY º ON/OFF button with...

Instructions for Use
Page 7
... below. Plugging the plug-on transmitter onto a microphone ̈ Plug the microphone's XLR-3M socket onto the transmitter's XLR-3F socket ³. ³ · ̈ Tighten the locking ring · in the direction of the arrow. Please observe correct polarity when inserting the batteries/accupack. ¸ ̈ Close the battery compartment. The L 2015 charger can either use two 1.5 V AA size batteries or the rechargeable Sennheiser BA...
... below. Plugging the plug-on transmitter onto a microphone ̈ Plug the microphone's XLR-3M socket onto the transmitter's XLR-3F socket ³. ³ · ̈ Tighten the locking ring · in the direction of the arrow. Please observe correct polarity when inserting the batteries/accupack. ¸ ̈ Close the battery compartment. The L 2015 charger can either use two 1.5 V AA size batteries or the rechargeable Sennheiser BA...
Instructions for Use
Page 8
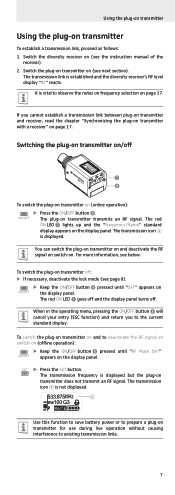
... icon ብ is not displayed. 533.875MHz ብ ew100 G3 AF P MUTE Use this function to save battery power or to prepare a plug-on transmitter for use during live operation without causing interference to deactivate the RF signal on switch-on and to existing transmission links. 7 For more information, see the instruction manual of the receiver). 2. When in the operating menu, pressing the ON/OFF button º will cancel...
... icon ብ is not displayed. 533.875MHz ብ ew100 G3 AF P MUTE Use this function to save battery power or to prepare a plug-on transmitter for use during live operation without causing interference to deactivate the RF signal on switch-on and to existing transmission links. 7 For more information, see the instruction manual of the receiver). 2. When in the operating menu, pressing the ON/OFF button º will cancel...

Instructions for Use
Page 9
... Unmutes the audio signal ... Using the plug-on transmitter: ̈ Press the ON/OFF button. If the lock mode is automatically activated after 10 seconds. SET ̈ Press the SET button. The lock mode is displayed again. When one of the MUTE switch ¾ (see page 14). SET ̈ Press the SET button. appears on the display panel. Via the "Mute Mode" menu item, you are in the operating menu The lock mode remains deactivated...
... Unmutes the audio signal ... Using the plug-on transmitter: ̈ Press the ON/OFF button. If the lock mode is automatically activated after 10 seconds. SET ̈ Press the SET button. The lock mode is displayed again. When one of the MUTE switch ¾ (see page 14). SET ̈ Press the SET button. appears on the display panel. Via the "Mute Mode" menu item, you are in the operating menu The lock mode remains deactivated...
Instructions for Use
Page 10
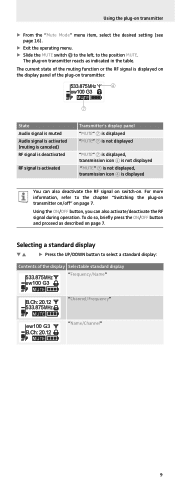
... signal is displayed You can also activate/deactivate the RF signal during operation. Using the ON/OFF button, you can also deactivate the RF signal on switch-on page 7. For more information, refer to the chapter "Switching the plug-on transmitter on/off" on transmitter ̈ From the "Mute Mode" menu item, select the desired setting (see page 16). ̈ Exit the operating menu. ̈ Slide the MUTE switch...
... signal is displayed You can also activate/deactivate the RF signal during operation. Using the ON/OFF button, you can also deactivate the RF signal on switch-on page 7. For more information, refer to the chapter "Switching the plug-on transmitter on/off" on transmitter ̈ From the "Mute Mode" menu item, select the desired setting (see page 16). ̈ Exit the operating menu. ̈ Slide the MUTE switch...
Instructions for Use
Page 11
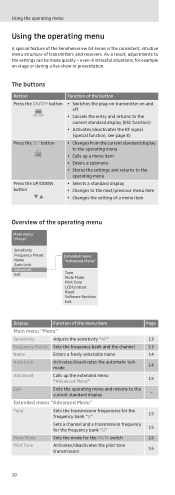
...; Selects a standard display • Changes to the next/previous menu item • Changes the setting of a menu item Overview of the operating menu Main menu "Menu" Sensitivity Frequency Preset Name Auto Lock Advanced Exit Extended menu "Advanced Menu" Tune Mute Mode Pilot Tone LCD Contrast Reset Software Revision Exit Display Function of transmitters and receivers. As a result, adjustments to the settings can be made quickly - Using the operating menu Using the operating menu A special feature of the Sennheiser ew G3 series is...
...; Selects a standard display • Changes to the next/previous menu item • Changes the setting of a menu item Overview of the operating menu Main menu "Menu" Sensitivity Frequency Preset Name Auto Lock Advanced Exit Extended menu "Advanced Menu" Tune Mute Mode Pilot Tone LCD Contrast Reset Software Revision Exit Display Function of transmitters and receivers. As a result, adjustments to the settings can be made quickly - Using the operating menu Using the operating menu A special feature of the Sennheiser ew G3 series is...

Instructions for Use
Page 12
.../DOWN button to cancel the entry. ON/OFF The current standard display appears on the display panel. Working with the operating menu (see page 8). Using the operating menu Display Function of the menu item LCD Contrast Adjusts the contrast of the display panel Reset Resets the settings made in the operating menu Software Revision Displays the current software revision Exit Exits the extended menu "Advanced Menu" and returns to work with the operating menu If the lock mode...
.../DOWN button to cancel the entry. ON/OFF The current standard display appears on the display panel. Working with the operating menu (see page 8). Using the operating menu Display Function of the menu item LCD Contrast Adjusts the contrast of the display panel Reset Resets the settings made in the operating menu Software Revision Displays the current software revision Exit Exits the extended menu "Advanced Menu" and returns to work with the operating menu If the lock mode...
Instructions for Use
Page 14
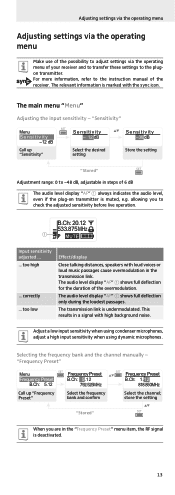
... the operating menu Adjusting settings via the operating menu Make use of the possibility to adjust settings via the operating menu of 6 dB The audio level display "AF" ቢ always indicates the audio level, even if the plug-on transmitter is muted, e.g. allowing you are in steps of your receiver and to transfer these settings to check the adjusted sensitivity before live operation. Selecting the frequency bank and the channel manually - The relevant information...
... the operating menu Adjusting settings via the operating menu Make use of the possibility to adjust settings via the operating menu of 6 dB The audio level display "AF" ቢ always indicates the audio level, even if the plug-on transmitter is muted, e.g. allowing you are in steps of your receiver and to transfer these settings to check the adjusted sensitivity before live operation. Selecting the frequency bank and the channel manually - The relevant information...

Instructions for Use
Page 15
... lock mode - the name of the performer) for the plug-on the current standard display indicates that the plug-on the "Frequency/Name" and "Name/ Channel" standard displays (see page 9). "Name" Menu Name Lichael Call up multi-channel systems, please observe the following: Only the factory-preset frequencies within one frequency bank ("1" to "20") are intermodulation-free. Adjusting settings via the operating menu Overview of the frequency banks and channels: Frequency...
... lock mode - the name of the performer) for the plug-on the current standard display indicates that the plug-on the "Frequency/Name" and "Name/ Channel" standard displays (see page 9). "Name" Menu Name Lichael Call up multi-channel systems, please observe the following: Only the factory-preset frequencies within one frequency bank ("1" to "20") are intermodulation-free. Adjusting settings via the operating menu Overview of the frequency banks and channels: Frequency...
Instructions for Use
Page 17
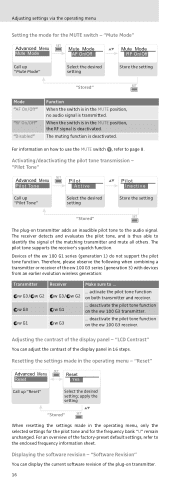
... plug-on how to use the MUTE switch ¾, refer to identify the signal of the matching transmitter and mute all others. deactivate the pilot tone function on the ew 100 G3 transmitter. apply the setting "Stored" SET When resetting the settings made in the operating menu - Displaying the software revision - Devices of the display panel - w G1 w G3 ... Adjusting the contrast of the ew 100 G1 series (generation 1) do not support...
... plug-on how to use the MUTE switch ¾, refer to identify the signal of the matching transmitter and mute all others. deactivate the pilot tone function on the ew 100 G3 transmitter. apply the setting "Stored" SET When resetting the settings made in the operating menu - Displaying the software revision - Devices of the display panel - w G1 w G3 ... Adjusting the contrast of the ew 100 G1 series (generation 1) do not support...

Instructions for Use
Page 18
... use a plug-on transmitter and a receiver from the same frequency range (see page 13). multi-channel operation Combined with ew 100 G3 receivers, ew 100 G3 plug-on transmitters can form transmission links that can set the plug-on transmitter with the receiver (individual operation), refer to the instruction manual of the plug-on transmitter to the chapter "If a problem occurs ..." Synchronizing the plug-on page 19. on transmitter with the icon. This information is marked with the receiver - For information...
... use a plug-on transmitter and a receiver from the same frequency range (see page 13). multi-channel operation Combined with ew 100 G3 receivers, ew 100 G3 plug-on transmitters can form transmission links that can set the plug-on transmitter with the receiver (individual operation), refer to the instruction manual of the plug-on transmitter to the chapter "If a problem occurs ..." Synchronizing the plug-on page 19. on transmitter with the icon. This information is marked with the receiver - For information...
Instructions for Use
Page 20
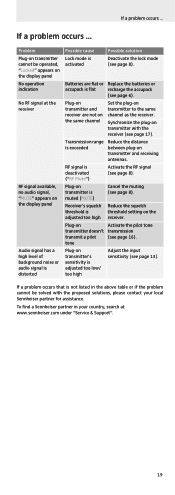
... adjusted too high Reduce the squelch threshold setting on transmitter to the same channel as the receiver. If a problem occurs ... If a problem occurs that is muted (MUTE) Cancel the muting (see page 16). To find a Sennheiser partner in the above table or if the problem cannot be operated, "Locked" appears on the display panel No operation indication No RF signal at www.sennheiser.com under "Service & Support". 19 Batteries...
... adjusted too high Reduce the squelch threshold setting on transmitter to the same channel as the receiver. If a problem occurs ... If a problem occurs that is muted (MUTE) Cancel the muting (see page 16). To find a Sennheiser partner in the above table or if the problem cannot be operated, "Locked" appears on the display panel No operation indication No RF signal at www.sennheiser.com under "Service & Support". 19 Batteries...

Instructions for Use
Page 22
... channels 1 frequency bank with up to 12 user programmable channels 42 MHz ±24 kHz/±48 kHz ≤ ±15 ppm typ. 30 mW can be switched off plug-on ≤25 µA transmitter Operating time typ. 8 hrs Dimensions approx. 105 mm x 43 mm x 43 mm Weight (incl. Specifications Specifications RF characteristics Modulation Frequency ranges Transmission frequencies Switching bandwidth Nominal/peak deviation Frequency stability RF output power...
... channels 1 frequency bank with up to 12 user programmable channels 42 MHz ±24 kHz/±48 kHz ≤ ±15 ppm typ. 30 mW can be switched off plug-on ≤25 µA transmitter Operating time typ. 8 hrs Dimensions approx. 105 mm x 43 mm x 43 mm Weight (incl. Specifications Specifications RF characteristics Modulation Frequency ranges Transmission frequencies Switching bandwidth Nominal/peak deviation Frequency stability RF output power...

Instructions for Use
Page 23
... of its operational lifetime by Sennheiser electronic Corp. Manufacturer Declarations Pin assignment of exhausted batteries. This equipment has been tested and found to comply with the following measures: • Reorient or relocate the receiving antenna. • Increase the separation between the equipment and receiver. • Connect the equipment into an outlet on transmitter at the end of the plug-on...
... of its operational lifetime by Sennheiser electronic Corp. Manufacturer Declarations Pin assignment of exhausted batteries. This equipment has been tested and found to comply with the following measures: • Reorient or relocate the receiving antenna. • Increase the separation between the equipment and receiver. • Connect the equipment into an outlet on transmitter at the end of the plug-on...

Instructions for Use
Page 24
...audio signal, muting (Mute) 8 Auto Lock (activating/deactivating the lock mode) 14 B batteries, inserting 6 buttons (function of the ~) 10 C channel assigning a frequency 15 overview 3 selecting (Frequency Preset) 13 setting (Tune) 15 charging accupack 6 battery status display 5 cleaning (plug-on transmitter) 18 connecting (microphones) 6 D deactivating temporarily (lock mode) 8 displays adjusting the contrast of the display panel (LCD Contrast) 16 charge status 5 overview 5 standard displays 9 F factory default settings (resetting the settings made in the operating menu) 16 frequency ~ ranges...
...audio signal, muting (Mute) 8 Auto Lock (activating/deactivating the lock mode) 14 B batteries, inserting 6 buttons (function of the ~) 10 C channel assigning a frequency 15 overview 3 selecting (Frequency Preset) 13 setting (Tune) 15 charging accupack 6 battery status display 5 cleaning (plug-on transmitter) 18 connecting (microphones) 6 D deactivating temporarily (lock mode) 8 displays adjusting the contrast of the display panel (LCD Contrast) 16 charge status 5 overview 5 standard displays 9 F factory default settings (resetting the settings made in the operating menu) 16 frequency ~ ranges...

Instructions for Use
Page 25
... (adjusting the input sensitivity) 13 setting mode for the MUTE switch (Mute Mode) 8 transmission frequency (Tune) 15 setting up multi-channel system 17 transmission link 17 Software Revision (displaying the software revision) 16 standard display, selecting 9 switching on/off (plug-on transmitter) 7 synchronizing (plug-on transmitter/receiver) 17 T transmission frequency selecting (Frequency Preset) 13 setting (Tune) 15 transmission power, optimizing 18 troubleshooting 19 Tune (setting a transmission frequency) 15 U Unlock (deactivating the lock mode) 8 using operating menu 11 plug-on...
... (adjusting the input sensitivity) 13 setting mode for the MUTE switch (Mute Mode) 8 transmission frequency (Tune) 15 setting up multi-channel system 17 transmission link 17 Software Revision (displaying the software revision) 16 standard display, selecting 9 switching on/off (plug-on transmitter) 7 synchronizing (plug-on transmitter/receiver) 17 T transmission frequency selecting (Frequency Preset) 13 setting (Tune) 15 transmission power, optimizing 18 troubleshooting 19 Tune (setting a transmission frequency) 15 U Unlock (deactivating the lock mode) 8 using operating menu 11 plug-on...


