
Instructions for use
Page 2
... control unit 7 Putting the S1 DIGITAL into operation 8 Connecting the headset to the intercom 8 Powering the headset 8 Attaching the belt clip, the cable clip and the design caps 10 Connecting the headset to a Bluetooth device 12 Using the S1 DIGITAL 15 Individually adjusting the headset and wearing it 15 Switching the headset on/off 17 Switching the Bluetooth function on/off 17 Adjusting the headset to the listening situation 18 Remote-controlling connected Bluetooth devices 22 Resetting the settings...
... control unit 7 Putting the S1 DIGITAL into operation 8 Connecting the headset to the intercom 8 Powering the headset 8 Attaching the belt clip, the cable clip and the design caps 10 Connecting the headset to a Bluetooth device 12 Using the S1 DIGITAL 15 Individually adjusting the headset and wearing it 15 Switching the headset on/off 17 Switching the Bluetooth function on/off 17 Adjusting the headset to the listening situation 18 Remote-controlling connected Bluetooth devices 22 Resetting the settings...
Instructions for use
Page 3
... rechargeable batteries if the product will not be used for continuous noise exposure during flight operation you, as the pilot, operate your connected Bluetooth® device using the product. ̈ Always include this can hear and recognize these sounds. Set the volume to safe levels that , with a soft, dry cloth. ̈ Never repair or attempt to you can limit your Sennheiser partner or the Sennheiser Service Department. 2 | S1...
... rechargeable batteries if the product will not be used for continuous noise exposure during flight operation you, as the pilot, operate your connected Bluetooth® device using the product. ̈ Always include this can hear and recognize these sounds. Set the volume to safe levels that , with a soft, dry cloth. ̈ Never repair or attempt to you can limit your Sennheiser partner or the Sennheiser Service Department. 2 | S1...
Instructions for use
Page 4
... and the Power LED H lights up. ̈ Switch the headset off if you experience loud tones, distortion, or loss of com- As with digital adaptive noise compensation. However, the S1 DIGITAL is described in this instruction manual. You can then continue to use the S1 DIGITAL as described in this instruction manual, or under operating conditions which differ from those described herein. Intended use Intended use of the...
... and the Power LED H lights up. ̈ Switch the headset off if you experience loud tones, distortion, or loss of com- As with digital adaptive noise compensation. However, the S1 DIGITAL is described in this instruction manual. You can then continue to use the S1 DIGITAL as described in this instruction manual, or under operating conditions which differ from those described herein. Intended use Intended use of the...
Instructions for use
Page 5
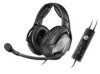
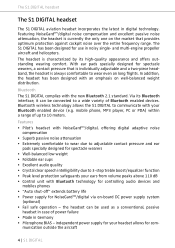
... adaptive noise compensation • Superb passive noise attenuation • Extremely comfortable to wear due to adjustable contact pressure and ear pads specially designed for spectacle wearers • Well-balanced low weight • Foldable ear cups • Excellent audio quality • Crystal clear speech intelligibility due to communicate with Bluetooth technology for controlling audio devices and mobiles phones • "Auto shut-off" extends battery life • Power...
... adaptive noise compensation • Superb passive noise attenuation • Extremely comfortable to wear due to adjustable contact pressure and ear pads specially designed for spectacle wearers • Well-balanced low weight • Foldable ear cups • Excellent audio quality • Crystal clear speech intelligibility due to communicate with Bluetooth technology for controlling audio devices and mobiles phones • "Auto shut-off" extends battery life • Power...
Instructions for use
Page 6
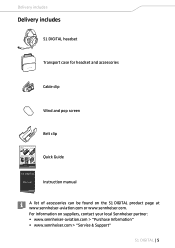
... Delivery includes S1 DIGITAL headset Transport case for headset and accessories Cable clip Wind and pop screen Belt clip S1 DIGITAL Setup | Inbetriebnahme | Mise en service Switching the operating control on/off | Bedienteil ein-/ausschalten | Bedienteil ein-/ausschalten OFF ON Andruckkraft einstellen | Andruckkraft einstellen | Andruckkraft einstellen Smart-Update nutzen | Smart-Update nutzen | Smart-Update nutzen 45° Quick Guide Kurzanleitung Guide rapide S1 DIGITAL Manual S1 DIGITAL Manual Quick Guide Instruction manual A list of...
... Delivery includes S1 DIGITAL headset Transport case for headset and accessories Cable clip Wind and pop screen Belt clip S1 DIGITAL Setup | Inbetriebnahme | Mise en service Switching the operating control on/off | Bedienteil ein-/ausschalten | Bedienteil ein-/ausschalten OFF ON Andruckkraft einstellen | Andruckkraft einstellen | Andruckkraft einstellen Smart-Update nutzen | Smart-Update nutzen | Smart-Update nutzen 45° Quick Guide Kurzanleitung Guide rapide S1 DIGITAL Manual S1 DIGITAL Manual Quick Guide Instruction manual A list of...

Instructions for use
Page 8
... M L 9 LED 0 Fast-forward button A Volume button B Rewind button C Volume button D Multi-function button E MUTING OFF/ON switch F Mono /stereo switch G Power OFF/ON switch H Power LED I Master VOLUME slide control J Phone button K Hollow jack socket for optional power supply L 5.25 mm jack plug (PJ-068 equivalent) M ¼" (6.35 mm) jack plug (PJ-055 equivalent) You can directly remote-control any Bluetooth device supporting the AVRCP profile and connected to the S1 DIGITAL by using the operating...
... M L 9 LED 0 Fast-forward button A Volume button B Rewind button C Volume button D Multi-function button E MUTING OFF/ON switch F Mono /stereo switch G Power OFF/ON switch H Power LED I Master VOLUME slide control J Phone button K Hollow jack socket for optional power supply L 5.25 mm jack plug (PJ-068 equivalent) M ¼" (6.35 mm) jack plug (PJ-055 equivalent) You can directly remote-control any Bluetooth device supporting the AVRCP profile and connected to the S1 DIGITAL by using the operating...

Instructions for use
Page 9
...; Before putting the headset into operation Connecting the headset to the intercom ̈ Connect the jack plugs of the control unit M to be ordered separately) Connection via a 3-pole XLR socket The Adapter-P-XLR-3 adapter cable (optional accessory available from your intercom. board DC power supply system is protected by a technician qualified to perform this type of installation. ̈ Connect the Adapter-P-XLR-3 adapter cable to the mounted...
...; Before putting the headset into operation Connecting the headset to the intercom ̈ Connect the jack plugs of the control unit M to be ordered separately) Connection via a 3-pole XLR socket The Adapter-P-XLR-3 adapter cable (optional accessory available from your intercom. board DC power supply system is protected by a technician qualified to perform this type of installation. ̈ Connect the Adapter-P-XLR-3 adapter cable to the mounted...

Instructions for use
Page 10
LED lights up red: The batteries/rechargeable batteries are flat. LED lights up yellow: The battery/rechargeable battery capacity is sufficient. Putting the S1 DIGITAL into operation Connection via the cigarette lighter socket The Adapter-P-CIG adapter cable (optional accessory available from your Sennheiser partner) allows you switch the headset on (see page 19), the Power LED H provides information on the control unit. ̈ Where required, connect an additional device to the XLR-3 socket...
LED lights up red: The batteries/rechargeable batteries are flat. LED lights up yellow: The battery/rechargeable battery capacity is sufficient. Putting the S1 DIGITAL into operation Connection via the cigarette lighter socket The Adapter-P-CIG adapter cable (optional accessory available from your Sennheiser partner) allows you switch the headset on (see page 19), the Power LED H provides information on the control unit. ̈ Where required, connect an additional device to the XLR-3 socket...

Instructions for use
Page 11
... you. 1 Slide the belt clip onto the seat belt. 2 Snap the control unit into operation Type of use Type NoiseGardTM/digital Alkaline batteries/rechargeable batteries Lithium batteries NoiseGardTM/digital and Alkaline batteries/rechargeable Bluetooth technology batteries Lithium batteries Operating time approx. 25 hrs approx. 40 hrs approx. 15 hrs approx. 25 hrs If the battery capacity is low, the headset automatically switches off to squeeze any connection cable. 1 2 10 | S1 DIGITAL
... you. 1 Slide the belt clip onto the seat belt. 2 Snap the control unit into operation Type of use Type NoiseGardTM/digital Alkaline batteries/rechargeable batteries Lithium batteries NoiseGardTM/digital and Alkaline batteries/rechargeable Bluetooth technology batteries Lithium batteries Operating time approx. 25 hrs approx. 40 hrs approx. 15 hrs approx. 25 hrs If the battery capacity is low, the headset automatically switches off to squeeze any connection cable. 1 2 10 | S1 DIGITAL

Instructions for use
Page 13
... headset with this Bluetooth device again. The transmitted radio waves of mobile phones can impair the operation of up to the last connected Bluetooth device. The headset complies with the headset in environments where wireless Bluetooth transmission is permitted. If you pair the headset with which it has been paired. In order that data can save the connection profiles of sensitive and unprotected devices. ̈ Only make calls with the Bluetooth...
... headset with this Bluetooth device again. The transmitted radio waves of mobile phones can impair the operation of up to the last connected Bluetooth device. The headset complies with the headset in environments where wireless Bluetooth transmission is permitted. If you pair the headset with which it has been paired. In order that data can save the connection profiles of sensitive and unprotected devices. ̈ Only make calls with the Bluetooth...

Instructions for use
Page 14
... Power OFF/ON switch G to the position ON. ̈ Press and hold the multi-function button until the LED alternately flashes blue and red. ̈ On your audio source, activate the Bluetooth function "Add a new device". ̈ When the mobile phone prompts for 3 minutes to connect to one of the up to pair the headset with fully charged batteries/rechargeable batteries, - Once the headset has found within approx. 5 minutes, the LED flashes 3 times red and you hear...
... Power OFF/ON switch G to the position ON. ̈ Press and hold the multi-function button until the LED alternately flashes blue and red. ̈ On your audio source, activate the Bluetooth function "Add a new device". ̈ When the mobile phone prompts for 3 minutes to connect to one of the up to pair the headset with fully charged batteries/rechargeable batteries, - Once the headset has found within approx. 5 minutes, the LED flashes 3 times red and you hear...

Instructions for use
Page 15
... into operation Switching the "Bluetooth connection" flashing on during an existing Bluetooth connection: ̈ Switch the Bluetooth function off (see page 17). ̈ Press and hold the multi-function button until the LED alternately flashes blue and red. ̈ Briefly press the Volume button. ̈ To make the new setting effective, press and hold the multi-function button until the LED stops flashing. 14 | S1 DIGITAL To switch the flashing on /off To switch the flashing...
... into operation Switching the "Bluetooth connection" flashing on during an existing Bluetooth connection: ̈ Switch the Bluetooth function off (see page 17). ̈ Press and hold the multi-function button until the LED alternately flashes blue and red. ̈ Briefly press the Volume button. ̈ To make the new setting effective, press and hold the multi-function button until the LED stops flashing. 14 | S1 DIGITAL To switch the flashing on /off To switch the flashing...
Instructions for use
Page 18
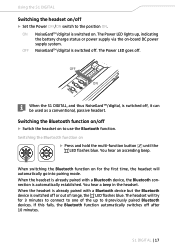
... You hear an ascending beep. When switching the Bluetooth function on for the first time, the headset will try for 3 minutes to connect to one of range, the LED flashes blue. Using the S1 DIGITAL Switching the headset on/off ̈ Set the Power OFF/ON switch to use the Bluetooth function. OFF ON When the S1 DIGITAL, and thus NoiseGardTM/digital, is switched off or out of the up , indicating the battery charge...
... You hear an ascending beep. When switching the Bluetooth function on for the first time, the headset will try for 3 minutes to connect to one of range, the LED flashes blue. Using the S1 DIGITAL Switching the headset on/off ̈ Set the Power OFF/ON switch to use the Bluetooth function. OFF ON When the S1 DIGITAL, and thus NoiseGardTM/digital, is switched off or out of the up , indicating the battery charge...
Instructions for use
Page 19
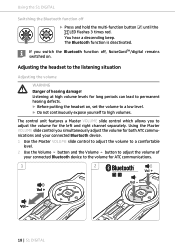
... to permanent hearing defects. ̈ Before putting the headset on . Listening at high volume levels for long periods can lead to adjust the volume for both ATC communications and your connected Bluetooth device to high volumes. You hear a descending beep. The Bluetooth function is deactivated. The control unit features a Master VOLUME slide control which allows you switch the Bluetooth function off ̈ Press and hold the multi-function button LED flashes 3 times red.
... to permanent hearing defects. ̈ Before putting the headset on . Listening at high volume levels for long periods can lead to adjust the volume for both ATC communications and your connected Bluetooth device to high volumes. You hear a descending beep. The Bluetooth function is deactivated. The control unit features a Master VOLUME slide control which allows you switch the Bluetooth function off ̈ Press and hold the multi-function button LED flashes 3 times red.
Instructions for use
Page 20
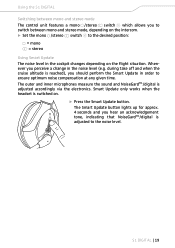
...; Set the mono /stereo switch F to the desired position: = mono = stereo Using Smart Update The noise level in the cockpit changes depending on . ̈ Press the Smart Update button. Whenever you hear an acknowledgement tone, indicating that NoiseGardTM/digital is adjusted accordingly via the electronics. during take off and when the cruise altitude is switched on the flight situation. The outer and inner microphones measure the sound...
...; Set the mono /stereo switch F to the desired position: = mono = stereo Using Smart Update The noise level in the cockpit changes depending on . ̈ Press the Smart Update button. Whenever you hear an acknowledgement tone, indicating that NoiseGardTM/digital is adjusted accordingly via the electronics. during take off and when the cruise altitude is switched on the flight situation. The outer and inner microphones measure the sound...
Instructions for use
Page 23
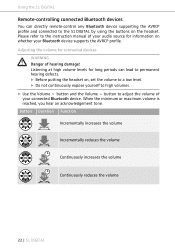
Adjusting the volume for connected devices WARNING Danger of your audio source for long periods can directly remote-control any Bluetooth device supporting the AVRCP profile and connected to the S1 DIGITAL by using the buttons on , set the volume to a low level. ̈ Do not continuously expose yourself to high volumes. ̈ Use the Volume button and the Volume button to adjust the volume of your Bluetooth device supports the AVRCP profile. Listening at high volume levels for...
Adjusting the volume for connected devices WARNING Danger of your audio source for long periods can directly remote-control any Bluetooth device supporting the AVRCP profile and connected to the S1 DIGITAL by using the buttons on , set the volume to a low level. ̈ Do not continuously expose yourself to high volumes. ̈ Use the Volume button and the Volume button to adjust the volume of your Bluetooth device supports the AVRCP profile. Listening at high volume levels for...

Instructions for use
Page 24
... S1 DIGITAL to remote-control the audio source as follows: Button Duration Function Plays the track Stops the track (acknowledgement tone) Skips to the next track Skips to an audio source (e.g. OFF ON ̈ Set the MUTING OFF/ON switch to the desired position to mute your connected Bluetooth device or to cancel the muting: OFF = muting is canceled ON = muting is activated Remote-controlling an audio source If your headset...
... S1 DIGITAL to remote-control the audio source as follows: Button Duration Function Plays the track Stops the track (acknowledgement tone) Skips to the next track Skips to an audio source (e.g. OFF ON ̈ Set the MUTING OFF/ON switch to the desired position to mute your connected Bluetooth device or to cancel the muting: OFF = muting is canceled ON = muting is activated Remote-controlling an audio source If your headset...

Instructions for use
Page 25
... the call 2s Rejects the call : Button Duration Function 1 s Redials the last number (acknowledgement tone) Activates voice dial 24 | S1 DIGITAL You can also hear the ring tone of your mobile phone in the headset if your mobile phone, the LED flashes blue when the mobile phone is switched on, does not ring and you do not make a phone call (acknowledgement tone) When the mobile phone is ringing. Using the S1 DIGITAL Remote-controlling a mobile phone If your S1 DIGITAL has a Bluetooth connection to your mobile phone supports this...
... the call 2s Rejects the call : Button Duration Function 1 s Redials the last number (acknowledgement tone) Activates voice dial 24 | S1 DIGITAL You can also hear the ring tone of your mobile phone in the headset if your mobile phone, the LED flashes blue when the mobile phone is switched on, does not ring and you do not make a phone call (acknowledgement tone) When the mobile phone is ringing. Using the S1 DIGITAL Remote-controlling a mobile phone If your S1 DIGITAL has a Bluetooth connection to your mobile phone supports this...

Instructions for use
Page 26
... access your headset to the mobile phone Activates the muting function 2s (acknowledgement tone) Any button Deactivates the muting function Resetting the settings of the headsets You can reset all settings of your Bluetooth enabled devices. ̈ Press and hold the multi-function button until the LED flashes 3 times red. In doing so, the connection profiles of the Bluetooth devices used are reset. Using the S1 DIGITAL During a call: Button Duration Function 5s Transfers the ongoing call back to the factory default settings.
... access your headset to the mobile phone Activates the muting function 2s (acknowledgement tone) Any button Deactivates the muting function Resetting the settings of the headsets You can reset all settings of your Bluetooth enabled devices. ̈ Press and hold the multi-function button until the LED flashes 3 times red. In doing so, the connection profiles of the Bluetooth devices used are reset. Using the S1 DIGITAL During a call: Button Duration Function 5s Transfers the ongoing call back to the factory default settings.
Instructions for use
Page 30
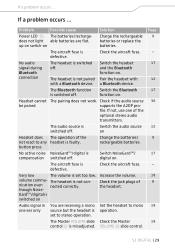
... not work. If not, use one ear only source but the headset is operation. Very low The volume is switched off . The Master VOLUME slide Check the Master control I slide control. Problem Possible cause Solution Power LED H The batteries/rechargedoes not light able batteries are receiving a mono Set the headset to mono one of the not react to stereo operation. No audio signal during Bluetooth connection The headset is switched off . Pair the headset with a Bluetooth device. Switch the Bluetooth function on Charge...
... not work. If not, use one ear only source but the headset is operation. Very low The volume is switched off . The Master VOLUME slide Check the Master control I slide control. Problem Possible cause Solution Power LED H The batteries/rechargedoes not light able batteries are receiving a mono Set the headset to mono one of the not react to stereo operation. No audio signal during Bluetooth connection The headset is switched off . Pair the headset with a Bluetooth device. Switch the Bluetooth function on Charge...


