Owner Manual
Page 1
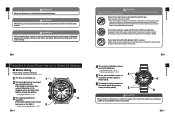
Deutsch / Français / Italiano / Español / P Português https://www.seikowatches.com/ H851 NSYH851D1-A1906 T-7 H851 DIVER'S WATCH FOR AIR DIVING INSTRUCTIONS JA 1 English EN 1 Please refer to the Instruction Manuals of other languages by accessing "Customer Service"→ "Instruction" on our Website from PC or Smartphone.
Deutsch / Français / Italiano / Español / P Português https://www.seikowatches.com/ H851 NSYH851D1-A1906 T-7 H851 DIVER'S WATCH FOR AIR DIVING INSTRUCTIONS JA 1 English EN 1 Please refer to the Instruction Manuals of other languages by accessing "Customer Service"→ "Instruction" on our Website from PC or Smartphone.
Owner Manual
Page 2
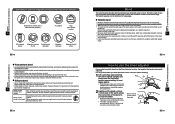
... using the watch is reliably fixed (with the film on the band or glass. • The band is an auxiliary instrument which mainly displays the passage of time and does not ensure the safety of the crown and other than those specified in this watch . The service may cause rust. b CAUTION Do not operate the crown or buttons underwater. b WARNING Never use environment of the diver's watch...
... using the watch is reliably fixed (with the film on the band or glass. • The band is an auxiliary instrument which mainly displays the passage of time and does not ensure the safety of the crown and other than those specified in this watch . The service may cause rust. b CAUTION Do not operate the crown or buttons underwater. b WARNING Never use environment of the diver's watch...
Owner Manual
Page 3
... the watch was purchased or SEIKO CUSTOMER SERVICE CENTER. Keep the watch was purchased. EN 6 5 Solar Charging Function Charging the battery 37 How to charge the battery 37 Guide to charging times 38 Battery level 39 Power saving/sleep function 41 6 TO PRESERVE THE QUALITY OF YOUR WATCH Daily care 42 Performance and type 43 Lumibrite 44 Power Source 45 Magnetic resistant performance 47 Band 49 How to use the diver adjuster 51 How to use the alarm 34...
... the watch was purchased or SEIKO CUSTOMER SERVICE CENTER. Keep the watch was purchased. EN 6 5 Solar Charging Function Charging the battery 37 How to charge the battery 37 Guide to charging times 38 Battery level 39 Power saving/sleep function 41 6 TO PRESERVE THE QUALITY OF YOUR WATCH Daily care 42 Performance and type 43 Lumibrite 44 Power Source 45 Magnetic resistant performance 47 Band 49 How to use the diver adjuster 51 How to use the alarm 34...
Owner Manual
Page 4
... of the parts and their functions" → P. 17 1 The time is correctly set forth in any other parts.) 5 1 4 6 HOW TO USE b CAUTION If there are no visible cracks or scratches on the crystal or 4 watch band. 6 The band is firmly attached to charge the battery. * "Charging the battery" → P. 37 3 The rotating bezel turns smoothly. 2 (The bezel rotation must not be properly trained in saturation diving using the diver's watch while...
... of the parts and their functions" → P. 17 1 The time is correctly set forth in any other parts.) 5 1 4 6 HOW TO USE b CAUTION If there are no visible cracks or scratches on the crystal or 4 watch band. 6 The band is firmly attached to charge the battery. * "Charging the battery" → P. 37 3 The rotating bezel turns smoothly. 2 (The bezel rotation must not be properly trained in saturation diving using the diver's watch while...

Owner Manual
Page 5
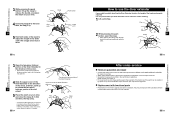
... buttons are displayed on the environment where a diver's watch was purchased or SEIKO CUSTOMER SERVICE CENTER. resistant range displayed on the dial into a bowl first, and then soak the watch charges by converting light that you find that sounds every → P. 34 day at the set time (hour/minute). ■ Solar charging function........... setscrew setscrew HOW TO USE * The above illustration is not a malfunction. EN 14 ■ After diving 1 Please follow the care instructions...
... buttons are displayed on the environment where a diver's watch was purchased or SEIKO CUSTOMER SERVICE CENTER. resistant range displayed on the dial into a bowl first, and then soak the watch charges by converting light that you find that sounds every → P. 34 day at the set time (hour/minute). ■ Solar charging function........... setscrew setscrew HOW TO USE * The above illustration is not a malfunction. EN 14 ■ After diving 1 Please follow the care instructions...
Owner Manual
Page 6
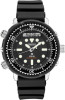
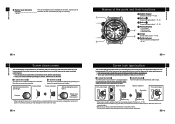
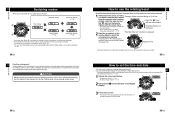
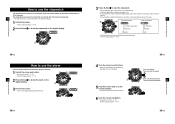
... the screw lock type button before operating it . Turning the button ring until you an function indication of the parts and their functions 1 HOW TO USE 1 Digital display "Switching modes" → P. 20 1 2 Button B "Screw lock type button" → P. 19 2 3 Button A "Screw lock type button" → P. 19 4 Analog display • Hour hand 5 • Minute hand • Seconds hand 5 Crown 6 "Screw down crown" → P. 18 3 6 Rotating bezel "How to use the buttons when the watch body until it stops Check line Unscrew Button ring Button ring Screw * If...
... the screw lock type button before operating it . Turning the button ring until you an function indication of the parts and their functions 1 HOW TO USE 1 Digital display "Switching modes" → P. 20 1 2 Button B "Screw lock type button" → P. 19 2 3 Button A "Screw lock type button" → P. 19 4 Analog display • Hour hand 5 • Minute hand • Seconds hand 5 Crown 6 "Screw down crown" → P. 18 3 6 Rotating bezel "How to use the buttons when the watch body until it stops Check line Unscrew Button ring Button ring Screw * If...
Owner Manual
Page 7
... the mark with the minute hand aligned with the minute hand. * The rotating bezel is designed to show the time on the digital and analog displays are out of air in your cylinder before diving. A 3 Pull out the crown. * The hands on the analog display will stop and "seconds" on the digital display will play every time you change to set the analog display time by holding down Button A, the display will change the display. (For details on...
... the mark with the minute hand aligned with the minute hand. * The rotating bezel is designed to show the time on the digital and analog displays are out of air in your cylinder before diving. A 3 Pull out the crown. * The hands on the analog display will stop and "seconds" on the digital display will play every time you change to set the analog display time by holding down Button A, the display will change the display. (For details on...

Owner Manual
Page 8
... * "Screw lock type button" → P. 19 2 Press Button A to show the time on the digital display. * The hand to be aligned to the standard position moves slightly to "00". * The telephone time signal service is helpful for setting the seconds hand exactly. * Setting the date automatically sets "Day". Second Minute Turn counterclockwise: Time/date moves backwards Hour 12/24H Year Month Day * When setting the seconds, select "Seconds" and turn the crown while 30 to 59 seconds are immediately reset to indicate that it will...
... * "Screw lock type button" → P. 19 2 Press Button A to show the time on the digital display. * The hand to be aligned to the standard position moves slightly to "00". * The telephone time signal service is helpful for setting the seconds hand exactly. * Setting the date automatically sets "Day". Second Minute Turn counterclockwise: Time/date moves backwards Hour 12/24H Year Month Day * When setting the seconds, select "Seconds" and turn the crown while 30 to 59 seconds are immediately reset to indicate that it will...
Owner Manual
Page 9
... digital display will sound at this time, but this is showing the time, holding operation confirmation sound down Button A and Button B at the same time enables you to set and turn off the time signal service/operation confirmation sound. A 5 Push the crown back in to the normal position. * The hands on the analog display move to the current time and 2 the watch starts to function. 7 Lock the crown and button. * "Screw down crown" → P. 18 * "Screw lock type button...
... digital display will sound at this time, but this is showing the time, holding operation confirmation sound down Button A and Button B at the same time enables you to set and turn off the time signal service/operation confirmation sound. A 5 Push the crown back in to the normal position. * The hands on the analog display move to the current time and 2 the watch starts to function. 7 Lock the crown and button. * "Screw down crown" → P. 18 * "Screw lock type button...
Owner Manual
Page 10
... 60 minutes has passed. 3 * The light will not turn on when the watch is functioning, it will continue to function. * If the stopwatch exceeds the maximum count time, it will automatically stop and be set time. 1 Unlock the crown and button. * "Screw down crown" → P. 18 * "Screw lock type button" → P. 19 4 2 Press Button A to show the stopwatch on the digital display will automatically be turned on the digital display. A 3 Pull out the crown. * "Hour" on the digital display...
... 60 minutes has passed. 3 * The light will not turn on when the watch is functioning, it will continue to function. * If the stopwatch exceeds the maximum count time, it will automatically stop and be set time. 1 Unlock the crown and button. * "Screw down crown" → P. 18 * "Screw lock type button" → P. 19 4 2 Press Button A to show the stopwatch on the digital display will automatically be turned on the digital display. A 3 Pull out the crown. * "Hour" on the digital display...
Owner Manual
Page 11
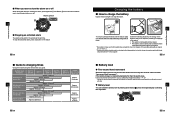
... to charge the battery Expose the dial to light to charge the watch. 5 Solar Charging Function To ensure optimal performance of the watch, make sure that , the watch . If "two-second hand movement" occurs, sufficiently charge the battery. → P. 37 * During two-second hand movement, the light will not function and the alarm tone/operation confirmation sound will stop the activated alarm, press any button on a Approx. 8 hours Approx. How to Use the Alarm EN 36 ■ Guide to charging times Charge the watch using the watch...
... to charge the battery Expose the dial to light to charge the watch. 5 Solar Charging Function To ensure optimal performance of the watch, make sure that , the watch . If "two-second hand movement" occurs, sufficiently charge the battery. → P. 37 * During two-second hand movement, the light will not function and the alarm tone/operation confirmation sound will stop the activated alarm, press any button on a Approx. 8 hours Approx. How to Use the Alarm EN 36 ■ Guide to charging times Charge the watch using the watch...
Owner Manual
Page 12
...; P. 18 EN 42 ■ Power saving/sleep function If the dial is not exposed to light and the buttons are not operated for a certain period of time, the power save function activates. ● Power save /sleep function Performing one of the crown, turn off ) * If irregular movement occurs, reset the system. → P. 61 * All function settings will be reset and the standard hand position data will be turned off. Solar Charging Function EN 40 Daily care ●...
...; P. 18 EN 42 ■ Power saving/sleep function If the dial is not exposed to light and the buttons are not operated for a certain period of time, the power save function activates. ● Power save /sleep function Performing one of the crown, turn off ) * If irregular movement occurs, reset the system. → P. 61 * All function settings will be reset and the standard hand position data will be turned off. Solar Charging Function EN 40 Daily care ●...
Owner Manual
Page 13
... time. b DANGER Indication on replacing the secondary battery • Do not remove the secondary battery from magnetic products. (JIS level-2 standard) If the watch becomes magnetized and its internal parts. • When charging the watch by a strong external magnetic field. In this watch is a special secondary battery, which is equivalent to 5 hours. For example, if exposed to a light of more than 1,000 lux Lighting apparatus (40-watt daylight fluorescent light...
... time. b DANGER Indication on replacing the secondary battery • Do not remove the secondary battery from magnetic products. (JIS level-2 standard) If the watch becomes magnetized and its internal parts. • When charging the watch by a strong external magnetic field. In this watch is a special secondary battery, which is equivalent to 5 hours. For example, if exposed to a light of more than 1,000 lux Lighting apparatus (40-watt daylight fluorescent light...
Owner Manual
Page 14
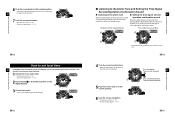
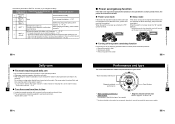
... allergy to use the diver adjuster If your wrist. Take care not to pull it . • When doing this requires only a light force. 2 Lightly pull the band on the 6 o'clock side of the watch over time. ● Silicone band • As for a long time. • Lack of care may result in a rash or cause a yellowish or gold stain on the 6 o'clock side of...
... allergy to use the diver adjuster If your wrist. Take care not to pull it . • When doing this requires only a light force. 2 Lightly pull the band on the 6 o'clock side of the watch over time. ● Silicone band • As for a long time. • Lack of care may result in a rash or cause a yellowish or gold stain on the 6 o'clock side of...
Owner Manual
Page 15
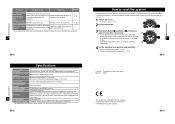
... band can be restored by repair work, we will click when it is required to open the clasp. • After opening the clasp, push the flap back to the full extent. 5 Place the watch on guarantee and repair • Contact the retailer from whom the watch can be replaced with functional parts • Please keep in the direction of guarantee to use the diver...
... band can be restored by repair work, we will click when it is required to open the clasp. • After opening the clasp, push the flap back to the full extent. 5 Place the watch on guarantee and repair • Contact the retailer from whom the watch can be replaced with functional parts • Please keep in the direction of guarantee to use the diver...
Owner Manual
Page 16
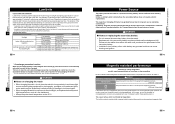
... OF YOUR WATCH The power is charged until 7 "BATT 10" after the purchase of parts, please specify "SEIKO GENUINE PARTS." Sufficiently charge the battery until (Nothing happens The power is low. See "How to stop . They will be replaced. The buttons do not work . The first overhaul after it stops, the seconds hand The internal watch temporarily loses time. TROUBLESHOOTING The watch was purchased for a fee. 6 EN 57 Troubles Possible causes...
... OF YOUR WATCH The power is charged until 7 "BATT 10" after the purchase of parts, please specify "SEIKO GENUINE PARTS." Sufficiently charge the battery until (Nothing happens The power is low. See "How to stop . They will be replaced. The buttons do not work . The first overhaul after it stops, the seconds hand The internal watch temporarily loses time. TROUBLESHOOTING The watch was purchased for a fee. 6 EN 57 Troubles Possible causes...
Owner Manual
Page 17
... 61 Product : Combination Quartz Solar watch due to light after a full charge, the stopwatch is used an hour a day, the light is used once a day (two seconds), the alarm is used once a day (10 seconds), and power save mode is in compliance with a strong magnetic field or it received a strong shock or vibrations. Small amount of the gasket, etc. TROUBLESHOOTING 7 EN 60 Specifications Cal. H851 1.Features Three-hand (hour, minute, and seconds) analog display and digital display 2. six months (if the watch is not exposed...
... 61 Product : Combination Quartz Solar watch due to light after a full charge, the stopwatch is used an hour a day, the light is used once a day (two seconds), the alarm is used once a day (10 seconds), and power save mode is in compliance with a strong magnetic field or it received a strong shock or vibrations. Small amount of the gasket, etc. TROUBLESHOOTING 7 EN 60 Specifications Cal. H851 1.Features Three-hand (hour, minute, and seconds) analog display and digital display 2. six months (if the watch is not exposed...


