
Installation Manual
Page 1
Seagate DAT Drive Installation Manual English
Seagate DAT Drive Installation Manual English

Installation Manual
Page 2
Seagate DAT Drive Installation Manual
Seagate DAT Drive Installation Manual
Installation Manual
Page 3
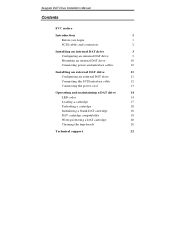
Seagate DAT Drive Installation Manual Contents FCC notice Introduction 1 Before you begin 1 SCSI cables and connectors 2 Installing an internal DAT drive 3 Configuring an internal DAT drive 3 Mounting an internal DAT drive 10 Connecting power and interface cables 10 Installing an external DAT drive 11 Configuring an external DAT drive 11 Connecting the SCSI interface cable 12 Connecting the power cord 13 Operating and maintaining a DAT drive 14...
Seagate DAT Drive Installation Manual Contents FCC notice Introduction 1 Before you begin 1 SCSI cables and connectors 2 Installing an internal DAT drive 3 Configuring an internal DAT drive 3 Mounting an internal DAT drive 10 Connecting power and interface cables 10 Installing an external DAT drive 11 Configuring an external DAT drive 11 Connecting the SCSI interface cable 12 Connecting the power cord 13 Operating and maintaining a DAT drive 14...
Installation Manual
Page 4
...lectrique, C. C., ch. 1374. You may cause interference to radio and television reception, which are designed to operate the equipment. Seagate Publication 10002664-005, July 1997 It has been tested and found to comply with the limits for Class B digital apparatus in accordance...the separation between the computer and the receiver. • Connect the computer into an outlet on a circuit different from the U.S. Seagate DAT Drive Installation Manual FCC notice This equipment generates and uses radio frequency energy and, if not installed and used in strict accordance with the manufacturer's...
...lectrique, C. C., ch. 1374. You may cause interference to radio and television reception, which are designed to operate the equipment. Seagate Publication 10002664-005, July 1997 It has been tested and found to comply with the limits for Class B digital apparatus in accordance...the separation between the computer and the receiver. • Connect the computer into an outlet on a circuit different from the U.S. Seagate DAT Drive Installation Manual FCC notice This equipment generates and uses radio frequency energy and, if not installed and used in strict accordance with the manufacturer's...
Installation Manual
Page 5
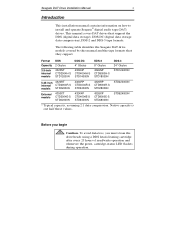
... installation manual contains information on how to install and operate Seagate® digital audio tape (DAT) drives. Format DDS Capacity 2 Gbytes 3.5-inch internal models 4320NT CTD2004H-S STD12000N DDS-DC 4* Gbytes 4324NP CTD4004H-S STD14000N DDS-2 8* Gbytes 4326NP CTD8000H-S STD18000N DDS-3 24* Gbytes STD124000N 5.25-inch 4320RT internal CTD2004R-S models STD22000N 4324RP CTD4004R-S STD24000N 4326RP CTD8000R-S STD28000N STD224000N External...
... installation manual contains information on how to install and operate Seagate® digital audio tape (DAT) drives. Format DDS Capacity 2 Gbytes 3.5-inch internal models 4320NT CTD2004H-S STD12000N DDS-DC 4* Gbytes 4324NP CTD4004H-S STD14000N DDS-2 8* Gbytes 4326NP CTD8000H-S STD18000N DDS-3 24* Gbytes STD124000N 5.25-inch 4320RT internal CTD2004R-S models STD22000N 4324RP CTD4004R-S STD24000N 4326RP CTD8000R-S STD28000N STD224000N External...
Installation Manual
Page 6
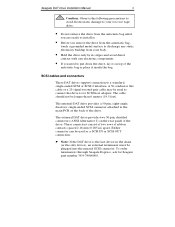
...following precautions to avoid electrostatic damage to your internal tape drive. • Do not remove the drive from the antistatic bag until you are ready to install it inside the bag. These connectors consist of two rows of the drive. A 50-conductor flat cable or a 25-signal... static electricity buildup from your body. • Hold the drive only by its edges and avoid direct contact with any electronic components. • If you need to its SCSI host adapter. The cable should not be plugged into the unused SCSI connector. Caution. Seagate DAT Drive Installation Manual 2 !
...following precautions to avoid electrostatic damage to your internal tape drive. • Do not remove the drive from the antistatic bag until you are ready to install it inside the bag. These connectors consist of two rows of the drive. A 50-conductor flat cable or a 25-signal... static electricity buildup from your body. • Hold the drive only by its edges and avoid direct contact with any electronic components. • If you need to its SCSI host adapter. The cable should not be plugged into the unused SCSI connector. Caution. Seagate DAT Drive Installation Manual 2 !

Installation Manual
Page 7
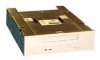
... to configure the drive's SCSI ID or other drive features. You can access the switchbank through a rectangular cutout in Figures 1 and 2. Seagate DAT Drive Installation Manual 3 Installing an internal DAT drive Internal drive installation involves three main steps: 1. Configuring the drive 2. Configuring an internal DAT drive Before you install the tape drive in 3.5-inch or 5.25-inch drive bays, respectively. Mounting the drive 3. Most features are...
... to configure the drive's SCSI ID or other drive features. You can access the switchbank through a rectangular cutout in Figures 1 and 2. Seagate DAT Drive Installation Manual 3 Installing an internal DAT drive Internal drive installation involves three main steps: 1. Configuring the drive 2. Configuring an internal DAT drive Before you install the tape drive in 3.5-inch or 5.25-inch drive bays, respectively. Mounting the drive 3. Most features are...
Installation Manual
Page 8
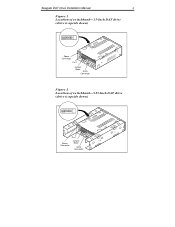
Seagate DAT Drive Installation Manual 4 Figure 1 Location of switchbank-3.5-Inch DAT drive (drive is upside down) O1 F2 F3 4 5 6 7 8 Power Connector Pin 1 Jumper Block SCSI Connector Figure 2 Location of switchbank-5.25-Inch DAT drive (drive is upside down) O1 F2 F3 4 5 6 7 8 Power Connector Pin 1 Jumper Block SCSI Connector
Seagate DAT Drive Installation Manual 4 Figure 1 Location of switchbank-3.5-Inch DAT drive (drive is upside down) O1 F2 F3 4 5 6 7 8 Power Connector Pin 1 Jumper Block SCSI Connector Figure 2 Location of switchbank-5.25-Inch DAT drive (drive is upside down) O1 F2 F3 4 5 6 7 8 Power Connector Pin 1 Jumper Block SCSI Connector

Installation Manual
Page 9
...computer system and you do not use) Inquiry DDS PassSelf-test String through Parity Disable Archive DDS-DC Disable MRS Mode MRS ON Enable Seagate DDS Enable All S3 S2 S1 SCSI ID Selection OFF OFF OFF OFF OFF ON OFF ON OFF OFF ON ON ON OFF OFF ON... OFF ON ON ON OFF ON ON ON SCSI ID 0 1 2 3 4 5 6 7 ® Note. The default dip switch settings for this drive, then turn to "Mounting an internal DAT drive" on page 10. Seagate DAT Drive Installation Manual 5 Factory-default settings for each switch are shown in detail on the following pages.
...computer system and you do not use) Inquiry DDS PassSelf-test String through Parity Disable Archive DDS-DC Disable MRS Mode MRS ON Enable Seagate DDS Enable All S3 S2 S1 SCSI ID Selection OFF OFF OFF OFF OFF ON OFF ON OFF OFF ON ON ON OFF OFF ON... OFF ON ON ON OFF ON ON ON SCSI ID 0 1 2 3 4 5 6 7 ® Note. The default dip switch settings for this drive, then turn to "Mounting an internal DAT drive" on page 10. Seagate DAT Drive Installation Manual 5 Factory-default settings for each switch are shown in detail on the following pages.

Installation Manual
Page 10
... issued from but the inferior specifications of the S6 switch can cause dataintegrity problems. The S4 switch enables or disables media-recognition system (MRS) mode. Seagate DAT Drive Installation Manual 6 SCSI ID switches (switches S1 through S3) The three switches S1 through S3 correspond to the SCSI device address identification bits 0 (LSB) through is...
... issued from but the inferior specifications of the S6 switch can cause dataintegrity problems. The S4 switch enables or disables media-recognition system (MRS) mode. Seagate DAT Drive Installation Manual 6 SCSI ID switches (switches S1 through S3) The three switches S1 through S3 correspond to the SCSI device address identification bits 0 (LSB) through is...
Installation Manual
Page 11
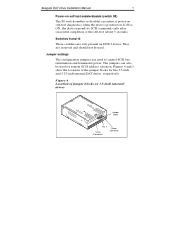
...10 These switches are reserved and should not be used for the 3.5-inch and 5.25-inch internal DAT drives, respectively. Figure 4 Location of jumper blocks on 3.5-Inch internal drives Jumper Block Pin 1 SCSI Connector Power Connector Jumper settings The configuration jumpers are used . The jumpers ... commands only after successful completion of the self-test (about 5 seconds). They are only present on DDS-3 drives. If S8 is powered on. Seagate DAT Drive Installation Manual 7 Power-on self-test enable/disable (switch S8) The S8 switch enables or disables execution of power-on...
...10 These switches are reserved and should not be used for the 3.5-inch and 5.25-inch internal DAT drives, respectively. Figure 4 Location of jumper blocks on 3.5-Inch internal drives Jumper Block Pin 1 SCSI Connector Power Connector Jumper settings The configuration jumpers are used . The jumpers ... commands only after successful completion of the self-test (about 5 seconds). They are only present on DDS-3 drives. If S8 is powered on. Seagate DAT Drive Installation Manual 7 Power-on self-test enable/disable (switch S8) The S8 switch enables or disables execution of power-on...
Installation Manual
Page 12
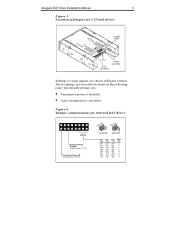
... ON OFF ON OFF ON OFF ON SCSI ID 0 1 2 3 4 5 6 7 These settings are described in Figure 6 below. Seagate DAT Drive Installation Manual 8 Figure 5 Location of jumpers for 5.25-inch drives Jumper Block Pin 1 SCSI Connector Power Connector Settings for internal DAT drives 15 13 11 9 7 5 3 1 16 14 12 10 8 6 4 2 SCSI ID ActiveTerminator Enabled (Jumper on pins 11-12...
... ON OFF ON OFF ON OFF ON SCSI ID 0 1 2 3 4 5 6 7 These settings are described in Figure 6 below. Seagate DAT Drive Installation Manual 8 Figure 5 Location of jumpers for 5.25-inch drives Jumper Block Pin 1 SCSI Connector Power Connector Settings for internal DAT drives 15 13 11 9 7 5 3 1 16 14 12 10 8 6 4 2 SCSI ID ActiveTerminator Enabled (Jumper on pins 11-12...
Installation Manual
Page 13
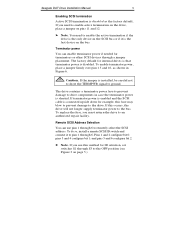
...it is the last device on pins 11 and 12. ® Note. You need to enable active termination on the drive, place a jumper on the bus. The drive contains a terminator power fuse to prevent damage to remotely select the SCSI address. If you need to enable the active ... not longer supply terminator power to the OFF position (see Figure 3 on the SCSI bus or if it to the drive. Seagate DAT Drive Installation Manual 9 Enabling SCSI termination Active SCSI termination is disabled as shown in case the terminator power is shorted. Caution. Remote SCSI Address Selection...
...it is the last device on pins 11 and 12. ® Note. You need to enable active termination on the drive, place a jumper on the bus. The drive contains a terminator power fuse to prevent damage to remotely select the SCSI address. If you need to enable the active ... not longer supply terminator power to the OFF position (see Figure 3 on the SCSI bus or if it to the drive. Seagate DAT Drive Installation Manual 9 Enabling SCSI termination Active SCSI termination is disabled as shown in case the terminator power is shorted. Caution. Remote SCSI Address Selection...

Installation Manual
Page 14
... and five on its side. Pin 1 on page 8 shows these connections for this drive is to your Seagate internal DAT drive horizontally or on each side. Your SCSI cable should have pin 1 highlighted by a colored stripe. Seagate DAT Drive Installation Manual 10 Mounting an internal DAT drive You can install your right as you may not work. Do not use...
... and five on its side. Pin 1 on page 8 shows these connections for this drive is to your Seagate internal DAT drive horizontally or on each side. Your SCSI cable should have pin 1 highlighted by a colored stripe. Seagate DAT Drive Installation Manual 10 Mounting an internal DAT drive You can install your right as you may not work. Do not use...
Installation Manual
Page 15
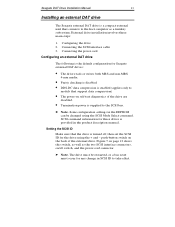
... in the EEPROM can be restarted, or a bus reset must be changed using the + and - Seagate DAT Drive Installation Manual 11 Installing an external DAT drive The Seagate external DAT drive is a compact external unit that connects to take effect. The drive must occur for the drive using the SCSI Mode Select command. push-button switch on the back of the...
... in the EEPROM can be restarted, or a bus reset must be changed using the + and - Seagate DAT Drive Installation Manual 11 Installing an external DAT drive The Seagate external DAT drive is a compact external unit that connects to take effect. The drive must occur for the drive using the SCSI Mode Select command. push-button switch on the back of the...

Installation Manual
Page 16
...install a terminating plug on the following page for an explanation of external DAT drives Push Switch ON/OFF Switch 6 SCSI Connectors Power Connector Connecting the SCSI interface cable Seagate's external DAT drives have two SCSI connectors to another SCSI device. ® Note. Turn... cables or terminating plugs. If the drive is the last drive or the only drive in Figure 7. See Figure 8 on the unused SCSI connector. You can purchase a terminating plug from Seagate Express (Seagate part number 38-9-74000000). Seagate DAT Drive Installation Manual 12 Figure 7 Rear panel of SCSI...
...install a terminating plug on the following page for an explanation of external DAT drives Push Switch ON/OFF Switch 6 SCSI Connectors Power Connector Connecting the SCSI interface cable Seagate's external DAT drives have two SCSI connectors to another SCSI device. ® Note. Turn... cables or terminating plugs. If the drive is the last drive or the only drive in Figure 7. See Figure 8 on the unused SCSI connector. You can purchase a terminating plug from Seagate Express (Seagate part number 38-9-74000000). Seagate DAT Drive Installation Manual 12 Figure 7 Rear panel of SCSI...

Installation Manual
Page 17
... that has both internal and external SCSI devices. Connecting the power cord Attach the power cord securely to the power connector on the previous page). Seagate DAT Drive Installation Manual 13 Figure 8 Diagram of the...
... that has both internal and external SCSI devices. Connecting the power cord Attach the power cord securely to the power connector on the previous page). Seagate DAT Drive Installation Manual 13 Figure 8 Diagram of the...
Installation Manual
Page 18
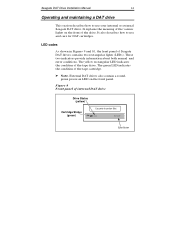
..., green power-on LED on the front of the various lights on the front panel. The yellow rectangular LED indicates the condition of the tape cartridge. ® Note. Seagate DAT Drive Installation Manual 14 Operating and maintaining a DAT drive This section describes how to use your internal or external Seagate DAT drive. The green LED indicates the condition of the tape drive.
..., green power-on LED on the front of the various lights on the front panel. The yellow rectangular LED indicates the condition of the tape cartridge. ® Note. Seagate DAT Drive Installation Manual 14 Operating and maintaining a DAT drive This section describes how to use your internal or external Seagate DAT drive. The green LED indicates the condition of the tape drive.
Installation Manual
Page 19
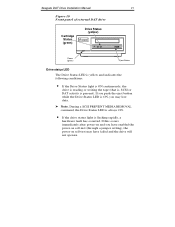
... not operate. Seagate DAT Drive Installation Manual 15 Figure 10 Front panel of external DAT drive Cartridge Status (green) Drive Status (yellow) Cassette Insertion Slot Power (green) Eject Button Drive status LED The Drive Status LED is yellow and indicates the following conditions: • If the Drive Status light is ON continuously, the drive is reading or writing the tape (that is...
... not operate. Seagate DAT Drive Installation Manual 15 Figure 10 Front panel of external DAT drive Cartridge Status (green) Drive Status (yellow) Cassette Insertion Slot Power (green) Eject Button Drive status LED The Drive Status LED is yellow and indicates the following conditions: • If the Drive Status light is ON continuously, the drive is reading or writing the tape (that is...
Installation Manual
Page 20
Seagate DAT Drive Installation Manual 16 Cartridge status LED The green, rectangular Cartridge Status LED indicates the following conditions: • If the Cartridge Status LED is ON (lit) continuously, a cartridge ... clean the tape heads using an approved DDS DAT cleaning cartridge, such as the Seagate Model 91301). See subsequent information about maintenance. • If the Cartridge Status LED is flashing slowly in the drive has generated a significant number of operation. First, clean the drive heads using an approved DDS DAT cleaning cartridge (such as the Seagate Model...
Seagate DAT Drive Installation Manual 16 Cartridge status LED The green, rectangular Cartridge Status LED indicates the following conditions: • If the Cartridge Status LED is ON (lit) continuously, a cartridge ... clean the tape heads using an approved DDS DAT cleaning cartridge, such as the Seagate Model 91301). See subsequent information about maintenance. • If the Cartridge Status LED is flashing slowly in the drive has generated a significant number of operation. First, clean the drive heads using an approved DDS DAT cleaning cartridge (such as the Seagate Model...